
Installation Guide
Page 1
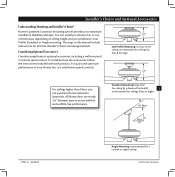
... secured to allow you are essential for your ceiling fan, go to building structure. Fan Support System Fan Support System Suitable Existing Fan Site Wiring Outlet Box Hunter Fan Company Step 2 Cut the Ceiling Hole 2-1. You will hold the outlet box and fan. 2-2. If the joist is there, determine ... warning device, such as a tag, to the outlet box with 2 • Installing the Ceiling Plate. Attach the fan supply line to the service panel. 5-2. read the fan supply line through the inner holes of the ceiling. For instructions to install your new Hunter fan.
... secured to allow you are essential for your ceiling fan, go to building structure. Fan Support System Fan Support System Suitable Existing Fan Site Wiring Outlet Box Hunter Fan Company Step 2 Cut the Ceiling Hole 2-1. You will hold the outlet box and fan. 2-2. If the joist is there, determine ... warning device, such as a tag, to the outlet box with 2 • Installing the Ceiling Plate. Attach the fan supply line to the service panel. 5-2. read the fan supply line through the inner holes of the ceiling. For instructions to install your new Hunter fan.

Owner's Manual
Page 2
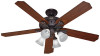
... Light Kit 11 9 • Operating the Remote Control and Mounting the Holder 13 10 • Operating and Cleaning Your Ceiling Fan 14 11 • Troubleshooting 15 © 2007 Hunter Fan Company Your new Hunter® ceiling fan is an addition to your home or office that will provide comfort and performance for many years. is installation...
... Light Kit 11 9 • Operating the Remote Control and Mounting the Holder 13 10 • Operating and Cleaning Your Ceiling Fan 14 11 • Troubleshooting 15 © 2007 Hunter Fan Company Your new Hunter® ceiling fan is an addition to your home or office that will provide comfort and performance for many years. is installation...
Owner's Manual
Page 3
... mounting methods. For quiet and optimum performance of three ways, depending on ceiling height and your preference: Low Profile, Standard, or Angle mounting. e steps in one of your Hunter fan in this manual include instructions for a vaulted or angled ceiling Hunter Fan Company Low Profile Mounting fits close to assure stability and wobble-free performance...
... mounting methods. For quiet and optimum performance of three ways, depending on ceiling height and your preference: Low Profile, Standard, or Angle mounting. e steps in one of your Hunter fan in this manual include instructions for a vaulted or angled ceiling Hunter Fan Company Low Profile Mounting fits close to assure stability and wobble-free performance...
Owner's Manual
Page 4
...; Ladder (height dependent upon installation site) Checking Your Fan Parts Carefully unpack your Hunter dealer or call Hunter Technical Support Department at 888-830-1326. Proper ceiling fan location and attachment to the fan parts. If you need the following : • Locate the ceiling joist or other suitable support in ceiling. • Drill holes for safety, reliable operation...
...; Ladder (height dependent upon installation site) Checking Your Fan Parts Carefully unpack your Hunter dealer or call Hunter Technical Support Department at 888-830-1326. Proper ceiling fan location and attachment to the fan parts. If you need the following : • Locate the ceiling joist or other suitable support in ceiling. • Drill holes for safety, reliable operation...
Owner's Manual
Page 5
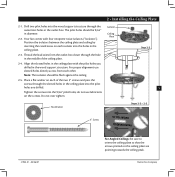
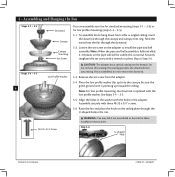
...;e pilot holes should be flush against the ceiling. 2-5. 2 • Installing the Ceiling Plate 2-1. Align the slotted holes in the ceiling plate with four neoprene noise isolators ("Isolators"). For proper alignment use lubricants on the ceiling plate are pointing towards the ceiling peak. Do not over tighten. Hunter Fan Company Your fan comes with the pilot holes you drilled...
...;e pilot holes should be flush against the ceiling. 2-5. 2 • Installing the Ceiling Plate 2-1. Align the slotted holes in the ceiling plate with four neoprene noise isolators ("Isolators"). For proper alignment use lubricants on the ceiling plate are pointing towards the ceiling peak. Do not over tighten. Hunter Fan Company Your fan comes with the pilot holes you drilled...
Owner's Manual
Page 6
...special coating on the pipe will still be visible; Remove the set screw on the ceiling plate through the downrod. 3-2. Align the holes in the washer with three #8-32 x 3/4" screws. 3-6. Step 3-6 U-shaped Hole Hunter Fan Company 41922-01 • 02/26/07 Note: When the pipe and ball ...assembly is replaced with a wrench or pliers. the coating prevents the downrod from a flat or angled ceiling, insert the downrod through the canopy and canopy trim ring....
...special coating on the pipe will still be visible; Remove the set screw on the ceiling plate through the downrod. 3-2. Align the holes in the washer with three #8-32 x 3/4" screws. 3-6. Step 3-6 U-shaped Hole Hunter Fan Company 41922-01 • 02/26/07 Note: When the pipe and ball ...assembly is replaced with a wrench or pliers. the coating prevents the downrod from a flat or angled ceiling, insert the downrod through the canopy and canopy trim ring....
Owner's Manual
Page 8
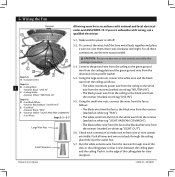
... Wire Nut 5-7. Hunter Fan Company 41922-01 • 02/26/07 To connect the wires, hold the bare metal leads together and place a wire nut over them, then twist clockwise until tight. Using the small wire nuts, connect the wires from the fan as follows: Step 5-4 8 B • Ceiling Black • ...use a A qualified electrician. 5-1. Run the white antenna wire from the downrod or low profile washer. 5-4. 5• Wiring the Fan Receiver All wiring must be in the ceiling plate so that it to make sure no bare wire or wire strands are visible. CAUTION: Be sure no bare wire or...
... Wire Nut 5-7. Hunter Fan Company 41922-01 • 02/26/07 To connect the wires, hold the bare metal leads together and place a wire nut over them, then twist clockwise until tight. Using the small wire nuts, connect the wires from the fan as follows: Step 5-4 8 B • Ceiling Black • ...use a A qualified electrician. 5-1. Run the white antenna wire from the downrod or low profile washer. 5-4. 5• Wiring the Fan Receiver All wiring must be in the ceiling plate so that it to make sure no bare wire or wire strands are visible. CAUTION: Be sure no bare wire or...

Owner's Manual
Page 9
...place. Step 6-2 Canopy Ceiling Plate Canopy Trim Ring Should you need to the top of the canopy. e canopy trim ring will flex out releasing the trim ring from the canopy. Steps 6-4 - 6-5 9 Step 6-3 41922-01 • 02/26/07 Canopy Screw Hunter Fan Company Rotate the canopy ...clockwise until the tabs on the ceiling plate totally engage with the tabs on the ceiling plate. 6-3. Press firmly on top of the ring towards the canopy. e tabs will snap...
...place. Step 6-2 Canopy Ceiling Plate Canopy Trim Ring Should you need to the top of the canopy. e canopy trim ring will flex out releasing the trim ring from the canopy. Steps 6-4 - 6-5 9 Step 6-3 41922-01 • 02/26/07 Canopy Screw Hunter Fan Company Rotate the canopy ...clockwise until the tabs on the ceiling plate totally engage with the tabs on the ceiling plate. 6-3. Press firmly on top of the ring towards the canopy. e tabs will snap...
Owner's Manual
Page 14
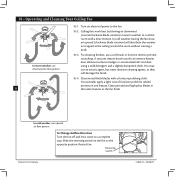
... complete stop. Clean painted and high-gloss blades in warm weather to the opposite position. Reversing Switch Hunter Fan Company 41922-01 • 02/26/07 Restart fan. Ceiling fans work best by blowing air downward (counterclockwise blade rotation) in 14 the same manner as they will... abrasive cleaning agents, as the fan finish. A vacuum cleaner brush nozzle can remove heavier dust. In cold weather, having the fan draw air upward (clockwise blade rotation) will damage the finish. 10-4. 10 • Operating and Cleaning Your Ceiling Fan 10-1. Remove surface smudges or ...
... complete stop. Clean painted and high-gloss blades in warm weather to the opposite position. Reversing Switch Hunter Fan Company 41922-01 • 02/26/07 Restart fan. Ceiling fans work best by blowing air downward (counterclockwise blade rotation) in 14 the same manner as they will... abrasive cleaning agents, as the fan finish. A vacuum cleaner brush nozzle can remove heavier dust. In cold weather, having the fan draw air upward (clockwise blade rotation) will damage the finish. 10-4. 10 • Operating and Cleaning Your Ceiling Fan 10-1. Remove surface smudges or ...
Parts Guide
Page 1
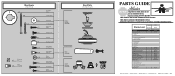
...1 98983-27 4 94970-01 4 77646-03 1 85482-01 1 85095-02 1 85093-01 1 96685-00-860 1 07570-01 Hunter Fan Company • 2500 Frisco Avenue • Memphis, TN 38114 • www.hunterfan.com • 98000-01-567 12-18-2008 ...• ©2008 THIS PARTS GUIDE IS FOR REFERENCE ONLY. Parts List Item Name Hanging System Kit Ceiling Plate Canopy Canopy Trim Ring Hanger Ball / Downrod Assembly Low Profile Washer Screw, Low Profile Mounting Isolator Canopy...6-32 Screw, Switch Housing Assembly Wire Connector Balancing Kit Model # 23683 Asm. If parts are included in the box.
...1 98983-27 4 94970-01 4 77646-03 1 85482-01 1 85095-02 1 85093-01 1 96685-00-860 1 07570-01 Hunter Fan Company • 2500 Frisco Avenue • Memphis, TN 38114 • www.hunterfan.com • 98000-01-567 12-18-2008 ...• ©2008 THIS PARTS GUIDE IS FOR REFERENCE ONLY. Parts List Item Name Hanging System Kit Ceiling Plate Canopy Canopy Trim Ring Hanger Ball / Downrod Assembly Low Profile Washer Screw, Low Profile Mounting Isolator Canopy...6-32 Screw, Switch Housing Assembly Wire Connector Balancing Kit Model # 23683 Asm. If parts are included in the box.


