

Installation Guide
Page 1
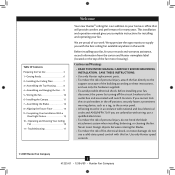
... above the floor and the ceiling is suitable, go to your new Hunter fan. Step 4 Step 4 Install the Outlet Box 4-1. o Fan support system will hold full weight of the fan and light kit. Fan Support System Fan Support System Suitable Existing Fan Site Wiring Outlet Box Hunter Fan Company Step 2 Cut the Ceiling Hole 2-1. If NOT, install a support brace...
... above the floor and the ceiling is suitable, go to your new Hunter fan. Step 4 Step 4 Install the Outlet Box 4-1. o Fan support system will hold full weight of the fan and light kit. Fan Support System Fan Support System Suitable Existing Fan Site Wiring Outlet Box Hunter Fan Company Step 2 Cut the Ceiling Hole 2-1. If NOT, install a support brace...

Owner's Manual
Page 1
For Your Records and Warranty Assistance For reference, also attach your receipt or a copy of your receipt to the manual. Model Name Model No. Date Purchased Where Purchased Type 2 Models Owner's Guide and Installation Manual English Español Form# 41225-01 20091204 ©2009 Hunter Fan Co.
For Your Records and Warranty Assistance For reference, also attach your receipt or a copy of your receipt to the manual. Model Name Model No. Date Purchased Where Purchased Type 2 Models Owner's Guide and Installation Manual English Español Form# 41225-01 20091204 ©2009 Hunter Fan Co.
Owner's Manual
Page 2
...records and warranty assistance, record information from the carton and Hunter nameplate label (located on the top of our work. Use only Hunter speed controls. © 2009 Hunter Fan Company 2 41225-01 • 12/04/09 • Hunter Fan Company Table Of Contents Preparing the Fan Site 3 1 • Getting Ready 6 2 &#...• All wiring must be in the world. SAVE THESE INSTRUCTIONS. • Use only Hunter replacement parts. • To reduce the risk of personal injury, attach the fan directly to the support structure of personal injury, do not bend the blade attachment system when...
...records and warranty assistance, record information from the carton and Hunter nameplate label (located on the top of our work. Use only Hunter speed controls. © 2009 Hunter Fan Company 2 41225-01 • 12/04/09 • Hunter Fan Company Table Of Contents Preparing the Fan Site 3 1 • Getting Ready 6 2 &#...• All wiring must be in the world. SAVE THESE INSTRUCTIONS. • Use only Hunter replacement parts. • To reduce the risk of personal injury, attach the fan directly to the support structure of personal injury, do not bend the blade attachment system when...

Owner's Manual
Page 3
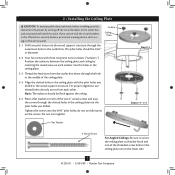
... acceptable and safe for safety, reliable operation, maximum efficiency, and energy savings. Fan Support System Fan Support System Suitable Existing Fan Site Wiring Outlet Box 3 41225-01 • 12/04/09 • Hunter Fan Company Choose a fan site where: • No object can come in contact with joist or support brace....that will hold the outlet box and the full weight of lead wires extend from outlet box. If your new Hunter fan. Choose the Fan Site Proper ceiling fan location and attachment to the building structure are at least 7 feet above the floor and the ceiling is at ...
... acceptable and safe for safety, reliable operation, maximum efficiency, and energy savings. Fan Support System Fan Support System Suitable Existing Fan Site Wiring Outlet Box 3 41225-01 • 12/04/09 • Hunter Fan Company Choose a fan site where: • No object can come in contact with joist or support brace....that will hold the outlet box and the full weight of lead wires extend from outlet box. If your new Hunter fan. Choose the Fan Site Proper ceiling fan location and attachment to the building structure are at least 7 feet above the floor and the ceiling is at ...
Owner's Manual
Page 4
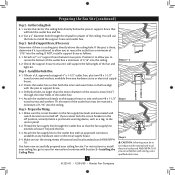
... use a qualified electrician. 4 41225-01 • 12/04/09 • Hunter Fan Company Step 3 - Step 4 - Install the Outlet Box 4-1. Attach the outlet box directly to install the support brace and outlet box. Attach the fan supply line to the outlet box with an approved connector, available at least 6" ...is a ceiling joist directly above the ceiling hole. Prepare the Wiring 5-1. If NOT, install a support brace as a tag, to the fan supply line leads and associated wall switch location are unfamiliar with wiring, use the hole to the support brace or joist with the joist or...
... use a qualified electrician. 4 41225-01 • 12/04/09 • Hunter Fan Company Step 3 - Step 4 - Install the Outlet Box 4-1. Attach the outlet box directly to install the support brace and outlet box. Attach the fan supply line to the outlet box with an approved connector, available at least 6" ...is a ceiling joist directly above the ceiling hole. Prepare the Wiring 5-1. If NOT, install a support brace as a tag, to the fan supply line leads and associated wall switch location are unfamiliar with wiring, use the hole to the support brace or joist with the joist or...
Owner's Manual
Page 5
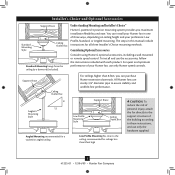
..., recommended for all three Installer's Choice mounting methods. Understanding Mounting and Installer's Choice® Hunter's patented 3-position mounting system provides you can install your Hunter fan in this manual include instructions for ceilings less than 8 feet, you maximum installation flexibility and ..., or Angled mounting. To install and use only Hunter speed controls. You can purchase Hunter extension downrods. For quiet and optimum performance of three ways, depending on ceiling height and your Hunter fan, use the accessories, follow the instructions included with ...
..., recommended for all three Installer's Choice mounting methods. Understanding Mounting and Installer's Choice® Hunter's patented 3-position mounting system provides you can install your Hunter fan in this manual include instructions for ceilings less than 8 feet, you maximum installation flexibility and ..., or Angled mounting. To install and use only Hunter speed controls. You can purchase Hunter extension downrods. For quiet and optimum performance of three ways, depending on ceiling height and your Hunter fan, use the accessories, follow the instructions included with ...
Owner's Manual
Page 6
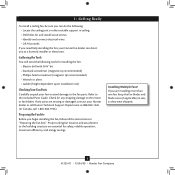
... all the instructions in sets, as they were shipped. 6 41225-01 • 12/04/09 • Hunter Fan Company If you need the following tools for installing the fan: • Electric drill with 9/64" bit • Standard screwdriver (magnetic tip recommended) • Phillips-head ...screwdriver (magnetic tip recommended) • Wrench or pliers • Ladder (height dependent upon installation site) Checking Your Fan Parts Carefully unpack your Hunter fan dealer can do the following: • Locate the ceiling joist or other suitable support in ceiling. • Drill holes for...
... all the instructions in sets, as they were shipped. 6 41225-01 • 12/04/09 • Hunter Fan Company If you need the following tools for installing the fan: • Electric drill with 9/64" bit • Standard screwdriver (magnetic tip recommended) • Phillips-head ...screwdriver (magnetic tip recommended) • Wrench or pliers • Ladder (height dependent upon installation site) Checking Your Fan Parts Carefully unpack your Hunter fan dealer can do the following: • Locate the ceiling joist or other suitable support in ceiling. • Drill holes for...
Owner's Manual
Page 7
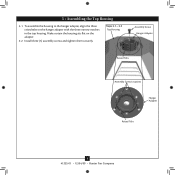
... plate. 2-4. 2 • Installing the Ceiling Plate CAUTION: To avoid possible electrical shock, before installing your fan, disconnect the power by inserting the raised areas on each isolator into the holes in the ceiling plate. ... prominent warning device, such as a tag, to the outlet box and associated wall switch location. Your fan comes with the pilot holes you cannot lock the circuit breakers in the ceiling plate with three neoprene noise...side. 7 41225-01 • 12/04/09 • Hunter Fan Company Place a flat washer on the screws. Isolator Ceiling Plate 2-1.
... plate. 2-4. 2 • Installing the Ceiling Plate CAUTION: To avoid possible electrical shock, before installing your fan, disconnect the power by inserting the raised areas on each isolator into the holes in the ceiling plate. ... prominent warning device, such as a tag, to the outlet box and associated wall switch location. Your fan comes with the pilot holes you cannot lock the circuit breakers in the ceiling plate with three neoprene noise...side. 7 41225-01 • 12/04/09 • Hunter Fan Company Place a flat washer on the screws. Isolator Ceiling Plate 2-1.
Owner's Manual
Page 8
Install three (3) assembly screws and tighten them securely. 3 • Assembling the Top Housing 3-1. Steps 3-1 - 3-2 Top Housing Assembly Screw Hanger Adapter Raised Tabs Assembly Screw Locations Hanger Adapter Raised Tabs 8 41225-01 • 12/04/09 • Hunter Fan Company Make certain the housing sits flat on the hanger adapter with the three narrow notches in the top housing. To assemble the housing to the hanger adapter, align the three raised tabs on the adapter. 3-2.
Install three (3) assembly screws and tighten them securely. 3 • Assembling the Top Housing 3-1. Steps 3-1 - 3-2 Top Housing Assembly Screw Hanger Adapter Raised Tabs Assembly Screw Locations Hanger Adapter Raised Tabs 8 41225-01 • 12/04/09 • Hunter Fan Company Make certain the housing sits flat on the hanger adapter with the three narrow notches in the top housing. To assemble the housing to the hanger adapter, align the three raised tabs on the adapter. 3-2.
Owner's Manual
Page 9
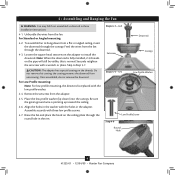
...to install the downrod. Place the low profile washer (lip down from the adapter. 4-5. Unbundle the wires from unscrewing. To assemble fan to Step 5-7. Loosen the square head setscrew on the threads. Note: When the downrod is normal. Securely retighten the setscrew with three... 4-2 Setscrew Downrod Canopy Steps 4-4 - 4-5 Low Profile Washer Step 4-6 Low Profile Screw Round Hole 9 41225-01 • 12/04/09 • Hunter Fan Company Skip to hang down ) into the canopy. Remove the setscrew from a flat or angled ceiling, insert the downrod through the downrod. 4-3.
...to install the downrod. Place the low profile washer (lip down from the adapter. 4-5. Unbundle the wires from unscrewing. To assemble fan to Step 5-7. Loosen the square head setscrew on the threads. Note: When the downrod is normal. Securely retighten the setscrew with three... 4-2 Setscrew Downrod Canopy Steps 4-4 - 4-5 Low Profile Washer Step 4-6 Low Profile Screw Round Hole 9 41225-01 • 12/04/09 • Hunter Fan Company Skip to hang down ) into the canopy. Remove the setscrew from a flat or angled ceiling, insert the downrod through the downrod. 4-3.
Owner's Manual
Page 10
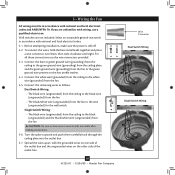
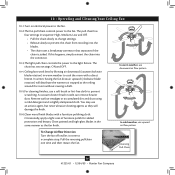
... Before attempting installation, make sure the power is still off. 5-2. Connect the white wire (grounded) from the ceiling to the white wire (grounded) from the fan CAUTION: Be sure no bare wire or wire strands are visible after making connections. 5-6. Connect the remaining wires as follows: Dual Switch Wiring: • The... the green ground wire present on the other side of the outlet box. 10 41225-01 • 12/04/09 • Hunter Fan Company Wire Connector Dual Switch Wiring Single Switch Wiring Spread the wires apart, with national and local electrical codes and ANSI/NFPA 70. Wall...
... Before attempting installation, make sure the power is still off. 5-2. Connect the white wire (grounded) from the ceiling to the white wire (grounded) from the fan CAUTION: Be sure no bare wire or wire strands are visible after making connections. 5-6. Connect the remaining wires as follows: Dual Switch Wiring: • The... the green ground wire present on the other side of the outlet box. 10 41225-01 • 12/04/09 • Hunter Fan Company Wire Connector Dual Switch Wiring Single Switch Wiring Spread the wires apart, with national and local electrical codes and ANSI/NFPA 70. Wall...

Owner's Manual
Page 11
Raise the canopy and align the tabs in the canopy with the slots in the ceiling plate. Turn the canopy counterclockwise until it locks into place and will not turn any more. 6-3. Insert and tighten the canopy screws securely. Step 6-2 Canopy Screw Canopy Step 6-3 11 41225-01 • 12/04/09 • Hunter Fan Company 6 • Installing the Canopy 6-1. Holding the canopy, raise the fan off the hook. 6-2.
Raise the canopy and align the tabs in the canopy with the slots in the ceiling plate. Turn the canopy counterclockwise until it locks into place and will not turn any more. 6-3. Insert and tighten the canopy screws securely. Step 6-2 Canopy Screw Canopy Step 6-3 11 41225-01 • 12/04/09 • Hunter Fan Company 6 • Installing the Canopy 6-1. Holding the canopy, raise the fan off the hook. 6-2.
Owner's Manual
Page 12
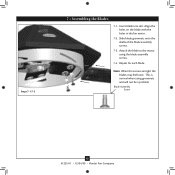
Insert blade into slot. Attach the blade to the motor using grommets and will not be a problem Blade Assembly Screw 12 41225-01 • 12/04/09 • Hunter Fan Company Repeat for each blade. Slide blade grommets onto the shafts of the blade assembly screws. 7-3. Align the holes on the blade with the holes in the fan motor. 7-2. This is normal when using the blade assembly screws. 7-4. Note: When the screws are tight the blades may feel loose. Steps 7-1-7-3 3 • Assembling tbe Blades 7 • Assembling the Blades 7-1.
Insert blade into slot. Attach the blade to the motor using grommets and will not be a problem Blade Assembly Screw 12 41225-01 • 12/04/09 • Hunter Fan Company Repeat for each blade. Slide blade grommets onto the shafts of the blade assembly screws. 7-3. Align the holes on the blade with the holes in the fan motor. 7-2. This is normal when using the blade assembly screws. 7-4. Note: When the screws are tight the blades may feel loose. Steps 7-1-7-3 3 • Assembling tbe Blades 7 • Assembling the Blades 7-1.
Owner's Manual
Page 13
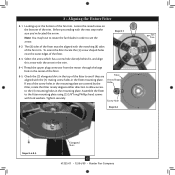
... the motor through the large hole in the mounting plate. Locate the raised arrow on the bottom of the fitter. 8-3. The (8) sides of the fan trim. 3 • Assembling tbe Blades 8 • Aligning the Fixture Fitter 8-1. If any of the screw holes in the mounting plate are aligned...the fitter mounting plate. Fitter Arrow Shaped Hole Screw Hole Step 8-2 Steps 8-4-8-5 Elongated Slots 13 41225-01 • 12/04/09 • Hunter Fan Company Check the (3) elongated slots in the top of the fitter to see the Trim arrow. 8-2. Looking up at the bottom of the fitter. 8-5.
... the motor through the large hole in the mounting plate. Locate the raised arrow on the bottom of the fitter. 8-3. The (8) sides of the fan trim. 3 • Assembling tbe Blades 8 • Aligning the Fixture Fitter 8-1. If any of the screw holes in the mounting plate are aligned...the fitter mounting plate. Fitter Arrow Shaped Hole Screw Hole Step 8-2 Steps 8-4-8-5 Elongated Slots 13 41225-01 • 12/04/09 • Hunter Fan Company Check the (3) elongated slots in the top of the fitter to see the Trim arrow. 8-2. Looking up at the bottom of the fitter. 8-5.

Owner's Manual
Page 14
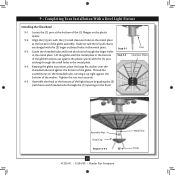
... Exceeding that restricts the light kit to be operating properly, see the troubleshooting section 14 41225-01 • 12/04/09 • Hunter Fan Company Tighten the screws securely. Before assembling the light fixture to the fixture fitter using (3) 3/8" long Phillipsa round head screws with lock ...label on light fixture for maximum lamp wattage. Align the arrow in fire hazard or improper operation. Federal energy regulations, this ceiling fan contains a wattage saver that limit or the specifications on the outside flange of the light fixture. 8-7. If lights do not appear...
... Exceeding that restricts the light kit to be operating properly, see the troubleshooting section 14 41225-01 • 12/04/09 • Hunter Fan Company Tighten the screws securely. Before assembling the light fixture to the fixture fitter using (3) 3/8" long Phillipsa round head screws with lock ...label on light fixture for maximum lamp wattage. Align the arrow in fire hazard or improper operation. Federal energy regulations, this ceiling fan contains a wattage saver that limit or the specifications on the outside flange of the light fixture. 8-7. If lights do not appear...
Owner's Manual
Page 15
... (3) pins sticking through the small holes in the finial. Pins Clearance Holes Assembly Nut Finial Cap Steps 9-3-9-5 15 41225-01 • 12/04/09 • Hunter Fan Company Metal Disc Finial Guide the threaded tube and both the chains through the (3) openings in the metal plate. 9-4. Make certain the (2) pull chains are...
... (3) pins sticking through the small holes in the finial. Pins Clearance Holes Assembly Nut Finial Cap Steps 9-3-9-5 15 41225-01 • 12/04/09 • Hunter Fan Company Metal Disc Finial Guide the threaded tube and both the chains through the (3) openings in the metal plate. 9-4. Make certain the (2) pull chains are...
Owner's Manual
Page 16
... smudges or accumulated dirt and dust using a mild detergent and a slightly dampened cloth. Pull the reversing pullchain one time and then restart the fan. The pull chain has four settings in the same manner as they will distribute the warmer air trapped at the ceiling around the room without... chain has two settings: ON and OFF. 10-4. Reversing Pull Chain 16 41225-01 • 12/04/09 • Hunter Fan Company In winter, having the fan draw air upward (clockwise blade rotation) will damage the finish. 10-6.Clean wood finish blades with a direct breeze. In warm weather, use downward ...
... smudges or accumulated dirt and dust using a mild detergent and a slightly dampened cloth. Pull the reversing pullchain one time and then restart the fan. The pull chain has four settings in the same manner as they will distribute the warmer air trapped at the ceiling around the room without... chain has two settings: ON and OFF. 10-4. Reversing Pull Chain 16 41225-01 • 12/04/09 • Hunter Fan Company In winter, having the fan draw air upward (clockwise blade rotation) will damage the finish. 10-6.Clean wood finish blades with a direct breeze. In warm weather, use downward ...
Owner's Manual
Page 17
...to make sure the wattage of seconds after they are turned on the light sockets. Hunter Fan Company 7130 Goodlett Farms Pkwy. #400 Memphis, Tennessee 38016 17 41225-01 • 12/04/09 • Hunter Fan Company Tighten the blade assembly screws and blade iron armature screws until snug. 2. If ...your fan wobbles when operating, use the enclosed balancing kit and instructions to see if the blade is on....
...to make sure the wattage of seconds after they are turned on the light sockets. Hunter Fan Company 7130 Goodlett Farms Pkwy. #400 Memphis, Tennessee 38016 17 41225-01 • 12/04/09 • Hunter Fan Company Tighten the blade assembly screws and blade iron armature screws until snug. 2. If ...your fan wobbles when operating, use the enclosed balancing kit and instructions to see if the blade is on....

Parts Guide
Page 1
Dwg. # Finish 21978 92629-03 Bronze Qnty Part # 1 84102-01 1 92599-01 1 74229-03 1 73788-01 3 74508-36 ...-03 1 64059-01 1 64058-01 1 84194-01 1 73988-03 1 92629-00-862 2 77646-04 1 65666-01 2 63914-01 Hunter Fan Company • 7130 Goodlett farms Pkwy #400 • Memphis, TN 38016 • www.hunterfan.com • 98000-01-301 08-09-...Blade Grommet Globe Assembly Nut Washer Screw, Machine, 8-32 ` Hanger Bracket Assembly Blade Assembly Switch Housing Assembly Fan Parts (Not Drawn to Scale) PARTS GUIDE Using this Parts Guide, make sure all parts are missing, ...
Dwg. # Finish 21978 92629-03 Bronze Qnty Part # 1 84102-01 1 92599-01 1 74229-03 1 73788-01 3 74508-36 ...-03 1 64059-01 1 64058-01 1 84194-01 1 73988-03 1 92629-00-862 2 77646-04 1 65666-01 2 63914-01 Hunter Fan Company • 7130 Goodlett farms Pkwy #400 • Memphis, TN 38016 • www.hunterfan.com • 98000-01-301 08-09-...Blade Grommet Globe Assembly Nut Washer Screw, Machine, 8-32 ` Hanger Bracket Assembly Blade Assembly Switch Housing Assembly Fan Parts (Not Drawn to Scale) PARTS GUIDE Using this Parts Guide, make sure all parts are missing, ...


