

Installation Guide
Page 1
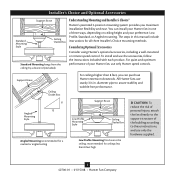
... a ceiling joist directly above the floor and the ceiling is at least 8 feet high. • e fan blades have now successfully prepared your new Hunter fan. Check the support brace to ensure it to allow you to recess the bottom of the outlet box a minimum ...the hole to building structure. Fan Support System o Fan attaches directly to install the support brace and outlet box. o Fan support system will support the full weight of the fan and light kit. Fan Support System Fan Support System Suitable Existing Fan Site Wiring Outlet Box Hunter Fan Company Step 2 Cut the Ceiling...
... a ceiling joist directly above the floor and the ceiling is at least 8 feet high. • e fan blades have now successfully prepared your new Hunter fan. Check the support brace to ensure it to allow you to recess the bottom of the outlet box a minimum ...the hole to building structure. Fan Support System o Fan attaches directly to install the support brace and outlet box. o Fan support system will support the full weight of the fan and light kit. Fan Support System Fan Support System Suitable Existing Fan Site Wiring Outlet Box Hunter Fan Company Step 2 Cut the Ceiling...
Owner's Manual
Page 1
installation and operation manual for Hunter Ceiling Fans TYPE 3 Models 42700-01 • 01/15/08 For Your Records and Warranty Assistance Model Name Catalog/Model No Serial No Date Purchased Where Purchased For reference also attach your receipt or a copy of your receipt to the manual.
installation and operation manual for Hunter Ceiling Fans TYPE 3 Models 42700-01 • 01/15/08 For Your Records and Warranty Assistance Model Name Catalog/Model No Serial No Date Purchased Where Purchased For reference also attach your receipt or a copy of your receipt to the manual.
Owner's Manual
Page 2
...the Remote Control and Mounting the Holder 14 11 • Operating and Cleaning Your Ceiling Fan 15 12 • Troubleshooting 16 Welcome Your new Hunter® ceiling fan is an addition to your fan, disconnect the power by turning off position, securely fasten a prominent warning device, such...• Use only Hunter replacement parts. • To reduce the risk of personal injury, attach the fan directly to supply you complete instructions for your fan. Never insert foreign objects between rotating fan blades. • To reduce the risk of the fan motor housing). This installation...
...the Remote Control and Mounting the Holder 14 11 • Operating and Cleaning Your Ceiling Fan 15 12 • Troubleshooting 16 Welcome Your new Hunter® ceiling fan is an addition to your fan, disconnect the power by turning off position, securely fasten a prominent warning device, such...• Use only Hunter replacement parts. • To reduce the risk of personal injury, attach the fan directly to supply you complete instructions for your fan. Never insert foreign objects between rotating fan blades. • To reduce the risk of the fan motor housing). This installation...
Owner's Manual
Page 3
...To reduce the risk of personal injury, attach the fan directly to these instructions, and use sturdy 3/4 in this manual include instructions for ceilings less than 8 feet, you maximum installation flexibility and ease. All Hunter fans use only the hardware supplied. 3 42700-01 ...• 01/15/08 • Hunter Fan Company Considering Optional Accessories Consider using Hunter's optional accessories, including a wall-mounted or remote speed control. ...
...To reduce the risk of personal injury, attach the fan directly to these instructions, and use sturdy 3/4 in this manual include instructions for ceilings less than 8 feet, you maximum installation flexibility and ease. All Hunter fans use only the hardware supplied. 3 42700-01 ...• 01/15/08 • Hunter Fan Company Considering Optional Accessories Consider using Hunter's optional accessories, including a wall-mounted or remote speed control. ...
Owner's Manual
Page 4
...the ceiling joist or other suitable support in . Gathering the Tools You will need help installing the fan, your Hunter fan dealer can direct you can do the following tools for installing the fan: • Electric drill with 9/64 in ceiling. • Drill holes for and install wood...(magnetic tip recommended) • Wrench or pliers • Ladder (height dependent upon installation site) Checking Your Fan Parts Carefully unpack your Hunter dealer or call Hunter Technical Support Department at 888-830-1326. If any parts are essential for any shipping damage to the included Parts...
...the ceiling joist or other suitable support in . Gathering the Tools You will need help installing the fan, your Hunter fan dealer can direct you can do the following tools for installing the fan: • Electric drill with 9/64 in ceiling. • Drill holes for and install wood...(magnetic tip recommended) • Wrench or pliers • Ladder (height dependent upon installation site) Checking Your Fan Parts Carefully unpack your Hunter dealer or call Hunter Technical Support Department at 888-830-1326. If any parts are essential for any shipping damage to the included Parts...
Owner's Manual
Page 5
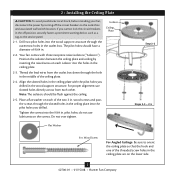
...the outlet box. Do not over tighten. pilot holes; Place a flat washer on the lower side. 5 42700-01 • 01/15/08 • Hunter Fan Company Tighten the screws into the holes in . 2-2. Isolator Ceiling Plate Flat Washer Step 2-2 Steps 2-3 - 2-5 3 in the middle of the threaded ... box down through the hole in . 2 • Installing the Ceiling Plate CAUTION: To avoid possible electrical shock, before installing your fan, disconnect the power by inserting the raised areas on the screws. Position the isolators between the ceiling plate and ceiling by turning off ...
...the outlet box. Do not over tighten. pilot holes; Place a flat washer on the lower side. 5 42700-01 • 01/15/08 • Hunter Fan Company Tighten the screws into the holes in . 2-2. Isolator Ceiling Plate Flat Washer Step 2-2 Steps 2-3 - 2-5 3 in the middle of the threaded ... box down through the hole in . 2 • Installing the Ceiling Plate CAUTION: To avoid possible electrical shock, before installing your fan, disconnect the power by inserting the raised areas on the screws. Position the isolators between the ceiling plate and ceiling by turning off ...
Owner's Manual
Page 6
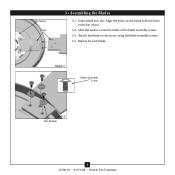
Insert blade into slot. Slide flat washers onto the shafts of the blade assembly screws. 3-3. Attach the blade to the motor using the blade assembly screws. 3-4. Repeat for each blade. 3 • Assembling tbe Blades Fan Motor Holes 3 • Assembling the Blades 3-1. Step 3-1 Blade Assembly Screw Step 3-2 Flat Washer 6 42700-01 • 01/15/08 • Hunter Fan Company Align the holes on the blade with the holes in the fan motor. 3-2.
Insert blade into slot. Slide flat washers onto the shafts of the blade assembly screws. 3-3. Attach the blade to the motor using the blade assembly screws. 3-4. Repeat for each blade. 3 • Assembling tbe Blades Fan Motor Holes 3 • Assembling the Blades 3-1. Step 3-1 Blade Assembly Screw Step 3-2 Flat Washer 6 42700-01 • 01/15/08 • Hunter Fan Company Align the holes on the blade with the holes in the fan motor. 3-2.
Owner's Manual
Page 7
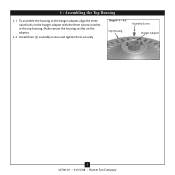
Steps 4-1 - 4-2 Assembly Screw Top Housing Hanger Adapter 7 42700-01 • 01/15/08 • Hunter Fan Company Install three (3) assembly screws and tighten them securely. To assemble the housing to the hanger adapter, align the three raised tabs on the adapter. 4-2. Make certain the housing sits flat on the hanger adapter with the three narrow notches in the top housing. 4 • Assembling the Top Housing 4-1.
Steps 4-1 - 4-2 Assembly Screw Top Housing Hanger Adapter 7 42700-01 • 01/15/08 • Hunter Fan Company Install three (3) assembly screws and tighten them securely. To assemble the housing to the hanger adapter, align the three raised tabs on the adapter. 4-2. Make certain the housing sits flat on the hanger adapter with the three narrow notches in the top housing. 4 • Assembling the Top Housing 4-1.
Owner's Manual
Page 8
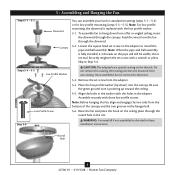
... this coating; Once assembled, do not remove the downrod. 5-3. Note: For low profile mounting, the downrod is fully installed, 2-3 threads on the threads. Raise the fan and place the hook on the adapter to install the pipe and ball assembly. Be sure the green ground wire is normal. WARNING... hang down ) into the canopy. Do not remove this is pointing up toward the ceiling. 5-5. Round Hole 8 42700-01 • 01/15/08 • Hunter Fan Company Securely retighten the set screw from unscrewing. Remove the set screw with the holes in the adapter. To assemble...
... this coating; Once assembled, do not remove the downrod. 5-3. Note: For low profile mounting, the downrod is fully installed, 2-3 threads on the threads. Raise the fan and place the hook on the adapter to install the pipe and ball assembly. Be sure the green ground wire is normal. WARNING... hang down ) into the canopy. Do not remove this is pointing up toward the ceiling. 5-5. Round Hole 8 42700-01 • 01/15/08 • Hunter Fan Company Securely retighten the set screw from unscrewing. Remove the set screw with the holes in the adapter. To assemble...
Owner's Manual
Page 9
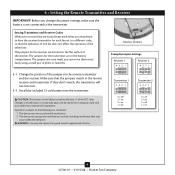
...the transmitter are very small; Operation is not connected to operate this fan. Setting Transmitter and Receiver Codes When two or more fans are located on 9 42700-01 • 01/15/08 • Hunter Fan Company Change the position of the FCC rules. CAUTION: The remote ... they don't match, the transmitter will not function. 6-2. Changes or modifications not expressly approved by Hunter Fan Company could void your authority to the transmitter. WARNING: Use only the Hunter Fan speed control supplied with part 15 of the jumpers in the remote receiver and transmitter. 6 •...
...the transmitter are very small; Operation is not connected to operate this fan. Setting Transmitter and Receiver Codes When two or more fans are located on 9 42700-01 • 01/15/08 • Hunter Fan Company Change the position of the FCC rules. CAUTION: The remote ... they don't match, the transmitter will not function. 6-2. Changes or modifications not expressly approved by Hunter Fan Company could void your authority to the transmitter. WARNING: Use only the Hunter Fan speed control supplied with part 15 of the jumpers in the remote receiver and transmitter. 6 •...
Owner's Manual
Page 10
... grey wire from the receiver. • Connect the red wire from the fan to the red wire from the receiver. • Connect the black wire with a white stripe from the receiver. 10 42700-01 • 01/15/08 • Hunter Fan Company Make sure the slot in the receiver is aligned with a white... stripe from the receiver. • Connect the white wire from the fan to the white wire (LIGHT OUT) from the fan to the black wire with the hook in the ceiling...
... grey wire from the receiver. • Connect the red wire from the fan to the red wire from the receiver. • Connect the black wire with a white stripe from the receiver. 10 42700-01 • 01/15/08 • Hunter Fan Company Make sure the slot in the receiver is aligned with a white... stripe from the receiver. • Connect the white wire from the fan to the white wire (LIGHT OUT) from the fan to the black wire with the hook in the ceiling...
Owner's Manual
Page 11
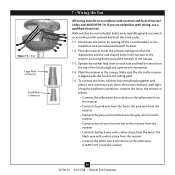
Run the thin white antenna wire from the other wires. 11 42700-01 • 01/15/08 • Hunter Fan Company Place the green and white wires on a separate side of the canopy.) 7-8. Push all wires and wire connectors back through one of the slots ... wire from the ceiling. 7-9. 7-6. CAUTION: Be sure no bare wire or wire strands are visible after making connections. 7-7. Using the large wire connectors, connect the fan and receiver to the power wires as follows: • Connect the white wire (A/C IN) from the receiver to the white wire from the ceiling. •...
Run the thin white antenna wire from the other wires. 11 42700-01 • 01/15/08 • Hunter Fan Company Place the green and white wires on a separate side of the canopy.) 7-8. Push all wires and wire connectors back through one of the slots ... wire from the ceiling. 7-9. 7-6. CAUTION: Be sure no bare wire or wire strands are visible after making connections. 7-7. Using the large wire connectors, connect the fan and receiver to the power wires as follows: • Connect the white wire (A/C IN) from the receiver to the white wire from the ceiling. •...
Owner's Manual
Page 12
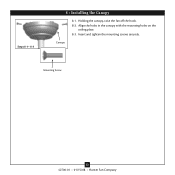
Insert and tighten the mounting screws securely. Canopy Mounting Screw 12 42700-01 • 01/15/08 • Hunter Fan Company Steps 8-1- 8-3 8 • Installing the Canopy 8-1. Align the holes in the canopy with the mounting holes on the ceiling plate. 8-3. Holding the canopy, raise the fan off the hook. 8-2.
Insert and tighten the mounting screws securely. Canopy Mounting Screw 12 42700-01 • 01/15/08 • Hunter Fan Company Steps 8-1- 8-3 8 • Installing the Canopy 8-1. Align the holes in the canopy with the mounting holes on the ceiling plate. 8-3. Holding the canopy, raise the fan off the hook. 8-2.
Owner's Manual
Page 13
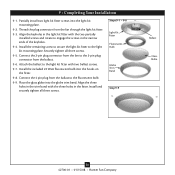
... light kit fitter to the light kit fitter with two ballast screws. 9-7. Connect the 2-pin plug connector from the fan to the 2-pin plug connector from the fan through the light kit fitter. 9-3. Align the keyholes in the light kit fitter with the three holes in the narrow.... 9-9. Steps 9-1 - 9-8 Light Kit Fitter Fluorescent Bulb Globe Trim Band Step 9-9 Ballast Glass Globe 13 42700-01 • 01/15/08 • Hunter Fan Company Thread the plug connector from the ballast. 9-6. Securely tighten all three screws. Connect the 4 pin plug from the ballast to engage the screws in...
... light kit fitter to the light kit fitter with two ballast screws. 9-7. Connect the 2-pin plug connector from the fan to the 2-pin plug connector from the fan through the light kit fitter. 9-3. Align the keyholes in the light kit fitter with the three holes in the narrow.... 9-9. Steps 9-1 - 9-8 Light Kit Fitter Fluorescent Bulb Globe Trim Band Step 9-9 Ballast Glass Globe 13 42700-01 • 01/15/08 • Hunter Fan Company Thread the plug connector from the ballast. 9-6. Securely tighten all three screws. Connect the 4 pin plug from the ballast to engage the screws in...
Owner's Manual
Page 14
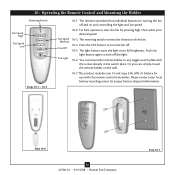
...select your local battery recycling center for turning the fan off and on and controlling the light and fan speed. 10-2. Press the OFF button to any toggle switch plate with the remote control transmitter. Fan Speed Medium Fan Off Fan Light 10-3. 10 • Operating the Remote Control... and Mounting the Holder Reversing Switch Fan Speed High Fan Speed Low Steps 10-1 - 10-5 10-1. Step 10-6 14 42700-01 • 01/15/08 • Hunter Fan Company Step 10-7 The ...
...select your local battery recycling center for turning the fan off and on and controlling the light and fan speed. 10-2. Press the OFF button to any toggle switch plate with the remote control transmitter. Fan Speed Medium Fan Off Fan Light 10-3. 10 • Operating the Remote Control... and Mounting the Holder Reversing Switch Fan Speed High Fan Speed Low Steps 10-1 - 10-5 10-1. Step 10-6 14 42700-01 • 01/15/08 • Hunter Fan Company Step 10-7 The ...
Owner's Manual
Page 15
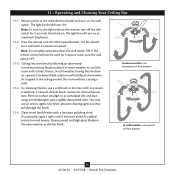
... will damage the finish. 11-5. You may use an artistic agent, but never abrasive cleaning agents as the fan finish. Ceiling fans work best by blowing air downward (counterclockwise blade rotation) in the same manner as they will not be used... for added protection and beauty. 11 • Operating and Cleaning Your Ceiling Fan 11-1. In warm weather, use downward air flow pattern In cold weather, use a soft brush or lint-free cloth ... finishes, use upward air flow pattern 15 42700-01 • 01/15/08 • Hunter Fan Company
... will damage the finish. 11-5. You may use an artistic agent, but never abrasive cleaning agents as the fan finish. Ceiling fans work best by blowing air downward (counterclockwise blade rotation) in the same manner as they will not be used... for added protection and beauty. 11 • Operating and Cleaning Your Ceiling Fan 11-1. In warm weather, use downward air flow pattern In cold weather, use a soft brush or lint-free cloth ... finishes, use upward air flow pattern 15 42700-01 • 01/15/08 • Hunter Fan Company
Owner's Manual
Page 16
...1. Tighten all connections according to the wiring the fan section. 3. Hunter Fan Company 2500 Frisco Avenue Memphis, Tennessee 38114 16 42700-01 • 01/15/08 • Hunter Fan Company Turn power on, replace fuse, or reset breaker. 2. If your fan wobbles when operating, use the enclosed balancing kit ... Web site at http://www.hunterfan.com. Turn power off, support fan very carefully, and check that the glass is properly seated. Check to balance the fan. 2. 12 • Troubleshooting Problem: Nothing happens; fan does not move. 1. Loosen canopy, check all blade and/or ...
...1. Tighten all connections according to the wiring the fan section. 3. Hunter Fan Company 2500 Frisco Avenue Memphis, Tennessee 38114 16 42700-01 • 01/15/08 • Hunter Fan Company Turn power on, replace fuse, or reset breaker. 2. If your fan wobbles when operating, use the enclosed balancing kit ... Web site at http://www.hunterfan.com. Turn power off, support fan very carefully, and check that the glass is properly seated. Check to balance the fan. 2. 12 • Troubleshooting Problem: Nothing happens; fan does not move. 1. Loosen canopy, check all blade and/or ...

Parts Guide
Page 1
... Canopy Screw Blade Assembly Screw 116 Screw, 6-32x 1/2 CSK OHMS SEMS 207 Screw, 8-32 x 3/8 OHSEMS Mounting Isolators R Serial No. Fan Parts (Not Drawn to Scale) 87 Remote 88 Remote Transmitter Cradle 86 Remote Receiver Wood Screw Wood Screw Flat Washer Washer, Installer Choice for ...Set 272 Ballast 202 Bulb Globe / Shade 205 Globe Trim Ring Missing / Broken Parts: Call 1-888-830-1326 Fan does not work: 1. For additional information on: Hunter Products Trouble Shooting Dealer Location Service Center Locator Call 1-800-448-6837 www.hunterfan.com Motor / Housing Assembly 75 ...
... Canopy Screw Blade Assembly Screw 116 Screw, 6-32x 1/2 CSK OHMS SEMS 207 Screw, 8-32 x 3/8 OHSEMS Mounting Isolators R Serial No. Fan Parts (Not Drawn to Scale) 87 Remote 88 Remote Transmitter Cradle 86 Remote Receiver Wood Screw Wood Screw Flat Washer Washer, Installer Choice for ...Set 272 Ballast 202 Bulb Globe / Shade 205 Globe Trim Ring Missing / Broken Parts: Call 1-888-830-1326 Fan does not work: 1. For additional information on: Hunter Products Trouble Shooting Dealer Location Service Center Locator Call 1-800-448-6837 www.hunterfan.com Motor / Housing Assembly 75 ...


