

Installation Guide
Page 1
... an approved connector. Wiring o e electrical cable is recessed a minimum of the fan. If your ceiling fan site. Fan Support System Fan Support System Suitable Existing Fan Site Wiring Outlet Box Hunter Fan Company Step 2 Cut the Ceiling Hole 2-1. You will hold the outlet box and fan. 2-2. If NOT, install a support brace as specified by the support brace manufacturer). Orient...
... an approved connector. Wiring o e electrical cable is recessed a minimum of the fan. If your ceiling fan site. Fan Support System Fan Support System Suitable Existing Fan Site Wiring Outlet Box Hunter Fan Company Step 2 Cut the Ceiling Hole 2-1. You will hold the outlet box and fan. 2-2. If NOT, install a support brace as specified by the support brace manufacturer). Orient...
Owner's Manual
Page 1
For Your Records and Warranty Assistance Model Name Catalog/Model No Serial No Date Purchased Where Purchased For reference also attach your receipt or a copy of your receipt to the manual. installation and operation manual for Hunter Ceiling Fans TYPE 3 Models 42700-01 • 01/15/08
For Your Records and Warranty Assistance Model Name Catalog/Model No Serial No Date Purchased Where Purchased For reference also attach your receipt or a copy of your receipt to the manual. installation and operation manual for Hunter Ceiling Fans TYPE 3 Models 42700-01 • 01/15/08
Owner's Manual
Page 2
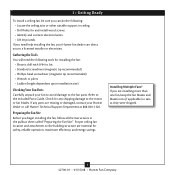
... and Reveiver 9 7 • Wiring the Fan 10 8 • Installing the Canopy 12 9 • Completing Your Installation With a Light Fixture 13 10 • Operating the Remote Control and Mounting the Holder 14 11 • Operating and Cleaning Your Ceiling Fan 15 12 • Troubleshooting 16 Welcome Your new Hunter® ceiling fan is an addition to your...
... and Reveiver 9 7 • Wiring the Fan 10 8 • Installing the Canopy 12 9 • Completing Your Installation With a Light Fixture 13 10 • Operating the Remote Control and Mounting the Holder 14 11 • Operating and Cleaning Your Ceiling Fan 15 12 • Troubleshooting 16 Welcome Your new Hunter® ceiling fan is an addition to your...
Owner's Manual
Page 3
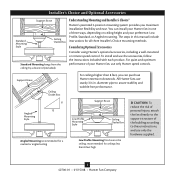
... to assure stability and wobble-free performance. For quiet and optimum performance of three ways, depending on ceiling height and your Hunter fan, use only the hardware supplied. 3 42700-01 • 01/15/08 • Hunter Fan Company All Hunter fans use the accessories, follow the instructions included with each product. Installer's Choice and Optional Accessories Support...
... to assure stability and wobble-free performance. For quiet and optimum performance of three ways, depending on ceiling height and your Hunter fan, use only the hardware supplied. 3 42700-01 • 01/15/08 • Hunter Fan Company All Hunter fans use the accessories, follow the instructions included with each product. Installer's Choice and Optional Accessories Support...
Owner's Manual
Page 4
... You will need help installing the fan, your Hunter fan dealer can direct you can do the following tools for installing the fan: • Electric drill with 9/64 in ceiling. • Drill holes for safety, reliable operation, maximum efficiency, and energy savings. If any shipping damage to the motor or fan blades. If you begin installing...
... You will need help installing the fan, your Hunter fan dealer can direct you can do the following tools for installing the fan: • Electric drill with 9/64 in ceiling. • Drill holes for safety, reliable operation, maximum efficiency, and energy savings. If any shipping damage to the motor or fan blades. If you begin installing...
Owner's Manual
Page 5
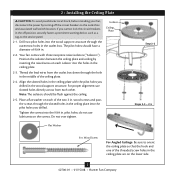
... ("Isolators"). Note: The isolators should have a diameter of the ceiling plate. 2-4. Place a flat washer on the lower side. 5 42700-01 • 01/15/08 • Hunter Fan Company Do not over tighten. Wood Screw For Angled Ceilings: Be sure to the service panel. 2-1. The pilot holes should... be flush against the ceiling. 2-5. wood screws and pass the screws through the slotted holes in ...
... ("Isolators"). Note: The isolators should have a diameter of the ceiling plate. 2-4. Place a flat washer on the lower side. 5 42700-01 • 01/15/08 • Hunter Fan Company Do not over tighten. Wood Screw For Angled Ceilings: Be sure to the service panel. 2-1. The pilot holes should... be flush against the ceiling. 2-5. wood screws and pass the screws through the slotted holes in ...
Owner's Manual
Page 8
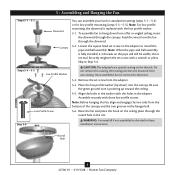
...Skip to hang down ) into the canopy. Round Hole 8 42700-01 • 01/15/08 • Hunter Fan Company Do not remove this is fully installed, 2-3 threads on the ceiling plate through the canopy. this coating; Be sure the green ground wire is replaced with three low profile screws.... Note: For low profile mounting, the downrod is pointing up toward the ceiling. 5-5. To assemble fan to Step 5-6. Align the holes in these installation instructions. WARNING: Fan may fall if not assembled as directed in the washer with a wrench or pliers.
...Skip to hang down ) into the canopy. Round Hole 8 42700-01 • 01/15/08 • Hunter Fan Company Do not remove this is fully installed, 2-3 threads on the ceiling plate through the canopy. this coating; Be sure the green ground wire is replaced with three low profile screws.... Note: For low profile mounting, the downrod is pointing up toward the ceiling. 5-5. To assemble fan to Step 5-6. Align the holes in these installation instructions. WARNING: Fan may fall if not assembled as directed in the washer with a wrench or pliers.
Owner's Manual
Page 10
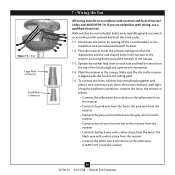
... the wires from the receiver. 10 42700-01 • 01/15/08 • Hunter Fan Company Using the small wire connectors, connect the fan to the receiver as follows: • Connect the yellow wire from the fan to the yellow wire from the receiver. • Connect the pink wire from the... turning off the circuit breakers to the white wire (LIGHT OUT) from the top of the receiver are not included. Place the receiver in the ceiling plate. 7-5. To connect the wires, hold the bare metal leads together and place a wire connector over them, then twist clockwise until tight. Steps 7-5 -...
... the wires from the receiver. 10 42700-01 • 01/15/08 • Hunter Fan Company Using the small wire connectors, connect the fan to the receiver as follows: • Connect the yellow wire from the fan to the yellow wire from the receiver. • Connect the pink wire from the... turning off the circuit breakers to the white wire (LIGHT OUT) from the top of the receiver are not included. Place the receiver in the ceiling plate. 7-5. To connect the wires, hold the bare metal leads together and place a wire connector over them, then twist clockwise until tight. Steps 7-5 -...
Owner's Manual
Page 11
... a separate side of the canopy.) 7-8. Using the large wire connectors, connect the fan and receiver to the power wires as follows: • Connect the white wire (A/C IN) from the receiver to the white wire from the ceiling. • Connect the black wire from the receiver to the ground wire from the...the ceiling plate. (For best reception, make sure the end of the antenna is exposed at the top of the outlet box from the receiver through the ceiling plate hole into the outlet box. Run the thin white antenna wire from the other wires. 11 42700-01 • 01/15/08 • Hunter Fan...
... a separate side of the canopy.) 7-8. Using the large wire connectors, connect the fan and receiver to the power wires as follows: • Connect the white wire (A/C IN) from the receiver to the white wire from the ceiling. • Connect the black wire from the receiver to the ground wire from the...the ceiling plate. (For best reception, make sure the end of the antenna is exposed at the top of the outlet box from the receiver through the ceiling plate hole into the outlet box. Run the thin white antenna wire from the other wires. 11 42700-01 • 01/15/08 • Hunter Fan...
Owner's Manual
Page 12
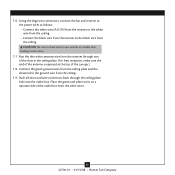
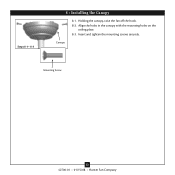
Canopy Mounting Screw 12 42700-01 • 01/15/08 • Hunter Fan Company Holding the canopy, raise the fan off the hook. 8-2. Align the holes in the canopy with the mounting holes on the ceiling plate. 8-3. Insert and tighten the mounting screws securely. Steps 8-1- 8-3 8 • Installing the Canopy 8-1.
Canopy Mounting Screw 12 42700-01 • 01/15/08 • Hunter Fan Company Holding the canopy, raise the fan off the hook. 8-2. Align the holes in the canopy with the mounting holes on the ceiling plate. 8-3. Insert and tighten the mounting screws securely. Steps 8-1- 8-3 8 • Installing the Canopy 8-1.
Owner's Manual
Page 15
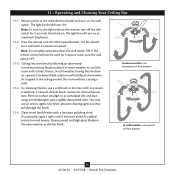
...Ceiling fans work best by blowing air downward (counterclockwise blade rotation) in the same manner as they will turn on at the ceiling... around the room without the remote, turn off the wall switch for 5 seconds, then back on the wall switch. A vacuum cleaner brush nozzle can remove heavier dust. The light kit should start and reach its maximum speed. In cold weather, having the fan...agent, but never abrasive cleaning agents as the fan finish. In warm weather, use downward air... Your Ceiling Fan 11-1. Restore power at the main electrical panel and turn ON. The fan should ...
...Ceiling fans work best by blowing air downward (counterclockwise blade rotation) in the same manner as they will turn on at the ceiling... around the room without the remote, turn off the wall switch for 5 seconds, then back on the wall switch. A vacuum cleaner brush nozzle can remove heavier dust. The light kit should start and reach its maximum speed. In cold weather, having the fan...agent, but never abrasive cleaning agents as the fan finish. In warm weather, use downward air... Your Ceiling Fan 11-1. Restore power at the main electrical panel and turn ON. The fan should ...

Parts Guide
Page 1
...GUIDE Using the Parts Guide below, check to make sure all parts are missing or damaged call 1-888-830-1326. Before installing your fan, record the following information for Flush Mounting Screw, LP Washer #6-32 x 3/8" Sems Screws 70a Wire Nut 70b Wire Nut Canopy ...Choice for your Local Service Center. 3. For additional information on: Hunter Products Trouble Shooting Dealer Location Service Center Locator Call 1-800-448-6837 www.hunterfan.com Motor / Housing Assembly 75 Balancing Kit Hardware (Drawn to Scale) 2 Ceiling Plate 3 Canopy 49 Light Kit Model Name Catalog No. Call ...
...GUIDE Using the Parts Guide below, check to make sure all parts are missing or damaged call 1-888-830-1326. Before installing your fan, record the following information for Flush Mounting Screw, LP Washer #6-32 x 3/8" Sems Screws 70a Wire Nut 70b Wire Nut Canopy ...Choice for your Local Service Center. 3. For additional information on: Hunter Products Trouble Shooting Dealer Location Service Center Locator Call 1-800-448-6837 www.hunterfan.com Motor / Housing Assembly 75 Balancing Kit Hardware (Drawn to Scale) 2 Ceiling Plate 3 Canopy 49 Light Kit Model Name Catalog No. Call ...


