
Installation Guide
Page 1
.... If NOT, install a support brace as walls or posts, within 30 inches of the fan. If the joist is recessed a minimum of 1/16" into ceiling. Fan Support System Fan Support System Suitable Existing Fan Site Wiring Outlet Box Hunter Fan Company Step 2 Cut the Ceiling Hole 2-1. o e bottom of the outlet box is there, determine if it to...
.... If NOT, install a support brace as walls or posts, within 30 inches of the fan. If the joist is recessed a minimum of 1/16" into ceiling. Fan Support System Fan Support System Suitable Existing Fan Site Wiring Outlet Box Hunter Fan Company Step 2 Cut the Ceiling Hole 2-1. o e bottom of the outlet box is there, determine if it to...
Owner's Manual
Page 2
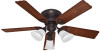
... 4 2 • Installing the Ceiling Plate 5 3 • Assembling the Fan 6 4 • Hanging and Wiring the Fan 7 5 • Installing the Canopy and Canopy Trim Ring 8 6 • Assembling the Blades 9 7 • Completing Your Installation With or Without a Light Fixture 10 8 • Operating and Cleaning Your Ceiling Fan 14 9 • Troubleshooting 15 Welcome Your new Hunter® ceiling fan is an addition...
... 4 2 • Installing the Ceiling Plate 5 3 • Assembling the Fan 6 4 • Hanging and Wiring the Fan 7 5 • Installing the Canopy and Canopy Trim Ring 8 6 • Assembling the Blades 9 7 • Completing Your Installation With or Without a Light Fixture 10 8 • Operating and Cleaning Your Ceiling Fan 14 9 • Troubleshooting 15 Welcome Your new Hunter® ceiling fan is an addition...
Owner's Manual
Page 3
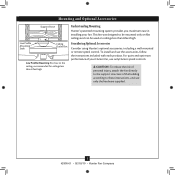
... For quiet and optimum performance of the building according to be mounted only on flat ceilings and can be used on ceilings less than 8 feet high Understanding Mounting Hunter's patented mounting system provides you maximum ease in installing your Hunter fan, use only Hunter speed controls. CAUTION: To reduce the risk of personal injury, attach the...
... For quiet and optimum performance of the building according to be mounted only on flat ceilings and can be used on ceilings less than 8 feet high Understanding Mounting Hunter's patented mounting system provides you maximum ease in installing your Hunter fan, use only Hunter speed controls. CAUTION: To reduce the risk of personal injury, attach the...
Owner's Manual
Page 4
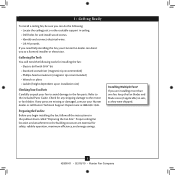
... in sets, as they were shipped. 4 42890-01 • 02/18/10 • Hunter Fan Company Refer to the motor or fan blades. Installing Multiple Fans? Proper ceiling fan location and attachment to the building structure are installing more than one fan, keep the fan blades and blade irons (if applicable) in the pullout sheet called "Preparing the...
... in sets, as they were shipped. 4 42890-01 • 02/18/10 • Hunter Fan Company Refer to the motor or fan blades. Installing Multiple Fans? Proper ceiling fan location and attachment to the building structure are installing more than one fan, keep the fan blades and blade irons (if applicable) in the pullout sheet called "Preparing the...
Owner's Manual
Page 5
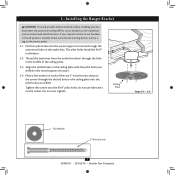
... into the pilot holes you drilled. do not use lubricants on each of the ceiling plate. 2-3. Ceiling Plate Steps 2-4 - 2-6 Flat Washer 3" Wood Screw 5 42890-01 • 02/18/10 • Hunter Fan Company If you drilled in the outlet box. Thread the lead wires from the outlet box down... the service panel. 2-1. Do not over tighten. 2 • Installing the Hanger Bracket CAUTION: To avoid possible electrical shock, before installing your fan, disconnect the power by turning off position, securely fasten a prominent warning device, such as a tag, to the outlet box and associated wall switch ...
... into the pilot holes you drilled. do not use lubricants on each of the ceiling plate. 2-3. Ceiling Plate Steps 2-4 - 2-6 Flat Washer 3" Wood Screw 5 42890-01 • 02/18/10 • Hunter Fan Company If you drilled in the outlet box. Thread the lead wires from the outlet box down... the service panel. 2-1. Do not over tighten. 2 • Installing the Hanger Bracket CAUTION: To avoid possible electrical shock, before installing your fan, disconnect the power by turning off position, securely fasten a prominent warning device, such as a tag, to the outlet box and associated wall switch ...

Owner's Manual
Page 7
...ungrounded wires on the other side of the outlet box. 7 42890-01 • 02/18/10 • Hunter Fan Company Dual Switch Wiring Single Switch Wiring 4 • Wiring the Fan All wiring must be in accordance with national and local electrical codes. 4-1. To connect the wires, hold the...Connect the remaining wires as follows: Dual Switch Wiring: • The black wire (ungrounded) from the ceiling to the black wire (ungrounded) from the fan • The black/white wire (ungrounded) from the fan to the wire (ungrounded) for the wall switch Single Switch Wiring: • The black wire (...
...ungrounded wires on the other side of the outlet box. 7 42890-01 • 02/18/10 • Hunter Fan Company Dual Switch Wiring Single Switch Wiring 4 • Wiring the Fan All wiring must be in accordance with national and local electrical codes. 4-1. To connect the wires, hold the...Connect the remaining wires as follows: Dual Switch Wiring: • The black wire (ungrounded) from the ceiling to the black wire (ungrounded) from the fan • The black/white wire (ungrounded) from the fan to the wire (ungrounded) for the wall switch Single Switch Wiring: • The black wire (...
Owner's Manual
Page 8
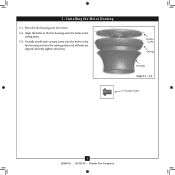
Securely tighten all holes are aligned. Partially install each canopy screw into the holes in the ceiling plate. 5-3. Align the holes in the fan housing with the holes in the fan housing and into the ceiling plate until all screws. Place the fan housing over the motor. 5-2. 5 • Installing the Motor Housing 5-1. Canopy Screw Canopy Housing Steps 5-1 - 5-3 Canopy Screw 8 42890-01 • 02/18/10 • Hunter Fan Company
Securely tighten all holes are aligned. Partially install each canopy screw into the holes in the ceiling plate. 5-3. Align the holes in the fan housing with the holes in the fan housing and into the ceiling plate until all screws. Place the fan housing over the motor. 5-2. 5 • Installing the Motor Housing 5-1. Canopy Screw Canopy Housing Steps 5-1 - 5-3 Canopy Screw 8 42890-01 • 02/18/10 • Hunter Fan Company
Owner's Manual
Page 14
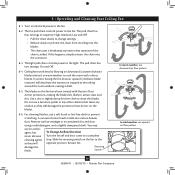
... room with Hunter's Dust Armor protection, making the blades less likely to the fan. 8-2. In winter, having the fan draw air upward (clockwise blade rotation) will To Change Airflow Direction Turn the fan off and let it come to prevent the chain from recoiling into the connector. 8-3. 8 • Operating and Cleaning Your Ceiling Fan 8-1. Use a dry...
... room with Hunter's Dust Armor protection, making the blades less likely to the fan. 8-2. In winter, having the fan draw air upward (clockwise blade rotation) will To Change Airflow Direction Turn the fan off and let it come to prevent the chain from recoiling into the connector. 8-3. 8 • Operating and Cleaning Your Ceiling Fan 8-1. Use a dry...


