
Installation Guide
Page 1
... a prominent warning device, such as walls or posts, within 30 inches of the fan blade tips. • e fan is secured to building structure. Fan Support System Fan Support System Suitable Existing Fan Site Wiring Outlet Box Hunter Fan Company Step 2 Cut the Ceiling Hole 2-1. If the joist is there, determine if it is secured to install the...
... a prominent warning device, such as walls or posts, within 30 inches of the fan blade tips. • e fan is secured to building structure. Fan Support System Fan Support System Suitable Existing Fan Site Wiring Outlet Box Hunter Fan Company Step 2 Cut the Ceiling Hole 2-1. If the joist is there, determine if it is secured to install the...
Owner's Manual
Page 2
... 16 10 • Operating and Cleaning Your Ceiling Fan 17 11 • Troubleshooting 18 Welcome Your new Hunter® ceiling fan is an addition to your fan. Before installing your fan, for many years. Cautions and Warnings • Read this fan. © 2010 Hunter Fan Company 2 42616-01 • 02/02/10 • Hunter Fan Company Never insert foreign objects between rotating...
... 16 10 • Operating and Cleaning Your Ceiling Fan 17 11 • Troubleshooting 18 Welcome Your new Hunter® ceiling fan is an addition to your fan. Before installing your fan, for many years. Cautions and Warnings • Read this fan. © 2010 Hunter Fan Company 2 42616-01 • 02/02/10 • Hunter Fan Company Never insert foreign objects between rotating...
Owner's Manual
Page 3
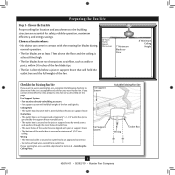
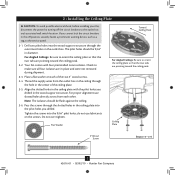
...into ceiling. Preparing the Fan Site Step 1 - Fan Support System • Fan attaches directly to building structure. • Fan support system will hold full weight of the fan and light kit. If your new Hunter fan. Choose a fan ...site where: • No object can come in contact with joist or support brace. • e bottom of the outlet box is secured to Section 2 • Installing the Ceiling Plate. Wiring • e electrical cable is recessed a minimum of lead wires extend from outlet box. Choose the Fan Site Proper ceiling fan...
...into ceiling. Preparing the Fan Site Step 1 - Fan Support System • Fan attaches directly to building structure. • Fan support system will hold full weight of the fan and light kit. If your new Hunter fan. Choose a fan ...site where: • No object can come in contact with joist or support brace. • e bottom of the outlet box is secured to Section 2 • Installing the Ceiling Plate. Wiring • e electrical cable is recessed a minimum of lead wires extend from outlet box. Choose the Fan Site Proper ceiling fan...
Owner's Manual
Page 4
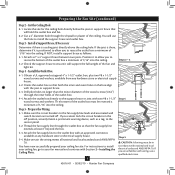
...-01 • 02/02/10 • Hunter Fan Company Orient the outlet box so that both the inner and outer holes in accordance with two #8 x 1-1/2" Step 4 wood screws and washers. e bottom of the outlet box must be recessed a minimum of 1/16" into the ceiling. Cut the Ceiling Hole 2-1. Step 3 - Steps 2 - 3 3-2. Make sure the...
...-01 • 02/02/10 • Hunter Fan Company Orient the outlet box so that both the inner and outer holes in accordance with two #8 x 1-1/2" Step 4 wood screws and washers. e bottom of the outlet box must be recessed a minimum of 1/16" into the ceiling. Cut the Ceiling Hole 2-1. Step 3 - Steps 2 - 3 3-2. Make sure the...
Owner's Manual
Page 5
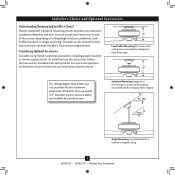
...Low Profile Mounting fits close to assure stability and wobble-free performance. All Hunter fans use only Hunter speed controls. For quiet and optimum performance of three ways, depending on ceiling height and your preference: Low Profile, Standard, or Angle mounting. Considering Optional... Understanding Mounting and Installer's Choice® Hunter's patented 3-position mounting system provides you can install your Hunter fan in this manual include instructions for a vaulted or angled ceiling 5 42616-01 • 02/02/10 • Hunter Fan Company To install and use the accessories,...
...Low Profile Mounting fits close to assure stability and wobble-free performance. All Hunter fans use only Hunter speed controls. For quiet and optimum performance of three ways, depending on ceiling height and your preference: Low Profile, Standard, or Angle mounting. Considering Optional... Understanding Mounting and Installer's Choice® Hunter's patented 3-position mounting system provides you can install your Hunter fan in this manual include instructions for a vaulted or angled ceiling 5 42616-01 • 02/02/10 • Hunter Fan Company To install and use the accessories,...
Owner's Manual
Page 6
... safety, reliable operation, maximum efficiency, and energy savings. 6 42616-01 • 02/02/10 • Hunter Fan Company Proper ceiling fan location and attachment to a licensed installer or electrician. If you are installing more than one fan, keep the fan blades and blade irons (if applicable) in sets, as they were shipped. 1 • Getting Ready To...
... safety, reliable operation, maximum efficiency, and energy savings. 6 42616-01 • 02/02/10 • Hunter Fan Company Proper ceiling fan location and attachment to a licensed installer or electrician. If you are installing more than one fan, keep the fan blades and blade irons (if applicable) in sets, as they were shipped. 1 • Getting Ready To...
Owner's Manual
Page 7
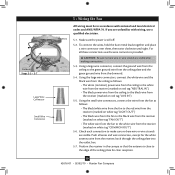
... over tighten. For Angled Ceilings: Be sure to orient the ceiling plate so that the two tabs are pointing toward the ceiling peak. Place a flat washer on the screws. Ceiling Plate 3" Wood Screw Steps 2-3 - 2-6 7 42616-01 • 02/02/10 • Hunter Fan Company Pass the screws through... the slotted holes in the ceiling plate into the wood support structure ...
... over tighten. For Angled Ceilings: Be sure to orient the ceiling plate so that the two tabs are pointing toward the ceiling peak. Place a flat washer on the screws. Ceiling Plate 3" Wood Screw Steps 2-3 - 2-6 7 42616-01 • 02/02/10 • Hunter Fan Company Pass the screws through... the slotted holes in the ceiling plate into the wood support structure ...

Owner's Manual
Page 9
... 1 DDIPip Swwititcchheses SSeett ttoo010010010 Transmitter 2 DDIPipSSwiittcchheses SSeett ttoo001111101 DDIPip Swwititcchheses SSeett ttoo010010010 9 42616-01 • 02/02/10 • Hunter Fan Company Move the toggle switch toward the side that the canopy slots sit on the flat surface of the other , you are in.... The dipswitches for the receiver are going to operate this fan. 4-4. Note: To hang the fan, you are located on the ceiling plate hooks. This device must tilt the canopy to operate the fan with the hooks on the transmitter. Change the position of ...
... 1 DDIPip Swwititcchheses SSeett ttoo010010010 Transmitter 2 DDIPipSSwiittcchheses SSeett ttoo001111101 DDIPip Swwititcchheses SSeett ttoo010010010 9 42616-01 • 02/02/10 • Hunter Fan Company Move the toggle switch toward the side that the canopy slots sit on the flat surface of the other , you are in.... The dipswitches for the receiver are going to operate this fan. 4-4. Note: To hang the fan, you are located on the ceiling plate hooks. This device must tilt the canopy to operate the fan with the hooks on the transmitter. Change the position of ...
Owner's Manual
Page 10
... codes and ANSI/NFPA 70. For all wires and wire connectors, except for clear reception. 10 42616-01 • 02/02/10 • Hunter Fan Company CAUTION: Be sure no bare wire or wire strands are visible after making connections. 5-3. Using the small wire connectors, connect the wires from ...the white wire from the receiver (marked on white tag "COMMON OUT") 5-6. Using a large wire connector, connect the ground wire from the ceiling to make sure no bare wire or wire strands are visible. Push all these connections use a qualified electrician. 5-1. Check each connection to the...
... codes and ANSI/NFPA 70. For all wires and wire connectors, except for clear reception. 10 42616-01 • 02/02/10 • Hunter Fan Company CAUTION: Be sure no bare wire or wire strands are visible after making connections. 5-3. Using the small wire connectors, connect the wires from ...the white wire from the receiver (marked on white tag "COMMON OUT") 5-6. Using a large wire connector, connect the ground wire from the ceiling to make sure no bare wire or wire strands are visible. Push all these connections use a qualified electrician. 5-1. Check each connection to the...

Owner's Manual
Page 11
...two canopy screws into place. Step 6-1 Tab Groove Step 6-2 Step 6-3 Canopy Canopy Trim Ring 11 42616-01 • 02/02/10 • Hunter Fan Company Canopy Screw Partially install a canopy screw between the slots in the canopy must be aligned. 6-2. WARNING: The slots in the canopy. Verify that ...the Canopy and Canopy Trim Ring WARNING: Failure to complete the following steps. 6-1. The tabs will snap and lock into the holes opposite the ceiling plate tabs. 6-4. Note: It is secure in the grooves of the canopy. When all the holes are still in the hanger ball groove...
...two canopy screws into place. Step 6-1 Tab Groove Step 6-2 Step 6-3 Canopy Canopy Trim Ring 11 42616-01 • 02/02/10 • Hunter Fan Company Canopy Screw Partially install a canopy screw between the slots in the canopy must be aligned. 6-2. WARNING: The slots in the canopy. Verify that ...the Canopy and Canopy Trim Ring WARNING: Failure to complete the following steps. 6-1. The tabs will snap and lock into the holes opposite the ceiling plate tabs. 6-4. Note: It is secure in the grooves of the canopy. When all the holes are still in the hanger ball groove...

Owner's Manual
Page 14
Raise the shade to a maximum of lights may result in the upper and lower switch housings. Federal energy regulations, this ceiling fan contains a wattage saver that limit or the specifications on the light socket may vary. 8 • Completing Your Installation With or Without a Light ... over the upper switch housing. To install each ). Shade Bulb Steps 8-8 - 8-10 14 42616-01 • 02/02/10 • Hunter Fan Company Exceeding that restricts the light kit to the light fixture. Align the side screw holes in fire hazard or improper operation. Plug Connector Detail...
Raise the shade to a maximum of lights may result in the upper and lower switch housings. Federal energy regulations, this ceiling fan contains a wattage saver that limit or the specifications on the light socket may vary. 8 • Completing Your Installation With or Without a Light ... over the upper switch housing. To install each ). Shade Bulb Steps 8-8 - 8-10 14 42616-01 • 02/02/10 • Hunter Fan Company Exceeding that restricts the light kit to the light fixture. Align the side screw holes in fire hazard or improper operation. Plug Connector Detail...
Owner's Manual
Page 17
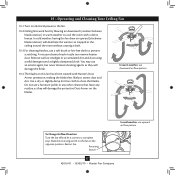
10 • Operating and Cleaning Your Ceiling Fan 10-1.Turn on electrical power to the fan. 10-2.Ceiling fans work best by blowing air downward (counterclockwise blade rotation) in warm weather to clean the blades. Use a dry or slightly damp lint free cloth to cool the room with Hunter's Dust Armor protection, making the blades less likely...
10 • Operating and Cleaning Your Ceiling Fan 10-1.Turn on electrical power to the fan. 10-2.Ceiling fans work best by blowing air downward (counterclockwise blade rotation) in warm weather to clean the blades. Use a dry or slightly damp lint free cloth to cool the room with Hunter's Dust Armor protection, making the blades less likely...
Owner's Manual
Page 18
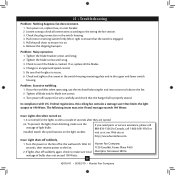
...888‑830‑1326 (In Canada, call 1-866-268-1936) or visit us at our Web site at the wall switch. Wait 30 Hunter Fan Company seconds, then resume power to an approved speed control. 5. Pull the pull chain to ensure it is on . 1. Tighten all the blades.... 2. Be sure that limits the light output to ensure that the hanger ball is engaged. 5. Problem: Excessive wobbling. 1. Federal regulations, this ceiling fan contains a wattage saver that the glass is cracked. To prevent the lights from dimming, make sure total Memphis, Tennessee 38016 wattage of bulbs does not...
...888‑830‑1326 (In Canada, call 1-866-268-1936) or visit us at our Web site at the wall switch. Wait 30 Hunter Fan Company seconds, then resume power to an approved speed control. 5. Pull the pull chain to ensure it is on . 1. Tighten all the blades.... 2. Be sure that limits the light output to ensure that the hanger ball is engaged. 5. Problem: Excessive wobbling. 1. Federal regulations, this ceiling fan contains a wattage saver that the glass is cracked. To prevent the lights from dimming, make sure total Memphis, Tennessee 38016 wattage of bulbs does not...
Parts Guide
Page 1
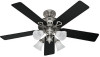
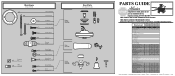
...THIS PARTS GUIDE IS FOR REFERENCE ONLY. Parts List Item Name Hanging System Kit Ceiling Plate Canopy Canopy Trim Ring Hanger Ball / Downrod Assembly Setscrew Low Profile Washer Canopy...Globe/Shade Thumb Screw Dummy Terminal, Male Dummy Terminal, Female Model # Asm. Dwg. # Finish Qnty 1 20345 96728-01 Antique Pewter Part # 96759-14 20347 96728-02 New Bronze Part # 96759-30 1 98962-...01 4 84884-09 84884-09 13 03007-07 03007-07 1 08198-00 08198-00 1 08200-00 08200-00 Hunter Fan Company • 7130 Goodlett Farms Pkwy. #400 • Memphis, TN 38016 • www.hunterfan.com &#...
...THIS PARTS GUIDE IS FOR REFERENCE ONLY. Parts List Item Name Hanging System Kit Ceiling Plate Canopy Canopy Trim Ring Hanger Ball / Downrod Assembly Setscrew Low Profile Washer Canopy...Globe/Shade Thumb Screw Dummy Terminal, Male Dummy Terminal, Female Model # Asm. Dwg. # Finish Qnty 1 20345 96728-01 Antique Pewter Part # 96759-14 20347 96728-02 New Bronze Part # 96759-30 1 98962-...01 4 84884-09 84884-09 13 03007-07 03007-07 1 08198-00 08198-00 1 08200-00 08200-00 Hunter Fan Company • 7130 Goodlett Farms Pkwy. #400 • Memphis, TN 38016 • www.hunterfan.com &#...


