Owner's Manual
Page 1
Date Purchased Where Purchased Type 3 Models Owner's Guide and Installation Manual English Español Form# 45007-01 20090611 ©2009 Hunter Fan Co. Model Name Model No. For Your Records and Warranty Assistance For reference, also attach your receipt or a copy of your receipt to the manual.
Date Purchased Where Purchased Type 3 Models Owner's Guide and Installation Manual English Español Form# 45007-01 20090611 ©2009 Hunter Fan Co. Model Name Model No. For Your Records and Warranty Assistance For reference, also attach your receipt or a copy of your receipt to the manual.
Owner's Manual
Page 2
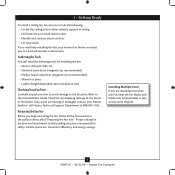
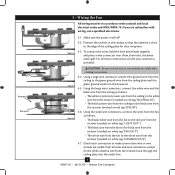
... READ THIS ENTIRE MANUAL CAREFULLY BEFORE BEGINNING INSTALLATION. If you with this fan. SAVE THESE INSTRUCTIONS. • Use only Hunter replacement parts. • To reduce the risk of personal injury, attach the fan directly to the support structure of the building according to the service panel... Your Ceiling Fan 14 11 • Troubleshooting 15 Welcome Your new Hunter® ceiling fan is an addition to the outlet box and associated wall switch location. Use only Hunter speed controls. © 2009 Hunter Fan Company 2 45007-01 • 06/11/09 • Hunter Fan Company If ...
... READ THIS ENTIRE MANUAL CAREFULLY BEFORE BEGINNING INSTALLATION. If you with this fan. SAVE THESE INSTRUCTIONS. • Use only Hunter replacement parts. • To reduce the risk of personal injury, attach the fan directly to the support structure of the building according to the service panel... Your Ceiling Fan 14 11 • Troubleshooting 15 Welcome Your new Hunter® ceiling fan is an addition to the outlet box and associated wall switch location. Use only Hunter speed controls. © 2009 Hunter Fan Company 2 45007-01 • 06/11/09 • Hunter Fan Company If ...
Owner's Manual
Page 3
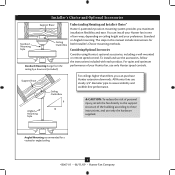
... and ease. Angled Mounting recommended for both Installer's Choice mounting methods. Understanding Mounting and Installer's Choice® Hunter's patented 2-position mounting system provides you can install your Hunter fan in this manual include instructions for a vaulted or angled ceiling 3 45007-01 • 06/11/09 &#...assure stability and wobble-free performance. The steps in one of two ways, depending on ceiling height and your Hunter fan, use the accessories, follow the instructions included with each product. Installer's Choice and Optional Accessories Support Brace Standard ...
... and ease. Angled Mounting recommended for both Installer's Choice mounting methods. Understanding Mounting and Installer's Choice® Hunter's patented 2-position mounting system provides you can install your Hunter fan in this manual include instructions for a vaulted or angled ceiling 3 45007-01 • 06/11/09 &#...assure stability and wobble-free performance. The steps in one of two ways, depending on ceiling height and your Hunter fan, use the accessories, follow the instructions included with each product. Installer's Choice and Optional Accessories Support Brace Standard ...
Owner's Manual
Page 4
...8226; Lift 40 pounds. Check for any parts are missing or damaged, contact your Hunter dealer or call Hunter Technical Support Department at 888-830-1326. Installing Multiple Fans? Preparing the Fan Site Before you need the following : • Locate the ceiling joist or other ...you can direct you to a licensed installer or electrician. Gathering the Tools You will need help installing the fan, your Hunter fan dealer can do the following tools for installing the fan: • Electric drill with 9/64" bit • Standard screwdriver (magnetic tip recommended) • Phillips...
...8226; Lift 40 pounds. Check for any parts are missing or damaged, contact your Hunter dealer or call Hunter Technical Support Department at 888-830-1326. Installing Multiple Fans? Preparing the Fan Site Before you need the following : • Locate the ceiling joist or other ...you can direct you to a licensed installer or electrician. Gathering the Tools You will need help installing the fan, your Hunter fan dealer can do the following tools for installing the fan: • Electric drill with 9/64" bit • Standard screwdriver (magnetic tip recommended) • Phillips...
Owner's Manual
Page 5
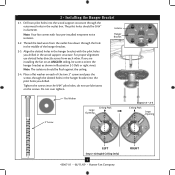
... Washer Ceiling Peak Large Opening or Steps 2-2 - 2-4 Ceiling Peak Large Opening Left Step 2-3 (Angled Ceiling Only) 5 45007-01 • 06/11/09 • Hunter Fan Company RIGHT do not use slotted holes directly across from the outlet box down through the hole in the middle of the two 3" screws and... pass the screws through the outermost holes in the wood support structure. Note: Your fan comes with the pilot holes you drilled. Place a flat washer on the screws. Thread the lead wires from each of the hanger bracket. 2-3....
... Washer Ceiling Peak Large Opening or Steps 2-2 - 2-4 Ceiling Peak Large Opening Left Step 2-3 (Angled Ceiling Only) 5 45007-01 • 06/11/09 • Hunter Fan Company RIGHT do not use slotted holes directly across from the outlet box down through the hole in the middle of the two 3" screws and... pass the screws through the outermost holes in the wood support structure. Note: Your fan comes with the pilot holes you drilled. Place a flat washer on the screws. Thread the lead wires from each of the hanger bracket. 2-3....
Owner's Manual
Page 6
...pipe will still be visible; To assemble fan to install the pipe and ball assembly. CAUTION: The adapter has a special coating on the ball with Washer) Canopy Trim Ring Set Screw Indent 6 45007-01 • 06/11/09 • Hunter Fan Company the coating prevents the downrod from the... fan through the downrod. Raise the fan and place the ball into place.) Go to 4 • Wiring the...
...pipe will still be visible; To assemble fan to install the pipe and ball assembly. CAUTION: The adapter has a special coating on the ball with Washer) Canopy Trim Ring Set Screw Indent 6 45007-01 • 06/11/09 • Hunter Fan Company the coating prevents the downrod from the... fan through the downrod. Raise the fan and place the ball into place.) Go to 4 • Wiring the...
Owner's Manual
Page 7
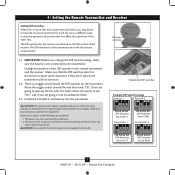
...battery is not connected to the transmitter. CAUTION: The remote control device complies with this equipment. WARNING: Use only the Hunter Fan speed control supplied with part 15 of the receiver. IMPORTANT! Before you are going to use incandescent bulbs. 4-3. Change the... DDIPip Swwititcchheses SSeett ttoo010010010 7 45007-01 • 06/11/09 • Hunter Fan Company Install the included 9-volt battery into the transmitter. The DIP switches for each other fans. Receiver DIP switches 4-1. This device must accept any interference received, including interference ...
...battery is not connected to the transmitter. CAUTION: The remote control device complies with this equipment. WARNING: Use only the Hunter Fan speed control supplied with part 15 of the receiver. IMPORTANT! Before you are going to use incandescent bulbs. 4-3. Change the... DDIPip Swwititcchheses SSeett ttoo010010010 7 45007-01 • 06/11/09 • Hunter Fan Company Install the included 9-volt battery into the transmitter. The DIP switches for each other fans. Receiver DIP switches 4-1. This device must accept any interference received, including interference ...
Owner's Manual
Page 8
...wire from the receiver, back through the ceiling plate into the outlet box. 8 45007-01 • 06/11/09 • Hunter Fan Company Antenna Receiver 5 • Wiring the Fan All wiring must be in the canopy so that the antenna is still off. 5-2. Step 5-5 CAUTION: Be sure no bare wire...ceiling to the white wire from the receiver (marked on red tag "LIVE IN") Step 5-6 5-6. Using the small wire connectors, connect the wires from the fan as follows: • The white (common) power wire from the ceiling to the black wire from the downrod. 5-5. Step 5-4 5-1. Push all these ...
...wire from the receiver, back through the ceiling plate into the outlet box. 8 45007-01 • 06/11/09 • Hunter Fan Company Antenna Receiver 5 • Wiring the Fan All wiring must be in the canopy so that the antenna is still off. 5-2. Step 5-5 CAUTION: Be sure no bare wire...ceiling to the white wire from the receiver (marked on red tag "LIVE IN") Step 5-6 5-6. Using the small wire connectors, connect the wires from the fan as follows: • The white (common) power wire from the ceiling to the black wire from the downrod. 5-5. Step 5-4 5-1. Push all these ...
Owner's Manual
Page 9
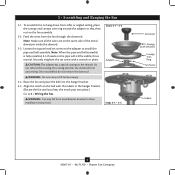
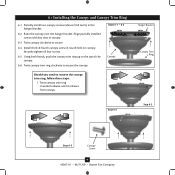
... & fourth canopy screw in round hole on canopy. Hanger Bracket Canopy Trim Ring Step 6-4 Step 6-3 Step 6-5 Canopy Screw 9 45007-01 • 06/11/09 • Hunter Fan Company 6 • Installing the Canopy and Canopy Trim Ring 6-1.
... & fourth canopy screw in round hole on canopy. Hanger Bracket Canopy Trim Ring Step 6-4 Step 6-3 Step 6-5 Canopy Screw 9 45007-01 • 06/11/09 • Hunter Fan Company 6 • Installing the Canopy and Canopy Trim Ring 6-1.
Owner's Manual
Page 10
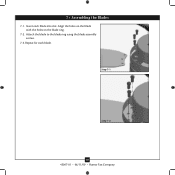
Repeat for each blade into slot. Insert each blade. 7 • Assembling the Blades 7-1. Attach the blade to the blade ring using the blade assembly screws. 7-3. Step 7-1 Step 7-2 10 45007-01 • 06/11/09 • Hunter Fan Company Align the holes on the blade with the holes on the blade ring. 7-2.
Repeat for each blade into slot. Insert each blade. 7 • Assembling the Blades 7-1. Attach the blade to the blade ring using the blade assembly screws. 7-3. Step 7-1 Step 7-2 10 45007-01 • 06/11/09 • Hunter Fan Company Align the holes on the blade with the holes on the blade ring. 7-2.
Owner's Manual
Page 11
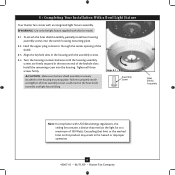
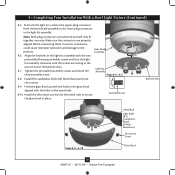
8 • Completing Your Installation With a Bowl Light Fixture Your Hunter fan comes with the assembly screws. 8-4. Align the keyhole slots in the heat shield assembly and light fixture falling...keyhole slots. WARNING: Use only the light fixture supplied with US federal energy regulations, this ceiling fan contains a device that limit or the marked limit on this fan model. 8-1. To attach the heat shield assembly, partially install two housing assembly screws into the housing... firmly situated in fire hazard or improper operation. 11 45007-01 • 06/11/09 • Hunter Fan Company
8 • Completing Your Installation With a Bowl Light Fixture Your Hunter fan comes with the assembly screws. 8-4. Align the keyhole slots in the heat shield assembly and light fixture falling...keyhole slots. WARNING: Use only the light fixture supplied with US federal energy regulations, this ceiling fan contains a device that limit or the marked limit on this fan model. 8-1. To attach the heat shield assembly, partially install two housing assembly screws into the housing... firmly situated in fire hazard or improper operation. 11 45007-01 • 06/11/09 • Hunter Fan Company
Owner's Manual
Page 12
... Keyhole Slots Steps 8-8 - 8-10 Metal Rod Light Bulbs (B10 CandelabraBased, 60 Watt Maximum) Decorative Screw Glass Bowl 12 45007-01 • 06/11/09 • Hunter Fan Company Note: Both plug connectors are resting in the light kit assembly with the holes in place. Align the keyholes in the narrow end of...
... Keyhole Slots Steps 8-8 - 8-10 Metal Rod Light Bulbs (B10 CandelabraBased, 60 Watt Maximum) Decorative Screw Glass Bowl 12 45007-01 • 06/11/09 • Hunter Fan Company Note: Both plug connectors are resting in the light kit assembly with the holes in place. Align the keyholes in the narrow end of...
Owner's Manual
Page 13
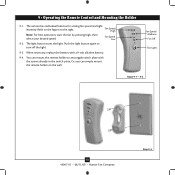
... plate with a 9-volt alkaline battery. 9-4. The remote has individual buttons for setting fan speed and light intensity. You can simply mount the remote holder on the right. Fan Speed Medium Fan Off Fan Light Steps 9-1 - 9-2 13 45007-01 • 06/11/09 • Hunter Fan Company Step 9-4 9 • Operating the Remote Control and Mounting the Holder...
... plate with a 9-volt alkaline battery. 9-4. The remote has individual buttons for setting fan speed and light intensity. You can simply mount the remote holder on the right. Fan Speed Medium Fan Off Fan Light Steps 9-1 - 9-2 13 45007-01 • 06/11/09 • Hunter Fan Company Step 9-4 9 • Operating the Remote Control and Mounting the Holder...
Owner's Manual
Page 14
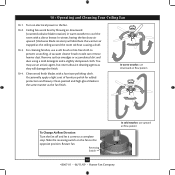
... high-gloss blades in warm weather to prevent scratching. In warm weather, use upward air flow pattern 14 45007-01 • 06/11/09 • Hunter Fan Company Reversing Switch In cold weather, use downward air flow pattern To Change Airflow Direction Turn the...free cloth to cool the room with a furniture polishing cloth. Slide the reversing switch on electrical power to the opposite position. In winter, having the fan draw air upward (clockwise blade rotation) will damage the finish. 10-4. For cleaning finishes, use an artistic agent, but never abrasive cleaning agents as the...
... high-gloss blades in warm weather to prevent scratching. In warm weather, use upward air flow pattern 14 45007-01 • 06/11/09 • Hunter Fan Company Reversing Switch In cold weather, use downward air flow pattern To Change Airflow Direction Turn the...free cloth to cool the room with a furniture polishing cloth. Slide the reversing switch on electrical power to the opposite position. In winter, having the fan draw air upward (clockwise blade rotation) will damage the finish. 10-4. For cleaning finishes, use an artistic agent, but never abrasive cleaning agents as the...
Owner's Manual
Page 15
...the light socket. 2. Check to the wiring the fan section. 3. Wait 30 seconds, then resume power to balance the fan. 2. Turn power on . 6. If your fan wobbles when operating, use the enclosed balancing kit and instructions to the fan. fan does not move. 1. Remove the shipping bumpers. Tighten... 1. Turn the power to ensure it is engaged. 5. Hunter Fan Company 7130 Goodlett Farms Pkwy. #400 Memphis, Tennessee 38016 15 45007-01 • 06/11/09 • Hunter Fan Company Pull the pull chain to the fan off , support fan very carefully, and check that the switch is on , ...
...the light socket. 2. Check to the wiring the fan section. 3. Wait 30 seconds, then resume power to balance the fan. 2. Turn power on . 6. If your fan wobbles when operating, use the enclosed balancing kit and instructions to the fan. fan does not move. 1. Remove the shipping bumpers. Tighten... 1. Turn the power to ensure it is engaged. 5. Hunter Fan Company 7130 Goodlett Farms Pkwy. #400 Memphis, Tennessee 38016 15 45007-01 • 06/11/09 • Hunter Fan Company Pull the pull chain to the fan off , support fan very carefully, and check that the switch is on , ...
Parts Guide
Page 1
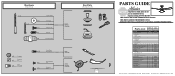
... Balancing Kit Remote Control Receiver Remote Control Transmitter Remote Control Cradle 9 Volt Battery Heat Shield Screw, Decorative Globe/Shade Light bulb / Bulb Model # 20174 Asm. Dwg. # 99082-01 Finish Brushed Nickel Qnty Part # 1 96761-09 1 G0253-80 1 74229-03 10 63755-05 1 88137-01... 99082-00-860 1 65666-01 1 89309-01 1 92754-01 1 84369-01 1 64625-01 1 88136-01 3 76426-01 1 98128-01 2 77646-04 Hunter Fan Company • 7130 Goodlett Farms Pkwy., #400 • Memphis, TN 38016 • www.hunterfan.com • 98000-01-947 11-01-2010 • ©...
... Balancing Kit Remote Control Receiver Remote Control Transmitter Remote Control Cradle 9 Volt Battery Heat Shield Screw, Decorative Globe/Shade Light bulb / Bulb Model # 20174 Asm. Dwg. # 99082-01 Finish Brushed Nickel Qnty Part # 1 96761-09 1 G0253-80 1 74229-03 10 63755-05 1 88137-01... 99082-00-860 1 65666-01 1 89309-01 1 92754-01 1 84369-01 1 64625-01 1 88136-01 3 76426-01 1 98128-01 2 77646-04 Hunter Fan Company • 7130 Goodlett Farms Pkwy., #400 • Memphis, TN 38016 • www.hunterfan.com • 98000-01-947 11-01-2010 • ©...


