
Quick Start Guide
Page 2
... 1. Step 3 Enable the embedded dial-up function is enabled but the HG532c is not used for network access. Enter the VPI and VCI parameters that the HG532c is passed, you can access the Web-based configuration utility. After the password authentication is working properly. 3 Setting the Internet ...Access Parameters To configure the HG532c, do as follows: Step 1 Verify the HG532c and the PC have shut down the ON/OFF button on the side of the HG532c to power on and the ADSL indicator blinks (for less than three...
... 1. Step 3 Enable the embedded dial-up function is enabled but the HG532c is not used for network access. Enter the VPI and VCI parameters that the HG532c is passed, you can access the Web-based configuration utility. After the password authentication is working properly. 3 Setting the Internet ...Access Parameters To configure the HG532c, do as follows: Step 1 Verify the HG532c and the PC have shut down the ON/OFF button on the side of the HG532c to power on and the ADSL indicator blinks (for less than three...

Quick Start Guide
Page 3
You need to the HG532c through a wireless connection. Step 2 Enable the wireless configuration service on your computer, do as follows (taking the authentication type WPA-PSK as an example): 1. Select PPP(oE) from the WPA ... Internet. Select the Enable WLAN option. 5. In the Computer Management window, choose Computer Management (Local) > Services and Applications >Services. 3 Click Submit. To configure the wireless network connection, do as follows (taking the Windows XP operating system as follows: Step 1 Enable the wireless network function, and set the wireless...
You need to the HG532c through a wireless connection. Step 2 Enable the wireless configuration service on your computer, do as follows (taking the authentication type WPA-PSK as an example): 1. Select PPP(oE) from the WPA ... Internet. Select the Enable WLAN option. 5. In the Computer Management window, choose Computer Management (Local) > Services and Applications >Services. 3 Click Submit. To configure the wireless network connection, do as follows (taking the Windows XP operating system as follows: Step 1 Enable the wireless network function, and set the wireless...

Quick Start Guide
Page 4
...computer is Started. Step 3 Configure the wireless network connection on the icon of the Computer Management window, right-click Wireless Zero Configuration, and then choose Properties ...from the shortcut menu. 3. Select the wireless network that is configured in Step 1, and then click...Networks from the shortcut menu. 4. In the Wireless Zero Configuration Properties (Local Computer) dialog box, check whether Service status is connected to the HG532c through a wireless connection. Choose Start > All Programs > ...
...computer is Started. Step 3 Configure the wireless network connection on the icon of the Computer Management window, right-click Wireless Zero Configuration, and then choose Properties ...from the shortcut menu. 3. Select the wireless network that is configured in Step 1, and then click...Networks from the shortcut menu. 4. In the Wireless Zero Configuration Properties (Local Computer) dialog box, check whether Service status is connected to the HG532c through a wireless connection. Choose Start > All Programs > ...

User Manual
Page 4
... Wireless Network Connection 9 Setting Up a Wireless Connection Through the WPS Button 9 Setting Up a Wireless Connection Manually 10 4 Configuring the HG532c 12 4.1 Changing the Administrator Password Used for Logging In to the Web-Based Configuration Utility 12 4.2 Enabling or Disabling the Wireless Network Function 12 4.3 Changing the Wireless Network Name and the Access Password...
... Wireless Network Connection 9 Setting Up a Wireless Connection Through the WPS Button 9 Setting Up a Wireless Connection Manually 10 4 Configuring the HG532c 12 4.1 Changing the Administrator Password Used for Logging In to the Web-Based Configuration Utility 12 4.2 Enabling or Disabling the Wireless Network Function 12 4.3 Changing the Wireless Network Name and the Access Password...

User Manual
Page 11
... the PC have connected properly, and the PC has obtained the IP address. By default, the DHCP function of voice and data services through Huawei USB HSPA modem. Enter http://192.168.1.1 in to install any special dial-up software on your computer or perform dial-up function. 1. In..., enter the user name (admin by default) and the password (admin by default), and then click Login. To configure the HG532c and your computer for the network access, do not need to configure the IP address of the following methods to surf the Internet: z Accessing the Network Through the Embedded PPP Dial...
... the PC have connected properly, and the PC has obtained the IP address. By default, the DHCP function of voice and data services through Huawei USB HSPA modem. Enter http://192.168.1.1 in to install any special dial-up software on your computer or perform dial-up function. 1. In..., enter the user name (admin by default) and the password (admin by default), and then click Login. To configure the HG532c and your computer for the network access, do not need to configure the IP address of the following methods to surf the Internet: z Accessing the Network Through the Embedded PPP Dial...

User Manual
Page 12
... Network Through the PPP Dial-Up Software on the left, choose Basic > WAN. 2. To configure the HG532c and your computer. Click New to the Internet, and then click Next. 4. Step 2 Install and configure the PPP dial-up my connection manually, and then click Next. 5. Click Create a new ...connection in the User name and Password text boxes, keep the default settings of the HG532c to display the New Connection Wizard window, and then ...
... Network Through the PPP Dial-Up Software on the left, choose Basic > WAN. 2. To configure the HG532c and your computer. Click New to the Internet, and then click Next. 4. Step 2 Install and configure the PPP dial-up my connection manually, and then click Next. 5. Click Create a new ...connection in the User name and Password text boxes, keep the default settings of the HG532c to display the New Connection Wizard window, and then ...

User Manual
Page 13
...Enter the user name and password in the displayed dialog box. 3.2 Configuring the HSPA uplink When the HG532c is ttyUSB0. Select Verify from the PIN operation drop-down combo box. 3. Click Submit. If you need to install the Huawei USB HSPA modem on the left, choose Basic > WAN. In ...the navigation tree on the HG532c so that are provided by the network operator and used for creating a network connection. Step 8 Configure the PIN code. 1. Select Anyone's use or...
...Enter the user name and password in the displayed dialog box. 3.2 Configuring the HSPA uplink When the HG532c is ttyUSB0. Select Verify from the PIN operation drop-down combo box. 3. Click Submit. If you need to install the Huawei USB HSPA modem on the left, choose Basic > WAN. In ...the navigation tree on the HG532c so that are provided by the network operator and used for creating a network connection. Step 8 Configure the PIN code. 1. Select Anyone's use or...

User Manual
Page 14
... the wireless network name and access password of the computer. Choose the WLAN page. 4. Select WPA-PSK from each other. 3.3 Configuring the Wireless Network Connection The HG532c provides the WLAN function on the left, choose Basic > WLAN. 3. In the navigation tree on a Local Area Network (LAN).... network adapter is installed on the side panel of searching for the wireless network. Log in to the Web-based configuration utility of the HG532c to enable the HG532c to save the settings. Enter an access password in the SSID text box. 6. Select AES from the WPA encryption...
... the wireless network name and access password of the computer. Choose the WLAN page. 4. Select WPA-PSK from each other. 3.3 Configuring the Wireless Network Connection The HG532c provides the WLAN function on the left, choose Basic > WLAN. 3. In the navigation tree on a Local Area Network (LAN).... network adapter is installed on the side panel of searching for the wireless network. Log in to the Web-based configuration utility of the HG532c to enable the HG532c to save the settings. Enter an access password in the SSID text box. 6. Select AES from the WPA encryption...

User Manual
Page 15
...the wireless network name and access password of the HG532c, do as follows: 1. Step 2 Enable the wireless configuration service on your computer, do as follows: 1. To manually set up a wireless connection, use the wireless configuration software that the HG532c is provided by Windows XP to set up a ... use two of the Computer Management window, right-click Wireless Zero Configuration, and then choose Properties from the shortcut menu. 10 Then the WPS indicator turns off. The WPS indicator of the HG532c becomes on from the blinking state, indicating that is connected to your...
...the wireless network name and access password of the HG532c, do as follows: 1. Step 2 Enable the wireless configuration service on your computer, do as follows: 1. To manually set up a wireless connection, use the wireless configuration software that the HG532c is provided by Windows XP to set up a ... use two of the Computer Management window, right-click Wireless Zero Configuration, and then choose Properties from the shortcut menu. 10 Then the WPS indicator turns off. The WPS indicator of the HG532c becomes on from the blinking state, indicating that is connected to your...

User Manual
Page 16
... Connections window, right-click Wireless Network Connection to configure my wireless network settings. 5. In the Wireless Network Connection dialog box, select the WLAN with the same name that a wireless connection is set up between you PC and the HG532c. 8. In the Wireless Network Connection Properties dialog ...box, click OK. 4. Step 3 Configure the wireless network connection on the icon of the wireless network in Step 1, and then click...
... Connections window, right-click Wireless Network Connection to configure my wireless network settings. 5. In the Wireless Network Connection dialog box, select the WLAN with the same name that a wireless connection is set up between you PC and the HG532c. 8. In the Wireless Network Connection Properties dialog ...box, click OK. 4. Step 3 Configure the wireless network connection on the icon of the wireless network in Step 1, and then click...

User Manual
Page 17
..., you change the password successfully, the current page jumps to the page for logging in to the Web-based configuration utility. After you can restore the default settings of the HG532c by pressing the WLAN button on the left, choose Maintenance > Account. To log in to the Web-based... configuration utility are restored to the Web-based configuration utility, enter the new password, and then click OK. Then enter the new...
..., you change the password successfully, the current page jumps to the page for logging in to the Web-based configuration utility. After you can restore the default settings of the HG532c by pressing the WLAN button on the left, choose Maintenance > Account. To log in to the Web-based... configuration utility are restored to the Web-based configuration utility, enter the new password, and then click OK. Then enter the new...
User Manual
Page 18
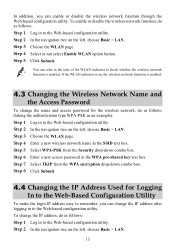
... or disable the wireless network function, do as follows (taking the authentication type WPA-PSK as an example): Step 1 Log in to the Web-based configuration utility. Step 2 In the navigation tree on the left, choose Basic > LAN. Step 8 Click Submit. 4.4 Changing the IP Address Used for the ...wireless network, do as follows: Step 1 Log in to the Web-based configuration utility. Step 3 Choose the WLAN page. Step 7 Select TKIP from the Security drop-down combo box. In addition, you can change the IP address after...
... or disable the wireless network function, do as follows (taking the authentication type WPA-PSK as an example): Step 1 Log in to the Web-based configuration utility. Step 2 In the navigation tree on the left, choose Basic > LAN. Step 8 Click Submit. 4.4 Changing the IP Address Used for the ...wireless network, do as follows: Step 1 Log in to the Web-based configuration utility. Step 3 Choose the WLAN page. Step 7 Select TKIP from the Security drop-down combo box. In addition, you can change the IP address after...
User Manual
Page 19
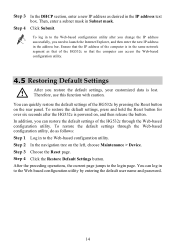
Then, enter a subnet mask in the same network segment as that of the HG532c so that the IP address of the HG532c through the Web-based configuration utility, do as follows: Step 1 Log in the IP address text box. Step 4 Click the Restore Default Settings button. Step 4 Click Submit. Therefore... default user name and password. 14 Step 2 In the navigation tree on the rear panel. To log in to the Web-based configuration utility after the HG532c is in Subnet mask. You can restore the default settings of the computer is powered on, and then release the button. In addition...
Then, enter a subnet mask in the same network segment as that of the HG532c so that the IP address of the HG532c through the Web-based configuration utility, do as follows: Step 1 Log in the IP address text box. Step 4 Click the Restore Default Settings button. Step 4 Click Submit. Therefore... default user name and password. 14 Step 2 In the navigation tree on the rear panel. To log in to the Web-based configuration utility after the HG532c is in Subnet mask. You can restore the default settings of the computer is powered on, and then release the button. In addition...

User Manual
Page 21
... you have entered the correct user name and user password that the network cable between the terminal and the computer is correctly configured. If the LAN indicator is correctly configured, do as follows: 1. On the desktop, right-click My Computer, and then choose Manage. 2. In the Internet Options dialog box, click the...
... you have entered the correct user name and user password that the network cable between the terminal and the computer is correctly configured. If the LAN indicator is correctly configured, do as follows: 1. On the desktop, right-click My Computer, and then choose Manage. 2. In the Internet Options dialog box, click the...

User Manual
Page 27
... splitter or to the telephone jack on or power off the HG532c. 4 Power connect the power adapter. 5 Reset restore the default settings of the LAN interface User name used for logging in to the Web-based configuration utility Password used for over six seconds to the Web-based... configuration utility DHCP server function Wireless network function Setting 192.168.1.1 255.255.255.0 admin admin Enable Enable 6.4 ...
... splitter or to the telephone jack on or power off the HG532c. 4 Power connect the power adapter. 5 Reset restore the default settings of the LAN interface User name used for logging in to the Web-based configuration utility Password used for over six seconds to the Web-based... configuration utility DHCP server function Wireless network function Setting 192.168.1.1 255.255.255.0 admin admin Enable Enable 6.4 ...


