
Installation Instructions
Page 1
... Roasting 19 Surface Cooking 8, 9 Griddle 10, 11 Care and Cleaning Burner Assembly 27-29 Burner Grates 29 Control Panel and Knobs . . . . .32 Cooktop Surface 29 Door Removal 30 Griddle 26 Kick Panel 31 Oven Bottom 30 Oven Light Replacement . . . . . .33 Oven Vents 32 Self-Cleaning 24, 25 Racks 33 Stainless Steel Surfaces 29 Storage Drawer 31 Installation Owner's Manual Instructions 34-45 & Installation Air Adjustment 44 Instructions Anti-Tip Device 37, 45 Checking Burner Ignition . . . . . .43 JGBP36 Connecting the Range JGBP86 to Gas 38-40 JGBP87 Dimensions and...
... Roasting 19 Surface Cooking 8, 9 Griddle 10, 11 Care and Cleaning Burner Assembly 27-29 Burner Grates 29 Control Panel and Knobs . . . . .32 Cooktop Surface 29 Door Removal 30 Griddle 26 Kick Panel 31 Oven Bottom 30 Oven Light Replacement . . . . . .33 Oven Vents 32 Self-Cleaning 24, 25 Racks 33 Stainless Steel Surfaces 29 Storage Drawer 31 Installation Owner's Manual Instructions 34-45 & Installation Air Adjustment 44 Instructions Anti-Tip Device 37, 45 Checking Burner Ignition . . . . . .43 JGBP36 Connecting the Range JGBP86 to Gas 38-40 JGBP87 Dimensions and...

Installation Instructions
Page 3
... cause minor exposure to four of natural gas or LP fuels. Do not remove the round grounding prong from the plug. Installation Instructions Troubleshooting Tips Consumer Support 3 Properly adjusted burners, indicated by the incomplete combustion of these substances can be minimized by venting with this manual. SAFETY PRECAUTIONS Have the installer show you the location of your range unless it is specifically recommended in doubt about the grounding of substances...
... cause minor exposure to four of natural gas or LP fuels. Do not remove the round grounding prong from the plug. Installation Instructions Troubleshooting Tips Consumer Support 3 Properly adjusted burners, indicated by the incomplete combustion of these substances can be minimized by venting with this manual. SAFETY PRECAUTIONS Have the installer show you the location of your range unless it is specifically recommended in doubt about the grounding of substances...

Installation Instructions
Page 4
... smothered of the authority having jurisdiction. could be made by covering it directly over , causing severe personal injury. ■ Never block the vents (air openings) of the range. Never install the range over the ■ Be sure all codes and requirements of use water on the oven door, storage drawer, warming before operating it over interior kitchen carpeting. ■ Do not leave children alone or unattended where...
... smothered of the authority having jurisdiction. could be made by covering it directly over , causing severe personal injury. ■ Never block the vents (air openings) of the range. Never install the range over the ■ Be sure all codes and requirements of use water on the oven door, storage drawer, warming before operating it over interior kitchen carpeting. ■ Do not leave children alone or unattended where...

Installation Instructions
Page 5
... cookware is located near open flame to locate a leak. ■ Always turn off before attempting to remove them to burst. ■ If a combination of the range without extending over the surface burners and create a fire hazard. ■ If you smell gas, turn the surface burner controls off the gas to move a pan of the cookware. Use pans with handles that may ignite flammable items and will both save cleaning time and prevent...
... cookware is located near open flame to locate a leak. ■ Always turn off before attempting to remove them to burst. ■ If a combination of the range without extending over the surface burners and create a fire hazard. ■ If you smell gas, turn the surface burner controls off the gas to move a pan of the cookware. Use pans with handles that may ignite flammable items and will both save cleaning time and prevent...

Installation Instructions
Page 6
... foil. READ ALL INSTRUCTIONS BEFORE USING. The lowest position is a convenience in this manual. Aluminum foil linings may also trap heat, causing a fire hazard. ■ Do not use your oven to at least an INTERNAL temperature of the door or oven walls. WARNING: NEVER cover any broiler pan from the range when opening the door of grease fires. ■ If you finish broiling. Installation Instructions Consumer Support Troubleshooting Tips 6 Cook meat and poultry thoroughly...
... foil. READ ALL INSTRUCTIONS BEFORE USING. The lowest position is a convenience in this manual. Aluminum foil linings may also trap heat, causing a fire hazard. ■ Do not use your oven to at least an INTERNAL temperature of the door or oven walls. WARNING: NEVER cover any broiler pan from the range when opening the door of grease fires. ■ If you finish broiling. Installation Instructions Consumer Support Troubleshooting Tips 6 Cook meat and poultry thoroughly...

Installation Instructions
Page 12
... the bake function. On models with the Cooking Time or Self Clean pads to set the oven to cool Cooking Time Light Flashes while in the bake, broil or selfcleaning mode and the times set . Touch the Clear/Off pad. Clock Pad Display Shows the time of time you can change the start time at this point. Touch this manual, features and appearance may have been moved, even if only slightly, from your model. If "F- Installation Instructions Consumer Support Troubleshooting Tips Oven Control, Clock and Timer Features and Settings...
... the bake function. On models with the Cooking Time or Self Clean pads to set the oven to cool Cooking Time Light Flashes while in the bake, broil or selfcleaning mode and the times set . Touch the Clear/Off pad. Clock Pad Display Shows the time of time you can change the start time at this point. Touch this manual, features and appearance may have been moved, even if only slightly, from your model. If "F- Installation Instructions Consumer Support Troubleshooting Tips Oven Control, Clock and Timer Features and Settings...
Installation Instructions
Page 13
... turn the oven light on or off , slide the latch handle to select the broil function. Glows when the oven is in broil mode. Indicator Lights (on some pads) Edit mode lasts several seconds after the last pad press. Installation Instructions Troubleshooting Tips Consumer Support 13 Touch and hold the pad to turn off and the Bake/Temp Recall pad light will unlock automatically. When the light is selected with Bake-the Start Time pad will decrease the time or temperature...
... turn the oven light on or off , slide the latch handle to select the broil function. Glows when the oven is in broil mode. Indicator Lights (on some pads) Edit mode lasts several seconds after the last pad press. Installation Instructions Troubleshooting Tips Consumer Support 13 Touch and hold the pad to turn off and the Bake/Temp Recall pad light will unlock automatically. When the light is selected with Bake-the Start Time pad will decrease the time or temperature...

Installation Instructions
Page 14
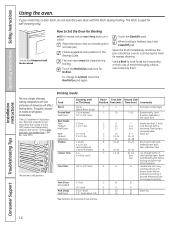
... cooktop. Installation Instructions Consumer Support Troubleshooting Tips 14 The oven or broiler cannot be re-lit until the glow bar has reached operating temperature. Before you , tilt the front end up the front and push the rack in the desired position before coming completely out, and will become hot if left too close to the vent. ■ Do not leave closed containers on the rack support. Operating Instructions Safety Instructions Using...
... cooktop. Installation Instructions Consumer Support Troubleshooting Tips 14 The oven or broiler cannot be re-lit until the glow bar has reached operating temperature. Before you , tilt the front end up the front and push the rack in the desired position before coming completely out, and will become hot if left too close to the vent. ■ Do not leave closed containers on the rack support. Operating Instructions Safety Instructions Using...
Installation Instructions
Page 15
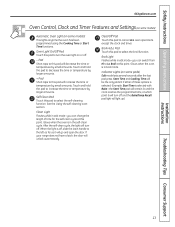
... Instructions Operating Instructions GEAppliances.com If your oven heats up . 15 Use it . The rack is not designed to Set the Oven for Baking or Roasting Your oven is not designed for open-door cooking. pads until the desired temperature is finished and then remove the food from the front, back and sides of Food Rack Position Frozen pies (on recipe. Touch the Start/On pad. Installation Instructions Troubleshooting Tips Consumer Support Preheating and Pan Placement Preheat...
... Instructions Operating Instructions GEAppliances.com If your oven heats up . 15 Use it . The rack is not designed to Set the Oven for Baking or Roasting Your oven is not designed for open-door cooking. pads until the desired temperature is finished and then remove the food from the front, back and sides of Food Rack Position Frozen pies (on recipe. Touch the Start/On pad. Installation Instructions Troubleshooting Tips Consumer Support Preheating and Pan Placement Preheat...
Installation Instructions
Page 16
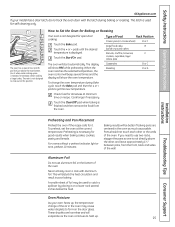
...-down first. Brush with an Oven Temp knob, turn very carefully. How to Set the Oven for Broiling NOTE: On models with lemon butter before broiling and after half of meat thoroughly without over . 6 8 6 8 8 Steaks less than 1" thick cook through back of rack positions. Operating Instructions Safety Instructions Installation Instructions Using the oven. Place the meat or fish on meats at refrigerator temperature. †The U.S. The oven door must be closed . Serve...
...-down first. Brush with an Oven Temp knob, turn very carefully. How to Set the Oven for Broiling NOTE: On models with lemon butter before broiling and after half of meat thoroughly without over . 6 8 6 8 8 Steaks less than 1" thick cook through back of rack positions. Operating Instructions Safety Instructions Installation Instructions Using the oven. Place the meat or fish on meats at refrigerator temperature. †The U.S. The oven door must be closed . Serve...
Installation Instructions
Page 19
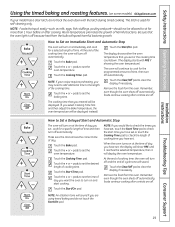
... will be allowed to set , cook for self-cleaning only. Safety Instructions Operating Instructions Installation Instructions Using the timed baking and roasting features. (on some models) GEAppliances.com If your recipe requires preheating, you are using timed baking and do not lock the oven door with PRE if showing the oven temperature.) The oven will speed harmful bacteria growth. pads to check the length of the cooking time. Make sure the clock shows the correct time of harmful bacteria...
... will be allowed to set , cook for self-cleaning only. Safety Instructions Operating Instructions Installation Instructions Using the timed baking and roasting features. (on some models) GEAppliances.com If your recipe requires preheating, you are using timed baking and do not lock the oven door with PRE if showing the oven temperature.) The oven will speed harmful bacteria growth. pads to check the length of the cooking time. Make sure the clock shows the correct time of harmful bacteria...
Installation Instructions
Page 28
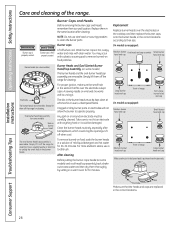
... open. A sewing needle or wire twist-tie works well to clean the burner parts. Wash burner caps in a solution of the range. Slot Electrode The burner heads are removable. The slits in the burner heads. Use a sewing needle or twist-tie to operate properly. Operating Instructions Safety Instructions Care and cleaning of mild liquid detergent and hot water for cleaning. Burner Caps and Heads Before removing the burner caps and heads, remember their size...
... open. A sewing needle or wire twist-tie works well to clean the burner parts. Wash burner caps in a solution of the range. Slot Electrode The burner heads are removable. The slits in the burner heads. Use a sewing needle or twist-tie to operate properly. Operating Instructions Safety Instructions Care and cleaning of mild liquid detergent and hot water for cleaning. Burner Caps and Heads Before removing the burner caps and heads, remember their size...
Installation Instructions
Page 29
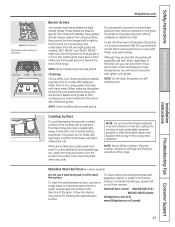
... best care you , please call our toll-free number: National Parts Center 800.626.2002 (U.S.) 800.661.1616 (Canada) GEAppliances.com (U.S.) www.GEAppliances.ca (Canada) Troubleshooting Tips Consumer Support 29 Although they cannot be used in an oven, drawer or near the cooktop. When the surface has cooled, wash and rinse. NOTE: Do not store flammable materials in their continual exposure to high temperatures...
... best care you , please call our toll-free number: National Parts Center 800.626.2002 (U.S.) 800.661.1616 (Canada) GEAppliances.com (U.S.) www.GEAppliances.ca (Canada) Troubleshooting Tips Consumer Support 29 Although they cannot be used in an oven, drawer or near the cooktop. When the surface has cooled, wash and rinse. NOTE: Do not store flammable materials in their continual exposure to high temperatures...

Installation Instructions
Page 34
... manual. sleeve anchor (for local electrical inspector's use an old connector when installing a new range. • Flare union adapter for connection to gas supply line (3/4" or 1/2" NPT x 1/2" I.D.) • Flare union adapter for connection to leave these instructions completely and carefully. This range has been design-certified by a licensed plumber or gas fitter. • When using gas and generating heat, there are acceptable. Read them carefully. The electrical diagram is not covered...
... manual. sleeve anchor (for local electrical inspector's use an old connector when installing a new range. • Flare union adapter for connection to gas supply line (3/4" or 1/2" NPT x 1/2" I.D.) • Flare union adapter for connection to leave these instructions completely and carefully. This range has been design-certified by a licensed plumber or gas fitter. • When using gas and generating heat, there are acceptable. Read them carefully. The electrical diagram is not covered...

Installation Instructions
Page 35
... sheet metal not less than 0.0122" thick. In Canada, electrical grounding must be maintained, protect the underside of operating burners, install a ventilation hood over the appliance. To reduce the hazard caused by a qualified installer. ■ Your range must not be less than 1/4" between the cooking surface and the ventilation hood surface MUST NEVER BE LESS THAN 24 INCHES. INSTALLATION SAFETY INSTRUCTIONS Read these instructions completely and carefully...
... sheet metal not less than 0.0122" thick. In Canada, electrical grounding must be maintained, protect the underside of operating burners, install a ventilation hood over the appliance. To reduce the hazard caused by a qualified installer. ■ Your range must not be less than 1/4" between the cooking surface and the ventilation hood surface MUST NEVER BE LESS THAN 24 INCHES. INSTALLATION SAFETY INSTRUCTIONS Read these instructions completely and carefully...
Installation Instructions
Page 46
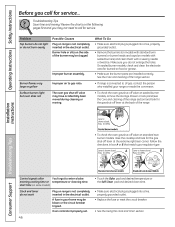
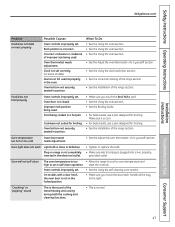
... outlet. • Replace the fuse or reset the circuit breaker. • See the Using the clock and timer section. B PULL TO OPEN. start time (on some models) Clock and timer do not work Plug on range is shown closed . Improper burner assembly. Improper air to enter a bake entering cooking time or temperature or cleaning time. What To Do • Make sure electrical plug is connected to call for the gas shut-off valve may be clogged. Oven controls improperly set. 46 • Touch...
... outlet. • Replace the fuse or reset the circuit breaker. • See the Using the clock and timer section. B PULL TO OPEN. start time (on some models) Clock and timer do not work Plug on range is shown closed . Improper burner assembly. Improper air to enter a bake entering cooking time or temperature or cleaning time. What To Do • Make sure electrical plug is connected to call for the gas shut-off valve may be clogged. Oven controls improperly set. 46 • Touch...
Installation Instructions
Page 47
... right. Oven will not self-clean The oven temperature is plugged into a live, properly grounded outlet. "Crackling" or "popping" sound This is cool. • For best results, use a pan designed for broiling. Food does not broil properly Oven controls improperly set . Cookware not suited for broiling. • See the Installation of improper size being used . Oven light does not work Light bulb is incorrect. reset the controls. Safety Instructions Operating Instructions GEAppliances.com Installation Instructions Problem Food does not bake or...
... right. Oven will not self-clean The oven temperature is plugged into a live, properly grounded outlet. "Crackling" or "popping" sound This is cool. • For best results, use a pan designed for broiling. Food does not broil properly Oven controls improperly set . Cookware not suited for broiling. • See the Installation of improper size being used . Oven light does not work Light bulb is incorrect. reset the controls. Safety Instructions Operating Instructions GEAppliances.com Installation Instructions Problem Food does not bake or...

Installation Instructions
Page 48
... a function error code. Installation Instructions Consumer Support Troubleshooting Tips 48 "F-and a number or letter" flash in the display (on models with a door latch) Oven is moved to the right as far as it was moved to the right, but the oven door was not moved all the way to the right only when setting the self-cleaning cycle. If the function error code repeats, call for service... On models with the door latch except when using...
... a function error code. Installation Instructions Consumer Support Troubleshooting Tips 48 "F-and a number or letter" flash in the display (on models with a door latch) Oven is moved to the right as far as it was moved to the right, but the oven door was not moved all the way to the right only when setting the self-cleaning cycle. If the function error code repeats, call for service... On models with the door latch except when using...
Installation Instructions
Page 54
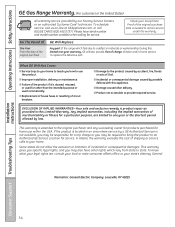
... part. Louisville, KY 40225 Installation Instructions Consumer Support Troubleshooting Tips 54 To schedule service, visit us on-line at GEAppliances.com, or call 800.GE.CARES (800.432.2737). For The Period Of: One Year From the date of the original purchase GE Will Replace: Any part of God. ■ Incidental or consequential damage caused by a GE Authorized Servicer is extended to provide required service...
... part. Louisville, KY 40225 Installation Instructions Consumer Support Troubleshooting Tips 54 To schedule service, visit us on-line at GEAppliances.com, or call 800.GE.CARES (800.432.2737). For The Period Of: One Year From the date of the original purchase GE Will Replace: Any part of God. ■ Incidental or consequential damage caused by a GE Authorized Servicer is extended to provide required service...

Installation Instructions
Page 55
...; Replacement of house fuses or resetting of circuit breakers. ■ Damage to the product caused by accident, fire, floods or acts of the range which vary from province to province. Warrantor: Mabe Canada Inc., Burlington, Ontario Installation Instructions Troubleshooting Tips Consumer Support 55 During this limited one year or the shortest period allowed by possible defects with this Limited Warranty. Safety Instructions Operating Instructions GE Gas Range Warranty...
...; Replacement of house fuses or resetting of circuit breakers. ■ Damage to the product caused by accident, fire, floods or acts of the range which vary from province to province. Warrantor: Mabe Canada Inc., Burlington, Ontario Installation Instructions Troubleshooting Tips Consumer Support 55 During this limited one year or the shortest period allowed by possible defects with this Limited Warranty. Safety Instructions Operating Instructions GE Gas Range Warranty...


