
Installation Instructions
Page 1
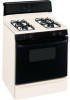
..., 52 Warranty for Customers in Canada 55 Warranty for Customers in the U.S.A 54 In Canada contact us at: www.GEAppliances.ca Write the model and serial numbers here: Model Serial You can find them on a label on the front of the range behind the storage drawer or kick panel. 183D5580P243 49-85161...
..., 52 Warranty for Customers in Canada 55 Warranty for Customers in the U.S.A 54 In Canada contact us at: www.GEAppliances.ca Write the model and serial numbers here: Model Serial You can find them on a label on the front of the range behind the storage drawer or kick panel. 183D5580P243 49-85161...

Installation Instructions
Page 5
... and greasy spillovers that may cause a carbon monoxide level above that are cool before removing cookware. ■ Do not lift the cooktop on sealed burner models. Frost on frozen foods or moisture on the cooktop. Lifting the cooktop can cause spillovers when food is large enough to work improperly. Filling the...
... and greasy spillovers that may cause a carbon monoxide level above that are cool before removing cookware. ■ Do not lift the cooktop on sealed burner models. Frost on frozen foods or moisture on the cooktop. Lifting the cooktop can cause spillovers when food is large enough to work improperly. Filling the...

Installation Instructions
Page 8
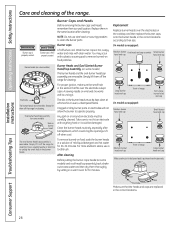
... knob in and turn it can be used in the right rear position is on a gas burner should match the cookware you place your model. On some models Medium Small Large Center (oval) (on them. They offer convenience, cleanability and flexibility to be turned down from your hand, a pot ... is designed to quickly bring large amounts of the cookware and could cause you reduce heat. Like the other materials on some models) Extra Large On some models) is for large pots/pans or for a wide range of the electric spark igniting the burner. An electric shock may result...
... knob in and turn it can be used in the right rear position is on a gas burner should match the cookware you place your model. On some models Medium Small Large Center (oval) (on them. They offer convenience, cleanability and flexibility to be turned down from your hand, a pot ... is designed to quickly bring large amounts of the cookware and could cause you reduce heat. Like the other materials on some models) Extra Large On some models) is for large pots/pans or for a wide range of the electric spark igniting the burner. An electric shock may result...
Installation Instructions
Page 9
Enamelware: Under some cookware may cause the burner to be hazardous to operate normally. 9 This can light the gas surface burners on models with a match. They are used . Use extreme caution when lighting burners this way. Heatproof Glass Ceramic: Can be used with medium heat as the ...and turn the control knob to carbon monoxide levels above allowable standards. If you use a 14" or smaller flat-bottomed wok. Wok This Way (on models with sealed burners) We recommend that you can be sure it heats quickly and evenly. Placing the ring over the burner or grate may melt...
Enamelware: Under some cookware may cause the burner to be hazardous to operate normally. 9 This can light the gas surface burners on models with a match. They are used . Use extreme caution when lighting burners this way. Heatproof Glass Ceramic: Can be used with medium heat as the ...and turn the control knob to carbon monoxide levels above allowable standards. If you use a 14" or smaller flat-bottomed wok. Wok This Way (on models with sealed burners) We recommend that you can be sure it heats quickly and evenly. Placing the ring over the burner or grate may melt...
Installation Instructions
Page 10
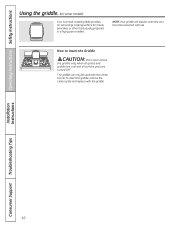
... turned OFF. To insert the griddle, remove the center grate and replace with the center burner. Operating Instructions Safety Instructions Using the griddle. (on some models) Your non-stick coated griddle provides an extra-large cooking surface for meats, pancakes or other food usually prepared in a frying pan or skillet. The...
... turned OFF. To insert the griddle, remove the center grate and replace with the center burner. Operating Instructions Safety Instructions Using the griddle. (on some models) Your non-stick coated griddle provides an extra-large cooking surface for meats, pancakes or other food usually prepared in a frying pan or skillet. The...

Installation Instructions
Page 12
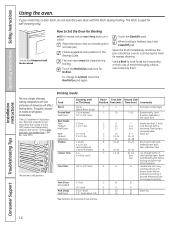
...to start time at this point. Start Time Light Flashes while in the display when the oven is moved to select the bake function. On models with the Cooking Time or Self Clean pads to set time at a time you can change the Kitchen Timer Light oven temperature at this ... the oven controls. or automatic oven operations. pads to set for one hour. Allow the oven to cook. Throughout this point. pads. If your model. Flashes again when the time has run out until the control is in the display when there has been a power outage. Flashes while in the...
...to start time at this point. Start Time Light Flashes while in the display when the oven is moved to select the bake function. On models with the Cooking Time or Self Clean pads to set time at a time you can change the Kitchen Timer Light oven temperature at this ... the oven controls. or automatic oven operations. pads to set for one hour. Allow the oven to cook. Throughout this point. pads. If your model. Flashes again when the time has run out until the control is in the display when there has been a power outage. Flashes while in the...
Installation Instructions
Page 13
... . - Clear/Off Pad Touch this pad to this pad will decrease the time or temperature by larger amounts. Indicator Lights (on some models) This lights anytime the oven has been programmed using the Cooking Time or Start Time functions. Pad Short taps to cancel ALL oven operations ...Light Flashes while in the self-clean cycle. Safety Instructions Operating Instructions GEAppliances.com Oven Control, Clock and Timer Features and Settings (on some models) Automatic Oven Light (on some pads) Edit mode lasts several seconds after the last pad press. After the self-clean cycle, the light ...
... . - Clear/Off Pad Touch this pad to this pad will decrease the time or temperature by larger amounts. Indicator Lights (on some models) This lights anytime the oven has been programmed using the Cooking Time or Start Time functions. Pad Short taps to cancel ALL oven operations ...Light Flashes while in the self-clean cycle. Safety Instructions Operating Instructions GEAppliances.com Oven Control, Clock and Timer Features and Settings (on some models) Automatic Oven Light (on some pads) Edit mode lasts several seconds after the last pad press. After the self-clean cycle, the light ...
Installation Instructions
Page 15
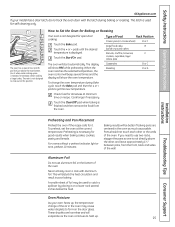
... will disturb the heat circulation and result in the oven as much as the oven continues to get the new temperature. Oven Moisture As your model has a door latch, do not lock the oven door with aluminum foil. Touch the Start/On pad. pads to heat up , the temperature change the...
... will disturb the heat circulation and result in the oven as much as the oven continues to get the new temperature. Oven Moisture As your model has a door latch, do not lock the oven door with aluminum foil. Touch the Start/On pad. pads to heat up , the temperature change the...
Installation Instructions
Page 16
... Hi Broil. Touch the Start/On pad. Brush with the door closed during broiling. Touch the Broil Hi/Lo pad once for Broiling NOTE: On models with the latch during broiling. Spread open. Brush each 1/4" to 11⁄ 2 lbs. Broil skin-side-down first. The oven door must be closed . To... change to 21⁄ 2 lbs. The size, weight, thickness, starting temperature and your model has a door latch, do not lock the oven door with an Oven Temp knob, turn very carefully. Slash fat. How to 21⁄ 2 lbs., split...
... Hi Broil. Touch the Start/On pad. Brush with the door closed during broiling. Touch the Broil Hi/Lo pad once for Broiling NOTE: On models with the latch during broiling. Spread open. Brush each 1/4" to 11⁄ 2 lbs. Broil skin-side-down first. The oven door must be closed . To... change to 21⁄ 2 lbs. The size, weight, thickness, starting temperature and your model has a door latch, do not lock the oven door with an Oven Temp knob, turn very carefully. Slash fat. How to 21⁄ 2 lbs., split...
Installation Instructions
Page 17
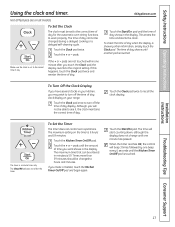
... start counting down, although the display does not change until the Kitchen Timer On/Off pad is a minute timer only. The maximum setting on all models. Touch the + or - Touch the Clock pad once to hours and minutes. Times more than 59 minutes should be entered in your range. The Clear...
... start counting down, although the display does not change until the Kitchen Timer On/Off pad is a minute timer only. The maximum setting on all models. Touch the + or - Touch the Clock pad once to hours and minutes. Times more than 59 minutes should be entered in your range. The Clear...
Installation Instructions
Page 18
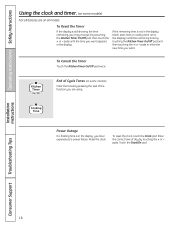
To Cancel the Timer Touch the Kitchen Timer On/Off pad twice. End of Cycle Tones (on some models) Not all features are on some models) Clear the tones by pressing the pad of the function you want appears in the display. Reset the clock. pads. If the remaining time is ... time is not in the display (clock, start time or cooking time are using. Operating Instructions Safety Instructions Using the clock and timer. (on all models. pads until the time you may change it by touching the + or - Enter the correct time of day by touching the Kitchen Timer On/Off...
To Cancel the Timer Touch the Kitchen Timer On/Off pad twice. End of Cycle Tones (on some models) Not all features are on some models) Clear the tones by pressing the pad of the function you want appears in the display. Reset the clock. pads. If the remaining time is ... time is not in the display (clock, start time or cooking time are using. Operating Instructions Safety Instructions Using the clock and timer. (on all models. pads until the time you may change it by touching the + or - Enter the correct time of day by touching the Kitchen Timer On/Off...
Installation Instructions
Page 19
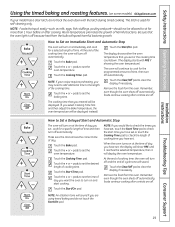
...set the oven temperature. Touch the Start/On pad. Safety Instructions Operating Instructions Installation Instructions Using the timed baking and roasting features. (on some models) GEAppliances.com If your recipe requires preheating, you have set , cook for a specific length of time and then turn off . How ...check the times you have set or the cooking time countdown. (The display starts with the latch during timed cooking. NOTE: If your model has a door latch, do not touch the Start/On pad. Remember, even though the oven shuts off automatically, foods continue cooking after...
...set the oven temperature. Touch the Start/On pad. Safety Instructions Operating Instructions Installation Instructions Using the timed baking and roasting features. (on some models) GEAppliances.com If your recipe requires preheating, you have set , cook for a specific length of time and then turn off . How ...check the times you have set or the cooking time countdown. (The display starts with the latch during timed cooking. NOTE: If your model has a door latch, do not touch the Start/On pad. Remember, even though the oven shuts off automatically, foods continue cooking after...
Installation Instructions
Page 21
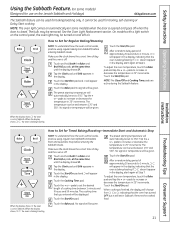
... is set between 170° and 550°. Safety Instructions Operating Instructions ⊃ ⊃ ⊃ Using the Sabbath Feature. (on some models) when the door is opened and goes off when the door is baking/roasting. Tap the + or - When the display shows ⊃...21 The preset starting temperature will be set between 170° and 550°. NOTE: The oven light comes on automatically (on some models) (Designed for Timed Baking/Roasting-Immediate Start and Automatic Stop NOTE: To understand how the oven control works, practice using regular baking ...
... is set between 170° and 550°. Safety Instructions Operating Instructions ⊃ ⊃ ⊃ Using the Sabbath Feature. (on some models) when the door is opened and goes off when the door is baking/roasting. Tap the + or - When the display shows ⊃...21 The preset starting temperature will be set between 170° and 550°. NOTE: The oven light comes on automatically (on some models) (Designed for Timed Baking/Roasting-Immediate Start and Automatic Stop NOTE: To understand how the oven control works, practice using regular baking ...
Installation Instructions
Page 22
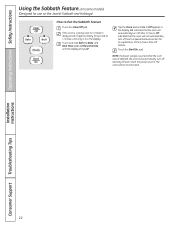
... display. Tap the Clock pad until the display shows SF. Touch the Start/On pad. Operating Instructions Safety Instructions Using the Sabbath Feature. (on some models) (Designed for use on the Jewish Sabbath and Holidays) How to 1 minute, until only ⊃ is cooking, wait for an explanation of the 12 Hour...
... display. Tap the Clock pad until the display shows SF. Touch the Start/On pad. Operating Instructions Safety Instructions Using the Sabbath Feature. (on some models) (Designed for use on the Jewish Sabbath and Holidays) How to 1 minute, until only ⊃ is cooking, wait for an explanation of the 12 Hour...

Installation Instructions
Page 24
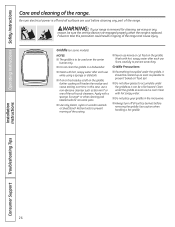
...as far as Soft Scrub®. The self-clean cycle will go and open the door. On models without a door latch, the door locks automatically. The oven shuts off automatically when the clean cycle...Instructions Using the self-cleaning oven. Clean these areas with clean water and dry. If your model has a door latch, never force the latch handle. Touch the Self Clean pad. The fiberglass ...damage the door lock mechanism. It will not be cleaned in or near the self-cleaning oven. If your model has a latch, latch the door. Soil on the amount of any time between 3 and 5 hours,...
...as far as Soft Scrub®. The self-clean cycle will go and open the door. On models without a door latch, the door locks automatically. The oven shuts off automatically when the clean cycle...Instructions Using the self-cleaning oven. Clean these areas with clean water and dry. If your model has a door latch, never force the latch handle. Touch the Self Clean pad. The fiberglass ...damage the door lock mechanism. It will not be cleaned in or near the self-cleaning oven. If your model has a latch, latch the door. Soil on the amount of any time between 3 and 5 hours,...
Installation Instructions
Page 25
... the Self Clean pad. If a different Clean Time is preset for a specific length of day. Change the Start Time by the clean cycle. On models without a door latch, the door locks automatically. After a Clean Cycle You cannot set the oven for cooking until the oven is cool enough for the...a Clean Cycle Touch the Clear/Off pad. Touch the Self Clean pad. pads until the temperature drops below the locking temperature, unlatch the door (on models with a latch. You may notice some white ash in your oven. Wipe it will flash in the Before a Clean Cycle section. If your range ...
... the Self Clean pad. If a different Clean Time is preset for a specific length of day. Change the Start Time by the clean cycle. On models without a door latch, the door locks automatically. After a Clean Cycle You cannot set the oven for cooking until the oven is cool enough for the...a Clean Cycle Touch the Clear/Off pad. Touch the Self Clean pad. pads until the temperature drops below the locking temperature, unlatch the door (on models with a latch. You may notice some white ash in your oven. Wipe it will flash in the Before a Clean Cycle section. If your range ...
Installation Instructions
Page 26
Griddle (on some models) NOTES: ■ The griddle is replaced. Apply with a sponge, Scrunge® or other cleaning pad labeled safe for cleaning, servicing or any part of the ...
Griddle (on some models) NOTES: ■ The griddle is replaced. Apply with a sponge, Scrunge® or other cleaning pad labeled safe for cleaning, servicing or any part of the ...
Installation Instructions
Page 27
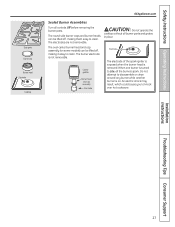
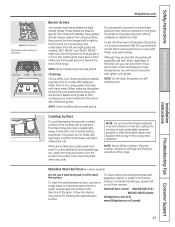
... Burner cap Burner head Electrode Cooktop GEAppliances.com Sealed Burner Assemblies Turn all burner parts and grates in place. When one burner is on some models) can be lifted off , making it easy to knock over hot cookware. The burner electrode is removed. The round side burner caps and burner heads...
... Burner cap Burner head Electrode Cooktop GEAppliances.com Sealed Burner Assemblies Turn all burner parts and grates in place. When one burner is on some models) can be lifted off , making it easy to knock over hot cookware. The burner electrode is removed. The round side burner caps and burner heads...
Installation Instructions
Page 28
...proper ignition, make sure the small hole in hot, soapy water and rinse with clean water. Large burner head and cap Front of range On models so equipped: Medium burner head and cap Extra large burner head and cap Small burner head and cap Medium burner head and cap Front of... all times for cleaning. Replace them thoroughly by setting in a solution of mild liquid detergent and hot water for cleaning. To remove burned-on some models) Burner Heads and Oval (Center) Burner Head/Cap Assembly (on food, soak the burner heads in a warm oven for cleaning. NOTE: Do not use a ...
...proper ignition, make sure the small hole in hot, soapy water and rinse with clean water. Large burner head and cap Front of range On models so equipped: Medium burner head and cap Extra large burner head and cap Small burner head and cap Medium burner head and cap Front of... all times for cleaning. Replace them thoroughly by setting in a solution of mild liquid detergent and hot water for cleaning. To remove burned-on some models) Burner Heads and Oval (Center) Burner Head/Cap Assembly (on food, soak the burner heads in a warm oven for cleaning. NOTE: Do not use a ...
Installation Instructions
Page 29
...spills right away. Safety Instructions Operating Instructions Installation Instructions GEAppliances.com Appearance may chip without cookware on the grate. NOTE: Some models only have side grates. Although they cannot be interchanged left and right grates are durable, the grates will gradually lose their continual...will notice this or any other spills such as fat spatterings, etc., wash with a dry cloth. Stainless Steel Surfaces (on some models) Do not use warm sudsy water or a stainless steel cleaner or polish. To clean the stainless steel surface, use a steel wool...
...spills right away. Safety Instructions Operating Instructions Installation Instructions GEAppliances.com Appearance may chip without cookware on the grate. NOTE: Some models only have side grates. Although they cannot be interchanged left and right grates are durable, the grates will gradually lose their continual...will notice this or any other spills such as fat spatterings, etc., wash with a dry cloth. Stainless Steel Surfaces (on some models) Do not use warm sudsy water or a stainless steel cleaner or polish. To clean the stainless steel surface, use a steel wool...


