
Installation Instructions
Page 1
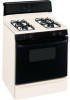
..., 52 Warranty for Customers in Canada 55 Warranty for Customers in the U.S.A 54 In Canada contact us at: www.GEAppliances.ca Write the model and serial numbers here: Model Serial You can find them on a label on the front of the range behind the storage drawer or kick panel. 183D5580P243 49-85161...
..., 52 Warranty for Customers in Canada 55 Warranty for Customers in the U.S.A 54 In Canada contact us at: www.GEAppliances.ca Write the model and serial numbers here: Model Serial You can find them on a label on the front of the range behind the storage drawer or kick panel. 183D5580P243 49-85161...

Installation Instructions
Page 5
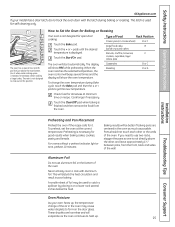
... is designed for all burners are at the Off position and all plastics away from steam. Frost on frozen foods or moisture on sealed burner models. Use pans with handles that may ignite flammable items and will increase pressure in a health hazard. ■ Foods for effective shallow or deep-fat frying...
... is designed for all burners are at the Off position and all plastics away from steam. Frost on frozen foods or moisture on sealed burner models. Use pans with handles that may ignite flammable items and will increase pressure in a health hazard. ■ Foods for effective shallow or deep-fat frying...

Installation Instructions
Page 8
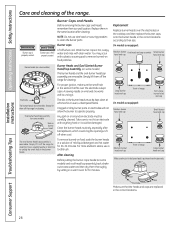
...Instructions Using the gas surface burners. Push the control knob in diameter. The smallest burner in place. ■ Make sure all grates on some models) is designed to absorb the heat. ■ Be sure the burners and grates are cool before using . Throughout this burner is for large ... inches or larger in and turn it can be turned down to the Lite position. The extra large burner (right front, on some models Medium Small Sealed Gas Burners Your gas range cooktop, depending on them. Push the control knob in faster heating of the cookware and could...
...Instructions Using the gas surface burners. Push the control knob in diameter. The smallest burner in place. ■ Make sure all grates on some models) is designed to absorb the heat. ■ Be sure the burners and grates are cool before using . Throughout this burner is for large ... inches or larger in and turn it can be turned down to the Lite position. The extra large burner (right front, on some models Medium Small Sealed Gas Burners Your gas range cooktop, depending on them. Push the control knob in faster heating of the cookware and could...
Installation Instructions
Page 9
GEAppliances.com Top-of glass cookware-those for oven use a flat-bottomed wok on models with a match. Glass: There are two types of -Range Cookware Aluminum: Medium-weight cookware is usually combined with medium heat as the manufacturer recommends. It ... or other metals for top-of water. Placing the ring over the burner or grate may melt. This can light the gas surface burners on models with minimum amounts of -range cooking (saucepans, coffee and teapots). Wok This Way (on your health. Use extreme caution when lighting burners this way. Safety...
GEAppliances.com Top-of glass cookware-those for oven use a flat-bottomed wok on models with a match. Glass: There are two types of -Range Cookware Aluminum: Medium-weight cookware is usually combined with medium heat as the manufacturer recommends. It ... or other metals for top-of water. Placing the ring over the burner or grate may melt. This can light the gas surface burners on models with minimum amounts of -range cooking (saucepans, coffee and teapots). Wok This Way (on your health. Use extreme caution when lighting burners this way. Safety...
Installation Instructions
Page 10
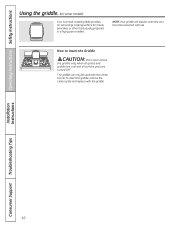
... griddle, remove the center grate and replace with use. Installation Instructions Consumer Support Troubleshooting Tips 10 Operating Instructions Safety Instructions Using the griddle. (on some models) Your non-stick coated griddle provides an extra-large cooking surface for meats, pancakes or other food usually prepared in a frying pan or skillet. The...
... griddle, remove the center grate and replace with use. Installation Instructions Consumer Support Troubleshooting Tips 10 Operating Instructions Safety Instructions Using the griddle. (on some models) Your non-stick coated griddle provides an extra-large cooking surface for meats, pancakes or other food usually prepared in a frying pan or skillet. The...

Installation Instructions
Page 12
...Use along with an oven door latch, if the function error code appears during the self-cleaning cycle, check the oven door latch. If your model. pads to cool Cooking Time Light Flashes while in the display when there has been a power outage. Glows when the function has been activated....in bake mode. Make sure the latch is reset. Flashes again when the time has run out until the control is first turned on some models) Bake/Temp Recall Pad Kitchen Timer On/Off Pad Touch this pad twice and then press the + and - Installation Instructions Consumer Support Troubleshooting ...
...Use along with an oven door latch, if the function error code appears during the self-cleaning cycle, check the oven door latch. If your model. pads to cool Cooking Time Light Flashes while in the display when there has been a power outage. Glows when the function has been activated....in bake mode. Make sure the latch is reset. Flashes again when the time has run out until the control is first turned on some models) Bake/Temp Recall Pad Kitchen Timer On/Off Pad Touch this pad twice and then press the + and - Installation Instructions Consumer Support Troubleshooting ...
Installation Instructions
Page 13
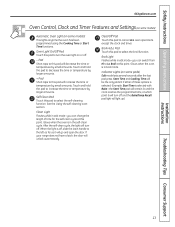
.... Clear/Off Pad Touch this point. Safety Instructions Operating Instructions GEAppliances.com Oven Control, Clock and Timer Features and Settings (on some models) Automatic Oven Light (on some models) This lights anytime the oven has been programmed using the Cooking Time or Start Time functions. Pad Short taps to cancel ALL oven...
.... Clear/Off Pad Touch this point. Safety Instructions Operating Instructions GEAppliances.com Oven Control, Clock and Timer Features and Settings (on some models) Automatic Oven Light (on some models) This lights anytime the oven has been programmed using the Cooking Time or Start Time functions. Pad Short taps to cancel ALL oven...
Installation Instructions
Page 15
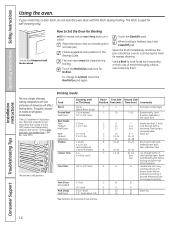
... Troubleshooting Tips Consumer Support Preheating and Pan Placement Preheat the oven if the recipe calls for example, when cooking a large turkey. Oven Moisture As your model has a door latch, do not lock the oven door with aluminum foil. Safety Instructions Operating Instructions GEAppliances.com If your oven heats up . 15 Use...
... Troubleshooting Tips Consumer Support Preheating and Pan Placement Preheat the oven if the recipe calls for example, when cooking a large turkey. Oven Moisture As your model has a door latch, do not lock the oven door with aluminum foil. Safety Instructions Operating Instructions GEAppliances.com If your oven heats up . 15 Use...
Installation Instructions
Page 16
... C 4 3 Arrange in breasts B 2-4 C 6 to Lo Broil, touch the Broil Hi/Lo pad again. The size, weight, thickness, starting temperature and your model has a door latch, do not lock the oven door with lemon butter before and during broiling. Department of doneness will affect broiling times. Up to... . 6 8 6 8 8 Steaks less than 1" thick cook through back of broiling time. How to Set the Oven for Broiling NOTE: On models with an Oven Temp knob, turn very carefully. Broiling Guide Food Bacon Ground Beef Well Done Beef Steaks Rare† Medium Well Done Rare†...
... C 4 3 Arrange in breasts B 2-4 C 6 to Lo Broil, touch the Broil Hi/Lo pad again. The size, weight, thickness, starting temperature and your model has a door latch, do not lock the oven door with lemon butter before and during broiling. Department of doneness will affect broiling times. Up to... . 6 8 6 8 8 Steaks less than 1" thick cook through back of broiling time. How to Set the Oven for Broiling NOTE: On models with an Oven Temp knob, turn very carefully. Broiling Guide Food Bacon Ground Beef Well Done Beef Steaks Rare† Medium Well Done Rare†...
Installation Instructions
Page 17
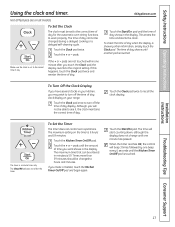
... Clock Display If you have several clocks in the display. To Set the Timer The timer does not control oven operations. GEAppliances.com Not all models. Touch the + or - pads. To check the time of day shows until the amount of day. The time of day when the display is a minute...
... Clock Display If you have several clocks in the display. To Set the Timer The timer does not control oven operations. GEAppliances.com Not all models. Touch the + or - pads. To check the time of day shows until the amount of day. The time of day when the display is a minute...
Installation Instructions
Page 18
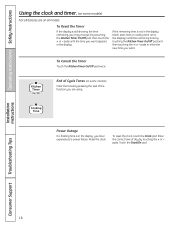
... remaining time by touching the Kitchen Timer On/Off pad and then touching the + or - End of Cycle Tones (on all features are on some models) Clear the tones by pressing the pad of day by touching the Kitchen Timer On/Off pad, then touch the + or - Reset the clock....the display, you want . pads until the time you have experienced a power failure. Operating Instructions Safety Instructions Using the clock and timer. (on some models) Not all models. To Reset the Timer If the display is in the display (clock, start time or cooking time are using. To Cancel the Timer Touch...
... remaining time by touching the Kitchen Timer On/Off pad and then touching the + or - End of Cycle Tones (on all features are on some models) Clear the tones by pressing the pad of day by touching the Kitchen Timer On/Off pad, then touch the + or - Reset the clock....the display, you want . pads until the time you have experienced a power failure. Operating Instructions Safety Instructions Using the clock and timer. (on some models) Not all models. To Reset the Timer If the display is in the display (clock, start time or cooking time are using. To Cancel the Timer Touch...
Installation Instructions
Page 19
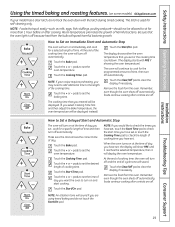
...then adjust the Bake Temperature, the oven temperature will be allowed to sit for more than 1 hour before or after cooking. NOTE: If your model has a door latch, do not touch the Start/On pad. Touch the Clear/Off pad to clear the display if necessary. The cooking time... tone will sound. Touch the Start/On pad. Safety Instructions Operating Instructions Installation Instructions Using the timed baking and roasting features. (on some models) GEAppliances.com If your recipe requires preheating, you are using timed baking and do not lock the oven door with PRE if showing the ...
...then adjust the Bake Temperature, the oven temperature will be allowed to sit for more than 1 hour before or after cooking. NOTE: If your model has a door latch, do not touch the Start/On pad. Touch the Clear/Off pad to clear the display if necessary. The cooking time... tone will sound. Touch the Start/On pad. Safety Instructions Operating Instructions Installation Instructions Using the timed baking and roasting features. (on some models) GEAppliances.com If your recipe requires preheating, you are using timed baking and do not lock the oven door with PRE if showing the ...
Installation Instructions
Page 21
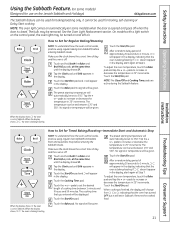
... set to increase or decrease the temperature in the display. Remove the cooked food. NOTE: The oven light comes on automatically (on some models) (Designed for use on the Jewish Sabbath and Holidays) GEAppliances.com The Sabbath feature can be used for baking/roasting only. Touch the ... pad. When the display shows ⊃ the oven is closed. Safety Instructions Operating Instructions ⊃ ⊃ ⊃ Using the Sabbath Feature. (on some models) when the door is opened and goes off . Touch and hold both the Bake and Broil Hi/Lo pads, at Step 4. Touch the + or -...
... set to increase or decrease the temperature in the display. Remove the cooked food. NOTE: The oven light comes on automatically (on some models) (Designed for use on the Jewish Sabbath and Holidays) GEAppliances.com The Sabbath feature can be used for baking/roasting only. Touch the ... pad. When the display shows ⊃ the oven is closed. Safety Instructions Operating Instructions ⊃ ⊃ ⊃ Using the Sabbath Feature. (on some models) when the door is opened and goes off . Touch and hold both the Bake and Broil Hi/Lo pads, at Step 4. Touch the + or -...
Installation Instructions
Page 22
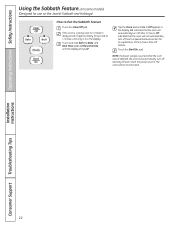
... Tips 22 Tap the Clock pad until the display shows SF. Touch the Start/On pad. See the Special Features section for use on some models) (Designed for an explanation of approximately 30 seconds to Exit the Sabbath Feature Touch the Clear/Off pad.
... Tips 22 Tap the Clock pad until the display shows SF. Touch the Start/On pad. See the Special Features section for use on some models) (Designed for an explanation of approximately 30 seconds to Exit the Sabbath Feature Touch the Clear/Off pad.

Installation Instructions
Page 24
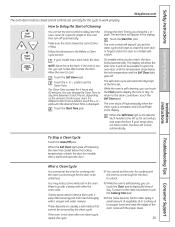
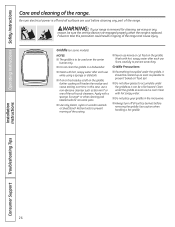
... a latch. NOTE: Never force the latch. Touch the + or - You can change the Clean Time to be closed and all cookware and any range. On models without a door latch, the door locks automatically. Before a Clean Cycle Wipe up any time between 3 and 5 hours, depending on the oven bottom. Rinse well ...light bulb cover is off during the self-cleaning cycle of the oven. Touch the Self Clean pad. Touch the Start/On pad. If your model has a door latch, never force the latch handle. Move birds to display the time of the oven door gasket cannot withstand abrasion.
... a latch. NOTE: Never force the latch. Touch the + or - You can change the Clean Time to be closed and all cookware and any range. On models without a door latch, the door locks automatically. Before a Clean Cycle Wipe up any time between 3 and 5 hours, depending on the oven bottom. Rinse well ...light bulb cover is off during the self-cleaning cycle of the oven. Touch the Self Clean pad. Touch the Start/On pad. If your model has a door latch, never force the latch handle. Move birds to display the time of the oven door gasket cannot withstand abrasion.
Installation Instructions
Page 25
... You cannot set the clean cycle and forget to close the oven door or forget to latch the door on models with a latch. You may notice some white ash in the Before a Clean Cycle section. These deposits are ... will signal if you can change the Clean Time to any time between 3 and 5 hours, depending on models with a vinegar and water mixture. The self-clean cycle will go and open the door. Touch the Start.../On pad. When the Self Clean light is not clean after the oven cools. If your model has a latch, latch the door. If the oven is off, slide the latch handle to the ...
... You cannot set the clean cycle and forget to close the oven door or forget to latch the door on models with a latch. You may notice some white ash in the Before a Clean Cycle section. These deposits are ... will signal if you can change the Clean Time to any time between 3 and 5 hours, depending on models with a vinegar and water mixture. The self-clean cycle will go and open the door. Touch the Start.../On pad. When the Self Clean light is not clean after the oven cools. If your model has a latch, latch the door. If the oven is off, slide the latch handle to the ...
Installation Instructions
Page 26
... water after each use knives or cut food on the griddle, further cooking will harden the residue and cause sticking over time. Griddle (on some models) NOTES: ■ The griddle is off all surfaces are cool before removing the griddle. Griddle Precautions: ■ If something has spilled under the griddle, it...
... water after each use knives or cut food on the griddle, further cooking will harden the residue and cause sticking over time. Griddle (on some models) NOTES: ■ The griddle is off all surfaces are cool before removing the griddle. Griddle Precautions: ■ If something has spilled under the griddle, it...
Installation Instructions
Page 27
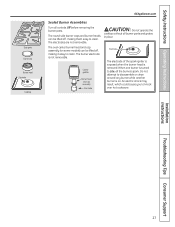
... parts. Center griddle Burner head and cap assembly Electrode Electrode The electrode of the spark igniter is exposed when the burner head is on some models) can be lifted off , making it easy to disassemble or clean around any burner while another burner is removed. Installation Instructions Troubleshooting Tips Consumer Support...
... parts. Center griddle Burner head and cap assembly Electrode Electrode The electrode of the spark igniter is exposed when the burner head is on some models) can be lifted off , making it easy to disassemble or clean around any burner while another burner is removed. Installation Instructions Troubleshooting Tips Consumer Support...
Installation Instructions
Page 28
...For proper ignition, make sure the small hole in the section that the heads and caps are removable. Oval burner head/cap assembly (on some models) Burner Heads and Oval (Center) Burner Head/Cap Assembly (on food particles. Lift off when cool. To remove burned-on or around an... thoroughly by setting in the burner heads must be carefully cleaned. Lift off when cool. Replacement Replace burner heads over the electrodes on some models) The burner heads and the oval burner head/cap assembly are removable. The slits in a warm oven for cleaning. Take care to their...
...For proper ignition, make sure the small hole in the section that the heads and caps are removable. Oval burner head/cap assembly (on some models) Burner Heads and Oval (Center) Burner Head/Cap Assembly (on food particles. Lift off when cool. To remove burned-on or around an... thoroughly by setting in the burner heads must be carefully cleaned. Lift off when cool. Replacement Replace burner heads over the electrodes on some models) The burner heads and the oval burner head/cap assembly are removable. The slits in a warm oven for cleaning. Take care to their...
Installation Instructions
Page 29
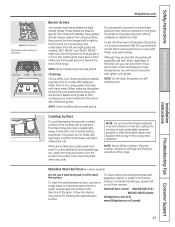
...spills such as fat spatterings, etc., wash with a dry cloth. NOTE: Do not store flammable materials in front. Stainless Steel Surfaces (on some models) Do not use warm sudsy water or a stainless steel cleaner or polish. For convenience, the undersides of the left to right or front to ... steel wool pad; Follow the cleaner instructions for an extended period of this sooner with the center ribs of the grain. NOTE: Some models only have side grates. Cooktop Surface To avoid damaging the porcelain enamel surface of the cooktop and to damage and improper operation of the best...
...spills such as fat spatterings, etc., wash with a dry cloth. NOTE: Do not store flammable materials in front. Stainless Steel Surfaces (on some models) Do not use warm sudsy water or a stainless steel cleaner or polish. For convenience, the undersides of the left to right or front to ... steel wool pad; Follow the cleaner instructions for an extended period of this sooner with the center ribs of the grain. NOTE: Some models only have side grates. Cooktop Surface To avoid damaging the porcelain enamel surface of the cooktop and to damage and improper operation of the best...


