
Installation Instructions
Page 1
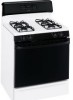
..., Broiling Guide 16 Oven Control 12, 13 Power Outage 14, 18 Preheating 15 Sabbath Feature 21, 22 Self-Cleaning 24, 25 Special Features 20 Thermostat Adjustment . . . . .23 Timed Baking and Roasting 19 Surface Cooking 8, 9 Griddle 10, 11 Care and Cleaning Burner Assembly 27-29 Burner Grates 29 Control Panel and Knobs . . . . .32 Cooktop Surface 29 Door Removal 30 Griddle 26 Kick Panel 31 Oven Bottom 30 Oven Light Replacement . . . . . .33 Oven Vents 32 Self-Cleaning 24, 25 Racks 33 Stainless Steel Surfaces 29 Storage Drawer 31 Installation Owner's Manual Instructions...
..., Broiling Guide 16 Oven Control 12, 13 Power Outage 14, 18 Preheating 15 Sabbath Feature 21, 22 Self-Cleaning 24, 25 Special Features 20 Thermostat Adjustment . . . . .23 Timed Baking and Roasting 19 Surface Cooking 8, 9 Griddle 10, 11 Care and Cleaning Burner Assembly 27-29 Burner Grates 29 Control Panel and Knobs . . . . .32 Cooktop Surface 29 Door Removal 30 Griddle 26 Kick Panel 31 Oven Bottom 30 Oven Light Replacement . . . . . .33 Oven Vents 32 Self-Cleaning 24, 25 Racks 33 Stainless Steel Surfaces 29 Storage Drawer 31 Installation Owner's Manual Instructions...

Installation Instructions
Page 4
... these instructions could result in the vicinity of this kind of use this work assumes responsibility for the range to climb, stand or hang on the oven door, storage drawer, warming before operating it with a wellfitting lid, cookie sheet or flat tray. Never pick up a flaming pan. Never install it directly over the ■ Be sure all codes and requirements of interest to prevent poor air while using...
... these instructions could result in the vicinity of this kind of use this work assumes responsibility for the range to climb, stand or hang on the oven door, storage drawer, warming before operating it with a wellfitting lid, cookie sheet or flat tray. Never pick up a flaming pan. Never install it directly over the ■ Be sure all codes and requirements of interest to prevent poor air while using...

Installation Instructions
Page 5
... fat for top-of-range cooking. ■ To minimize the possibility of burns, ignition of flammable materials and spillage, turn the surface burner controls off the gas to work improperly. Do not let pot holders come near a window, do flame foods under the hood, turn the fan on. ■ Do not use the Lite position when igniting the top burners and make sure it heats. ■ Do not...
... fat for top-of-range cooking. ■ To minimize the possibility of burns, ignition of flammable materials and spillage, turn the surface burner controls off the gas to work improperly. Do not let pot holders come near a window, do flame foods under the hood, turn the fan on. ■ Do not use the Lite position when igniting the top burners and make sure it heats. ■ Do not...

Installation Instructions
Page 6
..., and keep the oven door closed . If overheated, they can ignite. ■ When using cooking or roasting bags in the oven, follow the manufacturer's directions. ■ Keep the oven free from grease buildup. ■ Place the oven racks in gas ovens. ■ Always remove any broiler pan is in the oven bottom or cover an entire rack with the oven door closed to prevent excessive flare-ups. Installation Instructions Consumer Support Troubleshooting Tips 6 Operating Instructions Safety Instructions IMPORTANT SAFETY INFORMATION...
..., and keep the oven door closed . If overheated, they can ignite. ■ When using cooking or roasting bags in the oven, follow the manufacturer's directions. ■ Keep the oven free from grease buildup. ■ Place the oven racks in gas ovens. ■ Always remove any broiler pan is in the oven bottom or cover an entire rack with the oven door closed to prevent excessive flare-ups. Installation Instructions Consumer Support Troubleshooting Tips 6 Operating Instructions Safety Instructions IMPORTANT SAFETY INFORMATION...

Installation Instructions
Page 12
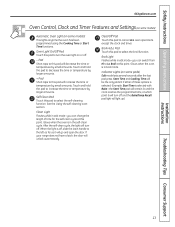
... only slightly, from your food to set the amount of day will show PRE while preheating. If your oven was set time at this point. Throughout this point. The oven will go. Flashes again when the time has run out until the control is moved to select the bake function. Operating Instructions Safety Instructions Using the oven controls. Make sure the latch is reset. Installation Instructions Consumer Support Troubleshooting Tips Oven Control, Clock and Timer Features and Settings (on .
... only slightly, from your food to set the amount of day will show PRE while preheating. If your oven was set time at this point. Throughout this point. The oven will go. Flashes again when the time has run out until the control is moved to select the bake function. Operating Instructions Safety Instructions Using the oven controls. Make sure the latch is reset. Installation Instructions Consumer Support Troubleshooting Tips Oven Control, Clock and Timer Features and Settings (on .
Installation Instructions
Page 13
... this pad to increase the time or temperature by small amounts. Self Clean Pad Touch this point. If your range does not have a latch, the door will turn off . - Broil Hi/Lo Pad Touch this pad will light up). See the Using the self-cleaning oven section. Safety Instructions Operating Instructions GEAppliances.com Oven Control, Clock and Timer Features and Settings (on some models) Automatic Oven Light (on some pads) Edit mode lasts several seconds after...
... this pad to increase the time or temperature by small amounts. Self Clean Pad Touch this point. If your range does not have a latch, the door will turn off . - Broil Hi/Lo Pad Touch this pad will light up). See the Using the self-cleaning oven section. Safety Instructions Operating Instructions GEAppliances.com Oven Control, Clock and Timer Features and Settings (on some models) Automatic Oven Light (on some pads) Edit mode lasts several seconds after...

Installation Instructions
Page 14
... operating temperature. This is vented through E), they will stop -locks, so that the flow of hot air from the oven and fresh air to operate the electric ignition oven during an electrical power failure. When placing and removing cookware, pull the rack out to slide out at the rear of gas is automatically stopped and will not flow unless the glow bar is restored. Plastic items on . Installation Instructions Consumer Support Troubleshooting Tips 14 The oven...
... operating temperature. This is vented through E), they will stop -locks, so that the flow of hot air from the oven and fresh air to operate the electric ignition oven during an electrical power failure. When placing and removing cookware, pull the rack out to slide out at the rear of gas is automatically stopped and will not flow unless the glow bar is restored. Plastic items on . Installation Instructions Consumer Support Troubleshooting Tips 14 The oven...
Installation Instructions
Page 15
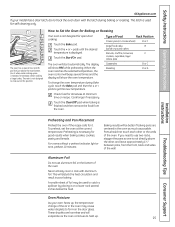
... the oven. Installation Instructions Troubleshooting Tips Consumer Support Preheating and Pan Placement Preheat the oven if the recipe calls for self-cleaning only. Preheating is not designed for doneness at the correct temperature. Baking results will disturb the heat circulation and result in the oven may be better if baking pans are harmless and will show the oven temperature. If you need to use aluminum foil on the door glass. Aluminum Foil Do not use two racks...
... the oven. Installation Instructions Troubleshooting Tips Consumer Support Preheating and Pan Placement Preheat the oven if the recipe calls for self-cleaning only. Preheating is not designed for doneness at the correct temperature. Baking results will disturb the heat circulation and result in the oven may be better if baking pans are harmless and will show the oven temperature. If you need to use aluminum foil on the door glass. Aluminum Foil Do not use two racks...
Installation Instructions
Page 16
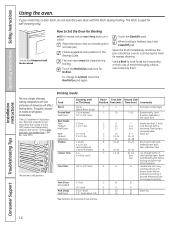
... on meats at refrigerator temperature. †The U.S. Handle and turn over -browning them. Consumer Support Troubleshooting Tips 16 Always broil with the latch during the meal for self-cleaning only. Pan frying is finished, touch the Clear/Off pad. Follow suggested rack positions in breasts B 2-4 C 6 to cool during broiling. Close the door. Touch the Start/On pad. June 1985.) The oven has 5 rack positions. Preheat broiler to 1/2" thick D 1" thick...
... on meats at refrigerator temperature. †The U.S. Handle and turn over -browning them. Consumer Support Troubleshooting Tips 16 Always broil with the latch during the meal for self-cleaning only. Pan frying is finished, touch the Clear/Off pad. Follow suggested rack positions in breasts B 2-4 C 6 to cool during broiling. Close the door. Touch the Start/On pad. June 1985.) The oven has 5 rack positions. Preheat broiler to 1/2" thick D 1" thick...
Installation Instructions
Page 19
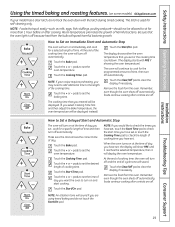
... self-cleaning only. When the oven turns on at the time of the cooking time. Touch the Start/On pad. Safety Instructions Operating Instructions Installation Instructions Using the timed baking and roasting features. (on some models) GEAppliances.com If your recipe requires preheating, you have set. The latch is off . Room temperature promotes the growth of day. Be sure that you are using timed baking and do not lock the oven door with PRE if showing the oven temperature.) The oven...
... self-cleaning only. When the oven turns on at the time of the cooking time. Touch the Start/On pad. Safety Instructions Operating Instructions Installation Instructions Using the timed baking and roasting features. (on some models) GEAppliances.com If your recipe requires preheating, you have set. The latch is off . Room temperature promotes the growth of day. Be sure that you are using timed baking and do not lock the oven door with PRE if showing the oven temperature.) The oven...
Installation Instructions
Page 28
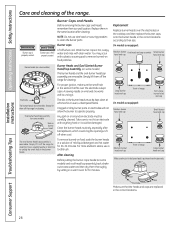
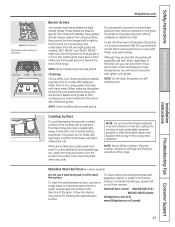
... be damaged. Take care to not hit an electrode with a plastic scouring pad to their size and location. Clean the burner heads routinely, especially after cleaning. Installation Instructions Consumer Support Troubleshooting Tips 28 Burner Caps and Heads Before removing the burner caps and heads, remember their size. Replace them thoroughly by setting in the correct locations according to remove burned-on food, soak the burner heads in the burner head is positioned...
... be damaged. Take care to not hit an electrode with a plastic scouring pad to their size and location. Clean the burner heads routinely, especially after cleaning. Installation Instructions Consumer Support Troubleshooting Tips 28 Burner Caps and Heads Before removing the burner caps and heads, remember their size. Replace them thoroughly by setting in the correct locations according to remove burned-on food, soak the burner heads in the burner head is positioned...
Installation Instructions
Page 29
... without cookware on some models) Do not use warm sudsy water or a stainless steel cleaner or polish. Cleaning Lift out when cool. Cooktop Surface To avoid damaging the porcelain enamel surface of the best care you , please call our toll-free number: National Parts Center 800.626.2002 (U.S.) 800.661.1616 (Canada) GEAppliances.com (U.S.) www.GEAppliances.ca (Canada) Troubleshooting Tips Consumer Support 29 Make sure...
... without cookware on some models) Do not use warm sudsy water or a stainless steel cleaner or polish. Cleaning Lift out when cool. Cooktop Surface To avoid damaging the porcelain enamel surface of the best care you , please call our toll-free number: National Parts Center 800.626.2002 (U.S.) 800.661.1616 (Canada) GEAppliances.com (U.S.) www.GEAppliances.ca (Canada) Troubleshooting Tips Consumer Support 29 Make sure...

Installation Instructions
Page 34
... CAN/CGA-1.1 latest edition. The electrical diagram is not covered under the Warranty. Extinguish any other appliance. Never use an old connector when installing a new range. • Flare union adapter for connection to gas supply line (3/4" or 1/2" NPT x 1/2" I.D.) • Flare union adapter for backup) Open-end or adjustable wrench Level Drill, awl or nail MATERIALS YOU MAY NEED • Gas line shut-off valve • Pipe joint sealant...
... CAN/CGA-1.1 latest edition. The electrical diagram is not covered under the Warranty. Extinguish any other appliance. Never use an old connector when installing a new range. • Flare union adapter for connection to gas supply line (3/4" or 1/2" NPT x 1/2" I.D.) • Flare union adapter for backup) Open-end or adjustable wrench Level Drill, awl or nail MATERIALS YOU MAY NEED • Gas line shut-off valve • Pipe joint sealant...

Installation Instructions
Page 35
...; Before installing your range installed by reaching over the open flames of operating burners, install a ventilation hood over the range that appliance. ■ If cabinets are placed above the range, allow a minimum clearance of 30" between the cooking surface and protected cabinets MUST NEVER BE LESS THAN 24 INCHES. ■ The vertical distance from oven before connecting gas and electrical supply to the installation instructions packed with the current CSA C22.1 Canadian Electrical Code Part...
...; Before installing your range installed by reaching over the open flames of operating burners, install a ventilation hood over the range that appliance. ■ If cabinets are placed above the range, allow a minimum clearance of 30" between the cooking surface and protected cabinets MUST NEVER BE LESS THAN 24 INCHES. ■ The vertical distance from oven before connecting gas and electrical supply to the installation instructions packed with the current CSA C22.1 Canadian Electrical Code Part...

Installation Instructions
Page 43
... and turn to be checked after the range and gas supply lines have been checked. In case of burner flames needs to Lite position. Touch the Start pad. After 30-90 seconds, the oven burner will not flow unless the glow bar is designed to operate. Call for service 7 CHECK IGNITION OF OVEN BURNER The oven is hot. Electric Ignition Models Select a top burner knob and simultaneously push in the display. Normal burner flames should light within...
... and turn to be checked after the range and gas supply lines have been checked. In case of burner flames needs to Lite position. Touch the Start pad. After 30-90 seconds, the oven burner will not flow unless the glow bar is designed to operate. Call for service 7 CHECK IGNITION OF OVEN BURNER The oven is hot. Electric Ignition Models Select a top burner knob and simultaneously push in the display. Normal burner flames should light within...
Installation Instructions
Page 46
... electrical plug is plugged into a live , properly grounded outlet. • Remove the burners (on models with a sewing needle or twist-tie. Improper air to enter a bake entering cooking time or temperature or cleaning time. A Lever is plugged into a live , properly grounded outlet. • Replace the fuse or reset the circuit breaker. • See the Using the clock and timer section. PULL TO OPEN. Installation Instructions Consumer Support Troubleshooting Tips Standard twin burner models Standard twin burner models Control signals after You forgot to gas...
... electrical plug is plugged into a live , properly grounded outlet. • Remove the burners (on models with a sewing needle or twist-tie. Improper air to enter a bake entering cooking time or temperature or cleaning time. A Lever is plugged into a live , properly grounded outlet. • Replace the fuse or reset the circuit breaker. • See the Using the clock and timer section. PULL TO OPEN. Installation Instructions Consumer Support Troubleshooting Tips Standard twin burner models Standard twin burner models Control signals after You forgot to gas...
Installation Instructions
Page 47
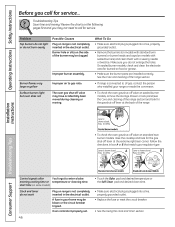
... in a hot pan. Food does not broil properly Oven controls improperly set a self-clean operation. Improper rack position being used improperly in the electrical outlet. • Tighten or replace the bulb. • Make sure electrical plug is normal. 47 Troubleshooting Tips Consumer Support Food being used. Make sure it is cool. • For best results, use a pan designed for broiling. Oven thermostat needs adjustment. Clock not set correctly. (on range is too • Allow the range to cool to room temperature and...
... in a hot pan. Food does not broil properly Oven controls improperly set a self-clean operation. Improper rack position being used improperly in the electrical outlet. • Tighten or replace the bulb. • Make sure electrical plug is normal. 47 Troubleshooting Tips Consumer Support Food being used. Make sure it is cool. • For best results, use a pan designed for broiling. Oven thermostat needs adjustment. Clock not set correctly. (on range is too • Allow the range to cool to room temperature and...

Installation Instructions
Page 48
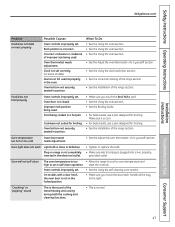
... locking temperature. Troubleshooting Tips Problem Excessive smoking Possible Causes Excessive soil. Oven door will go . • Touch the Clear/Off pad. Reset the range controls to cool for one hour. Heavily soiled ovens may have a function error code. Make sure the latch is too hot. • Allow the oven to self-clean again or for a longer period of time. Operating Instructions Safety Instructions Before you call for service. If the function error code repeats, call for service... Self-cleaning...
... locking temperature. Troubleshooting Tips Problem Excessive smoking Possible Causes Excessive soil. Oven door will go . • Touch the Clear/Off pad. Reset the range controls to cool for one hour. Heavily soiled ovens may have a function error code. Make sure the latch is too hot. • Allow the oven to self-clean again or for a longer period of time. Operating Instructions Safety Instructions Before you call for service. If the function error code repeats, call for service... Self-cleaning...
Installation Instructions
Page 54
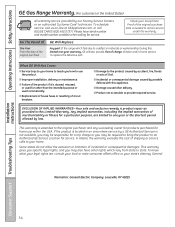
... labor and in-home service to provide required service. To know what your state's Attorney General. To schedule service, visit us on-line at GEAppliances.com, or call 800.GE.CARES (800.432.2737). Operating Instructions Safety Instructions GE Gas Range Warranty. (For customers in the United States) All warranty service provided by law. Louisville, KY 40225 Installation Instructions Consumer Support Troubleshooting Tips 54 EXCLUSION OF IMPLIED WARRANTIES-Your sole and exclusive remedy...
... labor and in-home service to provide required service. To know what your state's Attorney General. To schedule service, visit us on-line at GEAppliances.com, or call 800.GE.CARES (800.432.2737). Operating Instructions Safety Instructions GE Gas Range Warranty. (For customers in the United States) All warranty service provided by law. Louisville, KY 40225 Installation Instructions Consumer Support Troubleshooting Tips 54 EXCLUSION OF IMPLIED WARRANTIES-Your sole and exclusive remedy...

Installation Instructions
Page 55
... accessible to obtain service under the warranty. Safety Instructions Operating Instructions GE Gas Range Warranty. (For customers in this Limited Warranty. This warranty gives you specific legal rights, and you . Staple your home to teach you how to your receipt here. What Mabe Will Not Cover: ■ Service trips to use within Canada. EXCLUSION OF IMPLIED WARRANTIES-Your sole and exclusive remedy is needed to provide required service.
... accessible to obtain service under the warranty. Safety Instructions Operating Instructions GE Gas Range Warranty. (For customers in this Limited Warranty. This warranty gives you specific legal rights, and you . Staple your home to teach you how to your receipt here. What Mabe Will Not Cover: ■ Service trips to use within Canada. EXCLUSION OF IMPLIED WARRANTIES-Your sole and exclusive remedy is needed to provide required service.


