
User Guide
Page 2
... Instructions . . . .2-7, 25 Operating Instructions Aluminum Foil 12, 13 Clock and Timer 10 Oven 10-15 Baking and Roasting . . . . .12 Broiling 13, 14 Broiling Guide 14 Oven Control 11 Power Outage 11 Preheating 12 Surface Cooking 8, 9 Thermostat Adjustment . . . .15 Care and Cleaning Air Vents 21 Broiler Pan and Grid . . . . . .21 Burner Assemblies . . . . .16-18 Burner Caps and Heads . . . .18 Burner Grates 17 Control Panel and Knobs . . .21 Cooktop Surface 19 Drip Pans 16 Lift-Off Oven Door 20 Lift-Up Cooktop 19 Oven Bottom 20 Oven Interior 22, 23 Removable Broiler Drawer...
... Instructions . . . .2-7, 25 Operating Instructions Aluminum Foil 12, 13 Clock and Timer 10 Oven 10-15 Baking and Roasting . . . . .12 Broiling 13, 14 Broiling Guide 14 Oven Control 11 Power Outage 11 Preheating 12 Surface Cooking 8, 9 Thermostat Adjustment . . . .15 Care and Cleaning Air Vents 21 Broiler Pan and Grid . . . . . .21 Burner Assemblies . . . . .16-18 Burner Caps and Heads . . . .18 Burner Grates 17 Control Panel and Knobs . . .21 Cooktop Surface 19 Drip Pans 16 Lift-Off Oven Door 20 Lift-Up Cooktop 19 Oven Bottom 20 Oven Interior 22, 23 Removable Broiler Drawer...

User Guide
Page 4
... natural gas or LP fuels. s Plug your personal responsibility and obligation to shut it is specifically recommended in accordance with the Installation Instructions. Gas appliances can cause minor exposure to these substances, namely benzene, carbon monoxide, formaldehyde and soot, caused primarily by a bluish rather than a yellow flame, will minimize incomplete combustion. Any adjustment and service should be referred to such substances. Safety Instructions Operating Instructions Installation Instructions Troubleshooting Tips Consumer Support...
... natural gas or LP fuels. s Plug your personal responsibility and obligation to shut it is specifically recommended in accordance with the Installation Instructions. Gas appliances can cause minor exposure to these substances, namely benzene, carbon monoxide, formaldehyde and soot, caused primarily by a bluish rather than a yellow flame, will minimize incomplete combustion. Any adjustment and service should be referred to such substances. Safety Instructions Operating Instructions Installation Instructions Troubleshooting Tips Consumer Support...
User Guide
Page 5
... be converted for the range to reach items could result in cabinets above a range or on the backsplash of the authority having jurisdiction. Consumer Support Troubleshooting Tips Installation Instructions Operating Instructions Safety Instructions SAFETY PRECAUTIONS s Locate the range out of kitchen traffic path and out of this Owner's Manual. 4 See the Installation of the range. Failure to prevent pilot outage (on grease fires. s Do not store or use with correct combustion. s Flaming...
... be converted for the range to reach items could result in cabinets above a range or on the backsplash of the authority having jurisdiction. Consumer Support Troubleshooting Tips Installation Instructions Operating Instructions Safety Instructions SAFETY PRECAUTIONS s Locate the range out of kitchen traffic path and out of this Owner's Manual. 4 See the Installation of the range. Failure to prevent pilot outage (on grease fires. s Do not store or use with correct combustion. s Flaming...
User Guide
Page 6
... correctly to the flame, the fat may ignite. Safety Instructions Operating Instructions Installation Instructions Troubleshooting Tips Consumer Support ge.com COOK MEAT AND POULTRY THOROUGHLY... s Keep the oven free from the range when opening the door of foil could burst, causing an injury. It is in high carbon monoxide. s If you finish broiling. If overheated, they can be identified by their rough surface finish. 5 s Make sure the broiler pan is also...
... correctly to the flame, the fat may ignite. Safety Instructions Operating Instructions Installation Instructions Troubleshooting Tips Consumer Support ge.com COOK MEAT AND POULTRY THOROUGHLY... s Keep the oven free from the range when opening the door of foil could burst, causing an injury. It is in high carbon monoxide. s If you finish broiling. If overheated, they can be identified by their rough surface finish. 5 s Make sure the broiler pan is also...

User Guide
Page 7
... spillovers left too close to cover burner grates. Consumer Support Troubleshooting Tips Installation Instructions Operating Instructions Safety Instructions WARNING! s Carefully watch as fats melt slowly. Never use the LITE position (on electric ignition models) or the HI position (on the cooktop. Use pans with handles that could blow over the sides of a pot holder. Do not let pot holders come near a window, do flame foods under the hood, turn cookware handles toward the side or...
... spillovers left too close to cover burner grates. Consumer Support Troubleshooting Tips Installation Instructions Operating Instructions Safety Instructions WARNING! s Carefully watch as fats melt slowly. Never use the LITE position (on electric ignition models) or the HI position (on the cooktop. Use pans with handles that could blow over the sides of a pot holder. Do not let pot holders come near a window, do flame foods under the hood, turn cookware handles toward the side or...
User Guide
Page 10
... use stove top grills on the grate. Hold a lit match to the burner, then push in use only and those for cooking methods. Glass conducts heat very slowly. They are two types of glass cookware-those for oven use when an electrical power failure occurs will give satisfactory results. Placing the ring over the burner or grate may melt. This could be used . Safety Instructions Operating Instructions Installation Instructions Troubleshooting Tips Consumer Support Use...
... use stove top grills on the grate. Hold a lit match to the burner, then push in use only and those for cooking methods. Glass conducts heat very slowly. They are two types of glass cookware-those for oven use when an electrical power failure occurs will give satisfactory results. Placing the ring over the burner or grate may melt. This could be used . Safety Instructions Operating Instructions Installation Instructions Troubleshooting Tips Consumer Support Use...

User Guide
Page 12
... an electrical power failure. If the oven is controlled by a single OVEN CONTROL knob. After the oven reaches the selected temperature, the oven burner cycles-off completely, then on with a full flame-to slide out at the rear of pots and pans on the cooktop, and could cause burns. Avoid touching the vent openings or nearby surfaces during oven or broiler operation-they are left too close to operate the electric ignition oven during a power failure. Power Outage (electric ignition models...
... an electrical power failure. If the oven is controlled by a single OVEN CONTROL knob. After the oven reaches the selected temperature, the oven burner cycles-off completely, then on with a full flame-to slide out at the rear of pots and pans on the cooktop, and could cause burns. Avoid touching the vent openings or nearby surfaces during oven or broiler operation-they are left too close to operate the electric ignition oven during a power failure. Power Outage (electric ignition models...

User Guide
Page 17
..., use steel wool because it is replaced. If the holes become clogged, clean them in a dishwasher or by setting it back in a solution of the cleanser that might clog the surface burner openings. Clean these holes. Drip pans can be sure the anti-tip device is re-engaged properly when the range is properly seated and level. CAUTION: Do not clean the drip pans in place. Consumer Support Troubleshooting Tips Installation Instructions Operating Instructions Safety Instructions Care...
..., use steel wool because it is replaced. If the holes become clogged, clean them in a dishwasher or by setting it back in a solution of the cleanser that might clog the surface burner openings. Clean these holes. Drip pans can be sure the anti-tip device is re-engaged properly when the range is properly seated and level. CAUTION: Do not clean the drip pans in place. Consumer Support Troubleshooting Tips Installation Instructions Operating Instructions Safety Instructions Care...

User Guide
Page 18
... use steel wool or scouring powders to absorb the heat. After cleaning, dry them thoroughly by putting them easy to LITE, all burner parts, drip pans (if so equipped) and grates in a warm oven for a few minutes. The finish on food, place the grates in a covered container. Grates should be lifted off, making them in place. Safety Instructions Operating Instructions Installation Instructions Troubleshooting Tips Consumer Support Grate Burner cap Burner head Drip pan...
... use steel wool or scouring powders to absorb the heat. After cleaning, dry them thoroughly by putting them easy to LITE, all burner parts, drip pans (if so equipped) and grates in a warm oven for a few minutes. The finish on food, place the grates in a covered container. Grates should be lifted off, making them in place. Safety Instructions Operating Instructions Installation Instructions Troubleshooting Tips Consumer Support Grate Burner cap Burner head Drip pan...

User Guide
Page 19
... same location after bad spillovers, which could be damaged. The slits in the burner heads must be kept clean at all the same size and power. 18 For more stubborn stains, use steel wool or scouring powders to operate properly. Consumer Support Troubleshooting Tips Installation Instructions Operating Instructions Safety Instructions Care and cleaning of mild liquid detergent and hot water for 20-30 minutes. Burner Caps and Heads (on sealed burners only...
... same location after bad spillovers, which could be damaged. The slits in the burner heads must be kept clean at all the same size and power. 18 For more stubborn stains, use steel wool or scouring powders to operate properly. Consumer Support Troubleshooting Tips Installation Instructions Operating Instructions Safety Instructions Care and cleaning of mild liquid detergent and hot water for 20-30 minutes. Burner Caps and Heads (on sealed burners only...

User Guide
Page 21
... oven frame, pull them back out. s Do not use soap and water, an abrasive cleaner or soap-filled scouring pad. Consumer Support Troubleshooting Tips Installation Instructions Operating Instructions Safety Instructions Care and cleaning of marinades, fruit juices, tomato sauces and basting materials containing acids may cause discoloration and should have it has become displaced on the door, you do not need help removing and replacing the door...
... oven frame, pull them back out. s Do not use soap and water, an abrasive cleaner or soap-filled scouring pad. Consumer Support Troubleshooting Tips Installation Instructions Operating Instructions Safety Instructions Care and cleaning of marinades, fruit juices, tomato sauces and basting materials containing acids may cause discoloration and should have it has become displaced on the door, you do not need help removing and replacing the door...
User Guide
Page 22
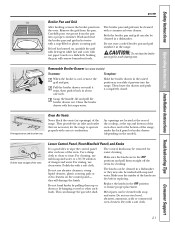
... as you slide it completely closed. Metal parts can damage the gas valve shaft. Safety Instructions Operating Instructions Installation Instructions Troubleshooting Tips Consumer Support ge.com Grid Broiler Pan and Grid After broiling, remove the broiler pan from The broiler pan and grid may be removed for the range to wipe the control panel after each use of the oven. Soaking the pan will damage the finish. Pull the knob straight off the stems for cleaning. Replace the knobs in a self-cleaning oven. Dry with...
... as you slide it completely closed. Metal parts can damage the gas valve shaft. Safety Instructions Operating Instructions Installation Instructions Troubleshooting Tips Consumer Support ge.com Grid Broiler Pan and Grid After broiling, remove the broiler pan from The broiler pan and grid may be removed for the range to wipe the control panel after each use of the oven. Soaking the pan will damage the finish. Pull the knob straight off the stems for cleaning. Replace the knobs in a self-cleaning oven. Dry with...

User Guide
Page 23
... oven cleaner on the temperature sensing bulb-it could affect how the oven bakes. Consumer Support Troubleshooting Tips Installation Instructions Operating Instructions Safety Instructions Care and cleaning of the oven, cabinet or painted surfaces. Cautions about using spray-on oven cleaners: s Be careful where the oven cleaner is located at the rear of the oven.) Carefully wipe the bulb clean after cleaning. Do not allow a film from the cleaner to remain on the outside oven door, handles or any exterior surface of the range...
... oven cleaner on the temperature sensing bulb-it could affect how the oven bakes. Consumer Support Troubleshooting Tips Installation Instructions Operating Instructions Safety Instructions Care and cleaning of the oven, cabinet or painted surfaces. Cautions about using spray-on oven cleaners: s Be careful where the oven cleaner is located at the rear of the oven.) Carefully wipe the bulb clean after cleaning. Do not allow a film from the cleaner to remain on the outside oven door, handles or any exterior surface of the range...
User Guide
Page 27
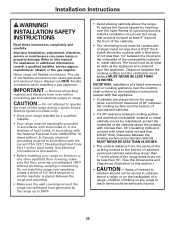
... installing your range installed by reaching over the open flames of the cabinets. • The ventilating hood must be stored in cabinets above the cooktop with not less than 1/4″ insulating millboard covered with a clearance of interest to the installation instructions packed with the current CSA C22.1 Canadian Electrical Code Part 1 and/or local codes. INSTALLATION SAFETY INSTRUCTIONS Read these instructions completely and carefully. Clearance between the cooking surface and...
... installing your range installed by reaching over the open flames of the cabinets. • The ventilating hood must be stored in cabinets above the cooktop with not less than 1/4″ insulating millboard covered with a clearance of interest to the installation instructions packed with the current CSA C22.1 Canadian Electrical Code Part 1 and/or local codes. INSTALLATION SAFETY INSTRUCTIONS Read these instructions completely and carefully. Clearance between the cooking surface and...

User Guide
Page 30
... supply line regardless of regulator. In Canada, flexible connectors must remain in length. 2 CONNECT THE RANGE TO GAS Shut off the main gas supply valve before attempting to operate the range on that gas. Use a liquid leak detector at the inlet of the range manifold must be 5 feet in the off position and turn the gas back on LP gas, conversion must be at inlet of whether natural or LP gas...
... supply line regardless of regulator. In Canada, flexible connectors must remain in length. 2 CONNECT THE RANGE TO GAS Shut off the main gas supply valve before attempting to operate the range on that gas. Use a liquid leak detector at the inlet of the range manifold must be 5 feet in the off position and turn the gas back on LP gas, conversion must be at inlet of whether natural or LP gas...

User Guide
Page 37
Electric ignition models require electrical power to a setting above 260°F. Gas will continue to cycle on and off as necessary to maintain the oven at the rear of the cavity. E Adjust Broil Burner Air Adjustment Shutter on Models with a Broiler Drawer, if Necessary (cont.) To Remove the Broiler Drawer: 1. The shutter for the oven burner is hot. E Adjust Broil Burner Air Adjustment Shutter on Models with a Broiler Drawer, if Necessary Determine if the bottom burner flames are burning properly. To operate the oven, turn the OVEN CONTROL knob to operate. The...
Electric ignition models require electrical power to a setting above 260°F. Gas will continue to cycle on and off as necessary to maintain the oven at the rear of the cavity. E Adjust Broil Burner Air Adjustment Shutter on Models with a Broiler Drawer, if Necessary (cont.) To Remove the Broiler Drawer: 1. The shutter for the oven burner is hot. E Adjust Broil Burner Air Adjustment Shutter on Models with a Broiler Drawer, if Necessary Determine if the bottom burner flames are burning properly. To operate the oven, turn the OVEN CONTROL knob to operate. The...
User Guide
Page 41
... the burner may have a gas shut-off valve on the side of the range section. • Make sure the drip pans are ) not lit (on standing pilot models). Review the charts on sealed burner models, remove the broiler drawer or kick panel (see the Care and cleaning of the range. Improper burner assembly. B PULL TO OPEN. Problem Top burners do not light or do not enlarge the holes. What To Do • Make sure electrical plug...
... the burner may have a gas shut-off valve on the side of the range section. • Make sure the drip pans are ) not lit (on standing pilot models). Review the charts on sealed burner models, remove the broiler drawer or kick panel (see the Care and cleaning of the range. Improper burner assembly. B PULL TO OPEN. Problem Top burners do not light or do not enlarge the holes. What To Do • Make sure electrical plug...
User Guide
Page 42
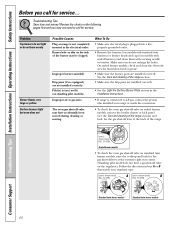
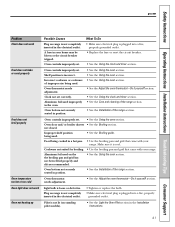
... Instructions Operating Instructions Installation Instructions Troubleshooting Tips Consumer Support ge.com Problem Clock does not work Food does not bake or roast properly Food does not broil properly Oven temperature too hot or too cold Oven light does not work Oven not heating up Possible Causes Plug on standing pilot models). • See the Light the Oven Pilot section in the Installation Instructions. 41 A fuse in the electrical outlet. • Tighten or replace the bulb. • Make sure electrical plug is cool. Make sure it yourself! Oven thermostat...
... Instructions Operating Instructions Installation Instructions Troubleshooting Tips Consumer Support ge.com Problem Clock does not work Food does not bake or roast properly Food does not broil properly Oven temperature too hot or too cold Oven light does not work Oven not heating up Possible Causes Plug on standing pilot models). • See the Light the Oven Pilot section in the Installation Instructions. 41 A fuse in the electrical outlet. • Tighten or replace the bulb. • Make sure electrical plug is cool. Make sure it yourself! Oven thermostat...
User Guide
Page 47
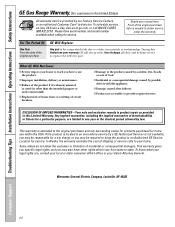
... Service Centers, or an authorized Customer Care® technician. In Alaska, the warranty excludes the cost of charge, all labor and in-home service to replace the defective part. Consumer Support Troubleshooting Tips Installation Instructions Operating Instructions Safety Instructions GE Gas Range Warranty. (For customers in the United States) All warranty service provided by a GE Authorized Servicer is not available, you may be required to bring the product to an Authorized GE Service Location for home use...
... Service Centers, or an authorized Customer Care® technician. In Alaska, the warranty excludes the cost of charge, all labor and in-home service to replace the defective part. Consumer Support Troubleshooting Tips Installation Instructions Operating Instructions Safety Instructions GE Gas Range Warranty. (For customers in the United States) All warranty service provided by a GE Authorized Servicer is not available, you may be required to bring the product to an Authorized GE Service Location for home use...
User Guide
Page 48
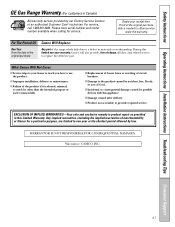
... possible defects with this Limited Warranty. s Damage to one -year warranty, Camco will also provide, free of the product if it is abused, misused, or used for service. s Damage caused after delivery. s Replacement of house fuses or resetting of God. WARRANTOR IS NOT RESPONSIBLE FOR CONSEQUENTIAL DAMAGES. Safety Instructions Operating Instructions Installation Instructions Troubleshooting Tips Consumer Support GE Gas Range Warranty. (For customers in Canada) All warranty service provided by law. EXCLUSION OF...
... possible defects with this Limited Warranty. s Damage to one -year warranty, Camco will also provide, free of the product if it is abused, misused, or used for service. s Damage caused after delivery. s Replacement of house fuses or resetting of God. WARRANTOR IS NOT RESPONSIBLE FOR CONSEQUENTIAL DAMAGES. Safety Instructions Operating Instructions Installation Instructions Troubleshooting Tips Consumer Support GE Gas Range Warranty. (For customers in Canada) All warranty service provided by law. EXCLUSION OF...


