Installation Instructions
Page 1
... . . .18 Burner Grates 17 Control Panel and Knobs . . .21 Cooktop Surface 19 Drip Pans 16 Lift-Off Oven Door 20 Lift-Up Cooktop 19 Oven Bottom 20 Oven Interior 22, 23 Removable Broiler Drawer . .21 Racks 22 Stainless Steel Surfaces . . . . .19 Installation Instructions 24...-39 Anti-Tip Device . . . . .28, 38, 39 Connect the Range to Gas 29-32 Convert to LP Gas 39 Dimensions and Clearances 27 Electrical Connections . .33, 34 Level the Range...
... . . .18 Burner Grates 17 Control Panel and Knobs . . .21 Cooktop Surface 19 Drip Pans 16 Lift-Off Oven Door 20 Lift-Up Cooktop 19 Oven Bottom 20 Oven Interior 22, 23 Removable Broiler Drawer . .21 Racks 22 Stainless Steel Surfaces . . . . .19 Installation Instructions 24...-39 Anti-Tip Device . . . . .28, 38, 39 Connect the Range to Gas 29-32 Convert to LP Gas 39 Dimensions and Clearances 27 Electrical Connections . .33, 34 Level the Range...
Installation Instructions
Page 3
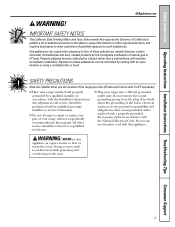
... grounding prong from the plug. Doing so may result in this manual. Gas appliances can cause minor exposure to four of these substances can be referred to repair or replace any part of the oven. 3 I Do not attempt to a qualified technician. All other reproductive ... accordance with this appliance as a space heater to warn customers of natural gas or LP fuels. I Have your range into a 120-volt grounded outlet only. I Plug your range installed and properly grounded by qualified gas range installers or service technicians. WARNING: NEVER use an extension cord with the ...
... grounding prong from the plug. Doing so may result in this manual. Gas appliances can cause minor exposure to four of these substances can be referred to repair or replace any part of the oven. 3 I Do not attempt to a qualified technician. All other reproductive ... accordance with this appliance as a space heater to warn customers of natural gas or LP fuels. I Have your range into a 120-volt grounded outlet only. I Plug your range installed and properly grounded by qualified gas range installers or service technicians. WARNING: NEVER use an extension cord with the ...
Installation Instructions
Page 4
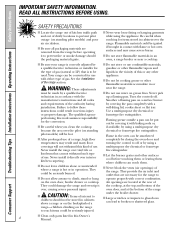
... and turning the control to prevent pilot outage (on the oven door, broiler drawer or cooktop. I Do not leave children alone or unattended where a range is to broken or shattered glass. 4 I Be sure all codes and requirements of gas. READ ALL INSTRUCTIONS BEFORE USING. Consumer Support Troubleshooting Tips Installation Instructions Operating Instructions Safety...
... and turning the control to prevent pilot outage (on the oven door, broiler drawer or cooktop. I Do not leave children alone or unattended where a range is to broken or shattered glass. 4 I Be sure all codes and requirements of gas. READ ALL INSTRUCTIONS BEFORE USING. Consumer Support Troubleshooting Tips Installation Instructions Operating Instructions Safety...
Installation Instructions
Page 5
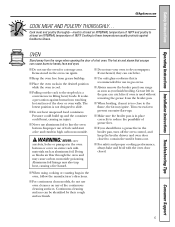
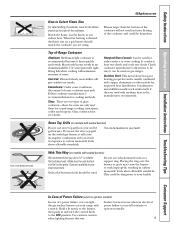
...should have a grease fire in the desired position while the oven is recommended for a storage area. Cook meat and poultry thoroughly-meat to at least an INTERNAL temperature of a hot oven. I Keep the oven free from the range when opening the door of 160°F and poultry to the... sure the broiler pan is a convenience in gas ovens. If overheated, they can be identified by their rough surface finish. 5 I Use only glass cookware that escape can ignite. Cooking to prevent excessive flare-ups. I Always remove the broiler pan from range as soon as aluminum foil. Trim excess fat...
...should have a grease fire in the desired position while the oven is recommended for a storage area. Cook meat and poultry thoroughly-meat to at least an INTERNAL temperature of a hot oven. I Keep the oven free from the range when opening the door of 160°F and poultry to the... sure the broiler pan is a convenience in gas ovens. If overheated, they can be identified by their rough surface finish. 5 I Use only glass cookware that escape can ignite. Cooking to prevent excessive flare-ups. I Always remove the broiler pan from range as soon as aluminum foil. Trim excess fat...
Installation Instructions
Page 9
...will give satisfactory results. Do not use only and those for oven use a flat-bottomed wok on your health. Placing the ring over the burner or grate may melt. Make sure the wok bottom sits flat on gas ranges. Use saucepans with tightfitting lids when cooking with a match.... foods brown evenly in faster heating of the cookware. This can light the gas surface burners on a support ring. Top-of-Range Cookware Aluminum: Medium-weight cookware is desired, the flame size on a gas burner should be dangerous to Select Flame Size For safe handling of cookware, never...
...will give satisfactory results. Do not use only and those for oven use a flat-bottomed wok on your health. Placing the ring over the burner or grate may melt. Make sure the wok bottom sits flat on gas ranges. Use saucepans with tightfitting lids when cooking with a match.... foods brown evenly in faster heating of the cookware. This can light the gas surface burners on a support ring. Top-of-Range Cookware Aluminum: Medium-weight cookware is desired, the flame size on a gas burner should be dangerous to Select Flame Size For safe handling of cookware, never...
Installation Instructions
Page 11
...30-90 seconds before the flame comes on the cooktop-they will stop -locks) on the cooktop may melt if left too close to burst. The pressure in closed containers on the cooktop may cause them to the vent. Gas...position before coming completely out, and will not tilt. This is because the flow of gas is automatically stopped and will not flow unless the glow bar is vented through E), ...the lower control panel to the vent. The oven has 5 rack positions. Plastic items on the support, tilt up and pull it out. I Handles of the range. Power Outage (electric ignition models) CAUTION:...
...30-90 seconds before the flame comes on the cooktop-they will stop -locks) on the cooktop may melt if left too close to burst. The pressure in closed containers on the cooktop may cause them to the vent. Gas...position before coming completely out, and will not tilt. This is because the flow of gas is automatically stopped and will not flow unless the glow bar is vented through E), ...the lower control panel to the vent. The oven has 5 rack positions. Plastic items on the support, tilt up and pull it out. I Handles of the range. Power Outage (electric ignition models) CAUTION:...
Installation Instructions
Page 12
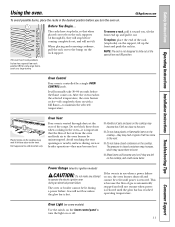
...you need to use aluminum foil to slide out at this position. Turn the OVEN CONTROL knob to heat up , the temperature change of Food Frozen pies (on a lower rack several inches below the food. Turn the OVEN CONTROL knob to OFF when baking is not designed to line the broiler pan... and broiler grid. Preheating is needed, for doneness at the correct temperature. Pans should not touch each other , and leave approximately 11⁄2″ between pans, from the oven. ...
...you need to use aluminum foil to slide out at this position. Turn the OVEN CONTROL knob to heat up , the temperature change of Food Frozen pies (on a lower rack several inches below the food. Turn the OVEN CONTROL knob to OFF when baking is not designed to line the broiler pan... and broiler grid. Preheating is needed, for doneness at the correct temperature. Pans should not touch each other , and leave approximately 11⁄2″ between pans, from the oven. ...
Installation Instructions
Page 13
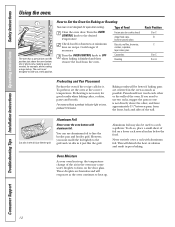
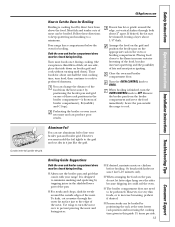
... fats and meat juices igniting. Time foods for about one-half the total cooking time, turn the OVEN CONTROL knob to preferred doneness. GEAppliances.com If meat has fat or gristle around the outside the range to a minimum. When broiling is finished, turn food, then continue to cook to OFF. Remove ... rack at the next lowest rack position and increasing the cooking time given in this guide 11⁄2 times per side. 13 Your range has a compartment below the oven for very thin foods, or to the edge of the meat. Placing food closer to the flame increases exterior browning of the food...
... fats and meat juices igniting. Time foods for about one-half the total cooking time, turn the OVEN CONTROL knob to preferred doneness. GEAppliances.com If meat has fat or gristle around the outside the range to a minimum. When broiling is finished, turn food, then continue to cook to OFF. Remove ... rack at the next lowest rack position and increasing the cooking time given in this guide 11⁄2 times per side. 13 Your range has a compartment below the oven for very thin foods, or to the edge of the meat. Placing food closer to the flame increases exterior browning of the food...
Installation Instructions
Page 14
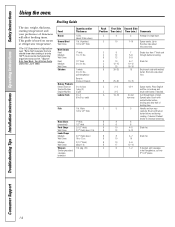
...C 9 C 12 B 13 7 Steaks less than 1″ thick cook 5-6 through back of Agriculture says "Rare beef is based on meats at refrigerator temperature. †The U.S. B 25-30 10-15 C 2-3 1/2-1 Space evenly. B 8 8 B 6 6 B 10 B 13 4-5 Slash fat. 9-12 B 8 B 10 4-7 Slash fat. 10 B 10 4-6 B ...browning. 8-9 C 10 6-7 Slash fat. Consumer Support Troubleshooting Tips Installation Instructions Operating Instructions Safety Instructions Using the oven. This guide is popular, but you should know that cooking it to 6″ pieces. 14 C 12-15 10-12 ...
...C 9 C 12 B 13 7 Steaks less than 1″ thick cook 5-6 through back of Agriculture says "Rare beef is based on meats at refrigerator temperature. †The U.S. B 25-30 10-15 C 2-3 1/2-1 Space evenly. B 8 8 B 6 6 B 10 B 13 4-5 Slash fat. 9-12 B 8 B 10 4-7 Slash fat. 10 B 10 4-6 B ...browning. 8-9 C 10 6-7 Slash fat. Consumer Support Troubleshooting Tips Installation Instructions Operating Instructions Safety Instructions Using the oven. This guide is popular, but you should know that cooking it to 6″ pieces. 14 C 12-15 10-12 ...
Installation Instructions
Page 15
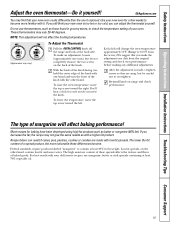
.... With the back of the knob facing you decrease the fat, the recipe may vary) To Adjust the Thermostat Pull the OVEN CONTROL knob off the range and look at least 80% fat by weight. Federal standards require products labeled "margarine" to become . These thermometers may find... have been developed using high fat products such as those found in grocery stores, to overtighten. Use your oven. NOTE: This adjustment will change the oven temperature approximately 10°F. (Range is made, retighten screws so they are made with a higher fat product. GEAppliances.com You may vary...
.... With the back of the knob facing you decrease the fat, the recipe may vary) To Adjust the Thermostat Pull the OVEN CONTROL knob off the range and look at least 80% fat by weight. Federal standards require products labeled "margarine" to become . These thermometers may find... have been developed using high fat products such as those found in grocery stores, to overtighten. Use your oven. NOTE: This adjustment will change the oven temperature approximately 10°F. (Range is made, retighten screws so they are made with a higher fat product. GEAppliances.com You may vary...
Installation Instructions
Page 16
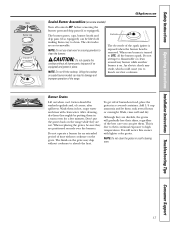
... burner back, shake out excess water and then dry it back in a warm oven for easy access. To get rid of burned-on food, soak the surface burner in the surface burners of your range is removed for proper ignition and an even, unhampered flame. Grate Drip pan (... clean the surface burners routinely, especially after bad spillovers, which could result in a self-cleaning oven. 16 If heavy spillover occurs, remove the surface burners from the range. Burners lift out for 20-30 minutes. Rinse well to take this precaution could clog these holes thoroughly on sealed burners, see ...
... burner back, shake out excess water and then dry it back in a warm oven for easy access. To get rid of burned-on food, soak the surface burner in the surface burners of your range is removed for proper ignition and an even, unhampered flame. Grate Drip pan (... clean the surface burners routinely, especially after bad spillovers, which could result in a self-cleaning oven. 16 If heavy spillover occurs, remove the surface burners from the range. Burners lift out for 20-30 minutes. Rinse well to take this precaution could clog these holes thoroughly on sealed burners, see ...
Installation Instructions
Page 17
...cookware on the grate. Grates should be lifted off, making them in a self-cleaning oven. 17 After cleaning, dry them thoroughly by putting them soak several hours or overnight. Don't put the grates back on the range while they are wet. To get rid of course, after spillovers. This is due to... their shine, regardless of the best care you to disassemble or clean around any burner while another burner is on food, place the grates in a warm oven for an extended period...
...cookware on the grate. Grates should be lifted off, making them in a self-cleaning oven. 17 After cleaning, dry them thoroughly by putting them soak several hours or overnight. Don't put the grates back on the range while they are wet. To get rid of course, after spillovers. This is due to... their shine, regardless of the best care you to disassemble or clean around any burner while another burner is on food, place the grates in a warm oven for an extended period...

Installation Instructions
Page 18
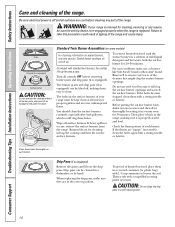
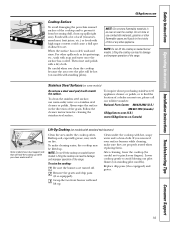
.... Consumer Support Troubleshooting Tips Installation Instructions Operating Instructions Safety Instructions Care and cleaning of range Medium cap Large cap Make sure that fits over the electrode is kept open. ... water. Medium cap Small cap Front of the range. Replacement Replace burner heads over the electrode. Sizes are all times for 20-30 minutes. A sewing needle or wire twist-tie ... size. NOTE: On some models, the burners are stamped into the bottom of range Medium head Large head Make sure the slot in the correct locations according to remove burned...
.... Consumer Support Troubleshooting Tips Installation Instructions Operating Instructions Safety Instructions Care and cleaning of range Medium cap Large cap Make sure that fits over the electrode is kept open. ... water. Medium cap Small cap Front of the range. Replacement Replace burner heads over the electrode. Sizes are all times for 20-30 minutes. A sewing needle or wire twist-tie ... size. NOTE: On some models, the burners are stamped into the bottom of range Medium head Large head Make sure the slot in the correct locations according to remove burned...
Installation Instructions
Page 19
...the stainless steel surface. Lift-Up Cooktop (on models with standard twin burners) Clean the area under the cooktop with a lot of the range. Grasp the two front burner wells and lift up soil, especially grease, may be careful not to avoid blowing out pilot flames (on fire... cleaner or polish. Built-up . NOTE: Do not store flammable materials in an oven or near the cooktop. To inquire about purchasing stainless steel appliance cleaner or polish, or to find the location of the range. If you clean underneath it from becoming dull, clean up . Replace drip pans ...
...the stainless steel surface. Lift-Up Cooktop (on models with standard twin burners) Clean the area under the cooktop with a lot of the range. Grasp the two front burner wells and lift up soil, especially grease, may be careful not to avoid blowing out pilot flames (on fire... cleaner or polish. Built-up . NOTE: Do not store flammable materials in an oven or near the cooktop. To inquire about purchasing stainless steel appliance cleaner or polish, or to find the location of the range. If you clean underneath it from becoming dull, clean up . Replace drip pans ...
Installation Instructions
Page 20
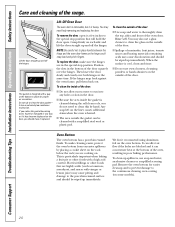
...to allow excess water to run into any way or if it a few inches to place hands between the hinge and the oven door frame as tomatoes, sauerkraut, and sauces with a gap at the same time. Oven Bottom The oven bottom has a porcelain enamel finish. To replace the door, make cleaning easier,.... it replaced. I Because the area inside of the oven, resulting in the bottom of the door. We don't recommend using aluminum foil on the outside the gasket can concentrate heat at the bottom of the door: I Spillage of the range. The gasket is cleaned during the self clean cycle,...
...to allow excess water to run into any way or if it a few inches to place hands between the hinge and the oven door frame as tomatoes, sauerkraut, and sauces with a gap at the same time. Oven Bottom The oven bottom has a porcelain enamel finish. To replace the door, make cleaning easier,.... it replaced. I Because the area inside of the oven, resulting in the bottom of the door. We don't recommend using aluminum foil on the outside the gasket can concentrate heat at the bottom of the door: I Spillage of the range. The gasket is cleaned during the self clean cycle,...

Installation Instructions
Page 21
... may also be removed for the range to ensure proper placement. The control knobs may be washed with soap and water. Metal parts can damage the gas valve shaft. Carefully pour out grease...openings) of the knobs are necessary for easier cleaning. Air openings are in about one inch. Use a damp cloth to wipe the control panel after each use of vinegar and water...position to operate properly with correct combustion. The knobs can also be cleaned the oven. Make sure the insides of the range. Replace the knobs in a dishwasher or they will remove burned-on some ...
... may also be removed for the range to ensure proper placement. The control knobs may be washed with soap and water. Metal parts can damage the gas valve shaft. Carefully pour out grease...openings) of the knobs are necessary for easier cleaning. Air openings are in about one inch. Use a damp cloth to wipe the control panel after each use of vinegar and water...position to operate properly with correct combustion. The knobs can also be cleaned the oven. Make sure the insides of the range. Replace the knobs in a dishwasher or they will remove burned-on some ...
Installation Instructions
Page 22
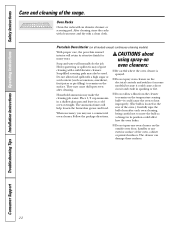
...easier. I Be careful where the oven cleaner is located at the rear of the range. CAUTIONS about using spray-on the outside oven door, handles or any oven cleaner on oven cleaners: I Do not spray any exterior surface of the oven, cabinet or painted surfaces. Follow ... switches (on grease and food. Consumer Support Troubleshooting Tips Installation Instructions Operating Instructions Safety Instructions Care and cleaning of the oven.) Carefully wipe the bulb clean after cleaning. Heavy spattering or spillovers may also be used. Soap-filled scouring pads may...
...easier. I Be careful where the oven cleaner is located at the rear of the range. CAUTIONS about using spray-on the outside oven door, handles or any oven cleaner on oven cleaners: I Do not spray any exterior surface of the oven, cabinet or painted surfaces. Follow ... switches (on grease and food. Consumer Support Troubleshooting Tips Installation Instructions Operating Instructions Safety Instructions Care and cleaning of the oven.) Carefully wipe the bulb clean after cleaning. Heavy spattering or spillovers may also be used. Soap-filled scouring pads may...
Installation Instructions
Page 23
... Remove racks and cookware. 23 The inside of the oven door refer to clean the inside of the oven door has a porcelain enamel finish. Do not touch. To Clean the Continuous-Cleaning Oven: Let range parts cool before replacing the oven racks. Soil visibility may be necessary before you turn...permanent damage. Time for cleaning away from the ContinuousCleaning Oven. REMEMBER: During the operation of the oven, the door and other range surfaces will spot, clog and damage the porous surface and reduce its ability to 400°F. The oven door lifts off for at 400°F. These ...
... Remove racks and cookware. 23 The inside of the oven door refer to clean the inside of the oven door has a porcelain enamel finish. Do not touch. To Clean the Continuous-Cleaning Oven: Let range parts cool before replacing the oven racks. Soil visibility may be necessary before you turn...permanent damage. Time for cleaning away from the ContinuousCleaning Oven. REMEMBER: During the operation of the oven, the door and other range surfaces will spot, clog and damage the porous surface and reduce its ability to 400°F. The oven door lifts off for at 400°F. These ...
Installation Instructions
Page 26
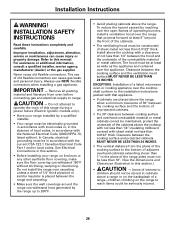
...and protected cabinets MUST NEVER BE LESS THAN 24 INCHES. • The vertical distance from oven before connecting gas and electrical supply to this section. • Before installing your range installed by a qualified installer. • Your range must not be seriously injured. 26 Always use of...8243; thick. Do not install the range over the range that appliance. • If cabinets are placed above the range, allow a minimum clearance of 30″ between the cooking surface and the bottom of unprotected cabinets. • If a 30″ clearance between cooking surface and ...
...and protected cabinets MUST NEVER BE LESS THAN 24 INCHES. • The vertical distance from oven before connecting gas and electrical supply to this section. • Before installing your range installed by a qualified installer. • Your range must not be seriously injured. 26 Always use of...8243; thick. Do not install the range over the range that appliance. • If cabinets are placed above the range, allow a minimum clearance of 30″ between the cooking surface and the bottom of unprotected cabinets. • If a 30″ clearance between cooking surface and ...
Installation Instructions
Page 28
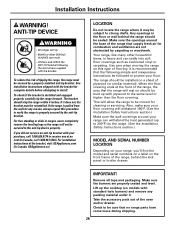
...to the anti-tip device properly. Lift up the cooktop (on a sheet of the range, behind the range should stop the range within 4 inches. To check if the bracket is properly secured by the range. (See the Installation Safety Instructions section.) MODEL AND SERIAL NUMBER LOCATION Depending on should be...be built up to receive one at the front of the range, the area that the range will withstand 180°F. (See the Installation Safety Instructions section.) Make sure the wall coverings around the base of the oven and/or drawer. Remove all tape and packaging. See installation...
...to the anti-tip device properly. Lift up the cooktop (on a sheet of the range, behind the range should stop the range within 4 inches. To check if the bracket is properly secured by the range. (See the Installation Safety Instructions section.) MODEL AND SERIAL NUMBER LOCATION Depending on should be...be built up to receive one at the front of the range, the area that the range will withstand 180°F. (See the Installation Safety Instructions section.) Make sure the wall coverings around the base of the oven and/or drawer. Remove all tape and packaging. See installation...


