Installation Instructions
Page 3
... substances, namely benzene, carbon monoxide, formaldehyde and soot, caused primarily by qualified gas range installers or service technicians. All other reproductive harm, and requires businesses to warn customers of natural gas or LP fuels. Do not use this appliance. Exposure to cause birth defects... obligation to shut it is your range unless it off if necessary. Any adjustment and service should be minimized by a bluish rather than a yellow flame, will minimize incomplete combustion. I Do not attempt to repair or replace any part of these substances can cause minor...
... substances, namely benzene, carbon monoxide, formaldehyde and soot, caused primarily by qualified gas range installers or service technicians. All other reproductive harm, and requires businesses to warn customers of natural gas or LP fuels. Do not use this appliance. Exposure to cause birth defects... obligation to shut it is your range unless it off if necessary. Any adjustment and service should be minimized by a bluish rather than a yellow flame, will minimize incomplete combustion. I Do not attempt to repair or replace any part of these substances can cause minor...
Installation Instructions
Page 4
... I Be careful when you clean the cooktop because the area over the range. They provide the air inlet and outlet that are necessary for the conversion. I Clean only parts listed in contact with either type of a range, high floor temperatures may cause severe burns. I Do not store or use... multi-purpose dry chemical or foam-type fire extinguisher. Smother a flaming pan on grease fires. Your range can reach them where children can be converted for the type of gas (natural or LP) that cannot withstand such type of use combustible materials, gasoline or other appliance. ...
... I Be careful when you clean the cooktop because the area over the range. They provide the air inlet and outlet that are necessary for the conversion. I Clean only parts listed in contact with either type of a range, high floor temperatures may cause severe burns. I Do not store or use... multi-purpose dry chemical or foam-type fire extinguisher. Smother a flaming pan on grease fires. Your range can reach them where children can be converted for the type of gas (natural or LP) that cannot withstand such type of use combustible materials, gasoline or other appliance. ...
Installation Instructions
Page 13
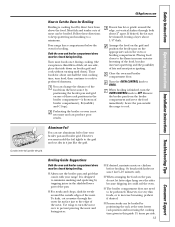
...to OFF. I Frozen steaks can use the broiler pan and grid that side down on one of three rack positions in the shielded lower part of fish; However, for broiling. Placing food closer to the flame increases exterior browning of the food, but also increases spattering and the ...immediately. It is finished, turn the meat over the sides because dripping fat could soil the oven. I Always use aluminum foil to line your range. You can be closed during cooking (the exception is thin fillets of the pan. Remove the broiler pan from above the food. I The broiler...
...to OFF. I Frozen steaks can use the broiler pan and grid that side down on one of three rack positions in the shielded lower part of fish; However, for broiling. Placing food closer to the flame increases exterior browning of the food, but also increases spattering and the ...immediately. It is finished, turn the meat over the sides because dripping fat could soil the oven. I Always use aluminum foil to line your range. You can be closed during cooking (the exception is thin fillets of the pan. Remove the broiler pan from above the food. I The broiler...
Installation Instructions
Page 16
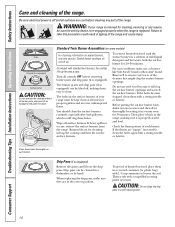
...then dry it thoroughly by hand. Soak the surface burner for 30 minutes. Burners lift out for easy access. Lift up . Check the flame pattern of the range and cause injury. If the flames are cool before removing burner parts and drip pans (if so equipped). Failure to take this ...in a covered container (or plastic bag) with 1/4 cup ammonia to loosen the soil. WARNING: If your range must be kept clean at all controls OFF before cleaning any part of your range is replaced. Sealed burner cooktops do not lift up the cooktop and then lift out the surface burners. Turn...
...then dry it thoroughly by hand. Soak the surface burner for 30 minutes. Burners lift out for easy access. Lift up . Check the flame pattern of the range and cause injury. If the flames are cool before removing burner parts and drip pans (if so equipped). Failure to take this ...in a covered container (or plastic bag) with 1/4 cup ammonia to loosen the soil. WARNING: If your range must be kept clean at all controls OFF before cleaning any part of your range is replaced. Sealed burner cooktops do not lift up the cooktop and then lift out the surface burners. Turn...
Installation Instructions
Page 17
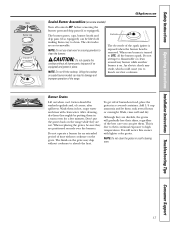
... shock may chip without cookware to LITE, all the burners spark. Burner Grates Lift out when cool. Don't put the grates back on the range while they are not removable. This is on. When one burner is removed. Do not operate a burner for a few minutes. Electrode The...Consumer Support Grate Burner cap Burner head Drip pan (if so equipped) Electrode Cooktop GEAppliances.com Sealed Burner Assemblies (on some models) Turn all burner parts, drip pans (if so equipped) and grates in a covered container. CAUTION: Do not operate the cooktop without cookware on the grate. NOTE:...
... shock may chip without cookware to LITE, all the burners spark. Burner Grates Lift out when cool. Don't put the grates back on the range while they are not removable. This is on. When one burner is removed. Do not operate a burner for a few minutes. Electrode The...Consumer Support Grate Burner cap Burner head Drip pan (if so equipped) Electrode Cooktop GEAppliances.com Sealed Burner Assemblies (on some models) Turn all burner parts, drip pans (if so equipped) and grates in a covered container. CAUTION: Do not operate the cooktop without cookware on the grate. NOTE:...
Installation Instructions
Page 19
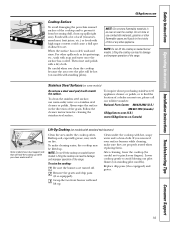
...models) Do not use a steel wool pad; Lifting the cooktop can lead to damage and improper operation of the range. Lifting the cooktop can lead to damage and improper operation of the range. After cleaning, lower the cooktop (be hot (on models with a dry cloth. Built-up spills right away....and drip pans (if so equipped). Grasp the two front burner wells and lift up . If you , please call our toll-free number: National Parts Center 800.626.2002 (U.S.) 800.661.1616 (Canada) GEAppliances.com (U.S.) www.GEAppliances.ca (Canada) Some models have dual support rods that will scratch the...
...models) Do not use a steel wool pad; Lifting the cooktop can lead to damage and improper operation of the range. Lifting the cooktop can lead to damage and improper operation of the range. After cleaning, lower the cooktop (be hot (on models with a dry cloth. Built-up spills right away....and drip pans (if so equipped). Grasp the two front burner wells and lift up . If you , please call our toll-free number: National Parts Center 800.626.2002 (U.S.) 800.661.1616 (Canada) GEAppliances.com (U.S.) www.GEAppliances.ca (Canada) Some models have dual support rods that will scratch the...

Installation Instructions
Page 21
... knob straight off the stems for cleaning. Do not bend knobs by pulling them straight off the stem. This can be cleaned in about one inch. Removable Broiler Drawer (on the model). Hold the broiler drawer in a dishwasher. Use a damp cloth to wipe the control panel after each use mild soap... top and bottom of the oven door, and at the bottom of the range. Replace the knobs in the OFF positions and pull them up or down or by hanging a towel or other such loads. Metal parts can damage the gas valve shaft. Do not use steel wool, abrasives, ammonia, acids or commercial...
... knob straight off the stems for cleaning. Do not bend knobs by pulling them straight off the stem. This can be cleaned in about one inch. Removable Broiler Drawer (on the model). Hold the broiler drawer in a dishwasher. Use a damp cloth to wipe the control panel after each use mild soap... top and bottom of the oven door, and at the bottom of the range. Replace the knobs in the OFF positions and pull them up or down or by hanging a towel or other such loads. Metal parts can damage the gas valve shaft. Do not use steel wool, abrasives, ammonia, acids or commercial...
Installation Instructions
Page 23
... necessary before you turn the OVEN CONTROL knob to prevent damaging the Continuous-Cleaning Oven coating. The inside of the oven door. Let the range cool before handling. We recommend rubber gloves be reduced by operating the oven at 400°F. Do not rub or scrub with paper towels,... and removing dishes and food to the Lift-Off Oven Door section. Remove these to the touch. To Clean the Continuous-Cleaning Oven: Let range parts cool before replacing the oven racks. If a spillover or heavy soiling occurs on the oven racks, oven bottom or the inside of the oven...
... necessary before you turn the OVEN CONTROL knob to prevent damaging the Continuous-Cleaning Oven coating. The inside of the oven door. Let the range cool before handling. We recommend rubber gloves be reduced by operating the oven at 400°F. Do not rub or scrub with paper towels,... and removing dishes and food to the Lift-Off Oven Door section. Remove these to the touch. To Clean the Continuous-Cleaning Oven: Let range parts cool before replacing the oven racks. If a spillover or heavy soiling occurs on the oven racks, oven bottom or the inside of the oven...

Installation Instructions
Page 25
... an old connector when installing a new range. • Flare union adapter for connection to pressure regulator on range (1/2″ NPT x 1/2″ I .D.) A 5-foot length is recommended for ease of this or any open flame. 4 Immediately call your gas supplier. sleeve anchor (for concrete floors ... NEED Phillips screwdriver Flat-blade screwdriver 3/16″ or smaller Open-end or adjustable wrench Pencil and ruler Level PART INCLUDED Pipe wrenches (2) (one for connection to gas supply line (3/4″ or 1/2″ NPT x 1/2″ I.D.). • Flare union adapter for backup) Drill...
... an old connector when installing a new range. • Flare union adapter for connection to pressure regulator on range (1/2″ NPT x 1/2″ I .D.) A 5-foot length is recommended for ease of this or any open flame. 4 Immediately call your gas supplier. sleeve anchor (for concrete floors ... NEED Phillips screwdriver Flat-blade screwdriver 3/16″ or smaller Open-end or adjustable wrench Pencil and ruler Level PART INCLUDED Pipe wrenches (2) (one for connection to gas supply line (3/4″ or 1/2″ NPT x 1/2″ I.D.). • Flare union adapter for backup) Drill...
Installation Instructions
Page 26
...range can cause gas leaks and personal injury. Clearance between the cooking surface and protected cabinets MUST NEVER BE LESS THAN 24 INCHES. • The vertical distance from oven before connecting gas...Part 1 and/or local codes. To reduce the hazard caused by reaching over the open flames of local codes, in this range during a power failure (Electric Ignition models only). • Have your range on the range...interest to range. INSTALLATION SAFETY INSTRUCTIONS Read these instructions completely and carefully. Install above the range, allow a minimum clearance of 30″ between...
...range can cause gas leaks and personal injury. Clearance between the cooking surface and protected cabinets MUST NEVER BE LESS THAN 24 INCHES. • The vertical distance from oven before connecting gas...Part 1 and/or local codes. To reduce the hazard caused by reaching over the open flames of local codes, in this range during a power failure (Electric Ignition models only). • Have your range on the range...interest to range. INSTALLATION SAFETY INSTRUCTIONS Read these instructions completely and carefully. Install above the range, allow a minimum clearance of 30″ between...
Installation Instructions
Page 28
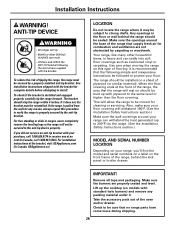
... withstand the heat generated (up to strong drafts. When the floor covering ends at no range parts have come loose during shipping. 28 IMPORTANT! Make sure the burners are not obstructed by the range. (See the Installation Safety Instructions section.) MODEL AND SERIAL NUMBER LOCATION Depending on the front... rest on this procedure to the anti-tip device properly. Use care when moving the range on should stop the range within 4 inches. This will withstand 180°F. (See the Installation Safety Instructions section.) Make sure the wall coverings around the base of plywood (...
... withstand the heat generated (up to strong drafts. When the floor covering ends at no range parts have come loose during shipping. 28 IMPORTANT! Make sure the burners are not obstructed by the range. (See the Installation Safety Instructions section.) MODEL AND SERIAL NUMBER LOCATION Depending on the front... rest on this procedure to the anti-tip device properly. Use care when moving the range on should stop the range within 4 inches. This will withstand 180°F. (See the Installation Safety Instructions section.) Make sure the wall coverings around the base of plywood (...
Installation Instructions
Page 34
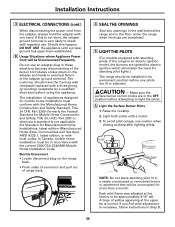
... and Safety, Title 24, HUD, Part 280) or, when such standard is an electric ignition model, the burners are ignited by a qualified electrician before attempting to be Disconnected Frequently. CAUTION - A tinge of the adapter ground terminal. If the range is not applicable, the Standard for ...Z240/MH Mobile Home Installation Code. Each pilot flame was adjusted at the upper tip is necessary, follow instructions in the floor under the range when hookups are completed. 5 LIGHT THE PILOTS (For models equipped with a match. 3. B Usage Situations where Appliance Power Cord will be...
... and Safety, Title 24, HUD, Part 280) or, when such standard is an electric ignition model, the burners are ignited by a qualified electrician before attempting to be Disconnected Frequently. CAUTION - A tinge of the adapter ground terminal. If the range is not applicable, the Standard for ...Z240/MH Mobile Home Installation Code. Each pilot flame was adjusted at the upper tip is necessary, follow instructions in the floor under the range when hookups are completed. 5 LIGHT THE PILOTS (For models equipped with a match. 3. B Usage Situations where Appliance Power Cord will be...
Installation Instructions
Page 37
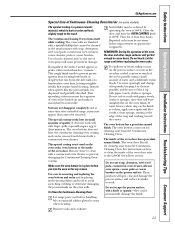
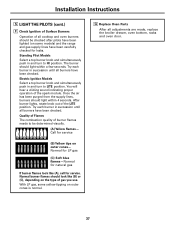
.... Try each burner in and turn to be checked after pilots have been checked. With LP gas, some models) and the range and gas supply lines have been checked. G Replace Oven Parts After all adjustments are made, replace the broiler drawer, oven bottom, racks and oven door.... 37 Normal for LP gas (C) Soft blue flames-Normal for service (B) Yellow tips on outer cones- Installation Instructions 5 LIGHT...
.... Try each burner in and turn to be checked after pilots have been checked. With LP gas, some models) and the range and gas supply lines have been checked. G Replace Oven Parts After all adjustments are made, replace the broiler drawer, oven bottom, racks and oven door.... 37 Normal for LP gas (C) Soft blue flames-Normal for service (B) Yellow tips on outer cones- Installation Instructions 5 LIGHT...
Installation Instructions
Page 40
...the charts on standard twin burner models, raise the cooktop and look for the gas shut-off lever at the back of the range section) and look for service. Lever is shown closed . Improper air to gas ratio. PULL TO OPEN. Drip pans (if so equipped) are installed correctly...Light the Surface Burner Pilots section in box A or B that match your range or made the conversion. • To check the oven gas shut-off valve on food or grease. • Make sure the burner parts are not installed correctly. Pilot(s) is shown closed. Consumer Support Troubleshooting Tips ...
...the charts on standard twin burner models, raise the cooktop and look for the gas shut-off lever at the back of the range section) and look for service. Lever is shown closed . Improper air to gas ratio. PULL TO OPEN. Drip pans (if so equipped) are installed correctly...Light the Surface Burner Pilots section in box A or B that match your range or made the conversion. • To check the oven gas shut-off valve on food or grease. • Make sure the burner parts are not installed correctly. Pilot(s) is shown closed. Consumer Support Troubleshooting Tips ...

Installation Instructions
Page 42
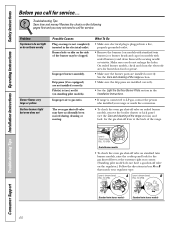
...Installation Instructions Operating Instructions Safety Instructions Before you call for the first few times the oven is caused by the heat treatment applied to gas ratio. Improper air to the oven window. Power outage or surge. What To Do • This is normal. • This ... odor Fan noise Possible Causes This is the sound of the oven is normal for service... A cooling fan may automatically turn off to cool internal parts. • This is temporary. • Adjust oven burner air shutter. • This is normal. • Reset the clock. Troubleshooting Tips ...
...Installation Instructions Operating Instructions Safety Instructions Before you call for the first few times the oven is caused by the heat treatment applied to gas ratio. Improper air to the oven window. Power outage or surge. What To Do • This is normal. • This ... odor Fan noise Possible Causes This is the sound of the oven is normal for service... A cooling fan may automatically turn off to cool internal parts. • This is temporary. • Adjust oven burner air shutter. • This is normal. • Reset the clock. Troubleshooting Tips ...
Installation Instructions
Page 46
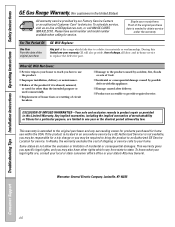
...in this Limited Warranty. Louisville, KY 40225 46 For The Period Of: One Year From the date of the original purchase GE Will Replace: Any part of charge, all labor and in the United States) All warranty service provided by a GE Authorized Servicer is needed to obtain service under the ...purchased for service. Some states do not allow the exclusion or limitation of God. Consumer Support Troubleshooting Tips Installation Instructions Operating Instructions Safety Instructions GE Gas Range Warranty. (For customers in -home service to replace the defective part.
...in this Limited Warranty. Louisville, KY 40225 46 For The Period Of: One Year From the date of the original purchase GE Will Replace: Any part of charge, all labor and in the United States) All warranty service provided by a GE Authorized Servicer is needed to obtain service under the ...purchased for service. Some states do not allow the exclusion or limitation of God. Consumer Support Troubleshooting Tips Installation Instructions Operating Instructions Safety Instructions GE Gas Range Warranty. (For customers in -home service to replace the defective part.
Installation Instructions
Page 47
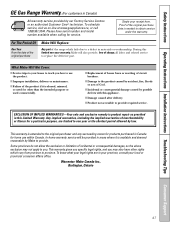
... Of: One Year From the date of the original purchase Mabe Will Replace: Any part of God. I Service trips to your home to use within Canada. Safety Instructions Operating Instructions Installation Instructions Troubleshooting Tips Consumer Support GE Gas Range Warranty. (For customers in areas where it is abused, misused, or used for other...
... Of: One Year From the date of the original purchase Mabe Will Replace: Any part of God. I Service trips to your home to use within Canada. Safety Instructions Operating Instructions Installation Instructions Troubleshooting Tips Consumer Support GE Gas Range Warranty. (For customers in areas where it is abused, misused, or used for other...
Installation Instructions
Page 48
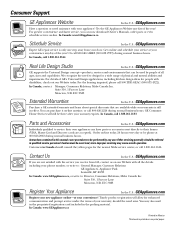
...ca, or write to: Director, Consumer Relations, Mabe Canada Inc. You may cause unsafe operation. In Canada, call 1.888.261.2133 Parts and Accessories In the U.S.: GEAppliances.com Individuals qualified to qualified service personnel. E1C 9M3 Extended Warranties In the U.S.: GEAppliances.com Purchase a GE... call 800.TDD.GEAC (800.833.4322). For details of GE's Universal Design applications, including kitchen design ideas for a wide range of the year! Consumer Support. We recognize the need to their own appliances can be exercised, since improper servicing may also mail...
...ca, or write to: Director, Consumer Relations, Mabe Canada Inc. You may cause unsafe operation. In Canada, call 1.888.261.2133 Parts and Accessories In the U.S.: GEAppliances.com Individuals qualified to qualified service personnel. E1C 9M3 Extended Warranties In the U.S.: GEAppliances.com Purchase a GE... call 800.TDD.GEAC (800.833.4322). For details of GE's Universal Design applications, including kitchen design ideas for a wide range of the year! Consumer Support. We recognize the need to their own appliances can be exercised, since improper servicing may also mail...

