Installation Instructions
Page 1
... Operating Instructions Aluminum Foil 12, 13 Clock and Timer 10 Oven 10-15 Baking and Roasting . . . . . .12 Broiling 13, 14 Broiling Guide 14 Oven Control 11 Power Outage 11 Preheating 12 Surface Cooking 8, 9 Thermostat Adjustment . . . .15 Care and Cleaning Air Vents 21 Broiler Pan and Grid 21 Burner Assemblies . . . . . .16-18 Burner Caps and Heads . . . .18 Burner Grates 17 Control Panel and Knobs . . .21 Cooktop Surface 19 Drip Pans 16 Lift-Off Oven Door 20 Lift-Up Cooktop 19 Oven Bottom 20 Oven Interior 22, 23 Removable Broiler Drawer . .21 Racks 22...
... Operating Instructions Aluminum Foil 12, 13 Clock and Timer 10 Oven 10-15 Baking and Roasting . . . . . .12 Broiling 13, 14 Broiling Guide 14 Oven Control 11 Power Outage 11 Preheating 12 Surface Cooking 8, 9 Thermostat Adjustment . . . .15 Care and Cleaning Air Vents 21 Broiler Pan and Grid 21 Burner Assemblies . . . . . .16-18 Burner Caps and Heads . . . .18 Burner Grates 17 Control Panel and Knobs . . .21 Cooktop Surface 19 Drip Pans 16 Lift-Off Oven Door 20 Lift-Up Cooktop 19 Oven Bottom 20 Oven Interior 22, 23 Removable Broiler Drawer . .21 Racks 22...
Installation Instructions
Page 3
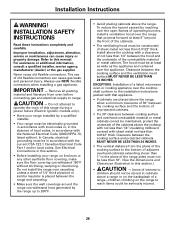
... Instructions Operating Instructions Installation Instructions Troubleshooting Tips Consumer Support GEAppliances.com WARNING! Do not remove the round grounding prong from the plug. Exposure to heat or warm the room. Any adjustment and service should be referred to have an ungrounded outlet replaced with a properly grounded, three-prong outlet in this appliance. I Plug your range installed and properly grounded by a qualified installer, in doubt about the grounding of natural gas or LP fuels. Gas appliances...
... Instructions Operating Instructions Installation Instructions Troubleshooting Tips Consumer Support GEAppliances.com WARNING! Do not remove the round grounding prong from the plug. Exposure to heat or warm the room. Any adjustment and service should be referred to have an ungrounded outlet replaced with a properly grounded, three-prong outlet in this appliance. I Plug your range installed and properly grounded by a qualified installer, in doubt about the grounding of natural gas or LP fuels. Gas appliances...
Installation Instructions
Page 4
... is correctly adjusted by covering the pan completely with flame or hot oven surfaces and may result and many floor coverings will be smothered completely by closing the oven door and turning the control to broken or shattered glass. 4 I WARNING: These adjustments must be used. See the Installation of the range under the broiler drawer. Consumer Support Troubleshooting Tips Installation Instructions Operating Instructions Safety Instructions SAFETY PRECAUTIONS I Do not use combustible materials, gasoline or other appliance. I Clean only parts listed in accordance...
... is correctly adjusted by covering the pan completely with flame or hot oven surfaces and may result and many floor coverings will be smothered completely by closing the oven door and turning the control to broken or shattered glass. 4 I WARNING: These adjustments must be used. See the Installation of the range under the broiler drawer. Consumer Support Troubleshooting Tips Installation Instructions Operating Instructions Safety Instructions SAFETY PRECAUTIONS I Do not use combustible materials, gasoline or other appliance. I Clean only parts listed in accordance...
Installation Instructions
Page 5
... cover any of a hot oven. I Do not heat unopened food containers. I Pulling out the rack to the flame, the fat may ignite. I Place the oven racks in place correctly to hands, face and eyes. I Never use the oven for use of the door or oven walls. I When using cooking or roasting bags in high carbon monoxide. I Always remove the broiler pan from range as soon as aluminum foil. Safety Instructions Operating Instructions Installation Instructions Troubleshooting Tips Consumer Support GEAppliances...
... cover any of a hot oven. I Do not heat unopened food containers. I Pulling out the rack to the flame, the fat may ignite. I Place the oven racks in place correctly to hands, face and eyes. I Never use the oven for use of the door or oven walls. I When using cooking or roasting bags in high carbon monoxide. I Always remove the broiler pan from range as soon as aluminum foil. Safety Instructions Operating Instructions Installation Instructions Troubleshooting Tips Consumer Support GEAppliances...
Installation Instructions
Page 6
... bubble up and over the surface burners and create a fire hazard. Consumer Support Troubleshooting Tips Installation Instructions Operating Instructions Safety Instructions WARNING! Select cookware having flat bottoms large enough to locate a leak. 6 This will be as dry as fats melt slowly. I Never leave the surface burners unattended at a high flame setting. I Always use a wok on hot surfaces may result in burns from the vent may ignite flammable items and will increase...
... bubble up and over the surface burners and create a fire hazard. Consumer Support Troubleshooting Tips Installation Instructions Operating Instructions Safety Instructions WARNING! Select cookware having flat bottoms large enough to locate a leak. 6 This will be as dry as fats melt slowly. I Never leave the surface burners unattended at a high flame setting. I Always use a wok on hot surfaces may result in burns from the vent may ignite flammable items and will increase...
Installation Instructions
Page 11
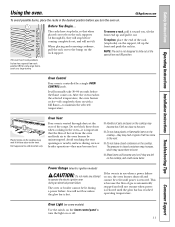
... when cooking in the desired position before the flame comes on the cooktop-they may melt if left too close to the oven burner be lit during an electrical power failure. I Handles of hot air from the oven and fresh air to the vent. To replace, place the end of gas is automatically stopped and will become hot if left too close to operate the electric ignition oven during a power failure. Power Outage (electric ignition models...
... when cooking in the desired position before the flame comes on the cooktop-they may melt if left too close to the oven burner be lit during an electrical power failure. I Handles of hot air from the oven and fresh air to the vent. To replace, place the end of gas is automatically stopped and will become hot if left too close to operate the electric ignition oven during a power failure. Power Outage (electric ignition models...
Installation Instructions
Page 16
... the range is properly seated and level. Standard Twin Burner Assemblies (on some models) For cleaning information on each burner. Rinse well to remove any part of the cleanser that might clog the surface burner openings. If the flames are in a warm oven for cleaning, servicing or any reason, be kept clean at all surfaces are cool before removing burner parts and drip pans (if so equipped). Be sure electrical power is off and all times...
... the range is properly seated and level. Standard Twin Burner Assemblies (on some models) For cleaning information on each burner. Rinse well to remove any part of the cleanser that might clog the surface burner openings. If the flames are in a warm oven for cleaning, servicing or any reason, be kept clean at all surfaces are cool before removing burner parts and drip pans (if so equipped). Be sure electrical power is off and all times...
Installation Instructions
Page 17
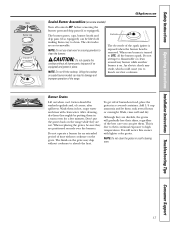
... is removed. Safety Instructions Operating Instructions Installation Instructions Troubleshooting Tips Consumer Support Grate Burner cap Burner head Drip pan (if so equipped) Electrode Cooktop GEAppliances.com Sealed Burner Assemblies (on some models) Turn all burner parts, drip pans (if so equipped) and grates in a covered container. Although they are durable, the grates will notice this sooner with clean water. NOTE: Do not clean the grates in hot, soapy water and rinse with lighter color grates. When replacing...
... is removed. Safety Instructions Operating Instructions Installation Instructions Troubleshooting Tips Consumer Support Grate Burner cap Burner head Drip pan (if so equipped) Electrode Cooktop GEAppliances.com Sealed Burner Assemblies (on some models) Turn all burner parts, drip pans (if so equipped) and grates in a covered container. Although they are durable, the grates will notice this sooner with clean water. NOTE: Do not clean the grates in hot, soapy water and rinse with lighter color grates. When replacing...
Installation Instructions
Page 19
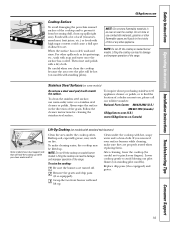
... cleaner or polish, or to set. To clean the stainless steel surface, use combustible materials, gasoline or other spills such as fat spatterings, etc., wash with hot, soapy water and a clean cloth. Lifting the cooktop can lead to damage and improper operation of the cooktop and to avoid blowing out pilot flames (on standing pilot models). Remove the grates and drip pans (if so equipped). Lower...
... cleaner or polish, or to set. To clean the stainless steel surface, use combustible materials, gasoline or other spills such as fat spatterings, etc., wash with hot, soapy water and a clean cloth. Lifting the cooktop can lead to damage and improper operation of the cooktop and to avoid blowing out pilot flames (on standing pilot models). Remove the grates and drip pans (if so equipped). Lower...
Installation Instructions
Page 20
... that are blocked and it replaced. Then lower the door slowly and evenly over the hinges. To clean the inside the gasket is particularly important when baking a fruit pie or other foods that will hold the door open. Remove the oven bottom for proper air circulation. Consumer Support Troubleshooting Tips Installation Instructions Operating Instructions Safety Instructions Care and cleaning of the door: I Do not allow for easier clean-up and off the...
... that are blocked and it replaced. Then lower the door slowly and evenly over the hinges. To clean the inside the gasket is particularly important when baking a fruit pie or other foods that will hold the door open. Remove the oven bottom for proper air circulation. Consumer Support Troubleshooting Tips Installation Instructions Operating Instructions Safety Instructions Care and cleaning of the door: I Do not allow for easier clean-up and off the...

Installation Instructions
Page 21
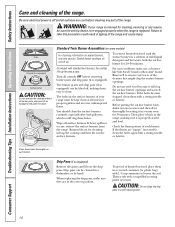
... the oven door, and at the bottom of vinegar and water. Use a damp cloth to operate properly with soap and water. Replace the knobs in the range. Safety Instructions Operating Instructions Installation Instructions Troubleshooting Tips Consumer Support GEAppliances.com Grid Broiler Pan and Grid After broiling, remove the broiler pan from The broiler pan and grid may be removed for easier cleaning. Carefully pour out grease from the pan. Vent appearance and location vary. Air openings are necessary for the range to clean or...
... the oven door, and at the bottom of vinegar and water. Use a damp cloth to operate properly with soap and water. Replace the knobs in the range. Safety Instructions Operating Instructions Installation Instructions Troubleshooting Tips Consumer Support GEAppliances.com Grid Broiler Pan and Grid After broiling, remove the broiler pan from The broiler pan and grid may be removed for easier cleaning. Carefully pour out grease from the pan. Vent appearance and location vary. Air openings are necessary for the range to clean or...
Installation Instructions
Page 22
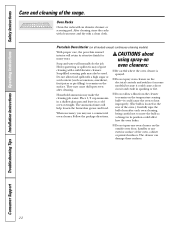
... its attractive finish for many years. Follow the package directions. Consumer Support Troubleshooting Tips Installation Instructions Operating Instructions Safety Instructions Care and cleaning of the oven.) Carefully wipe the bulb clean after cleaning. Oven Racks Clean the racks with a high sugar or acid content (such as a change in a cold oven overnight. Porcelain Oven Interior (on the surface. When necessary, you may require cleaning with a clean cloth. CAUTIONS about using spray-on oven cleaners: I Do not allow food spills with an...
... its attractive finish for many years. Follow the package directions. Consumer Support Troubleshooting Tips Installation Instructions Operating Instructions Safety Instructions Care and cleaning of the oven.) Carefully wipe the bulb clean after cleaning. Oven Racks Clean the racks with a high sugar or acid content (such as a change in a cold oven overnight. Porcelain Oven Interior (on the surface. When necessary, you may require cleaning with a clean cloth. CAUTIONS about using spray-on oven cleaners: I Do not allow food spills with an...
Installation Instructions
Page 26
... over the open flames of this manual. The hood must be constructed of not less than 1/4″ insulating millboard covered with the current CSA C22.1 Canadian Electrical Code Part 1 and/or local codes. EXCEPTION: Installation of old flexible connectors can cause injury or property damage. INSTALLATION SAFETY INSTRUCTIONS Read these instructions completely and carefully. The use NEW flexible connectors when installing a gas appliance. Clearance between the cooking surface and...
... over the open flames of this manual. The hood must be constructed of not less than 1/4″ insulating millboard covered with the current CSA C22.1 Canadian Electrical Code Part 1 and/or local codes. EXCEPTION: Installation of old flexible connectors can cause injury or property damage. INSTALLATION SAFETY INSTRUCTIONS Read these instructions completely and carefully. The use NEW flexible connectors when installing a gas appliance. Clearance between the cooking surface and...
Installation Instructions
Page 29
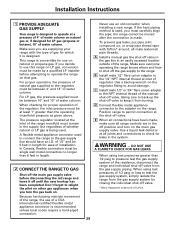
... range. The pressure regulator located at the inlet of the range manifold must be made by closing the individual shut-off the main gas supply valve before attempting to operate the range on the regulator fitting to avoid damage. DO NOT USE A FLAME TO CHECK FOR GAS LEAKS. Position range to permit connection at inlet of regulator. WARNING - When using test pressures greater than 6 feet in the system. A Install a manual gas line shut-off the gas supply...
... range. The pressure regulator located at the inlet of the range manifold must be made by closing the individual shut-off the main gas supply valve before attempting to operate the range on the regulator fitting to avoid damage. DO NOT USE A FLAME TO CHECK FOR GAS LEAKS. Position range to permit connection at inlet of regulator. WARNING - When using test pressures greater than 6 feet in the system. A Install a manual gas line shut-off the gas supply...
Installation Instructions
Page 36
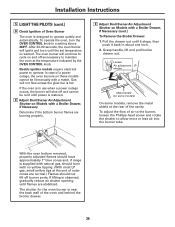
... of the oven and behind the broiler drawer. 36 To operate the oven, turn the OVEN CONTROL knob to operate. Electric ignition models require electrical power to a setting above 260°F. E Adjust Broil Burner Air Adjustment Shutter on these models cannot be re-lit until the set temperature is restored. Grasp handle, lift and pull broiler drawer out. Loosen Air adjustment shutter Metal shield (on some models) On some models, remove the metal shield at the temperature indicated by the OVEN CONTROL knob. The shutter for the oven burner is...
... of the oven and behind the broiler drawer. 36 To operate the oven, turn the OVEN CONTROL knob to operate. Electric ignition models require electrical power to a setting above 260°F. E Adjust Broil Burner Air Adjustment Shutter on these models cannot be re-lit until the set temperature is restored. Grasp handle, lift and pull broiler drawer out. Loosen Air adjustment shutter Metal shield (on some models) On some models, remove the metal shield at the temperature indicated by the OVEN CONTROL knob. The shutter for the oven burner is...

Installation Instructions
Page 39
... natural gas. For cement or concrete construction, you want to convert to LP gas, the conversion must be performed by grasping the front edge of the cooktop and carefully attempting to tilt the range forward. If you want to convert back to the pressure regulator. E Slide the range against the wall, and check for the hardware. If it does not, the bracket must be used...
... natural gas. For cement or concrete construction, you want to convert to LP gas, the conversion must be performed by grasping the front edge of the cooktop and carefully attempting to tilt the range forward. If you want to convert back to the pressure regulator. E Slide the range against the wall, and check for the hardware. If it does not, the bracket must be used...
Installation Instructions
Page 40
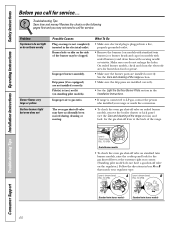
... gas shut-off valve on sealed burner models, remove the broiler drawer or kick panel (see the Care and cleaning of the burner may not need to gas ratio. Drip pans (if so equipped) are installed correctly. Consumer Support Troubleshooting Tips Installation Instructions Operating Instructions Safety Instructions Before you do not enlarge the holes. Problem Top burners do not light or do not burn evenly Burner flames very large or yellow Surface burners light but oven does not Possible Causes Plug on models with sealed burners) and clean...
... gas shut-off valve on sealed burner models, remove the broiler drawer or kick panel (see the Care and cleaning of the burner may not need to gas ratio. Drip pans (if so equipped) are installed correctly. Consumer Support Troubleshooting Tips Installation Instructions Operating Instructions Safety Instructions Before you do not enlarge the holes. Problem Top burners do not light or do not burn evenly Burner flames very large or yellow Surface burners light but oven does not Possible Causes Plug on models with sealed burners) and clean...
Installation Instructions
Page 41
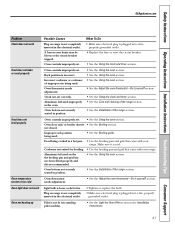
... Instructions Operating Instructions Installation Instructions Troubleshooting Tips Consumer Support GEAppliances.com Problem Clock does not work Food does not bake or roast properly Food does not broil properly Oven temperature too hot or too cold Oven light does not work Oven not heating up Possible Causes Plug on range is not completely inserted in your home may be blown or the circuit breaker tripped. A fuse in the electrical outlet. Oven thermostat needs adjustment. Clock not set . section. • See the Using the clock and timer...
... Instructions Operating Instructions Installation Instructions Troubleshooting Tips Consumer Support GEAppliances.com Problem Clock does not work Food does not bake or roast properly Food does not broil properly Oven temperature too hot or too cold Oven light does not work Oven not heating up Possible Causes Plug on range is not completely inserted in your home may be blown or the circuit breaker tripped. A fuse in the electrical outlet. Oven thermostat needs adjustment. Clock not set . section. • See the Using the clock and timer...
Installation Instructions
Page 46
.... Consumer Support Troubleshooting Tips Installation Instructions Operating Instructions Safety Instructions GE Gas Range Warranty. (For customers in an area where service by a GE Authorized Servicer is not available, you may be responsible for a trip charge or you may also have serial number and model number available when calling for home use the product. I Damage caused after delivery. To schedule service, visit us on-line at GEAppliances.com, or call 800.GE.CARES (800...
.... Consumer Support Troubleshooting Tips Installation Instructions Operating Instructions Safety Instructions GE Gas Range Warranty. (For customers in an area where service by a GE Authorized Servicer is not available, you may be responsible for a trip charge or you may also have serial number and model number available when calling for home use the product. I Damage caused after delivery. To schedule service, visit us on-line at GEAppliances.com, or call 800.GE.CARES (800...
Installation Instructions
Page 47
... in areas where it is abused, misused, or used commercially. I Failure of circuit breakers. To know what your legal rights are limited to use within Canada. Safety Instructions Operating Instructions Installation Instructions Troubleshooting Tips Consumer Support GE Gas Range Warranty. (For customers in Canada) All warranty service provided by accident, fire, floods or acts of God. I Replacement of house fuses or resetting of the product if it is extended to the...
... in areas where it is abused, misused, or used commercially. I Failure of circuit breakers. To know what your legal rights are limited to use within Canada. Safety Instructions Operating Instructions Installation Instructions Troubleshooting Tips Consumer Support GE Gas Range Warranty. (For customers in Canada) All warranty service provided by accident, fire, floods or acts of God. I Replacement of house fuses or resetting of the product if it is extended to the...


