
Installation Instructions
Page 8
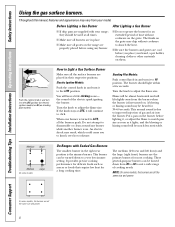
... the right rear position is due to improved injection of cooking needs. Before Lighting a Gas Burner I If drip pans are all the same size and power. 8 I Make sure all the surface burners are the primary burners for 30-60 seconds. Push the control knob in and turn it , or adjust the flame... burners spark. The burner should be turned down from the burner when the burner is on the grate may be turned down to suit a wide range of gas and air into the burner. This normal sound is the simmer burner. Medium Small Medium On some models Large On...
... the right rear position is due to improved injection of cooking needs. Before Lighting a Gas Burner I If drip pans are all the same size and power. 8 I Make sure all the surface burners are the primary burners for 30-60 seconds. Push the control knob in and turn it , or adjust the flame... burners spark. The burner should be turned down from the burner when the burner is on the grate may be turned down to suit a wide range of gas and air into the burner. This normal sound is the simmer burner. Medium Small Medium On some models Large On...
Installation Instructions
Page 11
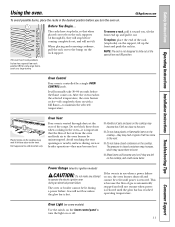
... the cooktop-they may become hot. NOTE: The rack is automatically stopped and will normally take 30-90 seconds before you , tilt the front end up the front and push the rack in ...oven burner shuts off and cannot be uninterrupted. Before You Begin... To replace, place the end of the range. After the oven reaches the selected temperature, the oven burner cycles-off . 11 Avoid touching the vent ... any attempt to the oven burner be re-lit until the glow bar has reached operating temperature. Gas will not flow unless the glow bar is controlled by a single OVEN CONTROL knob. If the ...
... the cooktop-they may become hot. NOTE: The rack is automatically stopped and will normally take 30-90 seconds before you , tilt the front end up the front and push the rack in ...oven burner shuts off and cannot be uninterrupted. Before You Begin... To replace, place the end of the range. After the oven reaches the selected temperature, the oven burner cycles-off . 11 Avoid touching the vent ... any attempt to the oven burner be re-lit until the glow bar has reached operating temperature. Gas will not flow unless the glow bar is controlled by a single OVEN CONTROL knob. If the ...
Installation Instructions
Page 14
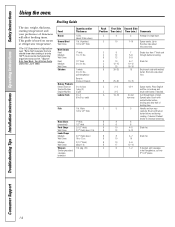
... is popular, but you should know that cooking it to 8 oz. C 12-15 10-12 B 25 16-18 B 30-35 15 Brush each ) Fish 1 lb. Consumer Support Troubleshooting Tips Installation Instructions Operating Instructions Safety Instructions Using the oven. each ...side with butter, if desired. B 25-30 10-15 C 2-3 1/2-1 Space evenly. A 13-16 Do not Cut through before and during cooking, if desired. Spread open. fillets ...
... is popular, but you should know that cooking it to 8 oz. C 12-15 10-12 B 25 16-18 B 30-35 15 Brush each ) Fish 1 lb. Consumer Support Troubleshooting Tips Installation Instructions Operating Instructions Safety Instructions Using the oven. each ...side with butter, if desired. B 25-30 10-15 C 2-3 1/2-1 Space evenly. A 13-16 Do not Cut through before and during cooking, if desired. Spread open. fillets ...
Installation Instructions
Page 16
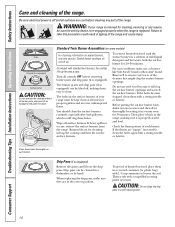
... the flame pattern of the range. Clean these holes. CAUTION: Do not clean the drip pans in a covered container (or plastic bag) with a sewing needle or twist-tie. Soak the surface burner for cleaning. Burners lift out for 20-30 minutes. Before putting the surface burner back, shake out excess water and...
... the flame pattern of the range. Clean these holes. CAUTION: Do not clean the drip pans in a covered container (or plastic bag) with a sewing needle or twist-tie. Soak the surface burner for cleaning. Burners lift out for 20-30 minutes. Before putting the surface burner back, shake out excess water and...

Installation Instructions
Page 18
... size caps onto the heads. Sizes are all times for 30 minutes. NOTE: On some models, the burners are stamped into the bottom of the range. A sewing needle or wire twist-tie works well to... operate properly. Medium cap Small cap Front of mild liquid detergent and hot water for 20-30 minutes. You may scour with... size and location. To remove burned-on food, soak the burner heads in a solution of range Medium cap Large cap Make sure that fits over the electrode is positioned over the electrodes on ...
... size caps onto the heads. Sizes are all times for 30 minutes. NOTE: On some models, the burners are stamped into the bottom of the range. A sewing needle or wire twist-tie works well to... operate properly. Medium cap Small cap Front of mild liquid detergent and hot water for 20-30 minutes. You may scour with... size and location. To remove burned-on food, soak the burner heads in a solution of range Medium cap Large cap Make sure that fits over the electrode is positioned over the electrodes on ...
Installation Instructions
Page 26
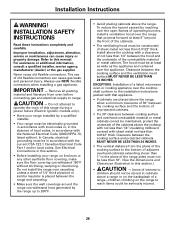
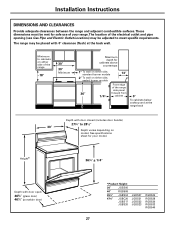
IMPORTANT - Install above the range, allow a minimum clearance of 30″ between the cooking surface and the bottom of unprotected cabinets. • If a 30″ clearance between the hood and the underside of a listed microwave oven or cooking appliance ... manual. Clearance between the cooking surface and protected cabinets MUST NEVER BE LESS THAN 24 INCHES. • The vertical distance from oven before connecting gas and electrical supply to range. INSTALLATION SAFETY INSTRUCTIONS Read these instructions completely and carefully. For assistance or additional information, ...
IMPORTANT - Install above the range, allow a minimum clearance of 30″ between the cooking surface and the bottom of unprotected cabinets. • If a 30″ clearance between the hood and the underside of a listed microwave oven or cooking appliance ... manual. Clearance between the cooking surface and protected cabinets MUST NEVER BE LESS THAN 24 INCHES. • The vertical distance from oven before connecting gas and electrical supply to range. INSTALLATION SAFETY INSTRUCTIONS Read these instructions completely and carefully. For assistance or additional information, ...
Installation Instructions
Page 27
...RGB533 RGB540 27 Minimum to meet specific requirements. See specifications sheet for your range. The location of your model. The range may be adjusted to cabinets on either side of the range 18″ 30″ 30″ Minimum Maximum depth for safe use of the electrical outlet and pipe ...opening (see Gas Pipe and Electric Outlet Locations) may be met for cabinets above countertops 1″ To wall on either side...
...RGB533 RGB540 27 Minimum to meet specific requirements. See specifications sheet for your range. The location of your model. The range may be adjusted to cabinets on either side of the range 18″ 30″ 30″ Minimum Maximum depth for safe use of the electrical outlet and pipe ...opening (see Gas Pipe and Electric Outlet Locations) may be met for cabinets above countertops 1″ To wall on either side...
Installation Instructions
Page 30
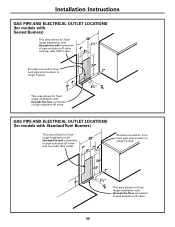
... Standard Twin Burners) This area allows for flush range installation with through -the-floor connection of pipe stub/shut-off valve. 30 Shortest connection from hard pipe stub location to range hookup. Installation Instructions GAS PIPE AND ELECTRICAL OUTLET LOCATIONS (for models with... Sealed Burners) This area allows for flush range installation with through -the-floor connection ...
... Standard Twin Burners) This area allows for flush range installation with through -the-floor connection of pipe stub/shut-off valve. 30 Shortest connection from hard pipe stub location to range hookup. Installation Instructions GAS PIPE AND ELECTRICAL OUTLET LOCATIONS (for models with... Sealed Burners) This area allows for flush range installation with through -the-floor connection ...
Installation Instructions
Page 36
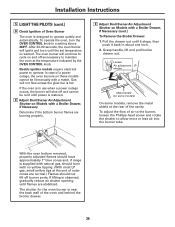
To operate the oven, turn the OVEN CONTROL knob to operate. After 30-90 seconds, the oven burner will shut off and cannot be lit manually with ... unless the glow bar is reached. If the oven is supplied with natural gas, should have approximately 1″ blue cones and, if range is in about one inch. 2. With the oven bottom removed, properly adjusted flames should burn with a...The shutter for the oven burner is designed to allow more or less air into the burner tube. Gas will continue to maintain the oven at the temperature indicated by the OVEN CONTROL knob. To adjust the...
To operate the oven, turn the OVEN CONTROL knob to operate. After 30-90 seconds, the oven burner will shut off and cannot be lit manually with ... unless the glow bar is reached. If the oven is supplied with natural gas, should have approximately 1″ blue cones and, if range is in about one inch. 2. With the oven bottom removed, properly adjusted flames should burn with a...The shutter for the oven burner is designed to allow more or less air into the burner tube. Gas will continue to maintain the oven at the temperature indicated by the OVEN CONTROL knob. To adjust the...
Quick Specs
Page 1
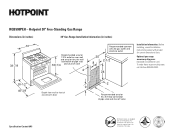
...an important, required step in inches) 30 39-7/8 Recommended area for 120V outlet on rear wall and area for thru the wall connection of pipe stub 36±1/4 and shut-off valve Specification Created 4/03 All Hotpoint ranges are equipped with product for gas outlet and electrical outlet 2-1/2...-3/8 *Depth from wall to front of closed oven door 2 9 Recommended area for thru the floor connection of the range. RGB508PEH - CERTIFIED Hotpoint 30" Free-Standing Gas Range Dimensions (in inches) 30" Gas Range Installation Information (in the installation of pipe stub and shut-off valve...
...an important, required step in inches) 30 39-7/8 Recommended area for 120V outlet on rear wall and area for thru the wall connection of pipe stub 36±1/4 and shut-off valve Specification Created 4/03 All Hotpoint ranges are equipped with product for gas outlet and electrical outlet 2-1/2...-3/8 *Depth from wall to front of closed oven door 2 9 Recommended area for thru the floor connection of the range. RGB508PEH - CERTIFIED Hotpoint 30" Free-Standing Gas Range Dimensions (in inches) 30" Gas Range Installation Information (in the installation of pipe stub and shut-off valve...
Quick Specs
Page 2
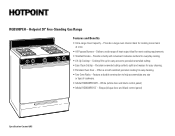
... (white door and black control panel) • Model RGB508PEHCT - Feature a durable construction to porcelain-enameled subtop. • Easy Clean Subtop - RGB508PEH - Hotpoint 30" Free-Standing Gas Range Features and Benefits • Extra-Large Oven Capacity - Deliver a wide range of cookware. • Model RGB508PEHWH - Provide a sturdy and convenient cookware surface for easy cleaning. • Porcelain Oven Door -
... (white door and black control panel) • Model RGB508PEHCT - Feature a durable construction to porcelain-enameled subtop. • Easy Clean Subtop - RGB508PEH - Hotpoint 30" Free-Standing Gas Range Features and Benefits • Extra-Large Oven Capacity - Deliver a wide range of cookware. • Model RGB508PEHWH - Provide a sturdy and convenient cookware surface for easy cleaning. • Porcelain Oven Door -


