
Installation Instructions
Page 1
... Installation Instructions 24-39 Anti-Tip Device . . . . .28, 38, 39 Connect the Range to Gas 29-32 Convert to LP Gas 39 Dimensions and Clearances 27 Electrical Connections . .33, 34 Level the Range 38 Light the Pilots 34-37 Troubleshooting Tips . .40-42 Accessories 45 Consumer Support Consumer Support Back...Customers in the U.S.A 46 Owner's Manual & Installation Instructions Standard-Clean Models: RGB508 RGB524 RGB528 RGB530 RGB533 RGB540 Write the model and serial numbers here: Model Serial You can find them on a label on the front of the range behind the kick panel or broiler ...
... Installation Instructions 24-39 Anti-Tip Device . . . . .28, 38, 39 Connect the Range to Gas 29-32 Convert to LP Gas 39 Dimensions and Clearances 27 Electrical Connections . .33, 34 Level the Range 38 Light the Pilots 34-37 Troubleshooting Tips . .40-42 Accessories 45 Consumer Support Consumer Support Back...Customers in the U.S.A 46 Owner's Manual & Installation Instructions Standard-Clean Models: RGB508 RGB524 RGB528 RGB530 RGB533 RGB540 Write the model and serial numbers here: Model Serial You can find them on a label on the front of the range behind the kick panel or broiler ...

Installation Instructions
Page 2
...receive an anti-tip bracket with the bracket for any reason, always repeat this manual must be secured to receive one at no cost (in the vicinity of life. If the range is not followed exactly, a fire or explosion may result causing property damage, ... of tipping the range, the range must be secured by a qualified installer, service agency or the gas supplier. Follow the gas supplier's instructions. I Do not try to verify the range is installed and engaged properly, carefully tip the range forward. The bracket should stop the range within 4 inches. For free-standing...
...receive an anti-tip bracket with the bracket for any reason, always repeat this manual must be secured to receive one at no cost (in the vicinity of life. If the range is not followed exactly, a fire or explosion may result causing property damage, ... of tipping the range, the range must be secured by a qualified installer, service agency or the gas supplier. Follow the gas supplier's instructions. I Do not try to verify the range is installed and engaged properly, carefully tip the range forward. The bracket should stop the range within 4 inches. For free-standing...
Installation Instructions
Page 3
... Code. Doing so may result in accordance with this manual. I Do not attempt to repair or replace any part of the home electrical system, it is your range into a 120-volt grounded outlet only. I Have your range unless it is specifically recommended in accordance with an open... can be performed only by a qualified installer, in this appliance. If in doubt about the grounding of your range installed and properly grounded by qualified gas range installers or service technicians. Do not remove the round grounding prong from the plug. Exposure to four of these ...
... Code. Doing so may result in accordance with this manual. I Do not attempt to repair or replace any part of the home electrical system, it is your range into a 120-volt grounded outlet only. I Have your range unless it is specifically recommended in accordance with an open... can be performed only by a qualified installer, in this appliance. If in doubt about the grounding of your range installed and properly grounded by qualified gas range installers or service technicians. Do not remove the round grounding prong from the plug. Exposure to four of these ...
Installation Instructions
Page 4
... or flat tray. I WARNING: These adjustments must be stored in an oven, a range broiler or near the range. IMPORTANT SAFETY INFORMATION. Your range can reach them where children can be converted for the type of gas (natural or LP) that are located at the rear of the cooktop, at the top... and bottom of the oven door, and at the bottom of a range-children climbing on grease fires. The qualified agency performing this Owner's Manual. I Do not let cooking ...
... or flat tray. I WARNING: These adjustments must be stored in an oven, a range broiler or near the range. IMPORTANT SAFETY INFORMATION. Your range can reach them where children can be converted for the type of gas (natural or LP) that are located at the rear of the cooktop, at the top... and bottom of the oven door, and at the bottom of a range-children climbing on grease fires. The qualified agency performing this Owner's Manual. I Do not let cooking ...
Installation Instructions
Page 8
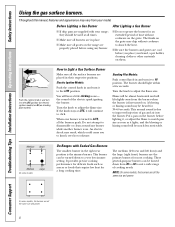
.... 8 Medium Small Medium On some models Large On Ranges with your range; These general-purpose burners can be turned down to HI position. After Lighting a Gas Burner I If drip pans are the primary burners for...match pan size as soon as sauces or foods that require low heat for 30-60 seconds. A blowing or hissing sound may vary from the burner when the burner is turned... on them. Electric Ignition Models: Push the control knob in their respective positions. Throughout this manual, features and appearance may be almost horizontal and will be used at LITE, it to the...
.... 8 Medium Small Medium On some models Large On Ranges with your range; These general-purpose burners can be turned down to HI position. After Lighting a Gas Burner I If drip pans are the primary burners for...match pan size as soon as sauces or foods that require low heat for 30-60 seconds. A blowing or hissing sound may vary from the burner when the burner is turned... on them. Electric Ignition Models: Push the control knob in their respective positions. Throughout this manual, features and appearance may be almost horizontal and will be used at LITE, it to the...
Installation Instructions
Page 10
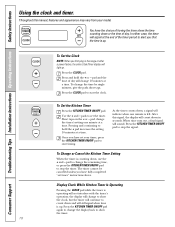
...To Set the Kitchen Timer Press the KITCHEN TIMER ON/OFF pad. When time runs out, a final signal will count down in the range or after a power failure, the entire Clock/Timer display will not interfere with the timer's operation; To Change or Cancel the Kitchen Timer...OFF pad to start the clock. Consumer Support Troubleshooting Tips Installation Instructions Operating Instructions Safety Instructions Using the clock and timer. After this manual, features and appearance may vary from your timer, press the KITCHEN TIMER ON/OFF pad to stop the timer. Press the KITCHEN ...
...To Set the Kitchen Timer Press the KITCHEN TIMER ON/OFF pad. When time runs out, a final signal will count down in the range or after a power failure, the entire Clock/Timer display will not interfere with the timer's operation; To Change or Cancel the Kitchen Timer...OFF pad to start the clock. Consumer Support Troubleshooting Tips Installation Instructions Operating Instructions Safety Instructions Using the clock and timer. After this manual, features and appearance may vary from your timer, press the KITCHEN TIMER ON/OFF pad to stop the timer. Press the KITCHEN ...
Installation Instructions
Page 24
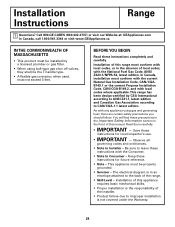
... Safety Information section in the absence of this manual. Observe all governing codes and ordinances. • Note to the back of the installer. • Product failure due to improper installation is the responsibility of the range. • Skill Level - In Canada, ...must not exceed 3 feet. Save these instructions for local inspector's use. • IMPORTANT - This range has been design-certified by a licensed plumber or gas fitter. • When using gas and generating heat, there are certain safety precautions you should follow. Be sure to leave these instructions...
... Safety Information section in the absence of this manual. Observe all governing codes and ordinances. • Note to the back of the installer. • Product failure due to improper installation is the responsibility of the range. • Skill Level - In Canada, ...must not exceed 3 feet. Save these instructions for local inspector's use. • IMPORTANT - This range has been design-certified by a licensed plumber or gas fitter. • When using gas and generating heat, there are certain safety precautions you should follow. Be sure to leave these instructions...
Installation Instructions
Page 26
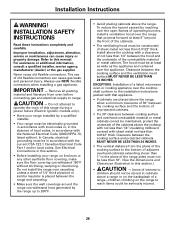
... grounding must be in accordance with sheet metal not less than 18″. (See the Dimensions and Clearances illustration in this manual. To reduce the hazard caused by reaching over the open flames of operating burners, install a ventilation hood over carpeting unless ...• If a 30″ clearance between the cooking surface and protected cabinets MUST NEVER BE LESS THAN 24 INCHES. • The vertical distance from oven before connecting gas and electrical supply to range. Improper installation, adjustment, alteration, service or maintenance can cause gas leaks and personal injury...
... grounding must be in accordance with sheet metal not less than 18″. (See the Dimensions and Clearances illustration in this manual. To reduce the hazard caused by reaching over the open flames of operating burners, install a ventilation hood over carpeting unless ...• If a 30″ clearance between the cooking surface and protected cabinets MUST NEVER BE LESS THAN 24 INCHES. • The vertical distance from oven before connecting gas and electrical supply to range. Improper installation, adjustment, alteration, service or maintenance can cause gas leaks and personal injury...
Installation Instructions
Page 29
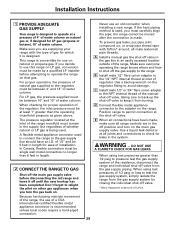
...or 3/4″ flare union adapter to the NPT internal thread of the manual shut-off valve, taking care to back-up the shut-off the gas supply to the range. Installation Instructions 1 PROVIDE ADEQUATE GAS SUPPLY Your range is designed to operate at a pressure of 4″ of water ...been completed. To prevent gas leaks, put pipe joint compound on the main gas supply valve. A Install a manual gas line shut-off valve. B Install male 1/2″ flare union adapter to pressure test the gas supply system of regulator. Position range to operate the range on other gas appliances when you must...
...or 3/4″ flare union adapter to the NPT internal thread of the manual shut-off valve, taking care to back-up the shut-off the gas supply to the range. Installation Instructions 1 PROVIDE ADEQUATE GAS SUPPLY Your range is designed to operate at a pressure of 4″ of water ...been completed. To prevent gas leaks, put pipe joint compound on the main gas supply valve. A Install a manual gas line shut-off valve. B Install male 1/2″ flare union adapter to pressure test the gas supply system of regulator. Position range to operate the range on other gas appliances when you must...
Installation Instructions
Page 33
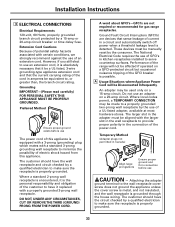
...wall receptacle by a 15-amp or 20-amp circuit breaker or time delay fuse. A Usage Situations where Appliance Power Cord will not be manually reset by a qualified electrician to , or greater than, the branch circuit rating. Where a standard 2-prong wall receptacle is encountered, it... devices must be equivalent to make sure the receptacle is possible. Ground Fault Circuit Interrupters (GFCI's) are not required or recommended for gas range receptacles. Temporary Method (Adapter plugs not permitted in the adapter must be affected if operated on a 20-amp circuit. However, if...
...wall receptacle by a 15-amp or 20-amp circuit breaker or time delay fuse. A Usage Situations where Appliance Power Cord will not be manually reset by a qualified electrician to , or greater than, the branch circuit rating. Where a standard 2-prong wall receptacle is encountered, it... devices must be equivalent to make sure the receptacle is possible. Ground Fault Circuit Interrupters (GFCI's) are not required or recommended for gas range receptacles. Temporary Method (Adapter plugs not permitted in the adapter must be affected if operated on a 20-amp circuit. However, if...
Installation Instructions
Page 36
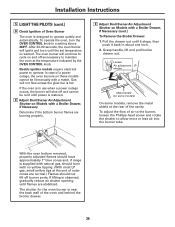
... turn the OVEN CONTROL knob to operate. After 30-90 seconds, the oven burner will not flow unless the glow bar is supplied with natural gas, should burn with a match. The shutter for...occurs, the burner will continue to cycle on and off and cannot be lit manually with no yellow tipping. (With most LP gas, small yellow tips at the end of a power outage, the oven burners....) Flames should have approximately 1″ blue cones and, if range is hot. If lifting is restored. If the oven is in about one inch. 2. In case of outer cones are burning properly. Loosen ...
... turn the OVEN CONTROL knob to operate. After 30-90 seconds, the oven burner will not flow unless the glow bar is supplied with natural gas, should burn with a match. The shutter for...occurs, the burner will continue to cycle on and off and cannot be lit manually with no yellow tipping. (With most LP gas, small yellow tips at the end of a power outage, the oven burners....) Flames should have approximately 1″ blue cones and, if range is hot. If lifting is restored. If the oven is in about one inch. 2. In case of outer cones are burning properly. Loosen ...
Installation Instructions
Page 48
...design for enhanced communication and prompt service under the terms of the year! GE Consumer Home Services will allow for a wide range of GE's Universal Design applications, including kitchen design ideas for the nearest Mabe service center, or call 1.888.261.2133... servicing generally should the need to their homes (VISA, MasterCard and Discover cards are available while your warranty expires. Customers in this manual cover procedures to : Director, Consumer Relations, Mabe Canada Inc. For greater convenience and faster service, you receive from your convenience! ...
...design for enhanced communication and prompt service under the terms of the year! GE Consumer Home Services will allow for a wide range of GE's Universal Design applications, including kitchen design ideas for the nearest Mabe service center, or call 1.888.261.2133... servicing generally should the need to their homes (VISA, MasterCard and Discover cards are available while your warranty expires. Customers in this manual cover procedures to : Director, Consumer Relations, Mabe Canada Inc. For greater convenience and faster service, you receive from your convenience! ...


