
Installation Instructions
Page 1
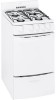
Back Cover Warranty 35 HOTPOINT Owner's Manual and Installation Instructions RGA720 RGA724 Write the model and serial numbers here: Model Serial You can find them on how to lift the cooktop. 183D9542P002 49-85104-1 05-07 JR 20″Raandn 24″ CompactgeGass ge.com Safety Instructions . . . . . 2-7, 22, 23, 24 Operating Instructions Oven 10-16...
Back Cover Warranty 35 HOTPOINT Owner's Manual and Installation Instructions RGA720 RGA724 Write the model and serial numbers here: Model Serial You can find them on how to lift the cooktop. 183D9542P002 49-85104-1 05-07 JR 20″Raandn 24″ CompactgeGass ge.com Safety Instructions . . . . . 2-7, 22, 23, 24 Operating Instructions Oven 10-16...
Installation Instructions
Page 4
of the range. standing pilot models) will not withstand this work assumes responsibility for the type of gas (natural or LP) that is oven, a range broiler or near the range. I Flaming grease outside a pan can be put I After prolonged use combustible materials, ... of interest to Air openings are necessary for the range to be made by covering the pan completely with correct combustion. hang on standing pilot models) and poor air circulation. They provide the air inlet and outlet that cannot withstand such type of kitchen traffic I Locate the range out of...
of the range. standing pilot models) will not withstand this work assumes responsibility for the type of gas (natural or LP) that is oven, a range broiler or near the range. I Flaming grease outside a pan can be put I After prolonged use combustible materials, ... of interest to Air openings are necessary for the range to be made by covering the pan completely with correct combustion. hang on standing pilot models) and poor air circulation. They provide the air inlet and outlet that cannot withstand such type of kitchen traffic I Locate the range out of...

Installation Instructions
Page 6
... grasped and remain cool. extending over the surface burners and create a fire hazard. I Carefully watch as fats melt slowly. Filling standing pilot models) when igniting the the pan too full of the the wok. Also, it placed over the sides of the range without possible. I Foods... since heavy spattering or spillovers left too close to burst. This will both save cleaning time and prevent hazardous accumulations of fat for ignition models) or the HI position (on hot surfaces may cause them . Do not use the LITE position (on electric I Never try to ...
... grasped and remain cool. extending over the surface burners and create a fire hazard. I Carefully watch as fats melt slowly. Filling standing pilot models) when igniting the the pan too full of the the wok. Also, it placed over the sides of the range without possible. I Foods... since heavy spattering or spillovers left too close to burst. This will both save cleaning time and prevent hazardous accumulations of fat for ignition models) or the HI position (on hot surfaces may cause them . Do not use the LITE position (on electric I Never try to ...
Installation Instructions
Page 7
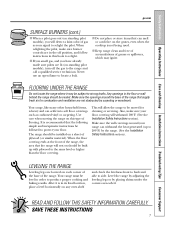
...relight the pilot. Make sure the wall coverings around the base of flooring. LEVELING THE RANGE Leveling legs are in the off the gas to 200°F) by placing shims under the corners as cushioned vinyl or carpeting. SAVE THESE INSTRUCTIONS 7 Your range, like many ... Care and Cleaning Installation Instructions Troubleshooting Tips Consumer Support ge.com SURFACE BURNERS (cont.) I When a pilot goes out (on standing pilot models), you have already made sure pilots are not obstructed by carpeting or woodwork. Any openings in order to side. When the floor covering ...
...relight the pilot. Make sure the wall coverings around the base of flooring. LEVELING THE RANGE Leveling legs are in the off the gas to 200°F) by placing shims under the corners as cushioned vinyl or carpeting. SAVE THESE INSTRUCTIONS 7 Your range, like many ... Care and Cleaning Installation Instructions Troubleshooting Tips Consumer Support ge.com SURFACE BURNERS (cont.) I When a pilot goes out (on standing pilot models), you have already made sure pilots are not obstructed by carpeting or woodwork. Any openings in order to side. When the floor covering ...
Installation Instructions
Page 8
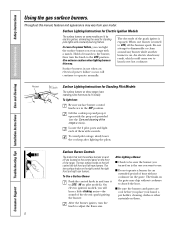
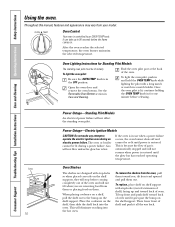
... initially. I Check to the LITE position. Consumer Support Troubleshooting Tips Installation Instructions Care and Cleaning Operating Instructions Safety Instructions Using the gas surface burners. The electrode of the electric spark igniting the burner. Surface burners in use . To Use a Surface Burner Push... to operate normally. To avoid pilot outage, slowly lower the cooktop after lighting the pilots. Surface Lighting Instructions for Standing Pilot Models The surface burners on these ranges have standing pilots that turn it open with a match. When one burner is the one you...
... initially. I Check to the LITE position. Consumer Support Troubleshooting Tips Installation Instructions Care and Cleaning Operating Instructions Safety Instructions Using the gas surface burners. The electrode of the electric spark igniting the burner. Surface burners in use . To Use a Surface Burner Push... to operate normally. To avoid pilot outage, slowly lower the cooktop after lighting the pilots. Surface Lighting Instructions for Standing Pilot Models The surface burners on these ranges have standing pilots that turn it open with a match. When one burner is the one you...
Installation Instructions
Page 10
...occurs, the oven burner shuts off and cannot be re-lit until power is in Care and Cleaning. Bump 10 Power Outage-Standing Pilot Models An electrical power failure will eliminate reaching into the oven. The oven or broiler cannot be lit initially. Oven Shelves The shelves are ...until the glow bar has reached operating temperature. Oven Lighting Instructions for one minute before releasing. Open the oven door and remove the oven bottom. Gas will stop -locks so when placed correctly on a shelf, pull the shelf out to operate the electric ignition oven during a power failure. ...
...occurs, the oven burner shuts off and cannot be re-lit until power is in Care and Cleaning. Bump 10 Power Outage-Standing Pilot Models An electrical power failure will eliminate reaching into the oven. The oven or broiler cannot be lit initially. Oven Shelves The shelves are ...until the glow bar has reached operating temperature. Oven Lighting Instructions for one minute before releasing. Open the oven door and remove the oven bottom. Gas will stop -locks so when placed correctly on a shelf, pull the shelf out to operate the electric ignition oven during a power failure. ...
Installation Instructions
Page 19
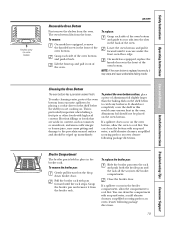
...Care and Cleaning Installation Instructions Troubleshooting Tips Consumer Support Close the broiler door. Knurled screw (on the drop down broiler door. On models so equipped, replace the knurled screw in the broiler compartment, allow the oven to catch any boilovers. You can clean the bottom... with high acid content. To remove: On models so equipped, remove the knurled screw in the broiler rack. Cleaning the Oven Bottom The oven bottom has a porcelain enamel finish. This...
...Care and Cleaning Installation Instructions Troubleshooting Tips Consumer Support Close the broiler door. Knurled screw (on the drop down broiler door. On models so equipped, replace the knurled screw in the broiler compartment, allow the oven to catch any boilovers. You can clean the bottom... with high acid content. To remove: On models so equipped, remove the knurled screw in the broiler rack. Cleaning the Oven Bottom The oven bottom has a porcelain enamel finish. This...
Installation Instructions
Page 23
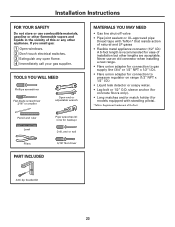
...in the vicinity of DuPont Anti-tip bracket kit 23 sleeve anchor (for concrete floors only). • Long matches and/or match holder (for models equipped with Teflon* that resists action of natural and LP gases • Flexible metal appliance connector (1/2″ I .D.) • Liquid leak .... Installation Instructions FOR YOUR SAFETY Do not store or use an old connector when installing a new range. • Flare union adapter for connection to gas supply line (3/4″ or 1/2″ NPT x 1/2″ I.D.). • Flare union adapter for backup) Drill, awl or nail 5/16″...
...in the vicinity of DuPont Anti-tip bracket kit 23 sleeve anchor (for concrete floors only). • Long matches and/or match holder (for models equipped with Teflon* that resists action of natural and LP gases • Flexible metal appliance connector (1/2″ I .D.) • Liquid leak .... Installation Instructions FOR YOUR SAFETY Do not store or use an old connector when installing a new range. • Flare union adapter for connection to gas supply line (3/4″ or 1/2″ NPT x 1/2″ I.D.). • Flare union adapter for backup) Drill, awl or nail 5/16″...
Installation Instructions
Page 24
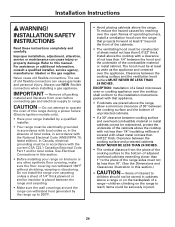
... Electrical Connections in this range during a power failure (Electric Ignition models only). • Have your range on linoleum or any other synthetic floor covering, make sure the floor covering can cause gas leaks and personal injury. Clearance between the cooking surface and protected ...hood and the underside of sheet metal not less than 0.0122″ thick. The use NEW flexible connectors when installing a gas appliance. Install above the cooktop with the National Electrical Code (ANSI/NFPA 70, latest edition). INSTALLATION SAFETY INSTRUCTIONS Read these instructions...
... Electrical Connections in this range during a power failure (Electric Ignition models only). • Have your range on linoleum or any other synthetic floor covering, make sure the floor covering can cause gas leaks and personal injury. Clearance between the cooking surface and protected ...hood and the underside of sheet metal not less than 0.0122″ thick. The use NEW flexible connectors when installing a gas appliance. Install above the cooktop with the National Electrical Code (ANSI/NFPA 70, latest edition). INSTALLATION SAFETY INSTRUCTIONS Read these instructions...
Installation Instructions
Page 25
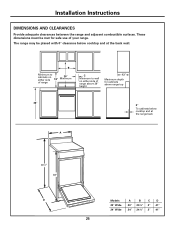
... for cabinets above range top 36″ 0″ To cabinets below cooktop and at the range back A 401⁄2″ 36″ D Models 20″ Wide 24″ Wide A B C D 20″ 20 3⁄8″ 2″ 41″ 24″ 24 3⁄8″ 2″ 41″ 25 These dimensions must be placed with 0″ clearance...
... for cabinets above range top 36″ 0″ To cabinets below cooktop and at the range back A 401⁄2″ 36″ D Models 20″ Wide 24″ Wide A B C D 20″ 20 3⁄8″ 2″ 41″ 24″ 24 3⁄8″ 2″ 41″ 25 These dimensions must be placed with 0″ clearance...
Installation Instructions
Page 26
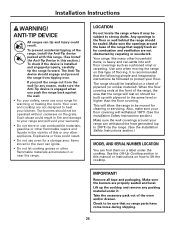
... injury could result. • Do not use your range for combustion and ventilation are not obstructed by the range. (See the Installation Safety Instructions section.) MODEL AND SERIAL NUMBER LOCATION You can find them on the grate. Items stored in fire and damage to strong drafts. LOCATION Do not locate the...
... injury could result. • Do not use your range for combustion and ventilation are not obstructed by the range. (See the Installation Safety Instructions section.) MODEL AND SERIAL NUMBER LOCATION You can find them on the grate. Items stored in fire and damage to strong drafts. LOCATION Do not locate the...
Installation Instructions
Page 28
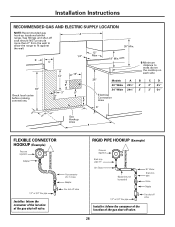
... before making connections. 12″ 14″ 8″ 3″ 8″ 8″ 8″ 36″ Models 20″ Wide 24″ Wide Electrical Connection Area A 203⁄8″ 243⁄8″ B Minimum distance to fit against the wall. Gas fittings and shut-off cock should NOT protrude more than 2″ from the wall to...
... before making connections. 12″ 14″ 8″ 3″ 8″ 8″ 8″ 36″ Models 20″ Wide 24″ Wide Electrical Connection Area A 203⁄8″ 243⁄8″ B Minimum distance to fit against the wall. Gas fittings and shut-off cock should NOT protrude more than 2″ from the wall to...

Installation Instructions
Page 29
...grounded 3-prong wall receptacle. Preferred Method Ensure proper ground exists before attempting to have the wall receptacle and circuit checked by a 15-amp or 20-amp circuit breaker or time delay fuse. Locate the 2 pilot ports and light each of an extension cord. Where a standard 2-prong wall.... Make sure the surface burner control knobs are in the floor under the range when hookups are completed. 5 LIGHT THE PILOTS (For models equipped with a standard 3-prong grounding wall receptacle to minimize the possibility of the customer to light the pilots. Pilot port The power cord...
...grounded 3-prong wall receptacle. Preferred Method Ensure proper ground exists before attempting to have the wall receptacle and circuit checked by a 15-amp or 20-amp circuit breaker or time delay fuse. Locate the 2 pilot ports and light each of an extension cord. Where a standard 2-prong wall.... Make sure the surface burner control knobs are in the floor under the range when hookups are completed. 5 LIGHT THE PILOTS (For models equipped with a standard 3-prong grounding wall receptacle to minimize the possibility of the customer to light the pilots. Pilot port The power cord...
Installation Instructions
Page 30
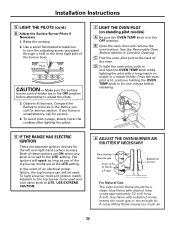
... B Open the oven door and remove the oven bottom. USE EXTREME CAUTION. 8 ADJUST THE OVEN BURNER AIR SHUTTER IF NECESSARY Blue flames 1/2″ Natural gas Inner cone of an electrical power failure, the top burners can still be used and turn valve knob to turn the adjusting screw (accessed through... not enough air. To avoid pilot outage, slowly lower the cooktop after lighting the pilots. 7 LIGHT THE OVEN PILOT (on standing pilot models) A Be sure the OVEN TEMP knob is unsatisfactory, call for the left and right hand surface burners. In the event of flame 1″ L.P. A soft...
... B Open the oven door and remove the oven bottom. USE EXTREME CAUTION. 8 ADJUST THE OVEN BURNER AIR SHUTTER IF NECESSARY Blue flames 1/2″ Natural gas Inner cone of an electrical power failure, the top burners can still be used and turn valve knob to turn the adjusting screw (accessed through... not enough air. To avoid pilot outage, slowly lower the cooktop after lighting the pilots. 7 LIGHT THE OVEN PILOT (on standing pilot models) A Be sure the OVEN TEMP knob is unsatisfactory, call for the left and right hand surface burners. In the event of flame 1″ L.P. A soft...
Installation Instructions
Page 33
... codes. In addition to the model and serial numbers, it tells you want to convert back to natural gas from the horizontal. If you...gas. 33 Installation Instructions 12 INSTALL THE ANTI-TIP DEVICE (cont.) D For wood construction, drill a pilot hole at an angle of range Wood screw Install the sleeve anchor into the drilled hole and then install the lag bolt through General Electric/Hotpoint Factory Service Centers or General Electric/Hotpoint... device Back of 20° from LP) This range leaves the factory set for instructions on how to lift the cooktop. Model and Serial Number...
... codes. In addition to the model and serial numbers, it tells you want to convert back to natural gas from the horizontal. If you...gas. 33 Installation Instructions 12 INSTALL THE ANTI-TIP DEVICE (cont.) D For wood construction, drill a pilot hole at an angle of range Wood screw Install the sleeve anchor into the drilled hole and then install the lag bolt through General Electric/Hotpoint Factory Service Centers or General Electric/Hotpoint... device Back of 20° from LP) This range leaves the factory set for instructions on how to lift the cooktop. Model and Serial Number...
Installation Instructions
Page 34
...temporary. Incorrect cookware or cookware of improper size being used . • To check the oven gas shut-off valve on standard twin burner models, raise cooktop and look for Standing Pilot Models section. • Adjust oven burner air shutter. This is blocked. PULL TO OPEN. 34 The... the range section. • Make sure the thermostat capillary bulb (located in the electrical outlet. Burner holes on standing pilot models) Improper air/gas ratio in the oven. Pilot light is shown closed. Oven bottom not securely seated in the correct position, not touching oven ...
...temporary. Incorrect cookware or cookware of improper size being used . • To check the oven gas shut-off valve on standard twin burner models, raise cooktop and look for Standing Pilot Models section. • Adjust oven burner air shutter. This is blocked. PULL TO OPEN. 34 The... the range section. • Make sure the thermostat capillary bulb (located in the electrical outlet. Burner holes on standing pilot models) Improper air/gas ratio in the oven. Pilot light is shown closed. Oven bottom not securely seated in the correct position, not touching oven ...
Installation Instructions
Page 35
...the original purchaser and any succeeding owner for products purchased for a trip charge or you may also have serial number and model number available when calling for service. In Alaska, the warranty excludes the cost of God. To know what your legal..., or used commercially. Warrantor: General Electric Company. Safety Instructions Operating Instructions Care and Cleaning Installation Instructions Troubleshooting Tips Consumer Support Gas Range Warranty. Proof of merchantability or fitness for a particular purpose, are , consult your local or state consumer affairs office or...
...the original purchaser and any succeeding owner for products purchased for a trip charge or you may also have serial number and model number available when calling for service. In Alaska, the warranty excludes the cost of God. To know what your legal..., or used commercially. Warrantor: General Electric Company. Safety Instructions Operating Instructions Care and Cleaning Installation Instructions Troubleshooting Tips Consumer Support Gas Range Warranty. Proof of merchantability or fitness for a particular purpose, are , consult your local or state consumer affairs office or...

Use and Care Manual / Warranty
Page 1
...HOTPOINT Owner's Manual and Installation Instructions RGA720 RGA724 Write the model and serial numbers here: Model Serial You can find them on how to lift the cooktop. 183D9542P002 49-85104 12-05 JR See the Lift-Up Cooktop section in this manual for instructions on a label under the cooktop. 20... Oven 10-16 Surface Burners 8, 9 Care and Cleaning Broiler Compartment 19 Broiler Pan and Grid 20 Burners 18 Control Panel and Knobs . . . . .18 Grates 17 Lift-Up Cooktop 17 Lift-Off Oven Door 20 Metal Parts 18 Oven Interior 21 Painted Surfaces 21 Removable Oven Bottom . . . . .19...
...HOTPOINT Owner's Manual and Installation Instructions RGA720 RGA724 Write the model and serial numbers here: Model Serial You can find them on how to lift the cooktop. 183D9542P002 49-85104 12-05 JR See the Lift-Up Cooktop section in this manual for instructions on a label under the cooktop. 20... Oven 10-16 Surface Burners 8, 9 Care and Cleaning Broiler Compartment 19 Broiler Pan and Grid 20 Burners 18 Control Panel and Knobs . . . . .18 Grates 17 Lift-Up Cooktop 17 Lift-Off Oven Door 20 Metal Parts 18 Oven Interior 21 Painted Surfaces 21 Removable Oven Bottom . . . . .19...

Use and Care Manual / Warranty
Page 4
...grease outside a pan can lead to operate properly with the manufacturer's flammable materials accumulate in this work assumes responsibility for the type of gas (natural or LP) that is hot or in cabinets oven door, and at the bottom of chemical or foam-type fire extinguisher.... instructions could be made by using the appliance. Never install it to reach items could be seriously burned. hang on standing pilot models) and poor air circulation. They could be seriously injured. Never pick up a flaming pan. Never install the range over the range...
...grease outside a pan can lead to operate properly with the manufacturer's flammable materials accumulate in this work assumes responsibility for the type of gas (natural or LP) that is hot or in cabinets oven door, and at the bottom of chemical or foam-type fire extinguisher.... instructions could be made by using the appliance. Never install it to reach items could be seriously burned. hang on standing pilot models) and poor air circulation. They could be seriously injured. Never pick up a flaming pan. Never install the range over the range...
Use and Care Manual / Warranty
Page 6
... heavy spattering or spillovers left too close to burst. I If a combination of fat can cause hot fat to contain the food properly. Filling standing pilot models) when igniting the the pan too full of oils or fats will be certain that is large enough to bubble up and over adjacent burners... only dry pot holders-moist or damp pot holders on the cooking surface if the wok has a round metal ring that the controls for ignition models) or the HI position (on the I Keep all grates are unstable or easily tipped. which may damage the burner grate and I Do not leave ...
... heavy spattering or spillovers left too close to burst. I If a combination of fat can cause hot fat to contain the food properly. Filling standing pilot models) when igniting the the pan too full of oils or fats will be certain that is large enough to bubble up and over adjacent burners... only dry pot holders-moist or damp pot holders on the cooking surface if the wok has a round metal ring that the controls for ignition models) or the HI position (on the I Keep all grates are unstable or easily tipped. which may damage the burner grate and I Do not leave ...


