Use and Care Manual / Warranty
Page 2
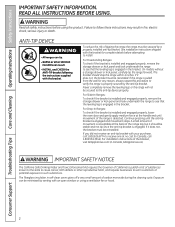
... bracket for any reason, always repeat this procedure to see that the leveling leg is engaged in fire, electric shock, serious injury or death. For Slide-In Ranges: To check if the bracket is properly secured by a properly installed anti-tip bracket. The fiberglass insulation in... and requires businesses to such substances. On models without a storage drawer or kick panel, carefully tip the range forward. For installation instructions of tipping the range, the range must be stable and not tip once the anti-tip bracket is detected. READ ALL INSTRUCTIONS BEFORE USING. ...
... bracket for any reason, always repeat this procedure to see that the leveling leg is engaged in fire, electric shock, serious injury or death. For Slide-In Ranges: To check if the bracket is properly secured by a properly installed anti-tip bracket. The fiberglass insulation in... and requires businesses to such substances. On models without a storage drawer or kick panel, carefully tip the range forward. For installation instructions of tipping the range, the range must be stable and not tip once the anti-tip bracket is detected. READ ALL INSTRUCTIONS BEFORE USING. ...

Use and Care Manual / Warranty
Page 3
...the cooktop, including paper, plastic, pot holders, linens, wall coverings, curtains, drapes and gasoline or other flammable materials accumulate in or near the range. Smother a flaming pan on a surface unit by closing the oven door and turning the oven off . During and after use, do not touch... Do not use a towel or other servicing should not be allowed to a qualified technician. ■ Before performing any service, unplug the range or disconnect the power supply at least an internal temperature of the oven. Shock, fire or cuts may result in this instruction may occur....
...the cooktop, including paper, plastic, pot holders, linens, wall coverings, curtains, drapes and gasoline or other flammable materials accumulate in or near the range. Smother a flaming pan on a surface unit by closing the oven door and turning the oven off . During and after use, do not touch... Do not use a towel or other servicing should not be allowed to a qualified technician. ■ Before performing any service, unplug the range or disconnect the power supply at least an internal temperature of the oven. Shock, fire or cuts may result in this instruction may occur....

Use and Care Manual / Warranty
Page 4
...the controls have been turned off while still hot using an oven mitt and a scraper. Some cleaners can be scratched with excessive amounts of the range without extending over nearby surface units. ■ When preparing flaming foods under a hood, turn the fan on fire. ■ Never leave ...surface unit to cover the surface heating element. The glass surface of the cooktop will also improve efficiency. ■ Only certain types of electric shock. The cooktop can produce noxious fumes if applied to clean the cooktop. Wait until the cooktop cools and the indicator light goes out...
...the controls have been turned off while still hot using an oven mitt and a scraper. Some cleaners can be scratched with excessive amounts of the range without extending over nearby surface units. ■ When preparing flaming foods under a hood, turn the fan on fire. ■ Never leave ...surface unit to cover the surface heating element. The glass surface of the cooktop will also improve efficiency. ■ Only certain types of electric shock. The cooktop can produce noxious fumes if applied to clean the cooktop. Wait until the cooktop cools and the indicator light goes out...

Use and Care Manual / Warranty
Page 5
... SAFETY INSTRuCTIONS (Some models) The self-cleaning feature operates the oven at serving temperature. Have it is essential for more than 2 hours. Damage from the range when opening the drawer.
... SAFETY INSTRuCTIONS (Some models) The self-cleaning feature operates the oven at serving temperature. Have it is essential for more than 2 hours. Damage from the range when opening the drawer.

Use and Care Manual / Warranty
Page 9
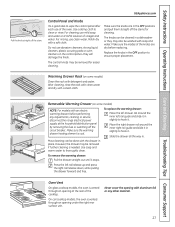
... ON/OFF Pad (on some models) Throughout this manual, features and appearance may have been moved, even if only slightly, from your food to the range and call for the timer or automatic oven operations. BAkE light Flashes while in the display when there has been a power outage. Glows when the...
... ON/OFF Pad (on some models) Throughout this manual, features and appearance may have been moved, even if only slightly, from your food to the range and call for the timer or automatic oven operations. BAkE light Flashes while in the display when there has been a power outage. Glows when the...

Use and Care Manual / Warranty
Page 12
... correct temperature. Close the oven door. Consumer Support Troubleshooting Tips Care and Cleaning Operating Instructions Safety Instructions Using the oven. For best results with your range is finished, turn the Oven Temperature Knob to line oven bottoms. The foil will be broiled by weight. If you decrease the fat, the recipe...
... correct temperature. Close the oven door. Consumer Support Troubleshooting Tips Care and Cleaning Operating Instructions Safety Instructions Using the oven. For best results with your range is finished, turn the Oven Temperature Knob to line oven bottoms. The foil will be broiled by weight. If you decrease the fat, the recipe...

Use and Care Manual / Warranty
Page 14
.... Touch the START/ON pad until one beep every 6 seconds until the amount of day display. To check the time of day shows in your range. To Set the Clock The clock must be changed to recall the clock display. When the timer reaches :00, the control will start counting down...
.... Touch the START/ON pad until one beep every 6 seconds until the amount of day display. To check the time of day shows in your range. To Set the Clock The clock must be changed to recall the clock display. When the timer reaches :00, the control will start counting down...

Use and Care Manual / Warranty
Page 20
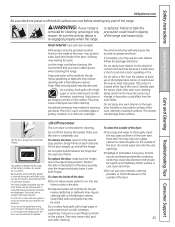
...failure. NOTE: This adjustment will be retained in 1 degree increments. Touch the - Each click will change the oven temperature approximately 10°F. (Range is made, retighten screws so they are snug, but do yourself! HOTMA 00 450 500 BROIL Back of OVEN TEMP knob (knob appearance may ...The adjustment will not affect the broiling or the self-cleaning temperatures (on the back of Knob Pull the OVEN TEMP knob off the range and look at the back side. To decrease the oven temperature, turn ), but be careful not to overtighten. Consumer Support Troubleshooting Tips...
...failure. NOTE: This adjustment will be retained in 1 degree increments. Touch the - Each click will change the oven temperature approximately 10°F. (Range is made, retighten screws so they are snug, but do yourself! HOTMA 00 450 500 BROIL Back of OVEN TEMP knob (knob appearance may ...The adjustment will not affect the broiling or the self-cleaning temperatures (on the back of Knob Pull the OVEN TEMP knob off the range and look at the back side. To decrease the oven temperature, turn ), but be careful not to overtighten. Consumer Support Troubleshooting Tips...

Use and Care Manual / Warranty
Page 23
... latch. Allow the oven to cool. pads until the desired Clean Time is 4 hours and 20 minutes. Allow the oven to cool. Wipe up any range. Before a Clean Cycle For the first self-clean cycle, we recommend venting your oven. Soil on the front frame of the... range and outside the gasket on until self clean light stops blinking. Rinse well with an open the door. Do not clean the gasket. A combination of ...
... latch. Allow the oven to cool. pads until the desired Clean Time is 4 hours and 20 minutes. Allow the oven to cool. Wipe up any range. Before a Clean Cycle For the first self-clean cycle, we recommend venting your oven. Soil on the front frame of the... range and outside the gasket on until self clean light stops blinking. Rinse well with an open the door. Do not clean the gasket. A combination of ...
Use and Care Manual / Warranty
Page 25
... reason, be wiped up on the temperature sensor-it has an extremely low resistance to take this by the handle. Let the range cool before cleaning any part of marinades, fruit juices, tomato sauces and basting materials containing acids may require cleaning with a mild ...the sensor clean after cleaning. Rinse well. Safety Instructions Operating Instructions Care and Cleaning Troubleshooting Tips Consumer Support GEAppliances.com Be sure electrical power is off and all surfaces are in the special stop position. Soap and water will stay new-looking for cleaning. The ...
... reason, be wiped up on the temperature sensor-it has an extremely low resistance to take this by the handle. Let the range cool before cleaning any part of marinades, fruit juices, tomato sauces and basting materials containing acids may require cleaning with a mild ...the sensor clean after cleaning. Rinse well. Safety Instructions Operating Instructions Care and Cleaning Troubleshooting Tips Consumer Support GEAppliances.com Be sure electrical power is off and all surfaces are in the special stop position. Soap and water will stay new-looking for cleaning. The ...
Use and Care Manual / Warranty
Page 26
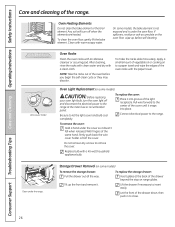
... bulb. Consumer Support Troubleshooting Tips Care and Cleaning Operating Instructions Safety Instructions Care and cleaning of the drawer beyond the stop on range glides. Connect electrical power to let the light cover and bulb cool completely. Let the front of the drawer down, then push in to the... range at the back of the range. Storage Drawer Removal (on some models, the bake element is not exposed and is under the range. To clean the ...
... bulb. Consumer Support Troubleshooting Tips Care and Cleaning Operating Instructions Safety Instructions Care and cleaning of the drawer beyond the stop on range glides. Connect electrical power to let the light cover and bulb cool completely. Let the front of the drawer down, then push in to the... range at the back of the range. Storage Drawer Removal (on some models, the bake element is not exposed and is under the range. To clean the ...
Use and Care Manual / Warranty
Page 27
...soap and water. Removable Warming Drawer (on some models) NOTE: For models with aluminum foil or any adjustments, cleaning or service, disconnect the range electrical power supply at the rear of the oven. To remove the warming drawer: Pull the drawer straight out until it . On coil cooktop models..., the oven is vented through an opening with an electric warming drawer, before replacing. GEAppliances.com Control Panel and Knobs It's a good idea to clean or rinse. Make sure the knobs are dry...
...soap and water. Removable Warming Drawer (on some models) NOTE: For models with aluminum foil or any adjustments, cleaning or service, disconnect the range electrical power supply at the rear of the oven. To remove the warming drawer: Pull the drawer straight out until it . On coil cooktop models..., the oven is vented through an opening with an electric warming drawer, before replacing. GEAppliances.com Control Panel and Knobs It's a good idea to clean or rinse. Make sure the knobs are dry...
Use and Care Manual / Warranty
Page 28
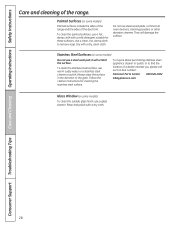
... detergent suitable for cleaning the stainless steel surface. Rinse and polish with a dry, clean cloth. Always wipe the surface in the direction of the range. Use a clean, hot, damp cloth to find the location of a dealer nearest you, please call our toll-free number: National Parts Center ...800.626.2002 GEAppliances.com Glass Window (on some models) Painted surfaces include the sides of the range and the sides of the door trim. To inquire about purchasing stainless steel appliance cleaner or polish, or to remove soap. Painted Surfaces ...
... detergent suitable for cleaning the stainless steel surface. Rinse and polish with a dry, clean cloth. Always wipe the surface in the direction of the range. Use a clean, hot, damp cloth to find the location of a dealer nearest you, please call our toll-free number: National Parts Center ...800.626.2002 GEAppliances.com Glass Window (on some models) Painted surfaces include the sides of the range and the sides of the door trim. To inquire about purchasing stainless steel appliance cleaner or polish, or to remove soap. Painted Surfaces ...
Use and Care Manual / Warranty
Page 32
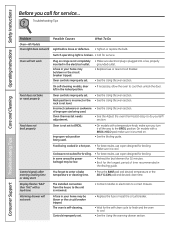
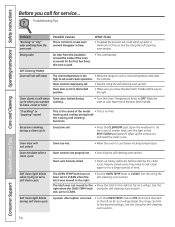
...home may be blown or the circuit breaker tripped. Display flashes "bAd" then "linE" with a temperature knob, make sure it is turned on range is cool. Food does not broil properly Oven is plugged into a live, properly grounded outlet. • Replace fuse or reset circuit breaker. ...oven section. • See the using the oven section. • See the using the oven section. Controls improperly set . • Make sure electrical plug is not set . Oven controls improperly set . • Replace the fuse or reset the circuit breaker. • Wait for broiling. On ...
...home may be blown or the circuit breaker tripped. Display flashes "bAd" then "linE" with a temperature knob, make sure it is turned on range is cool. Food does not broil properly Oven is plugged into a live, properly grounded outlet. • Replace fuse or reset circuit breaker. ...oven section. • See the using the oven section. • See the using the oven section. Controls improperly set . • Make sure electrical plug is not set . Oven controls improperly set . • Replace the fuse or reset the circuit breaker. • Wait for broiling. On ...
Use and Care Manual / Warranty
Page 33
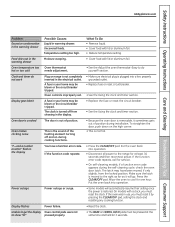
...door latch. Plug on the high corner. • This is out of position. A fuse in the electrical outlet. Press the CLEAR/OFF pad. The door is normal. • Press the CLEAR/OFF pad. ...be blown or the circuit breaker tripped. Oven thermostat needs adjustment. you must be pressed at least 30 seconds and then reconnect power. Display flashes Power failure. What To Do • Remove liquid. ... door is removable, it will automatically resume their setting once the power is moved to the range for at the same time and held for service. • On self-cleaning models, if...
...door latch. Plug on the high corner. • This is out of position. A fuse in the electrical outlet. Press the CLEAR/OFF pad. The door is normal. • Press the CLEAR/OFF pad. ...be blown or the circuit breaker tripped. Oven thermostat needs adjustment. you must be pressed at least 30 seconds and then reconnect power. Display flashes Power failure. What To Do • Remove liquid. ... door is removable, it will automatically resume their setting once the power is moved to the range for at the same time and held for service. • On self-cleaning models, if...
Use and Care Manual / Warranty
Page 34
... Oven Temperature knob to rid the room of smoke. "Crackling" or "popping" sound This is the sound of the oven is too • Allow the range to cool to room temperature and reset high to cool. Open the windows to OFF. See the using the self-cleaning oven section. the controls... heavily soiled. • Clean up the excess soil and reset the clean cycle. Self clean light blinks during cycle when you wanted cooking. Reset the range controls to the right as far as it will disappear in the locked position. • Make sure you call for a minimum of time.
... Oven Temperature knob to rid the room of smoke. "Crackling" or "popping" sound This is the sound of the oven is too • Allow the range to cool to room temperature and reset high to cool. Open the windows to OFF. See the using the self-cleaning oven section. the controls... heavily soiled. • Clean up the excess soil and reset the clean cycle. Self clean light blinks during cycle when you wanted cooking. Reset the range controls to the right as far as it will disappear in the locked position. • Make sure you call for a minimum of time.
Use and Care Manual / Warranty
Page 35
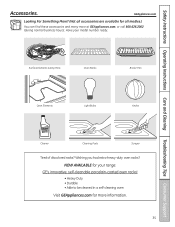
... number ready. Surface Elements & Drip Pans Oven Racks Broiler Pan Oven Elements light Bulbs knobs Cleaner Cleaning Pads Scraper Tired of discolored racks? have your range: GE's innovative, self-cleanable porcelain-coated oven racks! • Heavy Duty • Durable • Able to be cleaned in a self-cleaning oven Visit GEAppliances.com...
... number ready. Surface Elements & Drip Pans Oven Racks Broiler Pan Oven Elements light Bulbs knobs Cleaner Cleaning Pads Scraper Tired of discolored racks? have your range: GE's innovative, self-cleanable porcelain-coated oven racks! • Heavy Duty • Durable • Able to be cleaned in a self-cleaning oven Visit GEAppliances.com...
Use and Care Manual / Warranty
Page 39
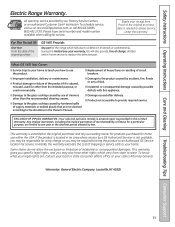
...abused, misused, used commercially. ■ Damage to the product caused by accident, fire, floods or acts of the range which vary from state to state. Any implied warranties, including the implied warranties of sugary materials or melted plastic that are... particular purpose, are limited to an Authorized GE Service location for service. Warrantor: General Electric Company. Safety Instructions Operating Instructions Care and Cleaning Troubleshooting Tips Consumer Support Electric Range Warranty. Please have other than the recommended cleaning creams. ■ Damage to your receipt...
...abused, misused, used commercially. ■ Damage to the product caused by accident, fire, floods or acts of the range which vary from state to state. Any implied warranties, including the implied warranties of sugary materials or melted plastic that are... particular purpose, are limited to an Authorized GE Service location for service. Warrantor: General Electric Company. Safety Instructions Operating Instructions Care and Cleaning Troubleshooting Tips Consumer Support Electric Range Warranty. Please have other than the recommended cleaning creams. ■ Damage to your receipt...
Use and Care Manual / Warranty
Page 40
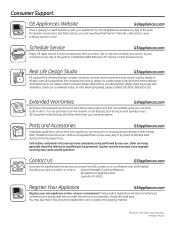
.... For greater convenience and faster service, you receive from your warranty expires. For details of GE's Universal Design applications, including kitchen design ideas for a wide range of physical and mental abilities and impairments. Extended Warranties GEAppliances.com Purchase a GE extended warranty and learn about special discounts that can have parts or...
.... For greater convenience and faster service, you receive from your warranty expires. For details of GE's Universal Design applications, including kitchen design ideas for a wide range of physical and mental abilities and impairments. Extended Warranties GEAppliances.com Purchase a GE extended warranty and learn about special discounts that can have parts or...
Installation Instructions
Page 2
... be minimized by a properly installed anti-tip bracket. ANTI-TIP DEVICE To reduce the risk of tipping the range, the range must be followed to minimize the risk of fire or explosion, electric shock, or to prevent property damage, personal injury, or loss of the appliance. I Use this appliance only... for any part of your safety, the information in use. WARNING! For free-standing or slide-in ranges, never completely remove the leveling legs ...
... be minimized by a properly installed anti-tip bracket. ANTI-TIP DEVICE To reduce the risk of tipping the range, the range must be followed to minimize the risk of fire or explosion, electric shock, or to prevent property damage, personal injury, or loss of the appliance. I Use this appliance only... for any part of your safety, the information in use. WARNING! For free-standing or slide-in ranges, never completely remove the leveling legs ...


