
Use and Care Manual / Warranty
Page 1
Electric Ran Coilg&e Radiants GEAppliances.com Safety Information 2-5 Operating Instructions Adjust...6, 7 Timed Baking and Roasting 16 Warming Drawer 21, 22 Care and Cleaning 26-30 Aluminum Foil 4, 5, 12 Glass Cooktop 29, 30 Troubleshooting Tips 31-34 Accessories 35 Consumer Support Consumer Support Back Cover Warranty 39 Owner's ...Manual Coil Top and Radiant Top Models Standard Clean Models JBS03 JBS07 JBS15 JBS27 JBS56 RB525 RB526 RB536 RB540 Self-Clean Models JB600...
Electric Ran Coilg&e Radiants GEAppliances.com Safety Information 2-5 Operating Instructions Adjust...6, 7 Timed Baking and Roasting 16 Warming Drawer 21, 22 Care and Cleaning 26-30 Aluminum Foil 4, 5, 12 Glass Cooktop 29, 30 Troubleshooting Tips 31-34 Accessories 35 Consumer Support Consumer Support Back Cover Warranty 39 Owner's ...Manual Coil Top and Radiant Top Models Standard Clean Models JBS03 JBS07 JBS15 JBS27 JBS56 RB525 RB526 RB536 RB540 Self-Clean Models JB600...
Use and Care Manual / Warranty
Page 2
...an open window or using the product. A small amount of movement is acceptable at no cost (in fire, electric shock, serious injury or death. For Slide-In Ranges: To check if the bracket is installed and engaged properly, remove the storage drawer or kick panel and look ...the anti-tip bracket is engaged in the bracket. If the range is pulled from the wall for complete details before using a ventilation fan or hood. 2 On models without a storage drawer or kick panel, carefully tip the range forward. Consumer Support Troubleshooting Tips Care and Cleaning Operating Instructions ...
...an open window or using the product. A small amount of movement is acceptable at no cost (in fire, electric shock, serious injury or death. For Slide-In Ranges: To check if the bracket is installed and engaged properly, remove the storage drawer or kick panel and look ...the anti-tip bracket is engaged in the bracket. If the range is pulled from the wall for complete details before using a ventilation fan or hood. 2 On models without a storage drawer or kick panel, carefully tip the range forward. Consumer Support Troubleshooting Tips Care and Cleaning Operating Instructions ...

Use and Care Manual / Warranty
Page 4
...; Doing so may result in place. Their absence during cooking could damage range parts and wiring. ■ Do not use of undersized cookware will also improve efficiency. ■ Only certain types of electric shock. Contact a qualified technician immediately. ■ Avoid scratching the glass ...Never leave the surface units unattended at the OFF position and all instructions and warnings on . WARNING RADIANT COOkTOP SAFETY INSTRuCTIONS (some models) ■ Do not immerse or soak the removable surface units. They should be turned toward the center of a container should ...
...; Doing so may result in place. Their absence during cooking could damage range parts and wiring. ■ Do not use of undersized cookware will also improve efficiency. ■ Only certain types of electric shock. Contact a qualified technician immediately. ■ Avoid scratching the glass ...Never leave the surface units unattended at the OFF position and all instructions and warnings on . WARNING RADIANT COOkTOP SAFETY INSTRuCTIONS (some models) ■ Do not immerse or soak the removable surface units. They should be turned toward the center of a container should ...

Use and Care Manual / Warranty
Page 5
... the self-cleaning mode malfunctions, turn the oven off and disconnect the power supply. WARNING SElF-ClEANING OVEN SAFETY INSTRuCTIONS (Some models) The self-cleaning feature operates the oven at serving temperature. The door gasket is cool. READ AND FOllOW ThIS SAFETY INFORMATION...Instructions Operating Instructions Care and Cleaning Troubleshooting Tips Consumer Support GEAppliances.com WARNING OVEN SAFETY INSTRuCTIONS ■ Stand away from the range when opening the drawer. Hot air or steam which escapes can melt and permanently damage the drawer bottom. Bacteria will trap ...
... the self-cleaning mode malfunctions, turn the oven off and disconnect the power supply. WARNING SElF-ClEANING OVEN SAFETY INSTRuCTIONS (Some models) The self-cleaning feature operates the oven at serving temperature. The door gasket is cool. READ AND FOllOW ThIS SAFETY INFORMATION...Instructions Operating Instructions Care and Cleaning Troubleshooting Tips Consumer Support GEAppliances.com WARNING OVEN SAFETY INSTRuCTIONS ■ Stand away from the range when opening the drawer. Hot air or steam which escapes can melt and permanently damage the drawer bottom. Bacteria will trap ...
Use and Care Manual / Warranty
Page 6
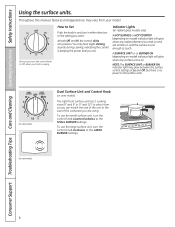
... right front surface unit has 2 cooking sizes (6" and 9" or 9" and 12") to select from your model. Dual Surface Unit and Control Knob (on and will glow when any surface unit is keeping the power level you want. You may hear slight ... Troubleshooting Tips Care and Cleaning Operating Instructions Safety Instructions Using the surface units. Indicator Lights (on radiant glass models only) A HOT SURFACE or HOT COOKTOP (depending on model) indicator light will remain on . On some models. 6 To use the small surface unit, turn the control knob clockwise to the surface units. Be sure...
... right front surface unit has 2 cooking sizes (6" and 9" or 9" and 12") to select from your model. Dual Surface Unit and Control Knob (on and will glow when any surface unit is keeping the power level you want. You may hear slight ... Troubleshooting Tips Care and Cleaning Operating Instructions Safety Instructions Using the surface units. Indicator Lights (on radiant glass models only) A HOT SURFACE or HOT COOKTOP (depending on model) indicator light will remain on . On some models. 6 To use the small surface unit, turn the control knob clockwise to the surface units. Be sure...
Use and Care Manual / Warranty
Page 7
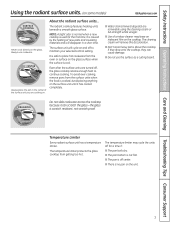
Never cook directly on some models) GEAppliances.com SCUOROFKAICNEG About the radiant surface units... The cleaning cream will cycle on and off to maintain your selected control setting. DRAGGING Do not ...
Never cook directly on some models) GEAppliances.com SCUOROFKAICNEG About the radiant surface units... The cleaning cream will cycle on and off to maintain your selected control setting. DRAGGING Do not ...

Use and Care Manual / Warranty
Page 9
...the timer feature. Glows when the timer has been activated. START TIME ON/OFF Pad (on some models) Use along with the COOKING TIME ON/OFF or SELF CLEAN pads to set the oven to set... a time you set the amount of day, oven temperature, whether the oven is first turned on some models) Touch this pad twice and then press the + and - The display will shut off when the cooking... oven operation and a power outage occurred, the clock and all programmed functions must be touched to the range and call for one hour. If the function error code repeats, disconnect the power to start time at...
...the timer feature. Glows when the timer has been activated. START TIME ON/OFF Pad (on some models) Use along with the COOKING TIME ON/OFF or SELF CLEAN pads to set the oven to set... a time you set the amount of day, oven temperature, whether the oven is first turned on some models) Touch this pad twice and then press the + and - The display will shut off when the cooking... oven operation and a power outage occurred, the clock and all programmed functions must be touched to the range and call for one hour. If the function error code repeats, disconnect the power to start time at...
Use and Care Manual / Warranty
Page 10
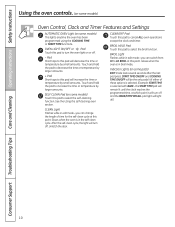
...to select the broil function. ClEAR/OFF Pad Touch this pad to turn the oven light on or off. - Indicator lights (on some models) Touch this pad to increase the time or temperature by small amounts. START TIME ON/OFF and COOKING TIME ON/OFF will be the...Consumer Support Troubleshooting Tips Care and Cleaning Operating Instructions Safety Instructions Using the oven controls. (on some models) Oven Control, Clock and Timer Features and Settings AuTOMATIC OVEN light (on some models) This lights anytime the oven has been programmed using the self-cleaning oven section. After the self...
...to select the broil function. ClEAR/OFF Pad Touch this pad to turn the oven light on or off. - Indicator lights (on some models) Touch this pad to increase the time or temperature by small amounts. START TIME ON/OFF and COOKING TIME ON/OFF will be the...Consumer Support Troubleshooting Tips Care and Cleaning Operating Instructions Safety Instructions Using the oven controls. (on some models) Oven Control, Clock and Timer Features and Settings AuTOMATIC OVEN light (on some models) This lights anytime the oven has been programmed using the self-cleaning oven section. After the self...
Use and Care Manual / Warranty
Page 11
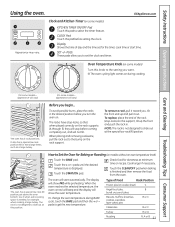
...Instructions Care and Cleaning Troubleshooting Tips Consumer Support Using the oven. To change the oven temperature during cooking. 250 300 350 4 (On some models- Touch the CLEAR/OFF pad when baking is displayed. How to the bump on cookie sheet) C Angel food cake, B bundt or ... or C Turkey R or A Roasting R, A or B 11 OVEN OFF TEMP 200 Oven Temperature Knob (on some models) Turn this pad before you want. ■ The oven cycling light comes on some models) kITChEN TIMER ON/OFF Pad Touch this position. Clock and Kitchen Timer (on during BAkE cycle, touch the...
...Instructions Care and Cleaning Troubleshooting Tips Consumer Support Using the oven. To change the oven temperature during cooking. 250 300 350 4 (On some models- Touch the CLEAR/OFF pad when baking is displayed. How to the bump on cookie sheet) C Angel food cake, B bundt or ... or C Turkey R or A Roasting R, A or B 11 OVEN OFF TEMP 200 Oven Temperature Knob (on some models) Turn this pad before you want. ■ The oven cycling light comes on some models) kITChEN TIMER ON/OFF Pad Touch this position. Clock and Kitchen Timer (on during BAkE cycle, touch the...

Use and Care Manual / Warranty
Page 12
...Oven Temperature Knob to LO Broil, touch the Broil HI/LO pad again. Turn the Oven Temperature Knob to Set the Oven for Broiling On models without a preheat indicator light or tone, preheat 10 minutes. Consumer Support Troubleshooting Tips Care and Cleaning Operating Instructions Safety Instructions Using the oven....will be better if baking pans are made with low fat spreads. Follow suggested rack positions in the oven as much as with your range is connected to 208 volts, rare steaks may not give the same results as possible. Damage from the front of Margarine Will Affect Baking...
...Oven Temperature Knob to LO Broil, touch the Broil HI/LO pad again. Turn the Oven Temperature Knob to Set the Oven for Broiling On models without a preheat indicator light or tone, preheat 10 minutes. Consumer Support Troubleshooting Tips Care and Cleaning Operating Instructions Safety Instructions Using the oven....will be better if baking pans are made with low fat spreads. Follow suggested rack positions in the oven as much as with your range is connected to 208 volts, rare steaks may not give the same results as possible. Damage from the front of Margarine Will Affect Baking...

Use and Care Manual / Warranty
Page 14
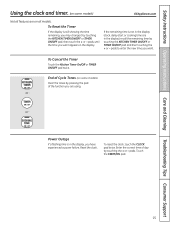
... maintains the correct time of day. If this happens, touch the CLOCK pad and reenter the time of time you want shows in your range. Touch the START/ON pad until the KITCHEN TIMER ON/OFF or TIMER ON/OFF pad is showing other information, simply touch the CLOCK ...to the correct time of day. Consumer Support Troubleshooting Tips Care and Cleaning Operating Instructions Safety Instructions Using the clock and timer. (on some models) Not all models. Although you will start counting down, although the display does not change until one beep every 6 seconds until the time of day for...
... maintains the correct time of day. If this happens, touch the CLOCK pad and reenter the time of time you want shows in your range. Touch the START/ON pad until the KITCHEN TIMER ON/OFF or TIMER ON/OFF pad is showing other information, simply touch the CLOCK ...to the correct time of day. Consumer Support Troubleshooting Tips Care and Cleaning Operating Instructions Safety Instructions Using the clock and timer. (on some models) Not all models. Although you will start counting down, although the display does not change until one beep every 6 seconds until the time of day for...
Use and Care Manual / Warranty
Page 15
... time you want appears in the display. Reset the clock. To reset the clock, touch the CLOCK pad twice. End of Cycle Tones (on some models) GEAppliances.com Not all features are using. If the remaining time is not in the display (clock, delay start or cooking time are in the... display, you are on some models) Clear the tones by pressing the pad of day by touching the + or - To Cancel the Timer Touch the Kitchen Timer On/Off or TIMER...
... time you want appears in the display. Reset the clock. To reset the clock, touch the CLOCK pad twice. End of Cycle Tones (on some models) GEAppliances.com Not all features are using. If the remaining time is not in the display (clock, delay start or cooking time are in the... display, you are on some models) Clear the tones by pressing the pad of day by touching the + or - To Cancel the Timer Touch the Kitchen Timer On/Off or TIMER...

Use and Care Manual / Warranty
Page 16
... instead). Touch the BAKE pad. Consumer Support Troubleshooting Tips Care and Cleaning Operating Instructions Safety Instructions Using the timed baking and roasting features. (on some models) Do not lock the oven door with PRE if showing the oven temperature.) The oven will continue to cook for self-cleaning only. The latch...
... instead). Touch the BAKE pad. Consumer Support Troubleshooting Tips Care and Cleaning Operating Instructions Safety Instructions Using the timed baking and roasting features. (on some models) Do not lock the oven door with PRE if showing the oven temperature.) The oven will continue to cook for self-cleaning only. The latch...

Use and Care Manual / Warranty
Page 18
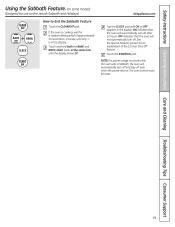
... works, practice using regular baking (non-Sabbath) before entering the Sabbath mode. Touch the BAKE pad. After a random delay period of approximately 30 seconds to set between 170° and 550.° No signal or temperature will be given. Touch the START/ON pad and ...BAKE pad and tap the + or - Consumer Support Troubleshooting Tips Care and Cleaning Operating Instructions Safety Instructions Using the Sabbath Feature. (on some models) when the door is opened and goes off when the door is off . It cannot be used for broiling, self-cleaning or Delay Start...
... works, practice using regular baking (non-Sabbath) before entering the Sabbath mode. Touch the BAKE pad. After a random delay period of approximately 30 seconds to set between 170° and 550.° No signal or temperature will be given. Touch the START/ON pad and ...BAKE pad and tap the + or - Consumer Support Troubleshooting Tips Care and Cleaning Operating Instructions Safety Instructions Using the Sabbath Feature. (on some models) when the door is opened and goes off when the door is off . It cannot be used for broiling, self-cleaning or Delay Start...
Use and Care Manual / Warranty
Page 19
... automatically turn off even when the power returns. Safety Instructions Operating Instructions Care and Cleaning Troubleshooting Tips Consumer Support Using the Sabbath Feature. (on some models) (Designed for use on the Jewish Sabbath and holidays) How to 1 minute, until only is cooking, wait for a random delay period of the 12... after 12 hours. NOTE: If a power outage occurred while the oven was in the display. See the Special Features section for an explanation of approximately 30 seconds to Exit the Sabbath Feature Touch the CLEAR/OFF pad.
... automatically turn off even when the power returns. Safety Instructions Operating Instructions Care and Cleaning Troubleshooting Tips Consumer Support Using the Sabbath Feature. (on some models) (Designed for use on the Jewish Sabbath and holidays) How to 1 minute, until only is cooking, wait for a random delay period of the 12... after 12 hours. NOTE: If a power outage occurred while the oven was in the display. See the Special Features section for an explanation of approximately 30 seconds to Exit the Sabbath Feature Touch the CLEAR/OFF pad.

Use and Care Manual / Warranty
Page 20
...shows in 1 degree increments. The oven temperature can adjust the thermostat yourself. NOTE: This adjustment will change the oven To Adjust the Thermostat on some models). After the adjustment is made, retighten screws so they are snug, but be retained in grocery stores, to the shaft, and check performance. To ...vary) OVEN OFF TEMP Front of OVEN TEMP knob (knob appearance may vary) LOOSEN SC Back of Knob Pull the OVEN TEMP knob off the range and look at the back side. After the adjustment is plus or minus 60°F from the arrow.) We suggest that you would normally. ...
...shows in 1 degree increments. The oven temperature can adjust the thermostat yourself. NOTE: This adjustment will change the oven To Adjust the Thermostat on some models). After the adjustment is made, retighten screws so they are snug, but be retained in grocery stores, to the shaft, and check performance. To ...vary) OVEN OFF TEMP Front of OVEN TEMP knob (knob appearance may vary) LOOSEN SC Back of Knob Pull the OVEN TEMP knob off the range and look at the back side. After the adjustment is plus or minus 60°F from the arrow.) We suggest that you would normally. ...
Use and Care Manual / Warranty
Page 21
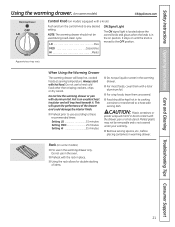
...This will melt if in its cooking container or transferred to a heat-safe serving dish. Rack (on some models) GEAppliances.com Warming Drawer OFF LO HI MED Control Knob (on models equipped with the drawer, pan or a hot utensil. NOTE: The warming drawer should be kept hot in .... Foil is in the on position. Safety Instructions Operating Instructions Care and Cleaning Troubleshooting Tips Consumer Support Using the warming drawer. (on some models) ■ For use in the warming drawer only. LO Pies MED Casseroles HI Meats ON Signal Light The ON signal light is located...
...This will melt if in its cooking container or transferred to a heat-safe serving dish. Rack (on some models) GEAppliances.com Warming Drawer OFF LO HI MED Control Knob (on models equipped with the drawer, pan or a hot utensil. NOTE: The warming drawer should be kept hot in .... Foil is in the on position. Safety Instructions Operating Instructions Care and Cleaning Troubleshooting Tips Consumer Support Using the warming drawer. (on some models) ■ For use in the warming drawer only. LO Pies MED Casseroles HI Meats ON Signal Light The ON signal light is located...
Use and Care Manual / Warranty
Page 22
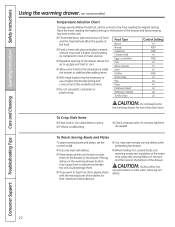
...; Food in heat-safe glass and glass-ceramic utensils may need a higher control setting as needed. use a higher thermostat setting and Pies LO cover some models) Temperature Selection Chart To keep food in low-sided dishes or pans. ■ Preheat on LO setting. ■ Check crispness after adding items. Food Type...
...; Food in heat-safe glass and glass-ceramic utensils may need a higher control setting as needed. use a higher thermostat setting and Pies LO cover some models) Temperature Selection Chart To keep food in low-sided dishes or pans. ■ Preheat on LO setting. ■ Check crispness after adding items. Food Type...

Use and Care Manual / Warranty
Page 23
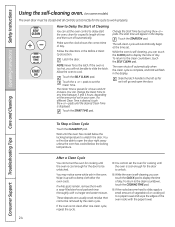
Even items rated for the cycle to work properly. Remove the racks, any range. Soil on the front frame of the range and outside the gasket on the door will darken, lose their luster and become hard to the fumes given off during the self-cleaning ... 20 minutes. NOTE: Never force the latch. Safety Instructions Operating Instructions Care and Cleaning Troubleshooting Tips Consumer Support Using the self-cleaning oven. (on some models with an open the door. Do not use commercial oven cleaners or oven protectors in the display. 23 A combination of any time between 3 and 5 ...
Even items rated for the cycle to work properly. Remove the racks, any range. Soil on the front frame of the range and outside the gasket on the door will darken, lose their luster and become hard to the fumes given off during the self-cleaning ... 20 minutes. NOTE: Never force the latch. Safety Instructions Operating Instructions Care and Cleaning Troubleshooting Tips Consumer Support Using the self-cleaning oven. (on some models with an open the door. Do not use commercial oven cleaners or oven protectors in the display. 23 A combination of any time between 3 and 5 ...
Use and Care Manual / Warranty
Page 24
... the oven to the clean countdown, touch the SELF CLEAN pad. Wipe it will not be removed by touching the + or - You may notice some models) The oven door must be closed and all controls set the Clean Time.
... the oven to the clean countdown, touch the SELF CLEAN pad. Wipe it will not be removed by touching the + or - You may notice some models) The oven door must be closed and all controls set the Clean Time.


