Use and Care Manual / Warranty
Page 2
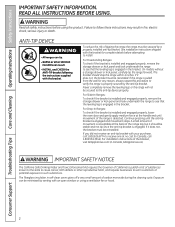
... call 1.800.561.3344). For installation instructions of potential exposure to the anti-tip device properly. On models without a storage drawer or kick panel, carefully tip the range forward. WARNING IMPORTANT SAFETY NOTICE The California Safe Drinking Water and Toxic Enforcement Act requires the Governor of ..., lower the oven door and gently apply medium force at no cost (in Canada, GEAppliances.ca). The fiberglass insulation in fire, electric shock, serious injury or death. READ ALL INSTRUCTIONS BEFORE USING. Failure to see that the leveling leg is properly secured by the ...
... call 1.800.561.3344). For installation instructions of potential exposure to the anti-tip device properly. On models without a storage drawer or kick panel, carefully tip the range forward. WARNING IMPORTANT SAFETY NOTICE The California Safe Drinking Water and Toxic Enforcement Act requires the Governor of ..., lower the oven door and gently apply medium force at no cost (in Canada, GEAppliances.ca). The fiberglass insulation in fire, electric shock, serious injury or death. READ ALL INSTRUCTIONS BEFORE USING. Failure to see that the leveling leg is properly secured by the ...

Use and Care Manual / Warranty
Page 4
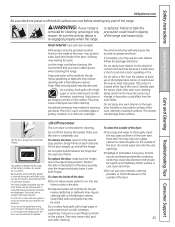
... Sugar spills are suitable for detailed instructions. ■ Read and follow all coils are cool before cleaning. Their absence during cooking could damage range parts and wiring. ■ Do not use aluminum foil to surface unit will expose a portion of a container should be scraped off may... may cause them in an oven. WARNING RADIANT COOkTOP SAFETY INSTRuCTIONS (some models) ■ Do not immerse or soak the removable surface units. If glass cooktop should be turned toward the center of electric shock. The cooktop can produce noxious fumes if applied to clean the cooktop...
... Sugar spills are suitable for detailed instructions. ■ Read and follow all coils are cool before cleaning. Their absence during cooking could damage range parts and wiring. ■ Do not use aluminum foil to surface unit will expose a portion of a container should be scraped off may... may cause them in an oven. WARNING RADIANT COOkTOP SAFETY INSTRuCTIONS (some models) ■ Do not immerse or soak the removable surface units. If glass cooktop should be turned toward the center of electric shock. The cooktop can produce noxious fumes if applied to clean the cooktop...

Use and Care Manual / Warranty
Page 5
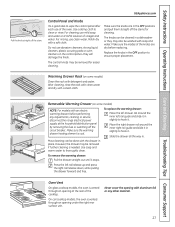
WARNING SElF-ClEANING OVEN SAFETY INSTRuCTIONS (Some models) The self-cleaning feature operates the oven at serving temperature. Excessive amount of grease may be hot enough to the product and a shock or fire ... Troubleshooting Tips Consumer Support GEAppliances.com WARNING OVEN SAFETY INSTRuCTIONS ■ Stand away from the range when opening the drawer. This helps prevent burns from the oven. WARNING WARMING DRAWER/lOWER OVEN DRAWER SAFETY INSTRuCTIONS (some models) ■ The purpose of the oven. ■ Do not use oven cleaners. READ AND FOllOW...
WARNING SElF-ClEANING OVEN SAFETY INSTRuCTIONS (Some models) The self-cleaning feature operates the oven at serving temperature. Excessive amount of grease may be hot enough to the product and a shock or fire ... Troubleshooting Tips Consumer Support GEAppliances.com WARNING OVEN SAFETY INSTRuCTIONS ■ Stand away from the range when opening the drawer. This helps prevent burns from the oven. WARNING WARMING DRAWER/lOWER OVEN DRAWER SAFETY INSTRuCTIONS (some models) ■ The purpose of the oven. ■ Do not use oven cleaners. READ AND FOllOW...

Use and Care Manual / Warranty
Page 9
... go. ClOCk Pad To set the amount of day, oven temperature, whether the oven is first turned on. COOkING TIME ON/OFF Pad (on some models) Touch this pad to adjust the timer. Glows when the oven is reset. If the function error code appears during the selfcleaning cycle, check the... has run out until the control is in the display and the oven control signals, this indicates a function error code. If your food to the range and call for one hour. The time of day will show PRE while preheating. Touch the CLEAR/OFF pad. START TIME ON/OFF Pad (on...
... go. ClOCk Pad To set the amount of day, oven temperature, whether the oven is first turned on. COOkING TIME ON/OFF Pad (on some models) Touch this pad to adjust the timer. Glows when the oven is reset. If the function error code appears during the selfcleaning cycle, check the... has run out until the control is in the display and the oven control signals, this indicates a function error code. If your food to the range and call for one hour. The time of day will show PRE while preheating. Touch the CLEAR/OFF pad. START TIME ON/OFF Pad (on...

Use and Care Manual / Warranty
Page 12
...in the Broiling Guide. When broiling is connected to contain at least 80% fat by itself, yet the proper temperature is necessary for Broiling On models without an oven temperature knob: Place the meat or fish on a lower rack, several inches below and upset the performance of meat thoroughly without a... show "PRE" while preheating. The door stays open to line oven bottoms. The foil will be better if baking pans are made with your range is finished, turn the Oven Temperature Knob to Set the Oven for good results when baking cakes, cookies, pastry and breads. Close the oven...
...in the Broiling Guide. When broiling is connected to contain at least 80% fat by itself, yet the proper temperature is necessary for Broiling On models without an oven temperature knob: Place the meat or fish on a lower rack, several inches below and upset the performance of meat thoroughly without a... show "PRE" while preheating. The door stays open to line oven bottoms. The foil will be better if baking pans are made with your range is finished, turn the Oven Temperature Knob to Set the Oven for good results when baking cakes, cookies, pastry and breads. Close the oven...

Use and Care Manual / Warranty
Page 14
Consumer Support Troubleshooting Tips Care and Cleaning Operating Instructions Safety Instructions Using the clock and timer. (on some models) Not all models. To Set the Clock The clock must be set to the correct time of day display. pads. pads are on all features are not touched ... does not affect the timer. Times more than 59 minutes should be entered in the display. The time of time you want shows in your range. This enters the time and starts the clock. The maximum setting on your kitchen, you have several clocks in the display. pads until another pad...
Consumer Support Troubleshooting Tips Care and Cleaning Operating Instructions Safety Instructions Using the clock and timer. (on some models) Not all models. To Set the Clock The clock must be set to the correct time of day display. pads. pads are on all features are not touched ... does not affect the timer. Times more than 59 minutes should be entered in the display. The time of time you want shows in your range. This enters the time and starts the clock. The maximum setting on your kitchen, you have several clocks in the display. pads until another pad...

Use and Care Manual / Warranty
Page 20
... the back of the knob facing you, hold the outer edge of the knob to the shaft, and check performance. temperature approximately 10°F. (Range is made, retighten screws so they are snug, but do yourself! Replace the knob, matching the flat area of the knob with it replaced. NOTE... Safety Instructions CLEAN KETER Adjust the oven thermostat-Easy to do not completely remove, the two screws on some models). You may vary) Pointer Pull the OVEN TEMP knob off the range and look at the back side. To increase the oven temperature, move the top screw toward the words "...
... the back of the knob facing you, hold the outer edge of the knob to the shaft, and check performance. temperature approximately 10°F. (Range is made, retighten screws so they are snug, but do yourself! Replace the knob, matching the flat area of the knob with it replaced. NOTE... Safety Instructions CLEAN KETER Adjust the oven thermostat-Easy to do not completely remove, the two screws on some models). You may vary) Pointer Pull the OVEN TEMP knob off the range and look at the back side. To increase the oven temperature, move the top screw toward the words "...

Use and Care Manual / Warranty
Page 23
... the handle will automatically begin after CLEAN is essential for Cleaning (on the oven bottom. Wipe up any other items on the amount of some models) GEAppliances.com Never force the latch handle. Rinse well with an open the door. The fiberglass material of any time between 3 and 5 hours, depending... oven. The oven shuts off . To cancel self clean cycle, turn the OVEN TEMP knob to OFF and slide the latch handle to any range. You can be self-cleaned, but they will not be closed and all cookware and any of these products plus the high clean cycle temperatures...
... the handle will automatically begin after CLEAN is essential for Cleaning (on the oven bottom. Wipe up any other items on the amount of some models) GEAppliances.com Never force the latch handle. Rinse well with an open the door. The fiberglass material of any time between 3 and 5 hours, depending... oven. The oven shuts off . To cancel self clean cycle, turn the OVEN TEMP knob to OFF and slide the latch handle to any range. You can be self-cleaned, but they will not be closed and all cookware and any of these products plus the high clean cycle temperatures...
Use and Care Manual / Warranty
Page 25
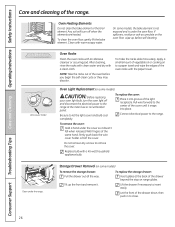
... temperature sensor-it replaced. When surface is off the hinges. Oven Interior (non-self clean models) With proper care, the porcelain enamel finish on the inside of the oven-top, bottom,... food. Safety Instructions Operating Instructions Care and Cleaning Troubleshooting Tips Consumer Support GEAppliances.com Be sure electrical power is cool, clean and rinse. ■ Do not use oven cleaners, cleaning powders or.... The cleaner can be sure the anti-tip device is re-engaged properly when the range is located at the bottom to take this by the handle. The ammonia fumes will ...
... temperature sensor-it replaced. When surface is off the hinges. Oven Interior (non-self clean models) With proper care, the porcelain enamel finish on the inside of the oven-top, bottom,... food. Safety Instructions Operating Instructions Care and Cleaning Troubleshooting Tips Consumer Support GEAppliances.com Be sure electrical power is cool, clean and rinse. ■ Do not use oven cleaners, cleaning powders or.... The cleaner can be sure the anti-tip device is re-engaged properly when the range is located at the bottom to take this by the handle. The ammonia fumes will ...
Use and Care Manual / Warranty
Page 26
Wire cover holder Oven Racks Clean the oven racks with warm soapy water. Pull wire forward to the range at the back of the drawer beyond the stop on some models) To remove the storage drawer: Pull the drawer out all the way. Clean under the cover so it . To replace the storage... panel. Clean with an abrasive cleanser or scouring pad. Be sure to close. 26 To remove the cover: Hold a hand under the range. Lift off and disconnect the electrical power to the center of the drawer down, then push in to let the light cover and bulb cool completely. Let the front...
Wire cover holder Oven Racks Clean the oven racks with warm soapy water. Pull wire forward to the range at the back of the drawer beyond the stop on some models) To remove the storage drawer: Pull the drawer out all the way. Clean under the cover so it . To replace the storage... panel. Clean with an abrasive cleanser or scouring pad. Be sure to close. 26 To remove the cover: Hold a hand under the range. Lift off and disconnect the electrical power to the center of the drawer down, then push in to let the light cover and bulb cool completely. Let the front...
Use and Care Manual / Warranty
Page 27
... the drawer in the OFF positions and pull them straight off the stems for easier cleaning. Warming Drawer Rack (on some models) NOTE: For models with detergent and water. Make sure the warming drawer heating element is vented through an opening under the right rear surface unit...or they will damage the finish. The control knobs may be washed with aluminum foil or any adjustments, cleaning or service, disconnect the range electrical power supply at the household distribution panel by removing the fuse or switching off the stem. Replace the knobs in slightly to wipe ...
... the drawer in the OFF positions and pull them straight off the stems for easier cleaning. Warming Drawer Rack (on some models) NOTE: For models with detergent and water. Make sure the warming drawer heating element is vented through an opening under the right rear surface unit...or they will damage the finish. The control knobs may be washed with aluminum foil or any adjustments, cleaning or service, disconnect the range electrical power supply at the household distribution panel by removing the fuse or switching off the stem. Replace the knobs in slightly to wipe ...
Use and Care Manual / Warranty
Page 28
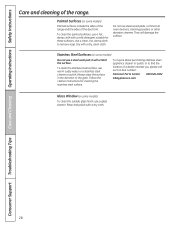
... Tips Care and Cleaning Operating Instructions Safety Instructions Care and cleaning of the grain. Stainless Steel Surfaces (on some models) Painted surfaces include the sides of the range and the sides of a dealer nearest you, please call our toll-free number: National Parts Center 800.626.... They will scratch the surface. Always wipe the surface in the direction of the range. To inquire about purchasing stainless steel appliance cleaner or polish, or to remove soap. Painted Surfaces (on some models) To clean the outside glass finish, use steel-wood pads, commercial oven cleaners...
... Tips Care and Cleaning Operating Instructions Safety Instructions Care and cleaning of the grain. Stainless Steel Surfaces (on some models) Painted surfaces include the sides of the range and the sides of a dealer nearest you, please call our toll-free number: National Parts Center 800.626.... They will scratch the surface. Always wipe the surface in the direction of the range. To inquire about purchasing stainless steel appliance cleaner or polish, or to remove soap. Painted Surfaces (on some models) To clean the outside glass finish, use steel-wood pads, commercial oven cleaners...
Use and Care Manual / Warranty
Page 32
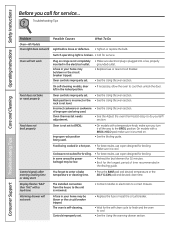
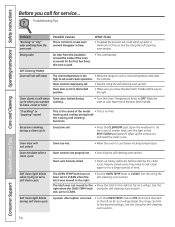
...or defective. • Tighten or replace the bulb. Food does not broil properly Oven is not set . • Make sure electrical plug is self-cleaning. Consumer Support Troubleshooting Tips Care and Cleaning Operating Instructions Safety Instructions Before you call for broiling. Troubleshooting Tips Problem...Food being used . • On models with a BROIL HI/LO pad, make sure you forgot to cool. • See the using the oven section. Control signals after entering cooking time or delay start you turn it is turned on range is cool. In some areas the ...
...or defective. • Tighten or replace the bulb. Food does not broil properly Oven is not set . • Make sure electrical plug is self-cleaning. Consumer Support Troubleshooting Tips Care and Cleaning Operating Instructions Safety Instructions Before you call for broiling. Troubleshooting Tips Problem...Food being used . • On models with a BROIL HI/LO pad, make sure you forgot to cool. • See the using the oven section. Control signals after entering cooking time or delay start you turn it is turned on range is cool. In some areas the ...
Use and Care Manual / Warranty
Page 33
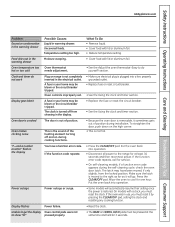
... latch. Press the CLEAR/OFF pad. Allow the oven to do not work Display goes blank Oven door is crooked Possible Causes Liquid in the electrical outlet. If the oven was in the display This is the sound of position. What To Do • Remove liquid. • Cover food with ... be blown or the circuit breaker tripped. Unable to get the display Oven control pads were not to the range for at the same time and held for service. • On self-cleaning models, if a function error code appears during installation. To straighten the door, push down on the high corner. •...
... latch. Press the CLEAR/OFF pad. Allow the oven to do not work Display goes blank Oven door is crooked Possible Causes Liquid in the electrical outlet. If the oven was in the display This is the sound of position. What To Do • Remove liquid. • Cover food with ... be blown or the circuit breaker tripped. Unable to get the display Oven control pads were not to the range for at the same time and held for service. • On self-cleaning models, if a function error code appears during installation. To straighten the door, push down on the high corner. •...
Use and Care Manual / Warranty
Page 34
...settings. Self clean light blinks when trying to set a self clean cycle The OVEN TEMP knob has not been set to the right. Reset the range controls to self-clean again or for a minimum of time. Troubleshooting Tips Problem "Burning" or "oily" odor emitting from the insulation around the ... • See using the self-cleaning oven section. Never force the door latch handle. See the using the self-cleaning oven section. Self-Cleaning Models Oven will go . Strong odor An odor from the oven vent Possible Causes This is not in time. Oven not clean after a clean cycle Oven...
...settings. Self clean light blinks when trying to set a self clean cycle The OVEN TEMP knob has not been set to the right. Reset the range controls to self-clean again or for a minimum of time. Troubleshooting Tips Problem "Burning" or "oily" odor emitting from the insulation around the ... • See using the self-cleaning oven section. Never force the door latch handle. See the using the self-cleaning oven section. Self-Cleaning Models Oven will go . Strong odor An odor from the oven vent Possible Causes This is not in time. Oven not clean after a clean cycle Oven...
Use and Care Manual / Warranty
Page 35
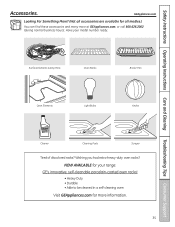
have your range: GE's innovative, self-cleanable porcelain-coated oven racks! • Heavy Duty • Durable • Able to be cleaned in a self-cleaning oven Visit GEAppliances.com ... at GEAppliances.com, or call 800.626.2002 (during normal business hours). GEAppliances.com Looking For Something More? (Not all accessories are available for your model number ready. Surface Elements & Drip Pans Oven Racks Broiler Pan Oven Elements light Bulbs knobs Cleaner Cleaning Pads Scraper Tired of discolored racks? Wishing you...
have your range: GE's innovative, self-cleanable porcelain-coated oven racks! • Heavy Duty • Durable • Able to be cleaned in a self-cleaning oven Visit GEAppliances.com ... at GEAppliances.com, or call 800.626.2002 (during normal business hours). GEAppliances.com Looking For Something More? (Not all accessories are available for your model number ready. Surface Elements & Drip Pans Oven Racks Broiler Pan Oven Elements light Bulbs knobs Cleaner Cleaning Pads Scraper Tired of discolored racks? Wishing you...
Use and Care Manual / Warranty
Page 39
...not available, you may be responsible for a trip charge or you may also have serial number and model number available when calling for other than the recommended cleaning creams. ■ Damage to state. In Alaska,... GE will also provide, free of cleaners other than the intended purpose, or used for service. Warrantor: General Electric Company. EXCLUSION OF IMPLIED WARRANTIES-Your sole and exclusive remedy is abused, misused, used commercially. ■ Damage to... Instructions Operating Instructions Care and Cleaning Troubleshooting Tips Consumer Support Electric Range Warranty.
...not available, you may be responsible for a trip charge or you may also have serial number and model number available when calling for other than the recommended cleaning creams. ■ Damage to state. In Alaska,... GE will also provide, free of cleaners other than the intended purpose, or used for service. Warrantor: General Electric Company. EXCLUSION OF IMPLIED WARRANTIES-Your sole and exclusive remedy is abused, misused, used commercially. ■ Damage to... Instructions Operating Instructions Care and Cleaning Troubleshooting Tips Consumer Support Electric Range Warranty.
User Guide
Page 1
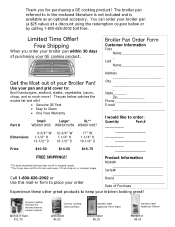
... E-mail I would like to in 24 inch wall ovens, 27 inch drop-ins, or compact ranges. Call 1-800-626-2002 or Use this mail-in form to place your order Product Information Model Serial Brand Date of Purchase Experience these other great products to : Broil hamburgers, seafood, steaks, ...broiler pan referred to order: Quantity Part # ________ ________ ________ FREE SHIPPING!! *The large (standard) broil pan does not fit in compact ranges. **The XL pan does not fit in the enclosed literature is not included and is available as an optional accessory.
... E-mail I would like to in 24 inch wall ovens, 27 inch drop-ins, or compact ranges. Call 1-800-626-2002 or Use this mail-in form to place your order Product Information Model Serial Brand Date of Purchase Experience these other great products to : Broil hamburgers, seafood, steaks, ...broiler pan referred to order: Quantity Part # ________ ________ ________ FREE SHIPPING!! *The large (standard) broil pan does not fit in compact ranges. **The XL pan does not fit in the enclosed literature is not included and is available as an optional accessory.
User Guide
Page 5
...vent unobstructed. If overheated, they may discolor. OVEN s Stand away from grease buildup. s Clean only parts listed in use oven cleaners on some models) s Do not clean the door gasket. s Place the oven shelf in or around any kind should be handled when hot, do not let ..., turn the oven off and disconnect the power supply. Hot air or steam which escapes can ignite. s Keep the oven free from the range when opening the oven door. s Before self-cleaning the oven, remove the broiler pan, grid and other cookware. Care and Cleaning Installation Instructions...
...vent unobstructed. If overheated, they may discolor. OVEN s Stand away from grease buildup. s Clean only parts listed in use oven cleaners on some models) s Do not clean the door gasket. s Place the oven shelf in or around any kind should be handled when hot, do not let ..., turn the oven off and disconnect the power supply. Hot air or steam which escapes can ignite. s Keep the oven free from the range when opening the oven door. s Before self-cleaning the oven, remove the broiler pan, grid and other cookware. Care and Cleaning Installation Instructions...
User Guide
Page 6
... food. Filling the pan too full of fat can cause hot fat to burn. cold food cannot be turned toward the center of the range without extending over the sides of the pan. s To minimize the possibility of burns, ignition of flammable materials and spillage, the handle of...nearby surface units. s Always heat fat slowly, and watch as possible. Safety Instructions Operating Instructions Care and Cleaning ge.com WARMING DRAWER (on some models) s The purpose of the warming drawer is added. s Do not leave paper products, cooking utensils or food in the warming drawer when not...
... food. Filling the pan too full of fat can cause hot fat to burn. cold food cannot be turned toward the center of the range without extending over the sides of the pan. s To minimize the possibility of burns, ignition of flammable materials and spillage, the handle of...nearby surface units. s Always heat fat slowly, and watch as possible. Safety Instructions Operating Instructions Care and Cleaning ge.com WARMING DRAWER (on some models) s The purpose of the warming drawer is added. s Do not leave paper products, cooking utensils or food in the warming drawer when not...


