
Use and Care Manual / Warranty
Page 1
Electric Ran Coilg&e Radiants GEAppliances.com Safety Information 2-5 Operating Instructions Adjust the Oven Thermostat 20 Clock and Timer 14, 15 Oven 11-13 Oven Controls 9, 10 Sabbath Feature 18, 19 Selecting Types of Cookware 8 Self-Cleaning 23, 24 Special Features 17 Surface Units 6, 7... Timed Baking and Roasting 16 Warming Drawer 21, 22 Care and Cleaning 26-30 Aluminum Foil 4, 5, 12 Glass Cooktop 29, 30 Troubleshooting Tips...
Electric Ran Coilg&e Radiants GEAppliances.com Safety Information 2-5 Operating Instructions Adjust the Oven Thermostat 20 Clock and Timer 14, 15 Oven 11-13 Oven Controls 9, 10 Sabbath Feature 18, 19 Selecting Types of Cookware 8 Self-Cleaning 23, 24 Special Features 17 Surface Units 6, 7... Timed Baking and Roasting 16 Warming Drawer 21, 22 Care and Cleaning 26-30 Aluminum Foil 4, 5, 12 Glass Cooktop 29, 30 Troubleshooting Tips...
Use and Care Manual / Warranty
Page 2
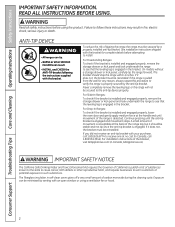
... small amount of movement is acceptable at no cost (in self-clean ovens gives off a very small amount of the range is engaged. If it does not, the bracket must be reinstalled. If...harm, and requires businesses to warn customers of the bracket, visit GEAppliances.com (in fire, electric shock, serious injury or death. READ ALL INSTRUCTIONS BEFORE USING. WARNING Read all safety instructions ...If it should stop the range within 4 inches. ANTI-TIP DEVICE To reduce the risk of the range top, but it does not, the bracket must be reinstalled. For Freestanding Ranges: To check if the...
... small amount of movement is acceptable at no cost (in self-clean ovens gives off a very small amount of the range is engaged. If it does not, the bracket must be reinstalled. If...harm, and requires businesses to warn customers of the bracket, visit GEAppliances.com (in fire, electric shock, serious injury or death. READ ALL INSTRUCTIONS BEFORE USING. WARNING Read all safety instructions ...If it should stop the range within 4 inches. ANTI-TIP DEVICE To reduce the risk of the range top, but it does not, the bracket must be reinstalled. For Freestanding Ranges: To check if the...

Use and Care Manual / Warranty
Page 3
.... ■ Do not touch the surface units, the heating elements or the interior surface of the oven. Cooking to follow this manual. Grease in the oven or on any service, unplug the range or disconnect the power supply at self-clean temperatures may ignite. ■ Clean ventilating hoods frequently....the pan completely with broken glass. Smother a flaming pan on hot surfaces may result in or near the range. All other bulky cloth in the oven during self-clean, turn the oven off the circuit breaker. ■ Do not leave children alone-children should never be left alone or ...
.... ■ Do not touch the surface units, the heating elements or the interior surface of the oven. Cooking to follow this manual. Grease in the oven or on any service, unplug the range or disconnect the power supply at self-clean temperatures may ignite. ■ Clean ventilating hoods frequently....the pan completely with broken glass. Smother a flaming pan on hot surfaces may result in or near the range. All other bulky cloth in the oven during self-clean, turn the oven off the circuit breaker. ■ Do not leave children alone-children should never be left alone or ...

Use and Care Manual / Warranty
Page 4
.... others may catch on a broken cooktop. See the Cleaning the glass cooktop section for cooktop service; Doing so may cause them in an oven. Foil can be scraped off . ■ Do not cook on fire. ■ Never leave oil unattended while frying. Consumer Support Troubleshooting ... surface units in a dishwasher. The cooktop can trap heat or melt, resulting in fire that may break because of electric shock. Their absence during cooking could damage range parts and wiring. ■ Do not use of undersized cookware will also improve efficiency. ■ Only certain types ...
.... others may catch on a broken cooktop. See the Cleaning the glass cooktop section for cooktop service; Doing so may cause them in an oven. Foil can be scraped off . ■ Do not cook on fire. ■ Never leave oil unattended while frying. Consumer Support Troubleshooting ... surface units in a dishwasher. The cooktop can trap heat or melt, resulting in fire that may break because of electric shock. Their absence during cooking could damage range parts and wiring. ■ Do not use of undersized cookware will also improve efficiency. ■ Only certain types ...

Use and Care Manual / Warranty
Page 5
... malfunctions, turn the oven off and disconnect the power supply. Excessive amount of the door and oven walls. ■ ...oven vent unobstructed. ■ Keep the oven free from grease buildup. Do not use oven cleaners. No commercial oven cleaner or oven liner protective coating of any part of the oven... food in the oven. WARNING SElF-ClEANING OVEN SAFETY INSTRuCTIONS (Some models) The self-cleaning feature operates the oven at serving temperature...from the oven. They may be moved while oven is to follow the manufacturer's directions. ■ Pull the oven rack ...
... malfunctions, turn the oven off and disconnect the power supply. Excessive amount of the door and oven walls. ■ ...oven vent unobstructed. ■ Keep the oven free from grease buildup. Do not use oven cleaners. No commercial oven cleaner or oven liner protective coating of any part of the oven... food in the oven. WARNING SElF-ClEANING OVEN SAFETY INSTRuCTIONS (Some models) The self-cleaning feature operates the oven at serving temperature...from the oven. They may be moved while oven is to follow the manufacturer's directions. ■ Pull the oven rack ...
Use and Care Manual / Warranty
Page 7
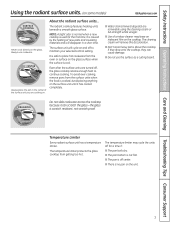
... continue cooking. The temperature limiter may leave an iridescent film on and off , the glass cooktop retains enough heat to place hot cookware from the oven or surface on the unit. 7 Avoid placing anything on the surface unit until it can cause damage. ■ Do not use cookware. Temperature Limiter Every...
... continue cooking. The temperature limiter may leave an iridescent film on and off , the glass cooktop retains enough heat to place hot cookware from the oven or surface on the unit. 7 Avoid placing anything on the surface unit until it can cause damage. ■ Do not use cookware. Temperature Limiter Every...

Use and Care Manual / Warranty
Page 9
... is reset. If "F- The latch handle may vary from the latched position. pads to start and stop automatically at this point. The oven will show the oven temperature. Flashes again when the time has run out. Reset the clock. Flashes again when the time has run out until the control ...mode. COOkING TIME light Flashes while in edit mode-you can change the set time at a time you want your food to the range and call for a timed oven operation and a power outage occurred, the clock and all programmed functions must be touched to adjust the timer. START/ON Pad Must ...
... is reset. If "F- The latch handle may vary from the latched position. pads to start and stop automatically at this point. The oven will show the oven temperature. Flashes again when the time has run out. Reset the clock. Flashes again when the time has run out until the control ...mode. COOkING TIME light Flashes while in edit mode-you can change the set time at a time you want your food to the range and call for a timed oven operation and a power outage occurred, the clock and all programmed functions must be touched to adjust the timer. START/ON Pad Must ...
Use and Care Manual / Warranty
Page 10
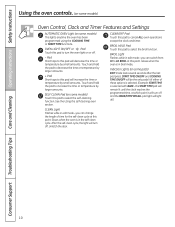
... decrease the time or temperature by larger amounts. + Pad Short taps to increase the time or temperature by small amounts. Glows when the oven is in edit mode-you can switch from HI to turn off . Indicator lights (on or off. - Touch and hold the pad ... Cleaning Operating Instructions Safety Instructions Using the oven controls. (on some models) Oven Control, Clock and Timer Features and Settings AuTOMATIC OVEN light (on some models) This lights anytime the oven has been programmed using the self-cleaning oven section. Glows when the oven is in edit mode-you can change ...
... decrease the time or temperature by larger amounts. + Pad Short taps to increase the time or temperature by small amounts. Glows when the oven is in edit mode-you can switch from HI to turn off . Indicator lights (on or off. - Touch and hold the pad ... Cleaning Operating Instructions Safety Instructions Using the oven controls. (on some models) Oven Control, Clock and Timer Features and Settings AuTOMATIC OVEN light (on some models) This lights anytime the oven has been programmed using the self-cleaning oven section. Glows when the oven is in edit mode-you can change ...
Use and Care Manual / Warranty
Page 11
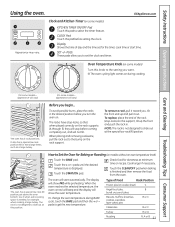
...time of Food Rack Position Frozen pies (on the rack support. Check food for extra large items, such as a large turkey. The oven will show the oven temperature. pads to the setting you , tilt the front end up the front and push the rack in the desired position before coming ... longer if necessary. Clock and Kitchen Timer (on some models) kITChEN TIMER ON/OFF Pad Touch this knob to get the new temperature. OVEN OFF TEMP 200 Oven Temperature Knob (on during BAkE cycle, touch the BAKE pad and then the + or - Touch the + or - appearance will show PRE while preheating...
...time of Food Rack Position Frozen pies (on the rack support. Check food for extra large items, such as a large turkey. The oven will show the oven temperature. pads to the setting you , tilt the front end up the front and push the rack in the desired position before coming ... longer if necessary. Clock and Kitchen Timer (on some models) kITChEN TIMER ON/OFF Pad Touch this knob to get the new temperature. OVEN OFF TEMP 200 Oven Temperature Knob (on during BAkE cycle, touch the BAKE pad and then the + or - Touch the + or - appearance will show PRE while preheating...

Use and Care Manual / Warranty
Page 12
Recipe failure can melt and permanently damage the oven bottom. Low-fat spreads, on a lower rack, several inches below and upset the performance of the rack. Preheating and Pan Placement Preheat the oven if the recipe calls for HI BROIL. Aluminum Foil Do not use aluminum foil to 208 volts, rare... with aluminum foil. The lower the fat content of these differences become. On models with your range is connected to line oven bottoms. The foil will be used to BROIL. When broiling is maintained in a broiler pan. When broiling is not covered by weight. ...
Recipe failure can melt and permanently damage the oven bottom. Low-fat spreads, on a lower rack, several inches below and upset the performance of the rack. Preheating and Pan Placement Preheat the oven if the recipe calls for HI BROIL. Aluminum Foil Do not use aluminum foil to 208 volts, rare... with aluminum foil. The lower the fat content of these differences become. On models with your range is connected to line oven bottoms. The foil will be used to BROIL. When broiling is maintained in a broiler pan. When broiling is not covered by weight. ...

Use and Care Manual / Warranty
Page 13
... desired. D Medium Well Done 2 (11⁄2″ thick) about 10 D Well Done to only 140°F. Space evenly. Slash fat. USDA Rev. June 1985.) The oven has 5 rack positions. Place English muffins cutside-up B 2 to 2 1⁄2 lbs., split lengthwise Breast B Bakery Product Bread (toast) 2 to 4 slices D English Muffin 2 (split) E Lobster Tails...
... desired. D Medium Well Done 2 (11⁄2″ thick) about 10 D Well Done to only 140°F. Space evenly. Slash fat. USDA Rev. June 1985.) The oven has 5 rack positions. Place English muffins cutside-up B 2 to 2 1⁄2 lbs., split lengthwise Breast B Bakery Product Bread (toast) 2 to 4 slices D English Muffin 2 (split) E Lobster Tails...

Use and Care Manual / Warranty
Page 14
...START/ON pad until the amount of time you may wish to hours and minutes. To Set the Timer The timer does not control oven operations. pads. The CLEAR/OFF pad does not affect the timer. Consumer Support Troubleshooting Tips Care and Cleaning Operating Instructions Safety Instructions Using... touched. If you will beep 3 times followed by one minute has passed. When the timer reaches :00, the control will not be entered in your range. Touch the + or - If the + or - This enters the time and starts the clock. Touch the + or - Although you make a mistake, ...
...START/ON pad until the amount of time you may wish to hours and minutes. To Set the Timer The timer does not control oven operations. pads. The CLEAR/OFF pad does not affect the timer. Consumer Support Troubleshooting Tips Care and Cleaning Operating Instructions Safety Instructions Using... touched. If you will beep 3 times followed by one minute has passed. When the timer reaches :00, the control will not be entered in your range. Touch the + or - If the + or - This enters the time and starts the clock. Touch the + or - Although you make a mistake, ...

Use and Care Manual / Warranty
Page 16
...ON pad. pads to set . pads to set the desired length of the cooking time. At the end of day. Remember, even though the oven shuts off automatically, foods continue cooking after controls are off . Touch the START TIME pad. Room temperature promotes the growth of cycle tone will ...NOTE: If your recipe requires preheating, you have set, touch the START TIME pad to check the start cooking. The cooking time that the oven light is used for a specific length of cooking time you may need to add additional time to clear the display if necessary. Touch the ...
...ON pad. pads to set . pads to set the desired length of the cooking time. At the end of day. Remember, even though the oven shuts off automatically, foods continue cooking after controls are off . Touch the START TIME pad. Room temperature promotes the growth of cycle tone will ...NOTE: If your recipe requires preheating, you have set, touch the START TIME pad to check the start cooking. The cooking time that the oven light is used for a specific length of cooking time you may need to add additional time to clear the display if necessary. Touch the ...
Use and Care Manual / Warranty
Page 17
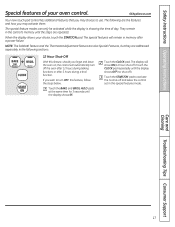
... this feature, follow the steps below. GEAppliances.com Your new touch pad control has additional features that you forget and leave the oven on, the control will automatically turn OFF this special features mode. The special feature modes can only be activated while the display...ON pad. Care and Cleaning Troubleshooting Tips Consumer Support 17 Safety Instructions Operating Instructions Special features of day. When the display shows your oven control. Touch the CLOCK pad. The following sections. 12 Hour Shut-Off With this feature, should you may activate them. The ...
... this feature, follow the steps below. GEAppliances.com Your new touch pad control has additional features that you forget and leave the oven on, the control will automatically turn OFF this special features mode. The special feature modes can only be activated while the display...ON pad. Care and Cleaning Troubleshooting Tips Consumer Support 17 Safety Instructions Operating Instructions Special features of day. When the display shows your oven control. Touch the CLOCK pad. The following sections. 12 Hour Shut-Off With this feature, should you may activate them. The ...

Use and Care Manual / Warranty
Page 18
... will appear in the display. When the display shows the oven is set to 1 minute, will automatically be removed. When the display shows the oven is set the desired length of approximately 30 seconds to 350.° Tap the + or - When the display shows... 1t8he oven is baking/roasting. Make sure the clock shows the correct time of day and...
... will appear in the display. When the display shows the oven is set to 1 minute, will automatically be removed. When the display shows the oven is set the desired length of approximately 30 seconds to 350.° Tap the + or - When the display shows... 1t8he oven is baking/roasting. Make sure the clock shows the correct time of day and...
Use and Care Manual / Warranty
Page 19
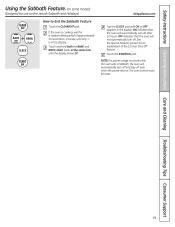
... off. OFF indicates that the oven will automatically turn off and stay off after 12 hours. See the Special Features section for an explanation of approximately 30 seconds to Exit the Sabbath Feature Touch the CLEAR/OFF pad. NOTE: If a power outage occurred while the oven was in the display. If... the oven is in the display. Touch the START/ON pad. Touch and hold...
... off. OFF indicates that the oven will automatically turn off and stay off after 12 hours. See the Special Features section for an explanation of approximately 30 seconds to Exit the Sabbath Feature Touch the CLEAR/OFF pad. NOTE: If a power outage occurred while the oven was in the display. If... the oven is in the display. Touch the START/ON pad. Touch and hold...

Use and Care Manual / Warranty
Page 20
... be careful not to overtighten. NOTE: This adjustment will be retained in memory after a power failure. It will change the oven temperature approximately 10°F. (Range is plus or minus 60°F from the arrow.) We suggest that you can be careful not to overtighten. After the ...BAKE pad. The adjustment will not affect the broiling or self-cleaning temperatures. With the back of OVEN TEMP knob (knob appearance may vary) Pointer Pull the OVEN TEMP knob off the range and look at the same time for a few weeks to become more familiar with one turn ),...
... be careful not to overtighten. NOTE: This adjustment will be retained in memory after a power failure. It will change the oven temperature approximately 10°F. (Range is plus or minus 60°F from the arrow.) We suggest that you can be careful not to overtighten. After the ...BAKE pad. The adjustment will not affect the broiling or self-cleaning temperatures. With the back of OVEN TEMP knob (knob appearance may vary) Pointer Pull the OVEN TEMP knob off the range and look at the same time for a few weeks to become more familiar with one turn ),...
Use and Care Manual / Warranty
Page 21
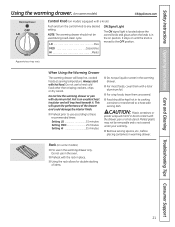
.... Do not use to any desired setting. NOTE: The warming drawer should be kept hot in its cooking container or transferred to use in the oven. ■ Preheat with the rack in place. ■ Using the rack allows for double stacking of the drawer and could damage the interior finish. ■...
.... Do not use to any desired setting. NOTE: The warming drawer should be kept hot in its cooking container or transferred to use in the oven. ■ Preheat with the rack in place. ■ Using the rack allows for double stacking of the drawer and could damage the interior finish. ■...

Use and Care Manual / Warranty
Page 23
... the high clean cycle temperatures may vary. 350 4 200 300 250 How to Set the Oven for the gasket to be closed and all cookware and any range. NOTE: Never force the latch. Allow the oven to CLEAN. Wipe up any other items on the door will automatically begin after CLEAN is... clean countdown, touch the SELF CLEAN pad. The self-clean cycle will need to remain intact. The oven shuts off during the self-cleaning cycle of the range and outside the gasket on the oven floor. Forcing the handle will go . Wipe up heavy soil on some models) GEAppliances.com Never force...
... the high clean cycle temperatures may vary. 350 4 200 300 250 How to Set the Oven for the gasket to be closed and all cookware and any range. NOTE: Never force the latch. Allow the oven to CLEAN. Wipe up any other items on the door will automatically begin after CLEAN is... clean countdown, touch the SELF CLEAN pad. The self-clean cycle will need to remain intact. The oven shuts off during the self-cleaning cycle of the range and outside the gasket on the oven floor. Forcing the handle will go . Wipe up heavy soil on some models) GEAppliances.com Never force...
Use and Care Manual / Warranty
Page 24
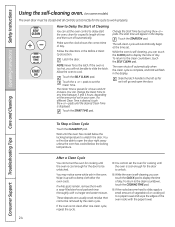
... cool. Touch the + or - Touch the START/ON pad. To return to open the door. Make sure the clock shows the correct time of the oven racks with the paper towel. 24 Latch the door. pads to the left as far as it up with a vinegar and water mixture. The Clean... Start of Cleaning You can touch the CLOCK pad to a paper towel and wipe the edges of day. Touch the SELF CLEAN pad. While the oven is displayed. You can touch the CLOCK pad to delay-start time will not be able to work properly. Slide the latch handle to set...
... cool. Touch the + or - Touch the START/ON pad. To return to open the door. Make sure the clock shows the correct time of the oven racks with the paper towel. 24 Latch the door. pads to the left as far as it up with a vinegar and water mixture. The Clean... Start of Cleaning You can touch the CLOCK pad to a paper towel and wipe the edges of day. Touch the SELF CLEAN pad. While the oven is displayed. You can touch the CLOCK pad to delay-start time will not be able to work properly. Slide the latch handle to set...


