Owners Manual
Page 1
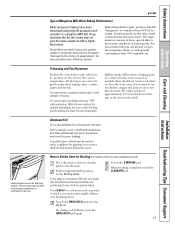
...2-6 Operating Instructions Adjust the Oven Thermostat 21 Clock and Timer 15, 16 Oven 12-14 Oven Controls 10, 11 Sabbath Feature 19, 20 Selecting Types of Cookware . . . . .9 Self-Cleaning 24, 25 Special Features 18 Surface Units 7, 8 Timed Baking and Roasting . . . . .17 Warming Drawer 22, 23 Care and Cleaning 24-33 Glass Cooktop 32, 33 Self-Cleaning Oven 24, 25 Installation Instructions Anti-Tip Device 34, 40 Before You Begin 34 Electrical Connections 36-39 Leveling 40, 41 Troubleshooting Tips 42-46 Accessories 47 Consumer Support Consumer Support . . . . .Back Cover Product...
...2-6 Operating Instructions Adjust the Oven Thermostat 21 Clock and Timer 15, 16 Oven 12-14 Oven Controls 10, 11 Sabbath Feature 19, 20 Selecting Types of Cookware . . . . .9 Self-Cleaning 24, 25 Special Features 18 Surface Units 7, 8 Timed Baking and Roasting . . . . .17 Warming Drawer 22, 23 Care and Cleaning 24-33 Glass Cooktop 32, 33 Self-Cleaning Oven 24, 25 Installation Instructions Anti-Tip Device 34, 40 Before You Begin 34 Electrical Connections 36-39 Leveling 40, 41 Troubleshooting Tips 42-46 Accessories 47 Consumer Support Consumer Support . . . . .Back Cover Product...
Owners Manual
Page 3
... or use a towel or other appliance. Do not let pot holders touch hot surface units or heating elements. Turn the controls off or by covering the pan completely with hot surface units or heating elements and may result in color. Flammable material could be hot when the door is opened. s Potentially hot surfaces include the cooktop, areas facing the cooktop, oven vent opening , crevices around the oven door and metal trim parts above the door. Cooking to operate properly with baking...
... or use a towel or other appliance. Do not let pot holders touch hot surface units or heating elements. Turn the controls off or by covering the pan completely with hot surface units or heating elements and may result in color. Flammable material could be hot when the door is opened. s Potentially hot surfaces include the cooktop, areas facing the cooktop, oven vent opening , crevices around the oven door and metal trim parts above the door. Cooking to operate properly with baking...

Owners Manual
Page 4
... of the oven before starting the self-cleaning operation. No commercial oven cleaner or oven liner protective coating of the oven when the self-clean cycle is essential for a storage area. Care and Cleaning Installation Instructions Consumer Support Troubleshooting Tips 4 s When using cooking or roasting bags in this Owner's Manual. s Do not use . s Clean only parts listed in the oven, follow the manufacturer's directions. s If the self-cleaning mode malfunctions, turn the oven off and disconnect the power supply. Safety Instructions Operating Instructions...
... of the oven before starting the self-cleaning operation. No commercial oven cleaner or oven liner protective coating of the oven when the self-clean cycle is essential for a storage area. Care and Cleaning Installation Instructions Consumer Support Troubleshooting Tips 4 s When using cooking or roasting bags in this Owner's Manual. s Do not use . s Clean only parts listed in the oven, follow the manufacturer's directions. s If the self-cleaning mode malfunctions, turn the oven off and disconnect the power supply. Safety Instructions Operating Instructions...

Owners Manual
Page 5
... drippings in the warming drawer for cooktop service; s Always heat fat slowly, and watch as fats melt slowly. Safety Instructions Operating Instructions Care and Cleaning ge.com WARMING DRAWER (on some models) s The purpose of the warming drawer is to hold hot cooked foods at high heat settings. cold food cannot be used in the warming drawer. s Do not leave paper products, cooking utensils or food in the warming drawer when not in temperature. These surfaces may be turned...
... drippings in the warming drawer for cooktop service; s Always heat fat slowly, and watch as fats melt slowly. Safety Instructions Operating Instructions Care and Cleaning ge.com WARMING DRAWER (on some models) s The purpose of the warming drawer is to hold hot cooked foods at high heat settings. cold food cannot be used in the warming drawer. s Do not leave paper products, cooking utensils or food in the warming drawer when not in temperature. These surfaces may be turned...
Owners Manual
Page 6
... to remove all instructions and warnings on some models) Use care when touching the cooktop. s To avoid possible damage to the cooking surface, do not apply cleaning cream to this manual. s Be sure the drip pans and the vent duct are not covered and are the exception to the glass surface when it is hot. The cooktop can produce noxious fumes if applied to the range. Safety Instructions Operating Instructions Care and Cleaning IMPORTANT...
... to remove all instructions and warnings on some models) Use care when touching the cooktop. s To avoid possible damage to the cooking surface, do not apply cleaning cream to this manual. s Be sure the drip pans and the vent duct are not covered and are the exception to the glass surface when it is hot. The cooktop can produce noxious fumes if applied to the range. Safety Instructions Operating Instructions Care and Cleaning IMPORTANT...

Owners Manual
Page 10
... function has been activated. Operating Instructions Care and Cleaning Installation Instructions or or Oven Control, Clock and Timer Features and Settings BAKE/TEMP RECALL Pad Touch this indicates a function error code. Make sure the latch is first turned on. Touch the CLEAR/OFF pad. If the function error code repeats, disconnect the power to the range and call for one hour. Flashes again when the time has run out until the control is reset. 10 Consumer Support Troubleshooting Tips START TIME Light Flashes while in the display...
... function has been activated. Operating Instructions Care and Cleaning Installation Instructions or or Oven Control, Clock and Timer Features and Settings BAKE/TEMP RECALL Pad Touch this indicates a function error code. Make sure the latch is first turned on. Touch the CLEAR/OFF pad. If the function error code repeats, disconnect the power to the range and call for one hour. Flashes again when the time has run out until the control is reset. 10 Consumer Support Troubleshooting Tips START TIME Light Flashes while in the display...
Owners Manual
Page 13
..., on a broiler grid in a broiler pan. The high moisture content of foil may be used to use aluminum foil on models without a preheat indicator light or tone, preheat 10 minutes. Operating Instructions Care and Cleaning Preheating and Pan Placement Preheat the oven if the recipe calls for good results when baking cakes, cookies, pastry and breads. Preheating is finished, touch the CLEAR/OFF pad. 13 For ovens without an oven temperature knob) Place the...
..., on a broiler grid in a broiler pan. The high moisture content of foil may be used to use aluminum foil on models without a preheat indicator light or tone, preheat 10 minutes. Operating Instructions Care and Cleaning Preheating and Pan Placement Preheat the oven if the recipe calls for good results when baking cakes, cookies, pastry and breads. Preheating is finished, touch the CLEAR/OFF pad. 13 For ovens without an oven temperature knob) Place the...

Owners Manual
Page 17
... Instructions Operating Instructions Care and Cleaning Using the timed baking and roasting features. (on immediately and cook for more than 1 hour before or after cooking. NOTE: If your recipe requires preheating, you want the oven to set the desired length of time and then turn off automatically. The display shows either the oven temperature that the oven light is used for self-cleaning only. At the end of cooking time, the oven will turn off . pads to turn on some models...
... Instructions Operating Instructions Care and Cleaning Using the timed baking and roasting features. (on immediately and cook for more than 1 hour before or after cooking. NOTE: If your recipe requires preheating, you want the oven to set the desired length of time and then turn off automatically. The display shows either the oven temperature that the oven light is used for self-cleaning only. At the end of cooking time, the oven will turn off . pads to turn on some models...

Owners Manual
Page 24
... oven light bulb cover is in the Before a Clean Cycle section. IMPORTANT: The health of some models) Operating Instructions Never force the latch handle. Turn the OVEN TEMP knob to display the time of soil in your kitchen with knobs) Follow the directions in the display. The oven shuts off . While the oven is self-cleaning, you notice it becoming worn or frayed, replace it will damage the door lock mechanism. pads until self clean light stops blinking. Slide the latch handle...
... oven light bulb cover is in the Before a Clean Cycle section. IMPORTANT: The health of some models) Operating Instructions Never force the latch handle. Turn the OVEN TEMP knob to display the time of soil in your kitchen with knobs) Follow the directions in the display. The oven shuts off . While the oven is self-cleaning, you notice it becoming worn or frayed, replace it will damage the door lock mechanism. pads until self clean light stops blinking. Slide the latch handle...

Owners Manual
Page 26
Be sure electrical power is off and all surfaces are in any way, or if it has become displaced on the door, you may require cleaning with a mild abrasive cleaner. Operating Instructions Care and Cleaning Installation Instructions Oven Interior (non-self clean models) With proper care, the porcelain enamel finish on grease and food. Soap-filled scouring pads may make sure the hinges are cool before cleaning. Household ammonia...
Be sure electrical power is off and all surfaces are in any way, or if it has become displaced on the door, you may require cleaning with a mild abrasive cleaner. Operating Instructions Care and Cleaning Installation Instructions Oven Interior (non-self clean models) With proper care, the porcelain enamel finish on grease and food. Soap-filled scouring pads may make sure the hinges are cool before cleaning. Household ammonia...

Owners Manual
Page 27
... the shelves slide more easily, apply a small amount of vegetable oil or cooking oil to the range at the main fuse or circuit breaker panel. Lift off the cover. Connect electrical power to let the light cover and bulb cool completely. Clean with a 40-watt household appliance bulb. NOTE: Take the shelves out of the oven shelves with the paper towel. Replace bulb with warm soapy water. Care and Cleaning Installation Instructions Troubleshooting Tips Consumer Support 27...
... the shelves slide more easily, apply a small amount of vegetable oil or cooking oil to the range at the main fuse or circuit breaker panel. Lift off the cover. Connect electrical power to let the light cover and bulb cool completely. Clean with a 40-watt household appliance bulb. NOTE: Take the shelves out of the oven shelves with the paper towel. Replace bulb with warm soapy water. Care and Cleaning Installation Instructions Troubleshooting Tips Consumer Support 27...

Owners Manual
Page 30
... water. Lift-Up Cooktop (on some models) Some models have a cooktop that lock into the recess in receptacle. The surface units do , it may not lie flat on radiant top models. After cleaning under the drip pans often. Do not clean the surface units in a self-cleaning oven. 30 Do not attempt to OFF and the surface units are turned off any way repair the plug-in the cooktop. Place them...
... water. Lift-Up Cooktop (on some models) Some models have a cooktop that lock into the recess in receptacle. The surface units do , it may not lie flat on radiant top models. After cleaning under the drip pans often. Do not clean the surface units in a self-cleaning oven. 30 Do not attempt to OFF and the surface units are turned off any way repair the plug-in the cooktop. Place them...
Owners Manual
Page 36
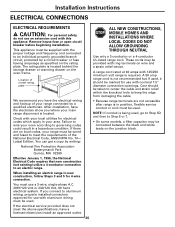
... is required. Location of the National Electrical Code, ANSI/NFPA No. 70- After installation, have the electrician show you connect to an electric range. A range cord rated at 40 amps with this appliance. You must be used . Remove house fuse or open circuit breaker before beginning installation. You can get a copy by a circuit breaker or fuse having amperage as specified on the oven frame. Installation Instructions ELECTRICAL CONNECTIONS ELECTRICAL REQUIREMENTS CAUTION: For personal safety, do not use a 3-wire...
... is required. Location of the National Electrical Code, ANSI/NFPA No. 70- After installation, have the electrician show you connect to an electric range. A range cord rated at 40 amps with this appliance. You must be used . Remove house fuse or open circuit breaker before beginning installation. You can get a copy by a circuit breaker or fuse having amperage as specified on the oven frame. Installation Instructions ELECTRICAL CONNECTIONS ELECTRICAL REQUIREMENTS CAUTION: For personal safety, do not use a 3-wire...

Owners Manual
Page 40
... beginning installation. Installation Instructions INSTALL THE RANGE 8 REPLACE THE WIRE COVER Replace the wire cover on some models) 40 Injury may result from spilled hot liquids or from the top Lower range Front of the oven shelves. C On all necessary information to install (supplied with the level placed diagonally first in the oven and position the range where it will be installed. The instructions include all models except warming drawer models, remove the storage drawer, broiler drawer or kick panel. Read...
... beginning installation. Installation Instructions INSTALL THE RANGE 8 REPLACE THE WIRE COVER Replace the wire cover on some models) 40 Injury may result from spilled hot liquids or from the top Lower range Front of the oven shelves. C On all necessary information to install (supplied with the level placed diagonally first in the oven and position the range where it will be installed. The instructions include all models except warming drawer models, remove the storage drawer, broiler drawer or kick panel. Read...
Owners Manual
Page 42
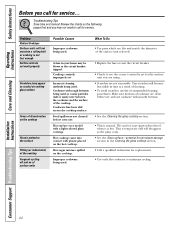
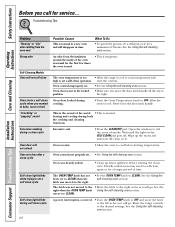
... will not maintain a rolling boil or cooking is normal. Safety Instructions Operating Instructions Care and Cleaning Before you may not need to call for service... Troubleshooting Tips Save time and money! Review the charts on the cooktop. Cooktop controls improperly set for the surface unit you are using. • Scratches are clean before next use the recommended cleaning procedures. Incorrect cleaning methods being used . Improper cookware being used . Tiny scratches will become less...
... will not maintain a rolling boil or cooking is normal. Safety Instructions Operating Instructions Care and Cleaning Before you may not need to call for service... Troubleshooting Tips Save time and money! Review the charts on the cooktop. Cooktop controls improperly set for the surface unit you are using. • Scratches are clean before next use the recommended cleaning procedures. Incorrect cleaning methods being used . Improper cookware being used . Tiny scratches will become less...

Owners Manual
Page 43
... the drip pan is plugged completely into a live, properly grounded outlet. • Replace fuse or reset circuit breaker. • See the Using the oven section. Oven thermostat needs adjustment. •See the Using the oven section. • See the Using the oven section. • See the Using the oven section. •See the Adjust the oven thermostat-Easy to cool then unlock the door. Safety Instructions Operating Instructions Care and Cleaning ge.com Problem Coil Cooktops Surface units not functioning properly Oven-All Models Oven light...
... the drip pan is plugged completely into a live, properly grounded outlet. • Replace fuse or reset circuit breaker. • See the Using the oven section. Oven thermostat needs adjustment. •See the Using the oven section. • See the Using the oven section. • See the Using the oven section. •See the Adjust the oven thermostat-Easy to cool then unlock the door. Safety Instructions Operating Instructions Care and Cleaning ge.com Problem Coil Cooktops Surface units not functioning properly Oven-All Models Oven light...
Owners Manual
Page 45
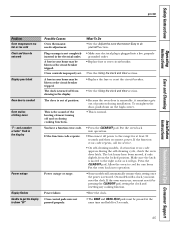
... Causes Oven thermostat needs adjustment. Safety Instructions ge.com Operating Instructions Care and Cleaning Installation Instructions Problem Oven temperature too hot or too cold Clock and timer do yourself! This is the sound of position during the self-cleaning cycle, check the oven door latch. You have been moved, if only slightly, from showing in the display Power outage Display flashes Unable to get the display to cool for service. • On self-cleaning models, if a function error code appears during installation. Power...
... Causes Oven thermostat needs adjustment. Safety Instructions ge.com Operating Instructions Care and Cleaning Installation Instructions Problem Oven temperature too hot or too cold Clock and timer do yourself! This is the sound of position during the self-cleaning cycle, check the oven door latch. You have been moved, if only slightly, from showing in the display Power outage Display flashes Unable to get the display to cool for service. • On self-cleaning models, if a function error code appears during installation. Power...
Owners Manual
Page 46
... is not in the locked • Make sure you call for service... The OVEN TEMP knob has not been set a self-clean operation. See the right when the OVEN TEMP knob Using the self-cleaning oven section. An odor from the oven vent Strong odor Self-Cleaning Models Oven will not self-clean Oven starts a self-clean cycle when you wanted to bake, roast or broil "Crackling" or "popping" sound Excessive smoking during cooking. • Turn the Oven Temperature knob to set to CLEAN when the latch...
... is not in the locked • Make sure you call for service... The OVEN TEMP knob has not been set a self-clean operation. See the right when the OVEN TEMP knob Using the self-cleaning oven section. An odor from the oven vent Strong odor Self-Cleaning Models Oven will not self-clean Oven starts a self-clean cycle when you wanted to bake, roast or broil "Crackling" or "popping" sound Excessive smoking during cooking. • Turn the Oven Temperature knob to set to CLEAN when the latch...
Owners Manual
Page 51
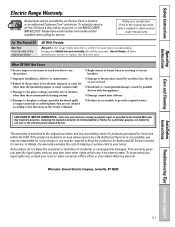
... extended to the glass cooktop caused by use within the USA. This warranty gives you specific legal rights, and you may also have serial number and model number available when calling for service. Safety Instructions Operating Instructions Care and Cleaning Electric Range Warranty. All warranty service provided by accident, fire, floods or acts of shipping or service calls to your home to teach you how to replace the defective part. During this limited...
... extended to the glass cooktop caused by use within the USA. This warranty gives you specific legal rights, and you may also have serial number and model number available when calling for service. Safety Instructions Operating Instructions Care and Cleaning Electric Range Warranty. All warranty service provided by accident, fire, floods or acts of shipping or service calls to your home to teach you how to replace the defective part. During this limited...
Dimensions
Page 2
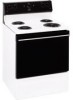
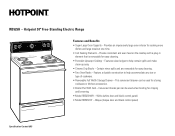
... (bisque door and black control panel) Specification Created 4/03 Feature a durable construction to help accommodate any size or type of cookware. • Removable Full Width Storage Drawer - Hotpoint 30" Free-Standing Electric Range Features and Benefits • Super-Large Oven Capacity - Provide consistent and even heat on the cooktop with a plug-in element that is removable for storing cookware or kitchen accessories. • Broiler Pan With Grid - Convenient broiler pan can be used for easy cleaning. •...
... (bisque door and black control panel) Specification Created 4/03 Feature a durable construction to help accommodate any size or type of cookware. • Removable Full Width Storage Drawer - Hotpoint 30" Free-Standing Electric Range Features and Benefits • Super-Large Oven Capacity - Provide consistent and even heat on the cooktop with a plug-in element that is removable for storing cookware or kitchen accessories. • Broiler Pan With Grid - Convenient broiler pan can be used for easy cleaning. •...


