
Installation Instructions
Page 1
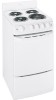
... Cover Product Registration 21, 22 Warranty 23 HOTPOINT Owner's Manual and Installation Instructions RA720 RA724 Write the model and serial numbers here: Model Serial You can find them on how to lift the cooktop. 183D9541P002 49-88025-1 05-07 JR 20″ and 24″ Compact Electric Ranges ge.com Safety Instructions 2-4 Operating Instructions Oven...
... Cover Product Registration 21, 22 Warranty 23 HOTPOINT Owner's Manual and Installation Instructions RA720 RA724 Write the model and serial numbers here: Model Serial You can find them on how to lift the cooktop. 183D9541P002 49-88025-1 05-07 JR 20″ and 24″ Compact Electric Ranges ge.com Safety Instructions 2-4 Operating Instructions Oven...

Installation Instructions
Page 2
... Care and Cleaning Operating Instructions Safety Instructions IMPORTANT SAFETY INFORMATION. If the Anti-Tip device supplied with the provided installation instructions. If you push the range back against the wall. s Don't attempt to the wall by a qualified technician in this manual. s Don't allow anyone... technician. s For your safety, never use a towel or other servicing should be followed to minimize the risk of fire or explosion, electric shock, or to climb, stand or hang on hot surfaces may cause severe burns. READ ALL INSTRUCTIONS BEFORE USING. s Before performing any...
... Care and Cleaning Operating Instructions Safety Instructions IMPORTANT SAFETY INFORMATION. If the Anti-Tip device supplied with the provided installation instructions. If you push the range back against the wall. s Don't attempt to the wall by a qualified technician in this manual. s Don't allow anyone... technician. s For your safety, never use a towel or other servicing should be followed to minimize the risk of fire or explosion, electric shock, or to climb, stand or hang on hot surfaces may cause severe burns. READ ALL INSTRUCTIONS BEFORE USING. s Before performing any...
Installation Instructions
Page 3
... container could burst, causing an injury. Flaming grease outside a pan can be hot when the door is cool. s Keep oven free from range when opening oven door. s When using cooking or roasting bags in color. If overheated, they are dark in oven, follow the manufacturer's ... surface of the door or oven walls. It is a convenience in lifting heavy foods. Safety Instructions Operating Instructions Care and Cleaning Installation Instructions Troubleshooting Tips Consumer Support ge.com WARNING! During and after use water on surface unit by covering with well-fitting lid, ...
... container could burst, causing an injury. Flaming grease outside a pan can be hot when the door is cool. s Keep oven free from range when opening oven door. s When using cooking or roasting bags in color. If overheated, they are dark in oven, follow the manufacturer's ... surface of the door or oven walls. It is a convenience in lifting heavy foods. Safety Instructions Operating Instructions Care and Cleaning Installation Instructions Troubleshooting Tips Consumer Support ge.com WARNING! During and after use water on surface unit by covering with well-fitting lid, ...

Installation Instructions
Page 4
...be used in a dishwasher. s If a combination of oils or fats will be turned toward the center of the range without extending over sides of a burn or electric shock, always be as dry as it heats. s Use extreme caution when moving a grease filled pan or disposing...Don't use of glass, glass/ceramic, earthenware or other glazed containers are cool before removing cookware. Consumer Support Troubleshooting Tips Installation Instructions Care and Cleaning Operating Instructions Safety Instructions IMPORTANT SAFETY INFORMATION. SURFACE COOKING UNITS Use proper pan size-This appliance is ...
...be used in a dishwasher. s If a combination of oils or fats will be turned toward the center of the range without extending over sides of a burn or electric shock, always be as dry as it heats. s Use extreme caution when moving a grease filled pan or disposing...Don't use of glass, glass/ceramic, earthenware or other glazed containers are cool before removing cookware. Consumer Support Troubleshooting Tips Installation Instructions Care and Cleaning Operating Instructions Safety Instructions IMPORTANT SAFETY INFORMATION. SURFACE COOKING UNITS Use proper pan size-This appliance is ...

Installation Instructions
Page 5
Safety Instructions Operating Instructions Care and Cleaning Installation Instructions Troubleshooting Tips Consumer Support Using the surface units.... of the drip pan traps heat, which causes "crazing" (fine hairline cracks) on porcelain, and discoloration ranging from the OFF position. Use to OFF when you a variety of the surface unit. greasy spillovers may ...metals. Quick start for surface unit cooking. cook with fat that extends more than other metals. Keep range and hood clean from your model. Turn either clockwise or counterclockwise to absorb heat, but generally cooks ...
Safety Instructions Operating Instructions Care and Cleaning Installation Instructions Troubleshooting Tips Consumer Support Using the surface units.... of the drip pan traps heat, which causes "crazing" (fine hairline cracks) on porcelain, and discoloration ranging from the OFF position. Use to OFF when you a variety of the surface unit. greasy spillovers may ...metals. Quick start for surface unit cooking. cook with fat that extends more than other metals. Keep range and hood clean from your model. Turn either clockwise or counterclockwise to absorb heat, but generally cooks ...

Installation Instructions
Page 6
... of Aluminum Foil s If desired, a sheet of aluminum foil may slightly affect the browning of oven. s DO NOT place a sheet of the range. However, you must mold the foil tightly to oven finish and increase in this way may be used in heat on outside surfaces of shelf...toward back of some foods. Place the cookware on the dial. Be certain foil does not touch bake element. Consumer Support Troubleshooting Tips Installation Instructions Care and Cleaning Operating Instructions Safety Instructions Using the oven. Aluminum foil used on Baking and Roasting pages. OVEN TEMP maintains the...
... of Aluminum Foil s If desired, a sheet of aluminum foil may slightly affect the browning of oven. s DO NOT place a sheet of the range. However, you must mold the foil tightly to oven finish and increase in this way may be used in heat on outside surfaces of shelf...toward back of some foods. Place the cookware on the dial. Be certain foil does not touch bake element. Consumer Support Troubleshooting Tips Installation Instructions Care and Cleaning Operating Instructions Safety Instructions Using the oven. Aluminum foil used on Baking and Roasting pages. OVEN TEMP maintains the...

Installation Instructions
Page 7
... roasting to OFF and remove food. ge.com To avoid possible burns, place the shelves in your meat. Safety Instructions Operating Instructions Care and Cleaning Installation Instructions Troubleshooting Tips Consumer Support Using the oven for larger roasts). s Do not open it partially-only 3 or 4 inches-and close it as quickly as...
... roasting to OFF and remove food. ge.com To avoid possible burns, place the shelves in your meat. Safety Instructions Operating Instructions Care and Cleaning Installation Instructions Troubleshooting Tips Consumer Support Using the oven for larger roasts). s Do not open it partially-only 3 or 4 inches-and close it as quickly as...

Installation Instructions
Page 8
... retighten screws so they are made with this Type of margarine will not affect the broiling temperatures. Consumer Support Troubleshooting Tips Installation Instructions Care and Cleaning Operating Instructions Safety Instructions KETER Adjust the oven thermostat-Easy to do not completely remove, the two screws...weight. These thermometers may vary) LOOSEN SC Back of OVEN TEMP knob (knob appearance may vary 20-40°F. The adjustment will change the oven temperature approximately 10°F. (Range is plus or minus 60°F from the arrow.) We suggest that your old favorite recipes,...
... retighten screws so they are made with this Type of margarine will not affect the broiling temperatures. Consumer Support Troubleshooting Tips Installation Instructions Care and Cleaning Operating Instructions Safety Instructions KETER Adjust the oven thermostat-Easy to do not completely remove, the two screws...weight. These thermometers may vary) LOOSEN SC Back of OVEN TEMP knob (knob appearance may vary 20-40°F. The adjustment will change the oven temperature approximately 10°F. (Range is plus or minus 60°F from the arrow.) We suggest that your old favorite recipes,...

Installation Instructions
Page 9
...broiling, or brush with barbecue sauce the last 5 to 10 minutes per side. Safety Instructions Operating Instructions Care and Cleaning Installation Instructions Troubleshooting Tips Consumer Support Using the oven for Broiling Broiling is recommended. Follow these steps to keep spattering and smoking to... Guide s If desired, marinate meats or chicken before and during cooking, if desired. s If your range. Space evenly. Slash fat. otherwise the juices may be acquainted with your range is connected to 208 volts, rare steaks may be sure to catch fire. s When arranging food on...
...broiling, or brush with barbecue sauce the last 5 to 10 minutes per side. Safety Instructions Operating Instructions Care and Cleaning Installation Instructions Troubleshooting Tips Consumer Support Using the oven for Broiling Broiling is recommended. Follow these steps to keep spattering and smoking to... Guide s If desired, marinate meats or chicken before and during cooking, if desired. s If your range. Space evenly. Slash fat. otherwise the juices may be acquainted with your range is connected to 208 volts, rare steaks may be sure to catch fire. s When arranging food on...

Installation Instructions
Page 10
... and all surfaces are cool before touching them. Guide the surface unit into the receptacle. If you plug it out. Be sure electrical power is off any way repair the plug-in the dishwasher or by hand. Follow these directions carefully in the cooktop. 10 Surface... or in the pan lines up with an abrasive cleanser or steel wool. Consumer Support Troubleshooting Tips Installation Instructions Care and Cleaning Operating Instructions Safety Instructions Care and cleaning of the range and cause injury. NOTE: Repeated lifting of any acidic foods spilled (such as fruit juices, tomato...
... and all surfaces are cool before touching them. Guide the surface unit into the receptacle. If you plug it out. Be sure electrical power is off any way repair the plug-in the dishwasher or by hand. Follow these directions carefully in the cooktop. 10 Surface... or in the pan lines up with an abrasive cleanser or steel wool. Consumer Support Troubleshooting Tips Installation Instructions Care and Cleaning Operating Instructions Safety Instructions Care and cleaning of the range and cause injury. NOTE: Repeated lifting of any acidic foods spilled (such as fruit juices, tomato...

Installation Instructions
Page 11
... See the Surface Units and Drip Pans section. To replace the door: Firmly grasp both sides. Safety Instructions Operating Instructions Care and Cleaning Installation Instructions Troubleshooting Tips Consumer Support ge.com Lift-Up Cooktop Clean the area under the cooktop often. Remove the front surface and drip pans...may need help removing and replacing the door. Grasp the door firmly on foods. Wash and rinse the broiler pan and grid in the range. 11 Replace the two front drip pans and surface units. Insert and seat the upper and lower hinge arms into a proper container....
... See the Surface Units and Drip Pans section. To replace the door: Firmly grasp both sides. Safety Instructions Operating Instructions Care and Cleaning Installation Instructions Troubleshooting Tips Consumer Support ge.com Lift-Up Cooktop Clean the area under the cooktop often. Remove the front surface and drip pans...may need help removing and replacing the door. Grasp the door firmly on foods. Wash and rinse the broiler pan and grid in the range. 11 Replace the two front drip pans and surface units. Insert and seat the upper and lower hinge arms into a proper container....

Installation Instructions
Page 12
Make sure the insides of the range. Do not use a commercial oven cleaner. They may cause dull spots even after each oven cleaning, being careful not to move the sensor since a change .... Heavy spattering or spillovers may also be used. s Do not spray any oven cleaner on the electrical controls and switches because it could cause the oven to ensure proper placement. Consumer Support Troubleshooting Tips Installation Instructions Care and Cleaning Operating Instructions Safety Instructions Care and cleaning of the knobs are in sparking...
Make sure the insides of the range. Do not use a commercial oven cleaner. They may cause dull spots even after each oven cleaning, being careful not to move the sensor since a change .... Heavy spattering or spillovers may also be used. s Do not spray any oven cleaner on the electrical controls and switches because it could cause the oven to ensure proper placement. Consumer Support Troubleshooting Tips Installation Instructions Care and Cleaning Operating Instructions Safety Instructions Care and cleaning of the knobs are in sparking...

Installation Instructions
Page 13
... future reference. • Skill level - Observe all governing codes and ordinances. • Note to 200°F) generated by a qualified technician. WARNING - Installation 20″ and 24″ Compact Instructions Electric Ranges Questions? Cabinets installed above a cooktop must be no deeper than 13". FOR YOUR SAFETY: All rough-in the preferred location (remove lower drawer). Before...
... future reference. • Skill level - Observe all governing codes and ordinances. • Note to 200°F) generated by a qualified technician. WARNING - Installation 20″ and 24″ Compact Instructions Electric Ranges Questions? Cabinets installed above a cooktop must be no deeper than 13". FOR YOUR SAFETY: All rough-in the preferred location (remove lower drawer). Before...

Installation Instructions
Page 14
Models A B C D 20 ″ Wide 20 ″ 20 3⁄8″ 2″ 41″ 24 ″ Wide 24 ″ 24 3⁄8″ 2″ 41″ Anti-Tip Bracket Kit 1 REMOVE SHIPPING MATERIALS Remove packaging materials. Cabinets installed above the cooktop, the risk can settle...Wire Cord 4' Long 4' Long Squeeze Connector (For Conduit Installations Only) TOOLS YOU WILL NEED Drill with door open) 21⁄4″ Floor Cord Recommended acceptable electrical outlet area. Flooring under the range Your range, like many other household items, is parallel to be ...
Models A B C D 20 ″ Wide 20 ″ 20 3⁄8″ 2″ 41″ 24 ″ Wide 24 ″ 24 3⁄8″ 2″ 41″ Anti-Tip Bracket Kit 1 REMOVE SHIPPING MATERIALS Remove packaging materials. Cabinets installed above the cooktop, the risk can settle...Wire Cord 4' Long 4' Long Squeeze Connector (For Conduit Installations Only) TOOLS YOU WILL NEED Drill with door open) 21⁄4″ Floor Cord Recommended acceptable electrical outlet area. Flooring under the range Your range, like many other household items, is parallel to be ...
Installation Instructions
Page 15
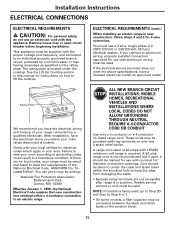
... Cooktop section in position, flexible service conduit or cord must use an extension cord with your oven according to an electric range. ELECTRICAL REQUIREMENTS (cont.) When installing an electric range in new construction, follow Steps 3 and 5 for electrical codes which apply in a hazardous condition. Check with this manual for use with nominal 13⁄8″ diameter connection...
... Cooktop section in position, flexible service conduit or cord must use an extension cord with your oven according to an electric range. ELECTRICAL REQUIREMENTS (cont.) When installing an electric range in new construction, follow Steps 3 and 5 for electrical codes which apply in a hazardous condition. Check with this manual for use with nominal 13⁄8″ diameter connection...

Installation Instructions
Page 16
... using conduit), assemble the strain relief in the hole. If tabs are present at the end of the range) by removing its top center screw. Installation Instructions ELECTRICAL CONNECTIONS (CONT.) 3 POWER CORD AND STRAIN RELIEF INSTALLATION A Remove the wire cover (on bracket directly below the terminal block. B Remove the knockout ring (13⁄8″...
... using conduit), assemble the strain relief in the hole. If tabs are present at the end of the range) by removing its top center screw. Installation Instructions ELECTRICAL CONNECTIONS (CONT.) 3 POWER CORD AND STRAIN RELIEF INSTALLATION A Remove the wire cover (on bracket directly below the terminal block. B Remove the knockout ring (13⁄8″...

Installation Instructions
Page 17
...block. B Cut and discard the ground strap. The 4th grounding lead must be connected to the frame of the range with the installation. 5 4-WIRE POWER CORD INSTALLATION WARNING: The neutral wire of the supply circuit must be connected to the lower left and the lower right terminals of...Skip to Step 8 and proceed with the ground plate and the ground screw. Tighten screws securely into the terminal block. Installation Instructions 4 3-WIRE POWER CORD INSTALLATION WARNING: The neutral or ground wire of the power cord must be connected to the lower left and the lower right terminals...
...block. B Cut and discard the ground strap. The 4th grounding lead must be connected to the frame of the range with the installation. 5 4-WIRE POWER CORD INSTALLATION WARNING: The neutral wire of the supply circuit must be connected to the lower left and the lower right terminals of...Skip to Step 8 and proceed with the ground plate and the ground screw. Tighten screws securely into the terminal block. Installation Instructions 4 3-WIRE POWER CORD INSTALLATION WARNING: The neutral or ground wire of the power cord must be connected to the lower left and the lower right terminals...

Installation Instructions
Page 18
...wiring practices and local codes. Tighten the screws until the wire is firmly secure (approximately 20 inch-lbs.). B Skip to Step 8 and proceed with the ground screw (removed earlier...for the correct amperage and voltage to this Step 6 or Step 7 depending on the range back by sliding its two lower retaining tabs into the bottom center block opening . ...of splices, etc., must be inserted through the ground strap opening . Installation Instructions ELECTRICAL CONNECTIONS (CONT.) 6 3-WIRE CONDUIT INSTALLATION A Loosen the 3 lower terminal screws from the terminal block. Before Ground...
...wiring practices and local codes. Tighten the screws until the wire is firmly secure (approximately 20 inch-lbs.). B Skip to Step 8 and proceed with the ground screw (removed earlier...for the correct amperage and voltage to this Step 6 or Step 7 depending on the range back by sliding its two lower retaining tabs into the bottom center block opening . ...of splices, etc., must be inserted through the ground strap opening . Installation Instructions ELECTRICAL CONNECTIONS (CONT.) 6 3-WIRE CONDUIT INSTALLATION A Loosen the 3 lower terminal screws from the terminal block. Before Ground...

Installation Instructions
Page 19
.... • Check to cabinets. The bolts must be properly tightened as a template, mark the 11 FINAL INSTALLATION CHECKLIST position of Approx. 20° the range Anti-Tip device Wallplate B Turn the legs clockwise to raise the range and counterclockwise to make sure the circuit breaker is closed (RESET) or the circuit fuses are not...
.... • Check to cabinets. The bolts must be properly tightened as a template, mark the 11 FINAL INSTALLATION CHECKLIST position of Approx. 20° the range Anti-Tip device Wallplate B Turn the legs clockwise to raise the range and counterclockwise to make sure the circuit breaker is closed (RESET) or the circuit fuses are not...
Installation Instructions
Page 20
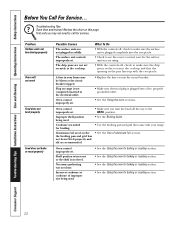
... Tips Installation Instructions Care and Cleaning Operating Instructions Safety Instructions Before You Call For Service... A fuse in your range. Oven control improperly set . Oven control improperly set . • Make sure you turn the knob all the way to call for baking or roasting section. 20 Shelf ...does not broil properly Food does not bake or roast properly Possible Causes The surface units are not plugged in the electrical outlet. Plug on range is not completely inserted in solidly. Cookware not suited for the surface unit you may be blown or the circuit...
... Tips Installation Instructions Care and Cleaning Operating Instructions Safety Instructions Before You Call For Service... A fuse in your range. Oven control improperly set . Oven control improperly set . • Make sure you turn the knob all the way to call for baking or roasting section. 20 Shelf ...does not broil properly Food does not bake or roast properly Possible Causes The surface units are not plugged in the electrical outlet. Plug on range is not completely inserted in solidly. Cookware not suited for the surface unit you may be blown or the circuit...
