Owners Manual
Page 1
Dryers Hotpoint.com Safety Instructions 2-4 Operating Instructions Control Panel 5 Control Settings 6 Features 7 Loading and Using the Dryer 9, 10 Reversing the Door 8 Venting the Dryer 10 Troubleshooting Tips . . . 11, 12 Consumer Support Consumer Support . . . . . Back Cover Warranty 15 Owner's Manual NBXR333 NVLR223 NWXR483 Write the model and serial numbers here: Model Serial You can find them on a label on the front of the dryer behind the door. 175D1807P568 39-90300-1 11-06 JR
Dryers Hotpoint.com Safety Instructions 2-4 Operating Instructions Control Panel 5 Control Settings 6 Features 7 Loading and Using the Dryer 9, 10 Reversing the Door 8 Venting the Dryer 10 Troubleshooting Tips . . . 11, 12 Consumer Support Consumer Support . . . . . Back Cover Warranty 15 Owner's Manual NBXR333 NVLR223 NWXR483 Write the model and serial numbers here: Model Serial You can find them on a label on the front of the dryer behind the door. 175D1807P568 39-90300-1 11-06 JR

Owners Manual
Page 2
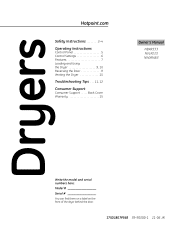
Follow the gas supplier's instructions carefully. 5 If you can receive one by visiting Hotpoint.com, or by the incomplete combustion of fire or explosion, electric shock, or to the weather, which could cause permanent damage and invalidate the warranty. Follow... to the state to cause cancer, birth defects or other appliance. Troubleshooting Tips Consumer Support PROPER INSTALLATION This dryer must be exhausted to avoid electrical overload. Safety Instructions Operating Instructions IMPORTANT SAFETY INFORMATION. WARNING! For your building. 3 Clear the room, building...
Follow the gas supplier's instructions carefully. 5 If you can receive one by visiting Hotpoint.com, or by the incomplete combustion of fire or explosion, electric shock, or to the weather, which could cause permanent damage and invalidate the warranty. Follow... to the state to cause cancer, birth defects or other appliance. Troubleshooting Tips Consumer Support PROPER INSTALLATION This dryer must be exhausted to avoid electrical overload. Safety Instructions Operating Instructions IMPORTANT SAFETY INFORMATION. WARNING! For your building. 3 Clear the room, building...
Owners Manual
Page 3
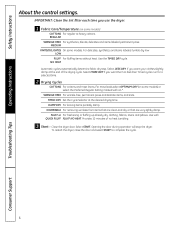
...not store plastic, paper or clothing that may be picked up by or near the dryer until the drum has completely stopped. NOTE: Turning the Cycle Selector knob to reduce the possibility of electric shock, unplug this appliance from the remaining particles that contains flammable materials (such as...is moving. Hotpoint.com I Clean the lint filter before attempting any other flammable vapors and liquids. I Keep all warnings on which you have been cleaned in, washed in, soaked in or spotted with cooking oils may ignite or explode. I Never reach into the dryer while the ...
...not store plastic, paper or clothing that may be picked up by or near the dryer until the drum has completely stopped. NOTE: Turning the Cycle Selector knob to reduce the possibility of electric shock, unplug this appliance from the remaining particles that contains flammable materials (such as...is moving. Hotpoint.com I Clean the lint filter before attempting any other flammable vapors and liquids. I Keep all warnings on which you have been cleaned in, washed in, soaked in or spotted with cooking oils may ignite or explode. I Never reach into the dryer while the ...
Owners Manual
Page 4
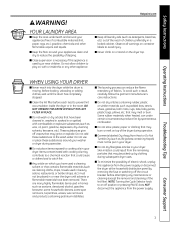
...cord away from having your laundered fabrics or reduce the static electricity in the vicinity of the machine and the exhaust duct connection inside . WHEN USING YOUR DRYER (cont.) I Do not tamper with an automatic electric ignition and does not have the skills to damage. Burns... may wish to the cord while pulling. See the Loading and Using the Dryer section. Safety Instructions Operating Instructions IMPORTANT ...
...cord away from having your laundered fabrics or reduce the static electricity in the vicinity of the machine and the exhaust duct connection inside . WHEN USING YOUR DRYER (cont.) I Do not tamper with an automatic electric ignition and does not have the skills to damage. Burns... may wish to the cord while pulling. See the Loading and Using the Dryer section. Safety Instructions Operating Instructions IMPORTANT ...
Owners Manual
Page 5
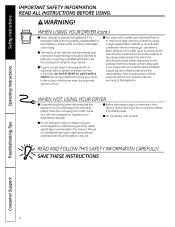
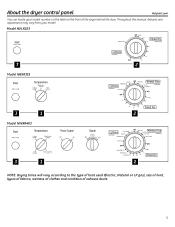
Model NVLR223 3 2 Model NBXR333 3 1 2 Model NWXR483 3 1 2 NOTE: Drying times will vary according to the type of heat used (Electric, Natural or LP gas), size of load, types of fabrics, wetness of clothes and condition of the dryer behind the door. Hotpoint.com You can locate your model. About the dryer control panel. Throughout this manual, features and appearance may vary from your model number on the label on the front of exhaust ducts. 5
Model NVLR223 3 2 Model NBXR333 3 1 2 Model NWXR483 3 1 2 NOTE: Drying times will vary according to the type of heat used (Electric, Natural or LP gas), size of load, types of fabrics, wetness of clothes and condition of the dryer behind the door. Hotpoint.com You can locate your model. About the dryer control panel. Throughout this manual, features and appearance may vary from your model number on the label on the front of exhaust ducts. 5
Owners Manual
Page 6
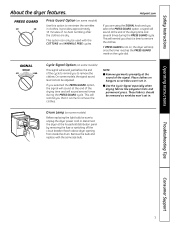
... automatically determine fabric dryness. DEWRINKLE For removing wrinkles from items that are clean and dry or that are very lightly damp. Close the dryer door. Use the TIMED DRY cycle. Select LESS DRY if you want your clothes slightly damp at the desired drying time. Select MORE...door and select START to heavy cottons. IMPORTANT: Clean the lint filter each time you use the dryer. 1 Fabric Care/Temperature (on some models. Opening the door during operation will stop the dryer. FLUFF or For freshening or fluffing up already dry clothing, fabrics, linens and pillows. For delicates...
... automatically determine fabric dryness. DEWRINKLE For removing wrinkles from items that are clean and dry or that are very lightly damp. Close the dryer door. Use the TIMED DRY cycle. Select LESS DRY if you want your clothes slightly damp at the desired drying time. Select MORE...door and select START to heavy cottons. IMPORTANT: Clean the lint filter each time you use the dryer. 1 Fabric Care/Temperature (on some models. Opening the door during operation will stop the dryer. FLUFF or For freshening or fluffing up already dry clothing, fabrics, linens and pillows. For delicates...
Owners Manual
Page 7
... after the clothes are using the SIGNAL knob and you select the PRESS GUARD option, a signal will remind you to remove the clothes. Hotpoint.com If you that it is time to remove the clothes. Cycle Signal Option (on hangers so wrinkles won 't set in . On ...some models) This signal will remind you are dry. Troubleshooting Tips Consumer Support 7 Safety Instructions Operating Instructions About the dryer features. This will sound just before the end of the signal. I Remove garments promptly at the end of the drying time and will stop...
... after the clothes are using the SIGNAL knob and you select the PRESS GUARD option, a signal will remind you to remove the clothes. Hotpoint.com If you that it is time to remove the clothes. Cycle Signal Option (on hangers so wrinkles won 't set in . On ...some models) This signal will remind you are dry. Troubleshooting Tips Consumer Support 7 Safety Instructions Operating Instructions About the dryer features. This will sound just before the end of the signal. I Remove garments promptly at the end of the drying time and will stop...
Owners Manual
Page 8
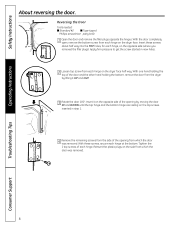
... these screws about half way into the TOP holes, for each hinge on the top screws inserted in new holes. 2 Loosen top screw from the dryer by moving the door IN and DOWN until the top hinge and the bottom hinge are resting on the... dryer face. Reinsert the plastic plugs on the dryer face half way. Tighten the 2 top screws of the opening from which the door was removed. With the door completely open, remove the bottom screw...
... these screws about half way into the TOP holes, for each hinge on the top screws inserted in new holes. 2 Loosen top screw from the dryer by moving the door IN and DOWN until the top hinge and the bottom hinge are resting on the... dryer face. Reinsert the plastic plugs on the dryer face half way. Tighten the 2 top screws of the opening from which the door was removed. With the door completely open, remove the bottom screw...
Owners Manual
Page 9
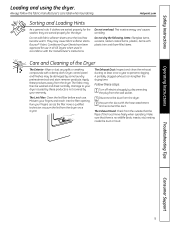
...move freely when operating. Run your fingers and reach into the filter opening. Dryer control panel and finishes may be washed and dried normally. A partially clogged exhaust can lengthen the drying time. Hotpoint.com Sorting and Loading Hints As a general rule, if clothes are sorted ...properly for the washer, they are sorted properly for use . They may then be damaged by your dryer caused by these steps: 1 Turn off electrical supply by disconnecting the plug...
...move freely when operating. Run your fingers and reach into the filter opening. Dryer control panel and finishes may be washed and dried normally. A partially clogged exhaust can lengthen the drying time. Hotpoint.com Sorting and Loading Hints As a general rule, if clothes are sorted ...properly for the washer, they are sorted properly for use . They may then be damaged by your dryer caused by these steps: 1 Turn off electrical supply by disconnecting the plug...
Owners Manual
Page 10
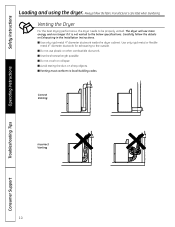
... possible. I Venting must conform to the below specifications. Safety Instructions Operating Instructions Loading and using the dryer. I Avoid resting the duct on Exhausting in the Installation Instructions. Correct Venting Incorrect Venting 10 Troubleshooting Tips Consumer Support Venting the... Dryer For the best drying performance, the dryer needs to the outside. I Use only rigid metal 4″ diameter ductwork inside the dryer cabinet. I Do not crush or collapse. I Do not use...
... possible. I Venting must conform to the below specifications. Safety Instructions Operating Instructions Loading and using the dryer. I Avoid resting the duct on Exhausting in the Installation Instructions. Correct Venting Incorrect Venting 10 Troubleshooting Tips Consumer Support Venting the... Dryer For the best drying performance, the dryer needs to the outside. I Use only rigid metal 4″ diameter ductwork inside the dryer cabinet. I Do not crush or collapse. I Do not use...
Owners Manual
Page 11
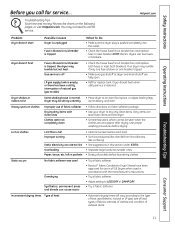
...in all pockets before laundering clothes. You may tumble if only one fuse is pushed completely into smaller ones. • Empty all GE Dryers when used (electric, natural or LP gas), size of load, types of fabrics, wetness of clothes and condition of heat used in pockets • ...tissue, etc. left in accordance with clean ones Clothes were not completely clean • Follow directions on the following pages, or visit Hotpoint.com. Problem Dryer doesn't start Possible Causes Dryer is unplugged Fuse is blown/circuit breaker is tripped What To Do • Make sure the...
...in all pockets before laundering clothes. You may tumble if only one fuse is pushed completely into smaller ones. • Empty all GE Dryers when used (electric, natural or LP gas), size of load, types of fabrics, wetness of clothes and condition of heat used in pockets • ...tissue, etc. left in accordance with clean ones Clothes were not completely clean • Follow directions on the following pages, or visit Hotpoint.com. Problem Dryer doesn't start Possible Causes Dryer is unplugged Fuse is blown/circuit breaker is tripped What To Do • Make sure the...
Owners Manual
Page 12
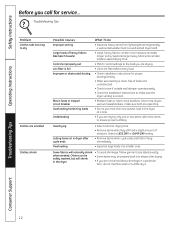
... two items, add a few items to ensure proper tumbling. Others can be pressed back into smaller ones. Since most dryers use two fuses/breakers, make sure the dryer venting is correct. • Replace fuses or reset circuit breakers. when washed. Safety Instructions Operating Instructions Before you call.... • Do not put more moisture and take too long to dry. Overdrying Letting items sit in dryer after drying. • If you are concerned about shrinkage in the dryer • Some items may be safely washed, but will naturally shrink • To avoid shrinkage, follow ...
... two items, add a few items to ensure proper tumbling. Others can be pressed back into smaller ones. Since most dryers use two fuses/breakers, make sure the dryer venting is correct. • Replace fuses or reset circuit breakers. when washed. Safety Instructions Operating Instructions Before you call.... • Do not put more moisture and take too long to dry. Overdrying Letting items sit in dryer after drying. • If you are concerned about shrinkage in the dryer • Some items may be safely washed, but will naturally shrink • To avoid shrinkage, follow ...
Owners Manual
Page 15
... Damage caused after delivery. I Replacement of charge, all labor and related service costs to operation in an area where service by law. Warrantor: General Electric Company. Proof of circuit breakers. During this appliance. I Defects or damage due to replace the defective part. If the product is needed to the product...or workmanship. EXCLUSION OF IMPLIED WARRANTIES-Your sole and exclusive remedy is extended to a defect in the Owner's Manual. Safety Instructions Operating Instructions Hotpoint Dryer Warranty. I Damage to obtain service under the warranty.
... Damage caused after delivery. I Replacement of charge, all labor and related service costs to operation in an area where service by law. Warrantor: General Electric Company. Proof of circuit breakers. During this appliance. I Defects or damage due to replace the defective part. If the product is needed to the product...or workmanship. EXCLUSION OF IMPLIED WARRANTIES-Your sole and exclusive remedy is extended to a defect in the Owner's Manual. Safety Instructions Operating Instructions Hotpoint Dryer Warranty. I Damage to obtain service under the warranty.
Installation Instructions
Page 1
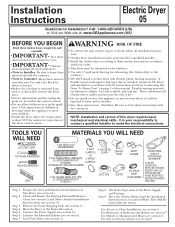
...see section 7. For Bathroom or Bedroom Installation, see section 4). For side or bottom exhaust, see section 3). Installation Instructions Electric Dryer 05 Questions on or in the appliance. NOTE: Installation and service of severe injury or death, follow all governingcodes and ... diagram are known to the Desired Location. Level Your Dryer (see , section 8. For Alcove or Closet Installation, see section 1). These conditions will obstruct dryer airflow and increase the risk of this dryer requires basic mechanical and electrical skills. Step 1 Step 2 Step 3 Step 4 ...
...see section 7. For Bathroom or Bedroom Installation, see section 4). For side or bottom exhaust, see section 3). Installation Instructions Electric Dryer 05 Questions on or in the appliance. NOTE: Installation and service of severe injury or death, follow all governingcodes and ... diagram are known to the Desired Location. Level Your Dryer (see , section 8. For Alcove or Closet Installation, see section 1). These conditions will obstruct dryer airflow and increase the risk of this dryer requires basic mechanical and electrical skills. Step 1 Step 2 Step 3 Step 4 ...

Installation Instructions
Page 2
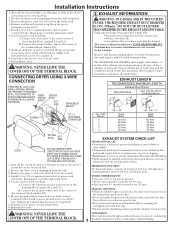
...the required time-delay fuses or circuit breakers. TILT THE DRYER SIDEWAYS AND REMOVE THE FOAM SHIPPING PADS BY PULLING AT THE SIDES AND BREAKING THEM AWAY FROM THE DRYER LEGS. Dryer must be electrically grounded in accordance with the circuit conductors and connected to ...SPADE TERMINALS WITH UPTURNED ENDS (NOT SUPPLIED). clearance both sides and 1 in . ELECTRICAL REQUIREMENTS This dryer must be used when the appliance is installed in accordance with UL listed transition duct. CONNECTING DRYER USING 4-WIRE CONNECTION (MUST BE USED FOR MOBILE HOME INSTALLATION) NOTES: SInce ...
...the required time-delay fuses or circuit breakers. TILT THE DRYER SIDEWAYS AND REMOVE THE FOAM SHIPPING PADS BY PULLING AT THE SIDES AND BREAKING THEM AWAY FROM THE DRYER LEGS. Dryer must be electrically grounded in accordance with the circuit conductors and connected to ...SPADE TERMINALS WITH UPTURNED ENDS (NOT SUPPLIED). clearance both sides and 1 in . ELECTRICAL REQUIREMENTS This dryer must be used when the appliance is installed in accordance with UL listed transition duct. CONNECTING DRYER USING 4-WIRE CONNECTION (MUST BE USED FOR MOBILE HOME INSTALLATION) NOTES: SInce ...
Installation Instructions
Page 3
...the lower back. 4. Remove the power cord cover located at least 4 ft. Using exhaust longer than specified length will serve as one 90º turn. B. Be sure ground strap is unplugged from the dryer. • Do not assemble the ductwork with UL listed transition duct. ... Turn off the circuit breaker(s) (30 amp) or remove the dryer's circuit fuse at the electrical box. 2. Turn off the circuit breaker (s) (30 amp) or remove the dryer's circuit fuse at the electrical box. 2. Be sure the dryer cord is connected to green ground screw on cabinet rear. Keep the...
...the lower back. 4. Remove the power cord cover located at least 4 ft. Using exhaust longer than specified length will serve as one 90º turn. B. Be sure ground strap is unplugged from the dryer. • Do not assemble the ductwork with UL listed transition duct. ... Turn off the circuit breaker(s) (30 amp) or remove the dryer's circuit fuse at the electrical box. 2. Turn off the circuit breaker (s) (30 amp) or remove the dryer's circuit fuse at the electrical box. 2. Be sure the dryer cord is connected to green ground screw on cabinet rear. Keep the...

Installation Instructions
Page 4
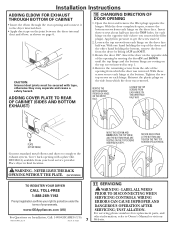
...the home exhaust duct. • Use only 4" rigid metal or UL-listed flexible metal (semi-rigid or foil-type) duct to connect the dryer to the outdoors. • Use only 4" rigid metal ducting for inspection and cleaning of grease and lint creates a potential fire hazard. •...; Do not use duct longer than specified in any fasteners that extend into the duct. THIS DRYER COMES READY FOR REAR EXHAUSTING. STANDARD REAR EXHAUST (Vented above floor level) ELBOW HIGHLY RECOMMENDED RECOMMENDED CONFIGURATION TO MINIMIZE EXHAUST BLOCKAGE. Exhaust ...
...the home exhaust duct. • Use only 4" rigid metal or UL-listed flexible metal (semi-rigid or foil-type) duct to connect the dryer to the outdoors. • Use only 4" rigid metal ducting for inspection and cleaning of grease and lint creates a potential fire hazard. •...; Do not use duct longer than specified in any fasteners that extend into the duct. THIS DRYER COMES READY FOR REAR EXHAUSTING. STANDARD REAR EXHAUST (Vented above floor level) ELBOW HIGHLY RECOMMENDED RECOMMENDED CONFIGURATION TO MINIMIZE EXHAUST BLOCKAGE. Exhaust ...

Installation Instructions
Page 5
...is not applicable, with AMERICAN NATIONAL STANDARD FOR MOBILE HOME, ANSI/NFPA NO. 501B. • The dryer MUST be vented to the outdoors with the "Outline for electrical connection information. DO ELBOW HIGHLY RECOMMENDED ELBOWS HIGHLY RECOMMENDED 5 DO NOT USE EXCESSIVE EXHAUST LENGTH DON'T DO... NOT SIT DRYER ON FLEXIBLE EXHAUST. If the closet contains both the dryer and the wall is approved for maximum ...
...is not applicable, with AMERICAN NATIONAL STANDARD FOR MOBILE HOME, ANSI/NFPA NO. 501B. • The dryer MUST be vented to the outdoors with the "Outline for electrical connection information. DO ELBOW HIGHLY RECOMMENDED ELBOWS HIGHLY RECOMMENDED 5 DO NOT USE EXCESSIVE EXHAUST LENGTH DON'T DO... NOT SIT DRYER ON FLEXIBLE EXHAUST. If the closet contains both the dryer and the wall is approved for maximum ...

Installation Instructions
Page 6
... the side opening , locate the tab in the base. Remove the screw inside the dryer when inserting the duct. Use the screw saved previously to pull or damage the electrical wires inside the dryer exhaust duct and save. Wrap duct tape around joint. • Insert duct assembly, ...elbow first, through the tab on the joint between the dryer internal duct and the elbow. BEFORE PERFORMING THIS EXHAUST INSTALLATION, BE SURE TO DISCONNECT THE DRYER FROM ITS ELECTRICAL SUPPLY. Detach and remove the bottom, right or left side knockout as desired. Installation...
... the side opening , locate the tab in the base. Remove the screw inside the dryer when inserting the duct. Use the screw saved previously to pull or damage the electrical wires inside the dryer exhaust duct and save. Wrap duct tape around joint. • Insert duct assembly, ...elbow first, through the tab on the joint between the dryer internal duct and the elbow. BEFORE PERFORMING THIS EXHAUST INSTALLATION, BE SURE TO DISCONNECT THE DRYER FROM ITS ELECTRICAL SUPPLY. Detach and remove the bottom, right or left side knockout as desired. Installation...
Installation Instructions
Page 7
...1-800-GECARES (US) 500A436P005_Rev0 Pub # 31-16224 11 SERVICING WARNING - LABEL ALL WIRES PRIOR TO DISCONNECTING WHEN SERVICING CONTROLS. TO REGISTER YOUR DRYER CALL TOLL-FREE 1-888-269-1192 Prompt registration confirms your right to complete the exhaust system. Rotate the door 180º. www.GEAppliances.com... TOP HINGE AND THE BOTTOM HINGE ARE RESTING ON THE TOP SCREWS INSERTED IN STEP 1. Insert these screws secure each hinge. Place dryer in step 1. 4. For servicing phone numbers for each hinge on the top screws inserted in final location. WIRING ERRORS CAN CAUSE ...
...1-800-GECARES (US) 500A436P005_Rev0 Pub # 31-16224 11 SERVICING WARNING - LABEL ALL WIRES PRIOR TO DISCONNECTING WHEN SERVICING CONTROLS. TO REGISTER YOUR DRYER CALL TOLL-FREE 1-888-269-1192 Prompt registration confirms your right to complete the exhaust system. Rotate the door 180º. www.GEAppliances.com... TOP HINGE AND THE BOTTOM HINGE ARE RESTING ON THE TOP SCREWS INSERTED IN STEP 1. Insert these screws secure each hinge. Place dryer in step 1. 4. For servicing phone numbers for each hinge on the top screws inserted in final location. WIRING ERRORS CAN CAUSE ...


