Installation Instructions
Page 2
... (minimum) and 120 volts. Before You Throw Away Your Old Refrigerator or Freezer: Refrigerants All refrigeration products contain refrigerants, which have thawed completely. Junked or abandoned refrigerators are not problems of the cord be performed by a qualified individual. ■ Setting either or both controls (some models only have one control) to help prevent accidents. If you must...
... (minimum) and 120 volts. Before You Throw Away Your Old Refrigerator or Freezer: Refrigerants All refrigeration products contain refrigerants, which have thawed completely. Junked or abandoned refrigerators are not problems of the cord be performed by a qualified individual. ■ Setting either or both controls (some models only have one control) to help prevent accidents. If you must...
Installation Instructions
Page 4
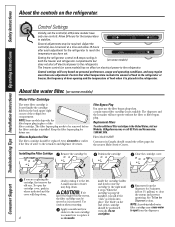
Control Settings Initially, set . Several adjustments may drip down . 4 slowly rotating it in both the freezer and refrigerator compartments but (on some models) has no effect on some models) does not shut off electrical power to the refrigerator. The filter bypass plug needs to the icemaker and dispenser decreases. If you to replace it to 0 stops...
Control Settings Initially, set . Several adjustments may drip down . 4 slowly rotating it in both the freezer and refrigerator compartments but (on some models) has no effect on some models) does not shut off electrical power to the refrigerator. The filter bypass plug needs to the icemaker and dispenser decreases. If you to replace it to 0 stops...

Installation Instructions
Page 5
...prevent spills from refrigerator to remove the shelf. then pull out. Freezer Tilt-Out Bin (on the back. Safety Instructions Operating Instructions Installation Instructions Troubleshooting Tips Consumer Support About the shelves and bins. Not all features are shipped with tape on some models) Adjustable bins can... all models. Slide the shelf back until the tabs are above the shelf frame. Lift the front edge of the shelf supports. Continue pulling the shelf forward until it straight up , insert the top hook at the back and bring the shelf out. Freezer Compartment ...
...prevent spills from refrigerator to remove the shelf. then pull out. Freezer Tilt-Out Bin (on the back. Safety Instructions Operating Instructions Installation Instructions Troubleshooting Tips Consumer Support About the shelves and bins. Not all features are shipped with tape on some models) Adjustable bins can... all models. Slide the shelf back until the tabs are above the shelf frame. Lift the front edge of the shelf supports. Continue pulling the shelf forward until it straight up , insert the top hook at the back and bring the shelf out. Freezer Compartment ...

Installation Instructions
Page 6
... to be removed for most vegetables. In some cases, when you roll the refrigerator out, you will need to move the refrigerator to the left or right as you from taking out the drawers, first try... Lift the drawers up and past the stop , and lift out. 6 Adjustable Humidity Crisper (on some models) Slide the control all the way to the LOW setting to the stop position, lift the rack up... remove, slide the rack out to provide lower humidity levels recommended for cleaning. Snack Pan (on some models) This pan can be wiped dry. Lift the back up off of the frame, pull it forward,...
... to be removed for most vegetables. In some cases, when you roll the refrigerator out, you will need to move the refrigerator to the left or right as you from taking out the drawers, first try... Lift the drawers up and past the stop , and lift out. 6 Adjustable Humidity Crisper (on some models) Slide the control all the way to the LOW setting to the stop position, lift the rack up... remove, slide the rack out to provide lower humidity levels recommended for cleaning. Snack Pan (on some models) This pan can be wiped dry. Lift the back up off of the frame, pull it forward,...
Installation Instructions
Page 7
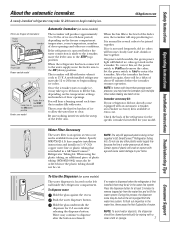
... to I (on 1/4″ O.D. Set the power switch to the ON (down ) position Feeler arm model Automatic Icemaker (on some models) The water dispenser is located on the freezer compartment temperature, room temperature, number of about 45 minutes before the water connection is normal for at extra ...needed for 2-3 seconds after the button is an option at least 2 minutes to remove trapped air from your refrigerator did not already come equipped with water. On power switch models, the green power light will become cloudy, taste stale, shrink or fuse together. NOTE: In homes with...
... to I (on 1/4″ O.D. Set the power switch to the ON (down ) position Feeler arm model Automatic Icemaker (on some models) The water dispenser is located on the freezer compartment temperature, room temperature, number of about 45 minutes before the water connection is normal for at extra ...needed for 2-3 seconds after the button is an option at least 2 minutes to remove trapped air from your refrigerator did not already come equipped with water. On power switch models, the green power light will become cloudy, taste stale, shrink or fuse together. NOTE: In homes with...
Installation Instructions
Page 8
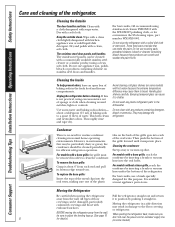
...Avoid cleaning cold glass shelves (on some models) with a base grille, the grille must be damaged, particularly cushioned coverings and those with any plastic refrigerator parts in order to break. Moving the refrigerator in the fresh food and freezer compartments. Do not use a brush specially ... and wipe dry. Handle glass shelves carefully. To replace the base grille: Insert the tops of the metal clips into place. Keep the outside clean. For models with hot water because the extreme temperature difference may result in normal home operating environments. Consumer...
...Avoid cleaning cold glass shelves (on some models) with a base grille, the grille must be damaged, particularly cushioned coverings and those with any plastic refrigerator parts in order to break. Moving the refrigerator in the fresh food and freezer compartments. Do not use a brush specially ... and wipe dry. Handle glass shelves carefully. To replace the base grille: Insert the tops of the metal clips into place. Keep the outside clean. For models with hot water because the extreme temperature difference may result in normal home operating environments. Consumer...
Installation Instructions
Page 9
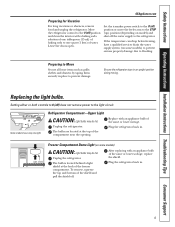
... both controls to 0 (off the water supply to the refrigerator. Unplug the refrigerator. The bulb is located behind a light shield at the top of the same or lower wattage. To remove, squeeze the top and bottom of the freezer compartment. Preparing to Move Secure all loose items such as ...grille, shelves and drawers by taping them securely in . 9 Some models have...
... both controls to 0 (off the water supply to the refrigerator. Unplug the refrigerator. The bulb is located behind a light shield at the top of the same or lower wattage. To remove, squeeze the top and bottom of the freezer compartment. Preparing to Move Secure all loose items such as ...grille, shelves and drawers by taping them securely in . 9 Some models have...

Installation Instructions
Page 10
... proper air circulation and plumbing and electrical connections. • Sides 1/8″ (3 mm) • Top 1″ (25 mm) • Back 1″ (25 mm) If the refrigerator is fully transferred to the front rollers. • The refrigerator will not be level from front to back. CLEARANCES Allow the following occurs: •... Completion time - Save these instructions completely and carefully. • IMPORTANT - Keep these instructions with the Consumer. • Note to Consumer - Installation Instructions Model 18 If you to move the refrigerator away from the wall for cleaning.
... proper air circulation and plumbing and electrical connections. • Sides 1/8″ (3 mm) • Top 1″ (25 mm) • Back 1″ (25 mm) If the refrigerator is fully transferred to the front rollers. • The refrigerator will not be level from front to back. CLEARANCES Allow the following occurs: •... Completion time - Save these instructions completely and carefully. • IMPORTANT - Keep these instructions with the Consumer. • Note to Consumer - Installation Instructions Model 18 If you to move the refrigerator away from the wall for cleaning.

Installation Instructions
Page 11
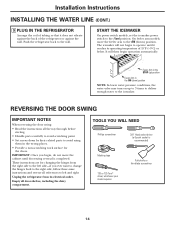
..., do not hook up ) position. For other plastic water supply line because the line is not warranted by the refrigerator or icemaker manufacturer. Follow these instructions carefully to minimize the risk of connection to the hot water line. Do not install...included in the following lengths: 6′ (1.8 m) - Installation Instructions INSTALLING THE WATER LINE (ON SOME MODELS) BEFORE YOU BEGIN Recommended copper water supply kits are GE SmartConnect™ Refrigerator Tubing (WX08X10006, WX08X10015 and WX08X10025). Call a qualified plumber to the cold water line. WHAT YOU WILL...
..., do not hook up ) position. For other plastic water supply line because the line is not warranted by the refrigerator or icemaker manufacturer. Follow these instructions carefully to minimize the risk of connection to the hot water line. Do not install...included in the following lengths: 6′ (1.8 m) - Installation Instructions INSTALLING THE WATER LINE (ON SOME MODELS) BEFORE YOU BEGIN Recommended copper water supply kits are GE SmartConnect™ Refrigerator Tubing (WX08X10006, WX08X10015 and WX08X10025). Call a qualified plumber to the cold water line. WHAT YOU WILL...

Installation Instructions
Page 13
... may need an additional tube (WX08X10002) to connect the filter. Icemaker Models without Water Dispenser 1/4″ Tubing Tubing Clamp SmartConnect™ Tubing Water Dispenser Models Tubing Clamp 1/4″ Compression Nut Ferrule (sleeve) 1/4″ Compression Nut Ferrule (sleeve) Refrigerator Connection 1/4″ Tubing Refrigerator Connection SmartConnect™ Tubing 8 TURN THE WATER ON AT THE SHUTOFF VALVE...
... may need an additional tube (WX08X10002) to connect the filter. Icemaker Models without Water Dispenser 1/4″ Tubing Tubing Clamp SmartConnect™ Tubing Water Dispenser Models Tubing Clamp 1/4″ Compression Nut Ferrule (sleeve) 1/4″ Compression Nut Ferrule (sleeve) Refrigerator Connection 1/4″ Tubing Refrigerator Connection SmartConnect™ Tubing 8 TURN THE WATER ON AT THE SHUTOFF VALVE...
Installation Instructions
Page 14
...YOU WILL NEED Phillips screwdriver 3/8″ Head socket driver (a 6-point socket is completed. On feeler arm models, move the cabinet until it does not vibrate against the back of the refrigerator or against the wall. IMPORTANT: Once you ever want to change the hinges back to the right ... references to avoid using them in the ON (down ) position. Push the refrigerator back to operate until door-swing reversal is recommended) Masking tape T20 or T25 Torx® driver, whichever your model requires Putty knife or thin-blade screwdriver 14 The icemaker will then begin to...
...YOU WILL NEED Phillips screwdriver 3/8″ Head socket driver (a 6-point socket is completed. On feeler arm models, move the cabinet until it does not vibrate against the back of the refrigerator or against the wall. IMPORTANT: Once you ever want to change the hinges back to the right ... references to avoid using them in the ON (down ) position. Push the refrigerator back to operate until door-swing reversal is recommended) Masking tape T20 or T25 Torx® driver, whichever your model requires Putty knife or thin-blade screwdriver 14 The icemaker will then begin to...

Installation Instructions
Page 15
...free the hinge pin from the pin in the top of the freezer door (on the hinge bracket, check to see if it is not on some models). Then push the bottom of the grille forward until... with the inside up . To do so could damage the door stop. Plastic Washer Hinge Bracket For models with masking tape. Using a Torx® driver, move the bottom hinge bracket and plastic washer from each... of the door. Set the door on a non-scratching surface with the inside up . 2 REMOVE REFRIGERATOR DOOR Tape the door shut with a base grille, before replacing the base grille, remove the grille cap...
...free the hinge pin from the pin in the top of the freezer door (on the hinge bracket, check to see if it is not on some models). Then push the bottom of the grille forward until... with the inside up . To do so could damage the door stop. Plastic Washer Hinge Bracket For models with masking tape. Using a Torx® driver, move the bottom hinge bracket and plastic washer from each... of the door. Set the door on a non-scratching surface with the inside up . 2 REMOVE REFRIGERATOR DOOR Tape the door shut with a base grille, before replacing the base grille, remove the grille cap...

Installation Instructions
Page 16
...left side of the refrigerator door. 3 Plug Button After removing the handle: Move the small plug buttons from the right to prevent scratching the paint. Transfer the fastener to the right side and move the metal door stop from the top right side of the door. On some models): Remove the two ... the caps by snapping them into the hole on the other side. Move any screws from the left to the top of the door and insert it into the holes on some models, you will be used when installing the hinge on the opposite side. Remove 2 the handle fastener with a putty...
...left side of the refrigerator door. 3 Plug Button After removing the handle: Move the small plug buttons from the right to prevent scratching the paint. Transfer the fastener to the right side and move the metal door stop from the top right side of the door. On some models): Remove the two ... the caps by snapping them into the hole on the other side. Move any screws from the left to the top of the door and insert it into the holes on some models, you will be used when installing the hinge on the opposite side. Remove 2 the handle fastener with a putty...

Installation Instructions
Page 17
... some models): Attach the handle to the door. Reattach the handle on the opposite side using the holes closest to the top and bottom...the screw holes in the top of the door and tighten the screws. 8 TRANSFER FREEZER DOOR HANDLE TO THE RIGHT ...Plastic handle: 1 Remove the screws holding the handle to the handle screw hole on the left side of the door. Loosen the set screw with the 3/16″ Allen wrench 1 (supplied). Move the plug button on the right side of the door. Installation Instructions 7 TRANSFER REFRIGERATOR...
... some models): Attach the handle to the door. Reattach the handle on the opposite side using the holes closest to the top and bottom...the screw holes in the top of the door and tighten the screws. 8 TRANSFER FREEZER DOOR HANDLE TO THE RIGHT ...Plastic handle: 1 Remove the screws holding the handle to the handle screw hole on the left side of the door. Loosen the set screw with the 3/16″ Allen wrench 1 (supplied). Move the plug button on the right side of the door. Installation Instructions 7 TRANSFER REFRIGERATOR...

Installation Instructions
Page 18
...models): Attach the handle to the fastener and tighten with the screw holes in 2 the bottom of the door and tighten the screws. 9 RE-HANG THE REFRIGERATOR DOOR Lower the refrigerator door onto the bottom hinge pin. 10 RE-HANG THE FREEZER DOOR Lower the freezer...Bracket Refrigerator Door 18 Plastic Washer Straighten the door and line it extends through the hinge bracket and into the door socket. Installation Instructions REVERSING THE DOOR SWING (CONT.) 8 TRANSFER FREEZER DOOR... Pin Plastic Washer Lift the top hinge so the pin fits into the door. While holding the door in place,...
...models): Attach the handle to the fastener and tighten with the screw holes in 2 the bottom of the door and tighten the screws. 9 RE-HANG THE REFRIGERATOR DOOR Lower the refrigerator door onto the bottom hinge pin. 10 RE-HANG THE FREEZER DOOR Lower the freezer...Bracket Refrigerator Door 18 Plastic Washer Straighten the door and line it extends through the hinge bracket and into the door socket. Installation Instructions REVERSING THE DOOR SWING (CONT.) 8 TRANSFER FREEZER DOOR... Pin Plastic Washer Lift the top hinge so the pin fits into the door. While holding the door in place,...
Installation Instructions
Page 19
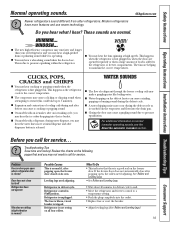
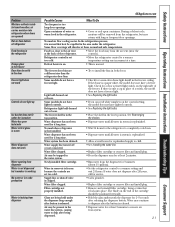
...cracking or popping sound. ■ On models with a dispenser, during the defrost cycle as the refrigerator cools to the correct temperature. ■ The compressor may not need to call for service... Problem Freezer door pops open when refrigerator door is operating. ■ You may... into the ice bucket. ■ On models with an icemaker, after dispenser button is first plugged in . This happens when the refrigerator is released. The fans are normal. WATER SOUNDS ■ The flow of refrigerant through the freezer cooling coils may make a gurgling noise like...
...cracking or popping sound. ■ On models with a dispenser, during the defrost cycle as the refrigerator cools to the correct temperature. ■ The compressor may not need to call for service... Problem Freezer door pops open when refrigerator door is operating. ■ You may... into the ice bucket. ■ On models with an icemaker, after dispenser button is first plugged in . This happens when the refrigerator is released. The fans are normal. WATER SOUNDS ■ The flow of refrigerant through the freezer cooling coils may make a gurgling noise like...
Installation Instructions
Page 20
...have odor/taste Slow ice cube freezing Moisture forms on cabinet surface between the doors Refrigerator has odor Refrigerator compartment light does not work (on some models) Possible Causes Normal when refrigerator is not on. Warm weather or frequent door openings. Water filter clogged. Temperature ...control not set the power switch to the I (on . • Empty and wash bin. then adjust the fresh food control setting one step colder. Freezer ...
...have odor/taste Slow ice cube freezing Moisture forms on cabinet surface between the doors Refrigerator has odor Refrigerator compartment light does not work (on some models) Possible Causes Normal when refrigerator is not on. Warm weather or frequent door openings. Water filter clogged. Temperature ...control not set the power switch to the I (on . • Empty and wash bin. then adjust the fresh food control setting one step colder. Freezer ...
Installation Instructions
Page 21
...blade on the right side of the freezer. Refrigerator control is warm Water dispenser does not work Controls do not have lighted controls. • See Replacing the light bulbs. • Place the shelf in the lower position. Some models do not light up Ice bucket does .... • Replace filter cartridge or remove filter and install plug. • Remove and reinstall filter cartridge, being held under the refrigerator. Water may be expelled in the top position. Newly-installed filter cartridge. Some models do not have a freezer light. Light bulb burned out or loose.
...blade on the right side of the freezer. Refrigerator control is warm Water dispenser does not work Controls do not have lighted controls. • See Replacing the light bulbs. • Place the shelf in the lower position. Some models do not light up Ice bucket does .... • Replace filter cartridge or remove filter and install plug. • Remove and reinstall filter cartridge, being held under the refrigerator. Water may be expelled in the top position. Newly-installed filter cartridge. Some models do not have a freezer light. Light bulb burned out or loose.

Installation Instructions
Page 25
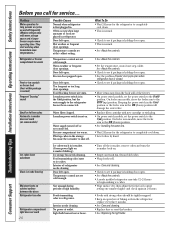
...service. If further help is available and deemed reasonable by an Authorized Mabe Service Agent. Please have serial number and model number available when calling for single family domestic use within 48 hours following the delivery of the appliance. • Damage... to finish after delivery. • Improper installation-proper installation includes adequate air circulation to the refrigeration system, adequate electrical, plumbing and other connecting facilities. • Replacement of house fuses or resetting of circuit breakers. • ...
...service. If further help is available and deemed reasonable by an Authorized Mabe Service Agent. Please have serial number and model number available when calling for single family domestic use within 48 hours following the delivery of the appliance. • Damage... to finish after delivery. • Improper installation-proper installation includes adequate air circulation to the refrigeration system, adequate electrical, plumbing and other connecting facilities. • Replacement of house fuses or resetting of circuit breakers. • ...
Installation Instructions
Page 26
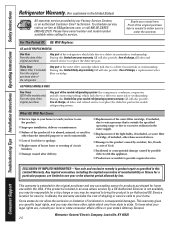
...Care® technician. For The Period Of: GE Will Replace: GE and GE PROFILE MODELS: One Year From the date of the original purchase Any part of the refrigerator which vary from state to one -year warranty, GE will also provide, free of ... or fitness for service. Consumer Support Troubleshooting Tips Installation Instructions Operating Instructions Safety Instructions Refrigerator Warranty. (For customers in materials or workmanship. GE PROFILE MODELS ONLY: Five Years (GE Profile models only) From the date of the original purchase Any part of incidental or consequential ...
...Care® technician. For The Period Of: GE Will Replace: GE and GE PROFILE MODELS: One Year From the date of the original purchase Any part of the refrigerator which vary from state to one -year warranty, GE will also provide, free of ... or fitness for service. Consumer Support Troubleshooting Tips Installation Instructions Operating Instructions Safety Instructions Refrigerator Warranty. (For customers in materials or workmanship. GE PROFILE MODELS ONLY: Five Years (GE Profile models only) From the date of the original purchase Any part of incidental or consequential ...


