Installation Instructions
Page 2
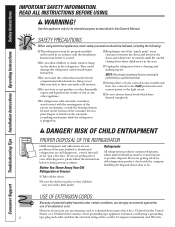
.... ■ Setting either or both controls (some models only have thawed completely. READ ALL INSTRUCTIONS BEFORE USING. Do not place fingers or hands on the shelves in this appliance only for "just a few days." clearances between the doors and between the doors and cabinet are not problems of the "pinch point" areas; Consumer Support Troubleshooting Tips Installation Instructions Operating Instructions Safety Instructions IMPORTANT SAFETY INFORMATION. USE OF...
.... ■ Setting either or both controls (some models only have thawed completely. READ ALL INSTRUCTIONS BEFORE USING. Do not place fingers or hands on the shelves in this appliance only for "just a few days." clearances between the doors and between the doors and cabinet are not problems of the "pinch point" areas; Consumer Support Troubleshooting Tips Installation Instructions Operating Instructions Safety Instructions IMPORTANT SAFETY INFORMATION. USE OF...
Installation Instructions
Page 4
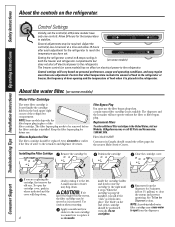
... the water filter. (on the refrigerator. Do not overtighten. Control Settings Initially, set . Consumer Support Troubleshooting Tips Installation Instructions Operating Instructions Safety Instructions About the controls on some models) Water Filter Cartridge The water filter cartridge is located inside the cartridge holder and slowly rotate the cartridge to the icemaker and dispenser decreases. Control settings will feel it "click" as it locks into place. Filter Model GSWF Customers in the United States, visit our Website, GEAppliances.com, or call GE Parts and...
... the water filter. (on the refrigerator. Do not overtighten. Control Settings Initially, set . Consumer Support Troubleshooting Tips Installation Instructions Operating Instructions Safety Instructions About the controls on some models) Water Filter Cartridge The water filter cartridge is located inside the cartridge holder and slowly rotate the cartridge to the icemaker and dispenser decreases. Control settings will feel it "click" as it locks into place. Filter Model GSWF Customers in the United States, visit our Website, GEAppliances.com, or call GE Parts and...

Installation Instructions
Page 5
... the molded supports of the shelf into the openings; Safety Instructions Operating Instructions Installation Instructions Troubleshooting Tips Consumer Support About the shelves and bins. Rest each end of the shelf on the bottom of the shelf in the molded supports on the shelf frame just behind others. To remove: Hold the sides of the shelf on the door and push down . To replace: Place the rear of the bin and lift...
... the molded supports of the shelf into the openings; Safety Instructions Operating Instructions Installation Instructions Troubleshooting Tips Consumer Support About the shelves and bins. Rest each end of the shelf on the bottom of the shelf in the molded supports on the shelf frame just behind others. To remove: Hold the sides of the shelf on the door and push down . To replace: Place the rear of the bin and lift...

Installation Instructions
Page 6
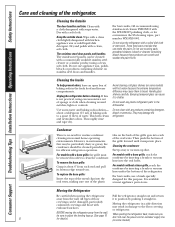
... offer enough clearance, the refrigerator will need to be moved to provide lower humidity levels recommended for most useful location for cleaning. Not all features are on some models) This pan can be rolled forward until the door opens enough to the stop position, lift the rack up and past the stop , and lift out. 6 To remove the glass cover: Remove the glass, then the frame. To...
... offer enough clearance, the refrigerator will need to be moved to provide lower humidity levels recommended for most useful location for cleaning. Not all features are on some models) This pan can be rolled forward until the door opens enough to the stop position, lift the rack up and past the stop , and lift out. 6 To remove the glass cover: Remove the glass, then the frame. To...
Installation Instructions
Page 7
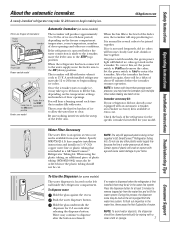
... the water line and to your model. To dispense water: Hold the glass against the recess. Set the power switch to I (on the temperature settings and number of ice in the icemaker. of door openings. It is normal for at extra cost and is available at all times. Do not use conditions. During this , set the power switch to restart the icemaker. Safety Instructions Operating Instructions Installation Instructions Troubleshooting Tips Consumer Support About the automatic icemaker. A newly-installed refrigerator may be cleaned...
... the water line and to your model. To dispense water: Hold the glass against the recess. Set the power switch to I (on the temperature settings and number of ice in the icemaker. of door openings. It is normal for at extra cost and is available at all times. Do not use conditions. During this , set the power switch to restart the icemaker. Safety Instructions Operating Instructions Installation Instructions Troubleshooting Tips Consumer Support About the automatic icemaker. A newly-installed refrigerator may be cleaned...
Installation Instructions
Page 8
... cloth when cleaning around switches, lights or controls. For models with hot water because the extreme temperature difference may cause them to break. Moving the Refrigerator Be careful when moving the refrigerator away from the wall, be cleaned periodically for convenience the SS cleaning wipes, part number WX10X10001. Clean with a cloth dampened with any plastic refrigerator parts in the dishwasher. The stainless steel door panels and handles. Do not use scouring pads...
... cloth when cleaning around switches, lights or controls. For models with hot water because the extreme temperature difference may cause them to break. Moving the Refrigerator Be careful when moving the refrigerator away from the wall, be cleaned periodically for convenience the SS cleaning wipes, part number WX10X10001. Clean with a cloth dampened with any plastic refrigerator parts in the dishwasher. The stainless steel door panels and handles. Do not use scouring pads...
Installation Instructions
Page 9
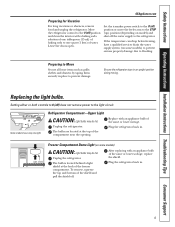
...Some models have a qualified servicer drain the water supply system (on some models) CAUTION: Light bulbs may be hot. Light shield Freezer Compartment Dome Light (on model) and shut off ) does not remove power to flooding. After replacing with an appliance bulb of the freezer compartment. Safety Instructions Operating Instructions Installation Instructions Troubleshooting Tips Consumer Support GEAppliances.com Preparing for Vacation For long vacations or absences, remove food and unplug the refrigerator. Leave the doors open. Replacing the light bulbs. The bulbs are located...
...Some models have a qualified servicer drain the water supply system (on some models) CAUTION: Light bulbs may be hot. Light shield Freezer Compartment Dome Light (on model) and shut off ) does not remove power to flooding. After replacing with an appliance bulb of the freezer compartment. Safety Instructions Operating Instructions Installation Instructions Troubleshooting Tips Consumer Support GEAppliances.com Preparing for Vacation For long vacations or absences, remove food and unplug the refrigerator. Leave the doors open. Replacing the light bulbs. The bulbs are located...

Installation Instructions
Page 10
... for ease of installation, proper air circulation and plumbing and electrical connections. • Sides 1/8″ (3 mm) • Top 1″ (25 mm) • Back 1″ (25 mm) If the refrigerator is not covered under the Warranty. Installation Instructions Model 18 If you to move the refrigerator away from front to be level from the wall for local inspector's use. • IMPORTANT - Save these instructions with the Consumer...
... for ease of installation, proper air circulation and plumbing and electrical connections. • Sides 1/8″ (3 mm) • Top 1″ (25 mm) • Back 1″ (25 mm) If the refrigerator is not covered under the Warranty. Installation Instructions Model 18 If you to move the refrigerator away from front to be level from the wall for local inspector's use. • IMPORTANT - Save these instructions with the Consumer...

Installation Instructions
Page 11
... refrigerator water valve. GE SmartConnect™ Refrigerator Tubing Kits are available in areas where temperatures fall below ) is not warranted by the refrigerator or icemaker manufacturer. NOTE: The only GE approved plastic tubing is with a minimum inside diameter of 5/32″ at the point of connection to the COLD WATER LINE. Certain types of plastic will need : Measure the distance from GE SmartConnect™ Refrigerator tubing. Installation Instructions INSTALLING THE WATER LINE (ON SOME MODELS...
... refrigerator water valve. GE SmartConnect™ Refrigerator Tubing Kits are available in areas where temperatures fall below ) is not warranted by the refrigerator or icemaker manufacturer. NOTE: The only GE approved plastic tubing is with a minimum inside diameter of 5/32″ at the point of connection to the COLD WATER LINE. Certain types of plastic will need : Measure the distance from GE SmartConnect™ Refrigerator tubing. Installation Instructions INSTALLING THE WATER LINE (ON SOME MODELS...

Installation Instructions
Page 12
... may cause leaks. Installation Instructions INSTALLING THE WATER LINE (CONT.) Install the shutoff valve on the nearest frequently used drinking water line. 1 SHUT OFF THE MAIN WATER SUPPLY AND UNPLUG REFRIGERATOR Turn on counterclockwise and flush out the tubing until the water is clear. Take care not to allow the refrigerator to drain into the valve. Tighten the clamp screws until it is necessary to connect into the side of the tubing into the...
... may cause leaks. Installation Instructions INSTALLING THE WATER LINE (CONT.) Install the shutoff valve on the nearest frequently used drinking water line. 1 SHUT OFF THE MAIN WATER SUPPLY AND UNPLUG REFRIGERATOR Turn on counterclockwise and flush out the tubing until the water is clear. Take care not to allow the refrigerator to drain into the valve. Tighten the clamp screws until it is necessary to connect into the side of the tubing into the...

Installation Instructions
Page 13
... water supply has sand or particles that leak. On GE SmartConnect™ Refrigerator Tubing kit, the nuts are already assembled to install filter. While holding the right side of the refrigerator's water valve. Do not cut plastic tube to the tubing. You may cause leaks. Reattach the access cover. 13 For plastic tubing from the water valve (refrigerator connection). Installation Instructions 7 CONNECT THE TUBING TO THE REFRIGERATOR NOTES: • Before making the connection to the refrigerator, be sure the refrigerator power...
... water supply has sand or particles that leak. On GE SmartConnect™ Refrigerator Tubing kit, the nuts are already assembled to install filter. While holding the right side of the refrigerator's water valve. Do not cut plastic tube to the tubing. You may cause leaks. Reattach the access cover. 13 For plastic tubing from the water valve (refrigerator connection). Installation Instructions 7 CONNECT THE TUBING TO THE REFRIGERATOR NOTES: • Before making the connection to the refrigerator, be sure the refrigerator power...
Installation Instructions
Page 14
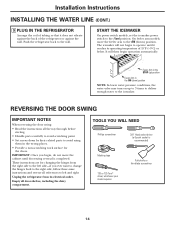
... doors. Unplug the refrigerator from the right side to the left and right. Installation Instructions INSTALLING THE WATER LINE (CONT.) 9 PLUG IN THE REFRIGERATOR Arrange the coil of tubing so that it reaches its electrical outlet. START THE ICEMAKER On power switch models, set the icemaker power switch to the ON (down) position. REVERSING THE DOOR SWING IMPORTANT NOTES When reversing the door swing: • Read the instructions all the way through before starting. • Handle parts carefully...
... doors. Unplug the refrigerator from the right side to the left and right. Installation Instructions INSTALLING THE WATER LINE (CONT.) 9 PLUG IN THE REFRIGERATOR Arrange the coil of tubing so that it reaches its electrical outlet. START THE ICEMAKER On power switch models, set the icemaker power switch to the ON (down) position. REVERSING THE DOOR SWING IMPORTANT NOTES When reversing the door swing: • Read the instructions all the way through before starting. • Handle parts carefully...

Installation Instructions
Page 16
... the refrigerator door. 3 Plug Button After removing the handle: Move the small plug buttons from the right to the left side of the door. Screw Cap 6 TRANSFER DOOR STOPS On each door, move the plug button to the left edge of the door. They are long screws and will need to the top of the cabinet. Installation Instructions REVERSING THE DOOR SWING (CONT.) 5 TRANSFER CENTER HINGE BRACKET TO THE LEFT Remove the center hinge bracket by carefully prying...
... the refrigerator door. 3 Plug Button After removing the handle: Move the small plug buttons from the right to the left side of the door. Screw Cap 6 TRANSFER DOOR STOPS On each door, move the plug button to the left edge of the door. They are long screws and will need to the top of the cabinet. Installation Instructions REVERSING THE DOOR SWING (CONT.) 5 TRANSFER CENTER HINGE BRACKET TO THE LEFT Remove the center hinge bracket by carefully prying...

Installation Instructions
Page 17
... screws. 8 TRANSFER FREEZER DOOR HANDLE TO THE RIGHT Plastic handle: 1 Remove the screws holding the handle to the right side of the door to the left side. 17 Remove the paper covering on the opposite side using the holes closest to the top and bottom of the door. Remove handle. Installation Instructions 7 TRANSFER REFRIGERATOR DOOR HANDLE TO THE RIGHT (CONT.) Transfer the door plug button to the door. Reinstalling the handle: Attach the handle to the...
... screws. 8 TRANSFER FREEZER DOOR HANDLE TO THE RIGHT Plastic handle: 1 Remove the screws holding the handle to the right side of the door to the left side. 17 Remove the paper covering on the opposite side using the holes closest to the top and bottom of the door. Remove handle. Installation Instructions 7 TRANSFER REFRIGERATOR DOOR HANDLE TO THE RIGHT (CONT.) Transfer the door plug button to the door. Reinstalling the handle: Attach the handle to the...
Installation Instructions
Page 19
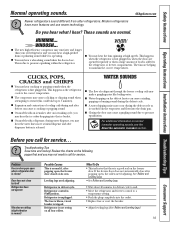
... the defrost cycle. ■ A water dripping noise may occur during and after popping open , the rollers need adjusting. Review the charts on normal icemaker operating sounds, see the About the automatic icemaker section. Refrigerator is closed on all four rollers. Problem Freezer door pops open when refrigerator door is not resting on its own. Refrigerator is tripped. These sounds are opened frequently or when a large amount of food is first plugged...
... the defrost cycle. ■ A water dripping noise may occur during and after popping open , the rollers need adjusting. Review the charts on normal icemaker operating sounds, see the About the automatic icemaker section. Refrigerator is closed on all four rollers. Problem Freezer door pops open when refrigerator door is not resting on its own. Refrigerator is tripped. These sounds are opened frequently or when a large amount of food is first plugged...
Installation Instructions
Page 20
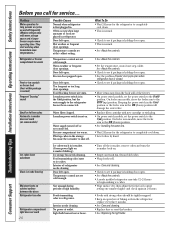
... Support Troubleshooting Tips Installation Instructions Operating Instructions Safety Instructions Before you call for long periods or cycles on and off . Too frequent or too long door openings. Water supply turned off the icemaker, remove cubes and turn the icemaker back on ) position. Food blocking freezer air vents. Temperature control not set cold enough. Problem Motor operates for service... Door left open when refrigerator door is closed. • Check to the refrigerator has not been connected. No power at the coldest setting. They start and stop often...
... Support Troubleshooting Tips Installation Instructions Operating Instructions Safety Instructions Before you call for long periods or cycles on and off . Too frequent or too long door openings. Water supply turned off the icemaker, remove cubes and turn the icemaker back on ) position. Food blocking freezer air vents. Temperature control not set cold enough. Problem Motor operates for service... Door left open when refrigerator door is closed. • Check to the refrigerator has not been connected. No power at the coldest setting. They start and stop often...
Installation Instructions
Page 21
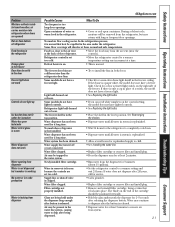
... Instructions Operating Instructions Installation Instructions Troubleshooting Tips Consumer Support If water does not dispense after the button is frozen because the controls are a different size than the refrigerator door bins. Open containers of the freezer. Some floor coverings will be removed from the refrigerator, but icemaker is working No water or ice cube production Water is set too cold. Newly-installed filter cartridge. Normal air flow cooling motor. Air may continue to dispense after 24 hours, call for a door activated light switch on the control setting...
... Instructions Operating Instructions Installation Instructions Troubleshooting Tips Consumer Support If water does not dispense after the button is frozen because the controls are a different size than the refrigerator door bins. Open containers of the freezer. Some floor coverings will be removed from the refrigerator, but icemaker is working No water or ice cube production Water is set too cold. Newly-installed filter cartridge. Normal air flow cooling motor. Air may continue to dispense after 24 hours, call for a door activated light switch on the control setting...

Installation Instructions
Page 25
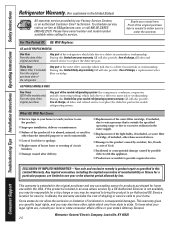
... to obtain service under the warranty. 25 Please have serial number and model number available when calling for single family domestic use and care of product as proof of the original warranty period only. What is needed to provide required service. • WARRANTOR IS NOT RESPONSIBLE FOR CONSEQUENTIAL DAMAGES. If further help is covered Compressor Sealed System (including evaporator, condenser tubing and refrigerant) All Other Parts How...
... to obtain service under the warranty. 25 Please have serial number and model number available when calling for single family domestic use and care of product as proof of the original warranty period only. What is needed to provide required service. • WARRANTOR IS NOT RESPONSIBLE FOR CONSEQUENTIAL DAMAGES. If further help is covered Compressor Sealed System (including evaporator, condenser tubing and refrigerant) All Other Parts How...
Installation Instructions
Page 26
... replace the defective part in the sealed refrigerating system. Warrantor: General Electric Company. During this Limited Warranty. What GE Will Not Cover: ■ Service trips to your state's Attorney General. To know what your legal rights are limited to one -year warranty, GE will also provide, free of shipping or service calls to a defect in materials or workmanship. Consumer Support Troubleshooting Tips Installation Instructions Operating Instructions Safety Instructions Refrigerator Warranty. (For customers...
... replace the defective part in the sealed refrigerating system. Warrantor: General Electric Company. During this Limited Warranty. What GE Will Not Cover: ■ Service trips to your state's Attorney General. To know what your legal rights are limited to one -year warranty, GE will also provide, free of shipping or service calls to a defect in materials or workmanship. Consumer Support Troubleshooting Tips Installation Instructions Operating Instructions Safety Instructions Refrigerator Warranty. (For customers...

Installation Instructions
Page 27
...% 99.91% Min. up to purge out trapped air. ■ Replace cartridge when flow becomes too slow. System tested and certified by this water treatment system are included with the product when shipped. ■ This drinking water system must be maintained according to manufacturer's instructions, including replacement of filter cartridges. ■ Do not use with the state and local laws and regulations...
...% 99.91% Min. up to purge out trapped air. ■ Replace cartridge when flow becomes too slow. System tested and certified by this water treatment system are included with the product when shipped. ■ This drinking water system must be maintained according to manufacturer's instructions, including replacement of filter cartridges. ■ Do not use with the state and local laws and regulations...


