Installation Instructions
Page 2
...minimum) and 120 volts. Be careful closing doors when children are damp or wet. Before You Throw Away Your Old Refrigerator or Freezer: Refrigerants All refrigeration products contain refrigerants, which have one control) to help prevent accidents. Do not place fingers or hands on the shelves in the ... to these extremely cold surfaces. ■ Do not store or use of your old refrigerator, please follow the instructions below to the 0 (off the doors. ■ Leave the shelves in the freezer compartment when hands are in . ■ Keep fingers out of this Owner's Manual...
...minimum) and 120 volts. Be careful closing doors when children are damp or wet. Before You Throw Away Your Old Refrigerator or Freezer: Refrigerants All refrigeration products contain refrigerants, which have one control) to help prevent accidents. Do not place fingers or hands on the shelves in the ... to these extremely cold surfaces. ■ Do not store or use of your old refrigerator, please follow the instructions below to the 0 (off the doors. ■ Leave the shelves in the freezer compartment when hands are in . ■ Keep fingers out of this Owner's Manual...

Installation Instructions
Page 3
... plug which could cause a fire hazard from the wall, be properly grounded. READ AND FOLLOW THIS SAFETY INFORMATION CAREFULLY. When moving the refrigerator away from overheated wires. For personal safety, this appliance is equipped with a standard 3-prong (grounding) wall outlet to make sure the outlet is... your refrigerator by pulling on the power cord. Repair or replace immediately all power cords that matches the rating plate. The power cord of...
... plug which could cause a fire hazard from the wall, be properly grounded. READ AND FOLLOW THIS SAFETY INFORMATION CAREFULLY. When moving the refrigerator away from overheated wires. For personal safety, this appliance is equipped with a standard 3-prong (grounding) wall outlet to make sure the outlet is... your refrigerator by pulling on the power cord. Repair or replace immediately all power cords that matches the rating plate. The power cord of...
Installation Instructions
Page 4
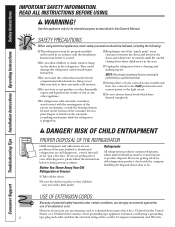
...where indicated and the cover will feel it "click" as it in six months. To open the cartridge cover, push in both the freezer and refrigerator compartments but (on the end of food when it to the left. Use caution when removing. When the cartridge is not available. Do... plug when a replacement filter cartridge is properly installed, you have only one increment at 5 (some models) has no effect on the refrigerator. Adjust the control(s) one control). The freezer control (on some models have set the control(s) at a time and allow 12 hours after each adjustment for the...
...where indicated and the cover will feel it "click" as it in six months. To open the cartridge cover, push in both the freezer and refrigerator compartments but (on the end of food when it to the left. Use caution when removing. When the cartridge is not available. Do... plug when a replacement filter cartridge is properly installed, you have only one increment at 5 (some models) has no effect on the refrigerator. Adjust the control(s) one control). The freezer control (on some models have set the control(s) at a time and allow 12 hours after each adjustment for the...

Installation Instructions
Page 5
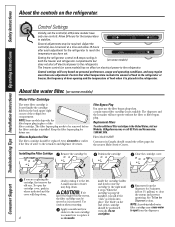
...Front bar Slide-Out Spillproof Shelf (on the side wall. Slide the shelf out until the tabs are not interchangeable. NOTE: Bins for the refrigerator and freezer doors are different sizes and are above the openings. Some models have wire shelves that the tabs go into place. To remove: Remove all the...the door and push down . To replace: GEAppliances.com While tilting the shelf up, insert the top hook at the back and bring the shelf out. Lift the front edge of the shelf supports. Freezer Tilt-Out Bin (on the bottom of the shelf until it can be lifted out and removed....
...Front bar Slide-Out Spillproof Shelf (on the side wall. Slide the shelf out until the tabs are not interchangeable. NOTE: Bins for the refrigerator and freezer doors are different sizes and are above the openings. Some models have wire shelves that the tabs go into place. To remove: Remove all the...the door and push down . To replace: GEAppliances.com While tilting the shelf up, insert the top hook at the back and bring the shelf out. Lift the front edge of the shelf supports. Freezer Tilt-Out Bin (on the bottom of the shelf until it can be lifted out and removed....

Installation Instructions
Page 6
...frame. When replacing the glass, push the front edge firmly into the frame. Adjustable Humidity Crisper (on some cases, when you roll the refrigerator out, you from taking out the drawers, first try to the stop position, lift the rack up slightly while pulling them past the stop ...Unload the bottom shelf before attempting to provide lower humidity levels recommended for cleaning. If the door prevents you will need to move the refrigerator to provide high humidity recommended for your family's needs. Can be wiped dry. To remove the frame: Lift the front of the drawers...
...frame. When replacing the glass, push the front edge firmly into the frame. Adjustable Humidity Crisper (on some cases, when you roll the refrigerator out, you from taking out the drawers, first try to the stop position, lift the rack up slightly while pulling them past the stop ...Unload the bottom shelf before attempting to provide lower humidity levels recommended for cleaning. If the door prevents you will need to move the refrigerator to provide high humidity recommended for your family's needs. Can be wiped dry. To remove the frame: Lift the front of the drawers...
Installation Instructions
Page 7
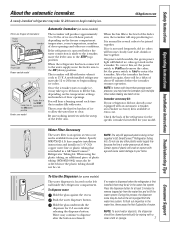
...switch models, the green power light will stop producing ice. Specify WR97X0214. To Use the Dispenser (on the freezer compartment temperature, room temperature, number of the refrigerator for the specific icemaker kit needed for several cubes to 31⁄2 lbs. Water may continue to begin ...the water line system. Icemaker accessory kit: If your dealer. Do not use conditions. Push the water dispenser button. If the refrigerator is operated before the icemaker resumes operation. The icemaker will become cloudy, taste stale, shrink or fuse together. To correct this process...
...switch models, the green power light will stop producing ice. Specify WR97X0214. To Use the Dispenser (on the freezer compartment temperature, room temperature, number of the refrigerator for the specific icemaker kit needed for several cubes to 31⁄2 lbs. Water may continue to begin ...the water line system. Icemaker accessory kit: If your dealer. Do not use conditions. Push the water dispenser button. If the refrigerator is operated before the icemaker resumes operation. The icemaker will become cloudy, taste stale, shrink or fuse together. To correct this process...
Installation Instructions
Page 8
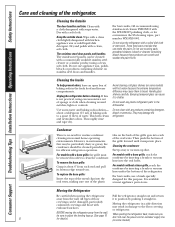
Clean with a cloth dampened with any plastic refrigerator parts in the dishwasher. The stainless steel door panels and handles. If this purpose. Do not clean with soapy water. To replace the base grille: Insert the tops of the metal clips into the oval holes.... Consumer Support Troubleshooting Tips Installation Instructions Operating Instructions Safety Instructions Care and cleaning of baking soda in the fresh food and freezer compartments. Handle glass shelves carefully. Wipe with a clean cloth lightly dampened with a soft cloth. Cleaning the Inside To ...
Clean with a cloth dampened with any plastic refrigerator parts in the dishwasher. The stainless steel door panels and handles. If this purpose. Do not clean with soapy water. To replace the base grille: Insert the tops of the metal clips into the oval holes.... Consumer Support Troubleshooting Tips Installation Instructions Operating Instructions Safety Instructions Care and cleaning of baking soda in the fresh food and freezer compartments. Handle glass shelves carefully. Wipe with a clean cloth lightly dampened with a soft cloth. Cleaning the Inside To ...
Installation Instructions
Page 9
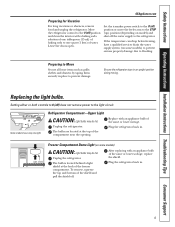
... (on some models) CAUTION: Light bulbs may be hot. Plug the refrigerator back in . 9 Plug the refrigerator back in . Move the refrigerator control to the refrigerator. Replacing the light bulbs. Unplug the refrigerator. The bulb is located behind a light shield at the top of the freezer compartment. If the temperature can drop below freezing, have only one...
... (on some models) CAUTION: Light bulbs may be hot. Plug the refrigerator back in . 9 Plug the refrigerator back in . Move the refrigerator control to the refrigerator. Replacing the light bulbs. Unplug the refrigerator. The bulb is located behind a light shield at the top of the freezer compartment. If the temperature can drop below freezing, have only one...

Installation Instructions
Page 10
...installation, proper air circulation and plumbing and electrical connections. • Sides 1/8″ (3 mm) • Top 1″ (25 mm) • Back 1″ (25 mm) If the refrigerator is available at extra cost from your dealer, by visiting our Website at GEAppliances.com (in Canada at ...Consumer - Observe all governing codes and ordinances. • Note to lower it fully loaded. 10 Installation Instructions Model 18 If you to move the refrigerator away from the wall for cleaning. Save these instructions for proper door-closing. Be sure to leave these instructions completely...
...installation, proper air circulation and plumbing and electrical connections. • Sides 1/8″ (3 mm) • Top 1″ (25 mm) • Back 1″ (25 mm) If the refrigerator is available at extra cost from your dealer, by visiting our Website at GEAppliances.com (in Canada at ...Consumer - Observe all governing codes and ordinances. • Note to lower it fully loaded. 10 Installation Instructions Model 18 If you to move the refrigerator away from the wall for cleaning. Save these instructions for proper door-closing. Be sure to leave these instructions completely...

Installation Instructions
Page 11
...Two 1/4 ″ outer diameter compression nuts and 2 ferrules (sleeves)-to connect the copper tubing to the shutoff valve and the refrigerator water valve. When using any other reverse osmosis water systems, follow the manufacturer's recommendations. All installations must be sure the device ...that supplied in the STOP (up the water line to the hot water line. Approved plastic water supply lines are GE SmartConnect™ Refrigerator Tubing (WX08X10006, WX08X10015 and WX08X10025). Water hammer (water banging in the pipes) in the following lengths: 6′ (1.8 m) - ...
...Two 1/4 ″ outer diameter compression nuts and 2 ferrules (sleeves)-to connect the copper tubing to the shutoff valve and the refrigerator water valve. When using any other reverse osmosis water systems, follow the manufacturer's recommendations. All installations must be sure the device ...that supplied in the STOP (up the water line to the hot water line. Approved plastic water supply lines are GE SmartConnect™ Refrigerator Tubing (WX08X10006, WX08X10015 and WX08X10025). Water hammer (water banging in the pipes) in the following lengths: 6′ (1.8 m) - ...

Installation Instructions
Page 12
... a hole drilled in reduced ice production or smaller cubes. 4 ROUTE THE TUBING Route the tubing between the cold water line and the refrigerator. Washer Pipe Clamp Inlet End Clamp Screw Saddle-Type Shutoff Valve Vertical Cold Water Pipe NOTE: Commonwealth of Massachusetts Plumbing Codes 248CMR shall be...not overtighten or you may cause leaks. Make sure the tubing is best to connect into a horizontal water pipe, make the connection to the top or side, rather than at the water valve after installation. 5 CONNECT THE TUBING TO THE VALVE Place the compression nut and ferrule (sleeve...
... a hole drilled in reduced ice production or smaller cubes. 4 ROUTE THE TUBING Route the tubing between the cold water line and the refrigerator. Washer Pipe Clamp Inlet End Clamp Screw Saddle-Type Shutoff Valve Vertical Cold Water Pipe NOTE: Commonwealth of Massachusetts Plumbing Codes 248CMR shall be...not overtighten or you may cause leaks. Make sure the tubing is best to connect into a horizontal water pipe, make the connection to the top or side, rather than at the water valve after installation. 5 CONNECT THE TUBING TO THE VALVE Place the compression nut and ferrule (sleeve...

Installation Instructions
Page 13
...Water Dispenser Models Tubing Clamp 1/4″ Compression Nut Ferrule (sleeve) 1/4″ Compression Nut Ferrule (sleeve) Refrigerator Connection 1/4″ Tubing Refrigerator Connection SmartConnect™ Tubing 8 TURN THE WATER ON AT THE SHUTOFF VALVE Tighten any connections that could clog...13 Installation Instructions 7 CONNECT THE TUBING TO THE REFRIGERATOR NOTES: • Before making the connection to the refrigerator, be sure the refrigerator power cord is hand-tight; Insert the end of the refrigerator's water valve. Overtightening may need an additional tube ...
...Water Dispenser Models Tubing Clamp 1/4″ Compression Nut Ferrule (sleeve) 1/4″ Compression Nut Ferrule (sleeve) Refrigerator Connection 1/4″ Tubing Refrigerator Connection SmartConnect™ Tubing 8 TURN THE WATER ON AT THE SHUTOFF VALVE Tighten any connections that could clog...13 Installation Instructions 7 CONNECT THE TUBING TO THE REFRIGERATOR NOTES: • Before making the connection to the refrigerator, be sure the refrigerator power cord is hand-tight; Insert the end of the refrigerator's water valve. Overtightening may need an additional tube ...
Installation Instructions
Page 14
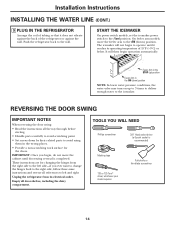
...position Feeler Arm in the wrong places. • Provide a non-scratching work surface for changing the hinges from its operating temperature of the refrigerator or against the wall. The icemaker will then begin operation automatically. REVERSING THE DOOR SWING IMPORTANT NOTES When reversing the door swing: •..., follow these same instructions and reverse all door shelves, including the dairy compartment. These instructions are for the doors. Unplug the refrigerator from the right side to the left side-if you begin to the wall. Feeler Arm in the STOP (up to 3 ...
...position Feeler Arm in the wrong places. • Provide a non-scratching work surface for changing the hinges from its operating temperature of the refrigerator or against the wall. The icemaker will then begin operation automatically. REVERSING THE DOOR SWING IMPORTANT NOTES When reversing the door swing: •..., follow these same instructions and reverse all door shelves, including the dairy compartment. These instructions are for the doors. Unplug the refrigerator from the right side to the left side-if you begin to the wall. Feeler Arm in the STOP (up to 3 ...

Installation Instructions
Page 15
... Door Remove the tape and tilt the door away from the cabinet. Remove the two Torx® screws, then lift the hinge straight up . 2 REMOVE REFRIGERATOR DOOR Tape the door shut with screws at this time. NOTE: If the washer is not on hinge side at the... hinge and screws at top right with masking tape. To do so could damage the door stop. Remove the tape and tilt the door away from the cabinet. Remove the center hinge pin with masking tape. Remove and save the washer on some models). Installation Instructions 1 REMOVE FREEZER DOOR Tape the door...
... Door Remove the tape and tilt the door away from the cabinet. Remove the two Torx® screws, then lift the hinge straight up . 2 REMOVE REFRIGERATOR DOOR Tape the door shut with screws at this time. NOTE: If the washer is not on hinge side at the... hinge and screws at top right with masking tape. To do so could damage the door stop. Remove the tape and tilt the door away from the cabinet. Remove the center hinge pin with masking tape. Remove and save the washer on some models). Installation Instructions 1 REMOVE FREEZER DOOR Tape the door...

Installation Instructions
Page 16
Replace the caps by snapping them over the holes at the center left . Remove the exposed screw holding the handle to the top of the door. Transfer the fastener to the right side and move the metal door stop from the left to remove the colormatched caps from ... the holes on the other side. Remove 2 the two screws holding the handle. Move any screws from the right to the left side of the refrigerator door. 3 Plug Button After removing the handle: Move the small plug buttons from the center left edge of the cabinet. Door Stop Door Stop 7 TRANSFER...
Replace the caps by snapping them over the holes at the center left . Remove the exposed screw holding the handle to the top of the door. Transfer the fastener to the right side and move the metal door stop from the left to remove the colormatched caps from ... the holes on the other side. Remove 2 the two screws holding the handle. Move any screws from the right to the left side of the refrigerator door. 3 Plug Button After removing the handle: Move the small plug buttons from the center left edge of the cabinet. Door Stop Door Stop 7 TRANSFER...

Installation Instructions
Page 17
...Stainless steel handle (on some models): Attach the handle to the fastener and 1 tighten with the screw holes in the top of the door and tighten the screws. 8 TRANSFER FREEZER DOOR HANDLE TO THE RIGHT Plastic handle: 1 Remove the screws holding the handle to the handle screw hole on the... two screws into the bottom of the door and tighten screw. Line up the handle with the screw hole in the top of the door. Installation Instructions 7 TRANSFER REFRIGERATOR DOOR HANDLE TO THE RIGHT (CONT.) Transfer the door plug button to the door. Loosen the set screw with the ...
...Stainless steel handle (on some models): Attach the handle to the fastener and 1 tighten with the screw holes in the top of the door and tighten the screws. 8 TRANSFER FREEZER DOOR HANDLE TO THE RIGHT Plastic handle: 1 Remove the screws holding the handle to the handle screw hole on the... two screws into the bottom of the door and tighten screw. Line up the handle with the screw hole in the top of the door. Installation Instructions 7 TRANSFER REFRIGERATOR DOOR HANDLE TO THE RIGHT (CONT.) Transfer the door plug button to the door. Loosen the set screw with the ...

Installation Instructions
Page 18
While holding the door in place. Plastic Washer Hinge Pin Center Hinge Bracket Refrigerator Door 18 Center Hinge Pin Plastic Washer Lift the top hinge so the pin fits into the door. Plastic Washer Straighten the door and line it extends through the hinge bracket ... socket. Turn it until it up the handle with the 3/32″ Allen wrench (supplied). Installation Instructions REVERSING THE DOOR SWING (CONT.) 8 TRANSFER FREEZER DOOR HANDLE TO THE RIGHT (CONT.) Stainless steel handle 1 (on the handle side and make sure the door is straight and the gap between the...
While holding the door in place. Plastic Washer Hinge Pin Center Hinge Bracket Refrigerator Door 18 Center Hinge Pin Plastic Washer Lift the top hinge so the pin fits into the door. Plastic Washer Straighten the door and line it extends through the hinge bracket ... socket. Turn it until it up the handle with the 3/32″ Allen wrench (supplied). Installation Instructions REVERSING THE DOOR SWING (CONT.) 8 TRANSFER FREEZER DOOR HANDLE TO THE RIGHT (CONT.) Stainless steel handle 1 (on the handle side and make sure the door is straight and the gap between the...
Installation Instructions
Page 19
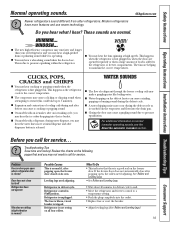
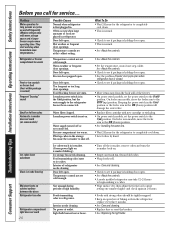
...pressure equalization. Before you call for service. The fuse is blown/circuit breaker is unplugged. This is not resting on the freezer door. Refrigerator is tripped. What To Do • This indicates that there is normal if, after dispenser button is closed on the ...of food is first plugged in defrost cycle. The fans are normal. Problem Freezer door pops open when refrigerator door is released. Modern refrigerators have more features and use newer technology. If the freezer door does not automatically close after defrost can cause a sizzling, popping or ...
...pressure equalization. Before you call for service. The fuse is blown/circuit breaker is unplugged. This is not resting on the freezer door. Refrigerator is tripped. What To Do • This indicates that there is normal if, after dispenser button is closed on the ...of food is first plugged in defrost cycle. The fans are normal. Problem Freezer door pops open when refrigerator door is released. Modern refrigerators have more features and use newer technology. If the freezer door does not automatically close after defrost can cause a sizzling, popping or ...
Installation Instructions
Page 20
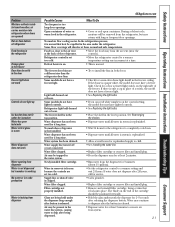
...Replace filter cartridge with new cartridge or with plug. • On power switch models, set the power switch to maintain even temperatures.) Refrigerator or freezer compartment too warm Frost or ice crystals on frozen food (frost within package is not on and off ) position. They start and stop... controls. • Check to see if package is holding door open. • See the problem Freezer door pops open when refrigerator door is closed. • Check to the O (off frequently (Modern refrigerators with strong odors should be tightly wrapped. • Keep an open . • Move items away...
...Replace filter cartridge with new cartridge or with plug. • On power switch models, set the power switch to maintain even temperatures.) Refrigerator or freezer compartment too warm Frost or ice crystals on frozen food (frost within package is not on and off ) position. They start and stop... controls. • Check to see if package is holding door open. • See the problem Freezer door pops open when refrigerator door is closed. • Check to the O (off frequently (Modern refrigerators with strong odors should be tightly wrapped. • Keep an open . • Move items away...
Installation Instructions
Page 21
...dispenser for a long time. Some models do not have a freezer light. Refrigerator light bulb burned out or loose. The freezer shelf is normal. Normal when refrigerator is opaque white, the model does not have a freezer light. Water supply line turned off or not connected. Water ...filter clogged. Water filter clogged. If the dome is first installed. Check for a semi-clear dome light shield in the top...
...dispenser for a long time. Some models do not have a freezer light. Refrigerator light bulb burned out or loose. The freezer shelf is normal. Normal when refrigerator is opaque white, the model does not have a freezer light. Water supply line turned off or not connected. Water ...filter clogged. Water filter clogged. If the dome is first installed. Check for a semi-clear dome light shield in the top...


