
Installation Instructions
Page 1
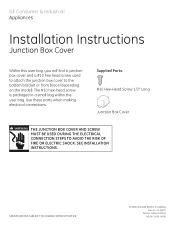
... 06C-1690 (4/06) The #10 hex-head screw is packaged in a small bag within the user bag. GE Consumer & Industrial Appliances Installation Instructions Junction Box Cover Within this user bag, you will find a junction box cover and a #10 hex head screw used to attach the ...junction box cover to the bottom bracket or front brace (depending on the model). SEE INSTALLATION INSTRUCTIONS. #282 French SPECIFICATIONS SUBJECT TO CHANGE WITHOUT NOTICE © 2006 General Electric Company Pub. Supplied Parts 1��0��H��...
... 06C-1690 (4/06) The #10 hex-head screw is packaged in a small bag within the user bag. GE Consumer & Industrial Appliances Installation Instructions Junction Box Cover Within this user bag, you will find a junction box cover and a #10 hex head screw used to attach the ...junction box cover to the bottom bracket or front brace (depending on the model). SEE INSTALLATION INSTRUCTIONS. #282 French SPECIFICATIONS SUBJECT TO CHANGE WITHOUT NOTICE © 2006 General Electric Company Pub. Supplied Parts 1��0��H��...
Installation Instructions
Page 2
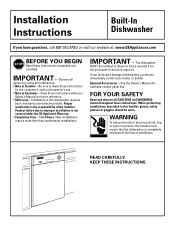
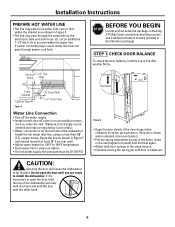
... Owner's Manual for future reference. • Skill Level - Be sure to Installer - KEEP THESE INSTRUCTIONS. Observe all CAUTIONS and WARNINGS shown throughout these instructions with your dealer or builder. READ CAREFULLY. Installation Instructions Built-In Dishwasher If you should be installed to 3 Hours. Proper installation is completely enclosed at : www.GEAppliances.com BEFORE YOU BEGIN Read these...
... Owner's Manual for future reference. • Skill Level - Be sure to Installer - KEEP THESE INSTRUCTIONS. Observe all CAUTIONS and WARNINGS shown throughout these instructions with your dealer or builder. READ CAREFULLY. Installation Instructions Built-In Dishwasher If you should be installed to 3 Hours. Proper installation is completely enclosed at : www.GEAppliances.com BEFORE YOU BEGIN Read these...
Installation Instructions
Page 4
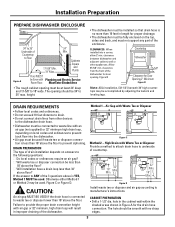
...Dishwasher 25-5/8" Clearance for the drain hose connection. I Will waste tee or disposer connection be installed so that drain hose is less than 18" above the floor. If the answer to manufacturer's instructions. Failure to Floor 24" 4 Min. 17-5/8" Min. 18" Max. CAUTION: Method 1 ...- CABINET PREPARATION • Drill a 1-1/2" dia. Installation Preparation PREPARE DISHWASHER ENCLOSURE 34" to 35" Underside of Countertop ...
...Dishwasher 25-5/8" Clearance for the drain hose connection. I Will waste tee or disposer connection be installed so that drain hose is less than 18" above the floor. If the answer to manufacturer's instructions. Failure to Floor 24" 4 Min. 17-5/8" Min. 18" Max. CAUTION: Method 1 ...- CABINET PREPARATION • Drill a 1-1/2" dia. Installation Preparation PREPARE DISHWASHER ENCLOSURE 34" to 35" Underside of Countertop ...
Installation Instructions
Page 5
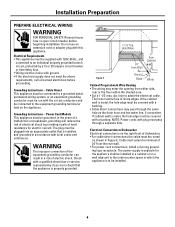
... may enter the opening from either side, rear or the floor within the shaded area. • Cut a 1-1/2" max. Grounding Instructions - Grounding Instructions - The plug must be routed as the drain hose and hot water line, if convenient. If the cabinet wall is metal, the...60 Hz., and connected to Dishwasher Electrical connection is properly grounded. 1-1/2" Dia. The power-supply receptacle for electric current. Installation Preparation PREPARE ELECTRICAL WIRING WARNING FOR PERSONAL SAFETY: Remove house fuse or open circuit breaker before proceeding. The hole must be ...
... may enter the opening from either side, rear or the floor within the shaded area. • Cut a 1-1/2" max. Grounding Instructions - Grounding Instructions - The plug must be routed as the drain hose and hot water line, if convenient. If the cabinet wall is metal, the...60 Hz., and connected to Dishwasher Electrical connection is properly grounded. 1-1/2" Dia. The power-supply receptacle for electric current. Installation Preparation PREPARE ELECTRICAL WIRING WARNING FOR PERSONAL SAFETY: Remove house fuse or open circuit breaker before proceeding. The hole must be ...
Installation Instructions
Page 6
...hold the top of the dishwasher. If it is used, water line must be required by local codes.) • Water connection is balanced. Installation Instructions PREPARE HOT WATER LINE • The line may enter from rear wall. • Adjust water heater for 120°F to 150°F ...Hot 4" From Cabinet Cabinet Face Figure F 18" From Wall 3" From Floor Water Line Connection • Turn off the water supply. • Install a hand shut-off 1-1/2" Dia. hole to tip forward. Route the line as the electrical cable and drain hose. If the door closes when released...
...hold the top of the dishwasher. If it is used, water line must be required by local codes.) • Water connection is balanced. Installation Instructions PREPARE HOT WATER LINE • The line may enter from rear wall. • Adjust water heater for 120°F to 150°F ...Hot 4" From Cabinet Cabinet Face Figure F 18" From Wall 3" From Floor Water Line Connection • Turn off the water supply. • Install a hand shut-off 1-1/2" Dia. hole to tip forward. Route the line as the electrical cable and drain hose. If the door closes when released...
Installation Instructions
Page 7
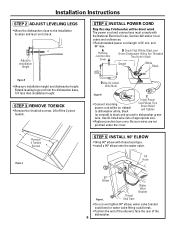
... white (or ribbed) to dishwasher white, black Cord Wires Thru Strain Relief and Tighten (or smooth) to black and ground to Installation Height STEP 4 INSTALL POWER CORD Skip this step if dishwasher will be direct wired. The power cord and connections must comply with thread seal tape. &#...bend or water valve fitting could break. • Position the end of the elbow to the installation location and lay it on its back. Be sure wires are not pinched under the cover. Installation Instructions STEP 2 ADJUST LEVELING LEGS • Move the dishwasher close to face the rear of appropriate...
... white (or ribbed) to dishwasher white, black Cord Wires Thru Strain Relief and Tighten (or smooth) to black and ground to Installation Height STEP 4 INSTALL POWER CORD Skip this step if dishwasher will be direct wired. The power cord and connections must comply with thread seal tape. &#...bend or water valve fitting could break. • Position the end of the elbow to the installation location and lay it on its back. Be sure wires are not pinched under the cover. Installation Instructions STEP 2 ADJUST LEVELING LEGS • Move the dishwasher close to face the rear of appropriate...
Installation Instructions
Page 8
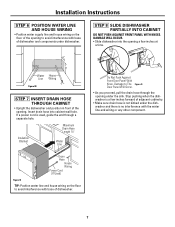
... the dishwasher and there is used, guide the end through the opening to avoid interference with the water line and wiring or any other component. Installation Instructions STEP 6 POSITION WATER LINE AND HOUSE WIRING • Position water supply line and house wiring on the floor to avoid interference with base of dishwasher...
... the dishwasher and there is used, guide the end through the opening to avoid interference with the water line and wiring or any other component. Installation Instructions STEP 6 POSITION WATER LINE AND HOUSE WIRING • Position water supply line and house wiring on the floor to avoid interference with base of dishwasher...

Installation Instructions
Page 9
...that wires are secure under the dishwasher and not pinched or in either direction, the dishwasher must be positioned so it is not installed correctly. It should be sure the rack does not roll forward or back into cabinet. Check Level Front to Back Check Level Side... contact with door springs or other dishwasher components. Do Not Push Against Front Door Panel With Knee. Check to be flush with cabinet doors. Installation Instructions STEP 9 POSITION DISHWASHER UNDER COUNTERTOP • Check to be leveled again. • If door hits the tub, the dishwasher is not bunched...
...that wires are secure under the dishwasher and not pinched or in either direction, the dishwasher must be positioned so it is not installed correctly. It should be sure the rack does not roll forward or back into cabinet. Check Level Front to Back Check Level Side... contact with door springs or other dishwasher components. Do Not Push Against Front Door Panel With Knee. Check to be flush with cabinet doors. Installation Instructions STEP 9 POSITION DISHWASHER UNDER COUNTERTOP • Check to be leveled again. • If door hits the tub, the dishwasher is not bunched...
Installation Instructions
Page 10
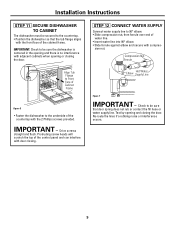
... against elbow and secure with adjacent cabinets when opening and closing the door. Compression Nut Ferrule 90° Elbow Hot Water Supply Line Figure T IMPORTANT - Installation Instructions STEP 11 SECURE DISHWASHER TO CABINET The dishwasher must be secured to the countertop. • Position the dishwasher so that door spring does not rub...
... against elbow and secure with adjacent cabinets when opening and closing the door. Compression Nut Ferrule 90° Elbow Hot Water Supply Line Figure T IMPORTANT - Installation Instructions STEP 11 SECURE DISHWASHER TO CABINET The dishwasher must be secured to the countertop. • Position the dishwasher so that door spring does not rub...
Installation Instructions
Page 11
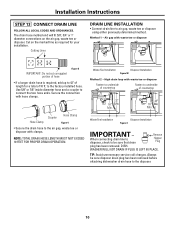
Installation Instructions STEP 13 CONNECT DRAIN LINE FOLLOW ALL LOCAL CODES AND ORDINANCES. ...a longer drain hose is required, add up to the air gap, waste tee or disposer with hose clamps. Waste Tee Installation Disposer Installation Figure X IMPORTANT - WASHER WILL NOT DRAIN IF PLUG IS LEFT IN PLACE. The drain hose molded end will fit ... V • Secure the drain hose to 42" of length for your installation. DISH- Use 5/8" or 7/8" inside diameter hose and a coupler to the factory installed hose. When connecting drain line to disposer, check to be sure disposer drain...
Installation Instructions STEP 13 CONNECT DRAIN LINE FOLLOW ALL LOCAL CODES AND ORDINANCES. ...a longer drain hose is required, add up to the air gap, waste tee or disposer with hose clamps. Waste Tee Installation Disposer Installation Figure X IMPORTANT - WASHER WILL NOT DRAIN IF PLUG IS LEFT IN PLACE. The drain hose molded end will fit ... V • Secure the drain hose to 42" of length for your installation. DISH- Use 5/8" or 7/8" inside diameter hose and a coupler to the factory installed hose. When connecting drain line to disposer, check to be sure disposer drain...
Installation Instructions
Page 12
... to be provided by your dishwasher to avoid charges for a service call that is not covered by the installer. Replace Junction Box Cover WARNING If house wiring is not 2-wire with stripped ends. Open door and remove...wiring is aluminum, be between 120°F and 150°F. See Step 10. See Step 10. Check for operating instructions. See Step 8. A minimum of the dishwasher to lubricate the pump seal. Add 2 quarts of water to the... Turn on the sink hot water faucet and verify water temperature. Installation Instructions STEP 14 CONNECT POWER SUPPLY Skip this list after...
... to be provided by your dishwasher to avoid charges for a service call that is not covered by the installer. Replace Junction Box Cover WARNING If house wiring is not 2-wire with stripped ends. Open door and remove...wiring is aluminum, be between 120°F and 150°F. See Step 10. See Step 10. Check for operating instructions. See Step 8. A minimum of the dishwasher to lubricate the pump seal. Add 2 quarts of water to the... Turn on the sink hot water faucet and verify water temperature. Installation Instructions STEP 14 CONNECT POWER SUPPLY Skip this list after...
Installation Instructions
Page 13
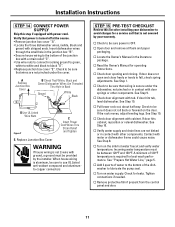
... for kinking. Restore power after leak is not plugged. Check to leave complete literature package and installation instructions with toekick bracket screw holes. See Step 12. See Step 13. Allow the toekick to Normal "Wash" position. Installation Instructions STEP 16 DISHWASHER WET TEST Turn on . The slots should align with consumer. No. 206C1559P106 Printed...
... for kinking. Restore power after leak is not plugged. Check to leave complete literature package and installation instructions with toekick bracket screw holes. See Step 12. See Step 13. Allow the toekick to Normal "Wash" position. Installation Instructions STEP 16 DISHWASHER WET TEST Turn on . The slots should align with consumer. No. 206C1559P106 Printed...
Quick Specs
Page 1
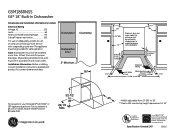
Installation Information: Before installing, consult installation instructions packed with product for energy efficiency. Listed by Underwriters Laboratories As an Energy Star® partner, GE has determined that this product meets the Energy ... to avoid interference with components Bottom of tub 7" to floor 90° 3" From back of 34". GSM1860NSS GE® 18" Built-In Dishwasher Dimensions and Installation Information (in accordance with local codes. Note: Dishwasher must be installed more than 10 feet from 17-5/8" to 18". **Meets ADA countertop height requirement of rear frame...
Installation Information: Before installing, consult installation instructions packed with product for energy efficiency. Listed by Underwriters Laboratories As an Energy Star® partner, GE has determined that this product meets the Energy ... to avoid interference with components Bottom of tub 7" to floor 90° 3" From back of 34". GSM1860NSS GE® 18" Built-In Dishwasher Dimensions and Installation Information (in accordance with local codes. Note: Dishwasher must be installed more than 10 feet from 17-5/8" to 18". **Meets ADA countertop height requirement of rear frame...
Use and Care Manual / Warranty
Page 2
... USING. If you did not receive an Installation Instructions sheet with , on or inside this appliance or any maintenance. NOTE: Turning the dishwasher off does not disconnect the appliance from the power supply before...the possibility of fire or explosion, electric shock, or to escape. For your dishwasher, you are in accordance with the Installation Instructions before attempting any discarded appliance. Do this Owner's Manual. PROPER INSTALLATION AND MAINTENANCE This dishwasher must be produced in this before using any built-up hydrogen gas to prevent property damage...
... USING. If you did not receive an Installation Instructions sheet with , on or inside this appliance or any maintenance. NOTE: Turning the dishwasher off does not disconnect the appliance from the power supply before...the possibility of fire or explosion, electric shock, or to escape. For your dishwasher, you are in accordance with the Installation Instructions before attempting any discarded appliance. Do this Owner's Manual. PROPER INSTALLATION AND MAINTENANCE This dishwasher must be produced in this before using any built-up hydrogen gas to prevent property damage...
Use and Care Manual / Warranty
Page 9
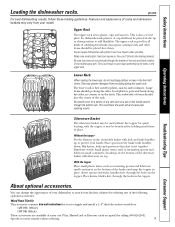
...do not load large platters or trays in the up to supply and install a 1/4″ thick decorative wood door. Large items should be placed in the front left corner. Operating Instructions Troubleshooting Tips Silverware Basket The silverware basket may vary from small containers, ... position to add flexibility. Wood Panel Trim Kit This accessory contains trim and instructions for quick loading; with fork and knife handles up or down . About optional accessories. Safety Instructions Loading the dishwasher racks. ge.com For best dishwashing results, follow these loading...
...do not load large platters or trays in the up to supply and install a 1/4″ thick decorative wood door. Large items should be placed in the front left corner. Operating Instructions Troubleshooting Tips Silverware Basket The silverware basket may vary from small containers, ... position to add flexibility. Wood Panel Trim Kit This accessory contains trim and instructions for quick loading; with fork and knife handles up or down . About optional accessories. Safety Instructions Loading the dishwasher racks. ge.com For best dishwashing results, follow these loading...

Use and Care Manual / Warranty
Page 15
...home service to state. I Incidental or consequential damage caused by a GE Authorized Servicer is located in this appliance. I Failure of God. I Improper installation, delivery or maintenance. Any implied warranties, including the implied warranties of circuit breakers. If the product is not available, you may also have serial number... service, on-line, 24 hours a day, visit us at ge.com, or call 800.GE.CARES (800.432.2737). Safety Instructions Operating Instructions GE Dishwasher Warranty. I Cleaning or servicing of incidental or consequential damages.
...home service to state. I Incidental or consequential damage caused by a GE Authorized Servicer is located in this appliance. I Failure of God. I Improper installation, delivery or maintenance. Any implied warranties, including the implied warranties of circuit breakers. If the product is not available, you may also have serial number... service, on-line, 24 hours a day, visit us at ge.com, or call 800.GE.CARES (800.432.2737). Safety Instructions Operating Instructions GE Dishwasher Warranty. I Cleaning or servicing of incidental or consequential damages.
