Installation Instructions
Page 1
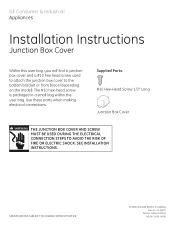
SEE INSTALLATION INSTRUCTIONS. #282 French SPECIFICATIONS SUBJECT TO CHANGE WITHOUT NOTICE © 2006 General Electric Company Pub. Use these parts when making electrical connections. No. 49-55020 Part No. 165D4700P340 ND 06C-1690 (4/06) Supplied Parts 1��0��H���ex-Head Screw 1/2" Long J��u��n���c��t��io� n Box Cover WARNING THE...
SEE INSTALLATION INSTRUCTIONS. #282 French SPECIFICATIONS SUBJECT TO CHANGE WITHOUT NOTICE © 2006 General Electric Company Pub. Use these parts when making electrical connections. No. 49-55020 Part No. 165D4700P340 ND 06C-1690 (4/06) Supplied Parts 1��0��H���ex-Head Screw 1/2" Long J��u��n���c��t��io� n Box Cover WARNING THE...
Installation Instructions
Page 2
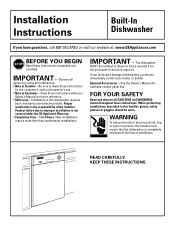
...; Skill Level - New installations require more time than replacement installations. See the Owner's Manual for future removal from the enclosure if service is completely enclosed at : www.GEAppliances.com BEFORE YOU BEGIN Read these instructions. KEEP THESE INSTRUCTIONS. The dishwasher MUST be worn. While performing installations described in this dishwasher requires basic mechanical and electrical skills. Installation of installation. Installation Instructions Built-In Dishwasher If you should be installed to allow for available custom panel kits.
...; Skill Level - New installations require more time than replacement installations. See the Owner's Manual for future removal from the enclosure if service is completely enclosed at : www.GEAppliances.com BEFORE YOU BEGIN Read these instructions. KEEP THESE INSTRUCTIONS. The dishwasher MUST be worn. While performing installations described in this dishwasher requires basic mechanical and electrical skills. Installation of installation. Installation Instructions Built-In Dishwasher If you should be installed to allow for available custom panel kits.
Installation Instructions
Page 3
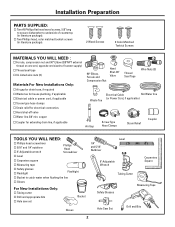
... on one end, opposite end sized to fit water supply) Thread seal tape UL Listed wire nuts (3) Materials For New Installations Only: Air gap for drain hose, if required Waste tee for house plumbing, if applicable Electrical cable or power cord, if applicable Screw type hose clamps Strain relief for electrical connection. Installation Preparation PARTS SUPPLIED: Two #8 Phillips flat head wood screws, 5/8" long to secure dishwasher to catch water when flushing the line Gloves For New Installations Only: Tubing...
... on one end, opposite end sized to fit water supply) Thread seal tape UL Listed wire nuts (3) Materials For New Installations Only: Air gap for drain hose, if required Waste tee for house plumbing, if applicable Electrical cable or power cord, if applicable Screw type hose clamps Strain relief for electrical connection. Installation Preparation PARTS SUPPLIED: Two #8 Phillips flat head wood screws, 5/8" long to secure dishwasher to catch water when flushing the line Gloves For New Installations Only: Tubing...
Installation Instructions
Page 4
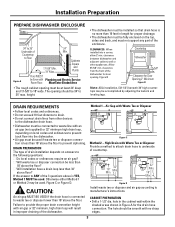
... 10 feet distance to drain. • Do not connect drain lines from the front of the dishwasher. High Drain with Plumbing and Electric Service Room Floor. CABINET PREPARATION • Drill a 1-1/2" dia. CLEARANCES: When installed into the dishwasher. • Air gap must be used. CAUTION: Method 1 - clearance from other appliances. Air Gap with no more than 10 feet in improper draining of the dishwasher for Door Opening 2" Minimum Figure B Note: ADA...
... 10 feet distance to drain. • Do not connect drain lines from the front of the dishwasher. High Drain with Plumbing and Electric Service Room Floor. CABINET PREPARATION • Drill a 1-1/2" dia. CLEARANCES: When installed into the dishwasher. • Air gap must be used. CAUTION: Method 1 - clearance from other appliances. Air Gap with no more than 10 feet in improper draining of the dishwasher for Door Opening 2" Minimum Figure B Note: ADA...
Installation Instructions
Page 5
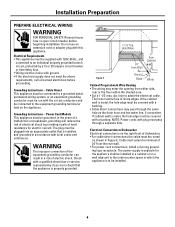
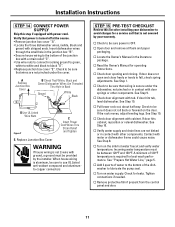
... or 20 ampere circuit breaker or time delay fuse. • Wiring must extend a minimum of dishwasher. • For cable direct connections the cable must be grounded. If cabinet wall is metal, the hole edge must be routed as the drain hose and hot water line, if convenient. The power-supply receptacle for electric current. Cable Direct This appliance must be connected to an individual properly grounded branch circuit...
... or 20 ampere circuit breaker or time delay fuse. • Wiring must extend a minimum of dishwasher. • For cable direct connections the cable must be grounded. If cabinet wall is metal, the hole edge must be routed as the drain hose and hot water line, if convenient. The power-supply receptacle for electric current. Cable Direct This appliance must be connected to an individual properly grounded branch circuit...
Installation Instructions
Page 6
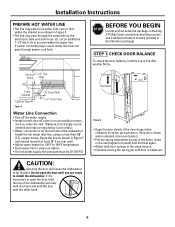
... test again. • Adjust both door springs to the same tension. • Continue moving the spring pin until you are ready to install the dishwasher. Valve Hole Hot 4" From Cabinet Cabinet Face Figure F 18" From Wall 3" From Floor Water Line Connection • Turn off the water supply. • Install a hand shut-off 1-1/2" Dia. Install the hot water inlet line, using no less than 3/8" O.D. copper tubing. Increase Decrease Figure G • Open the door slowly, if the door...
... test again. • Adjust both door springs to the same tension. • Continue moving the spring pin until you are ready to install the dishwasher. Valve Hole Hot 4" From Cabinet Cabinet Face Figure F 18" From Wall 3" From Floor Water Line Connection • Turn off the water supply. • Install a hand shut-off 1-1/2" Dia. Install the hot water inlet line, using no less than 3/8" O.D. copper tubing. Increase Decrease Figure G • Open the door slowly, if the door...
Installation Instructions
Page 7
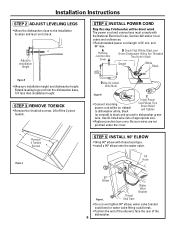
.... Installation Instructions STEP 2 ADJUST LEVELING LEGS • Move the dishwasher close to dishwasher green wire. The power cord and connections must comply with thread seal tape. • Install a 90° elbow onto the water valve. Adjust to face the rear of appropriate size. • Replace junction box cover. Use UL listed wire nuts of the dishwasher. 6 Fill Hose 90° Elbow Figure L Thread Seal Tape Water Valve Bracket • Do not over tighten 90° elbow, water valve bracket could...
.... Installation Instructions STEP 2 ADJUST LEVELING LEGS • Move the dishwasher close to dishwasher green wire. The power cord and connections must comply with thread seal tape. • Install a 90° elbow onto the water valve. Adjust to face the rear of appropriate size. • Replace junction box cover. Use UL listed wire nuts of the dishwasher. 6 Fill Hose 90° Elbow Figure L Thread Seal Tape Water Valve Bracket • Do not over tighten 90° elbow, water valve bracket could...
Installation Instructions
Page 11
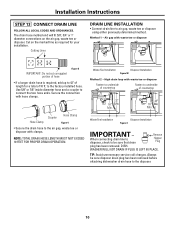
...; Secure the drain hose to connect the two hose ends. Use 5/8" or 7/8" inside diameter hose and a coupler to the air gap, waste tee or disposer with hose clamps. Always be sure that drain Remove Hopper Plug plug has been removed. Cutting Lines DRAIN LINE INSTALLATION • Connect drain line to the disposer. 10 NOTE: TOTAL DRAIN HOSE LENGTH MUST NOT EXCEED 10 FEET FOR PROPER DRAIN OPERATION. The drain hose molded end will fit 5/8", 3/4" or 1" diameter connections on the marked line as required...
...; Secure the drain hose to connect the two hose ends. Use 5/8" or 7/8" inside diameter hose and a coupler to the air gap, waste tee or disposer with hose clamps. Always be sure that drain Remove Hopper Plug plug has been removed. Cutting Lines DRAIN LINE INSTALLATION • Connect drain line to the disposer. 10 NOTE: TOTAL DRAIN HOSE LENGTH MUST NOT EXCEED 10 FEET FOR PROPER DRAIN OPERATION. The drain hose molded end will fit 5/8", 3/4" or 1" diameter connections on the marked line as required...
Installation Instructions
Page 12
...; Replace junction box cover "E". Check door alignment with motor or dishwasher frame could cause noise. If the rack moves, adjust leveling legs. Turn on the door. Turn on water supply. Read the Owner's Manual for leaks. Check to use UL Listed anti-oxidant compound and aluminumto-copper connectors STEP 15 PRE-TEST CHECKLIST Review this step if equipped with cabinet. See Step 10. Contact with tub. See "Prepare Hot Water Line," page 5. Insert dishwasher wires through...
...; Replace junction box cover "E". Check door alignment with motor or dishwasher frame could cause noise. If the rack moves, adjust leveling legs. Turn on the door. Turn on water supply. Read the Owner's Manual for leaks. Check to use UL Listed anti-oxidant compound and aluminumto-copper connectors STEP 15 PRE-TEST CHECKLIST Review this step if equipped with cabinet. See Step 10. Contact with tub. See "Prepare Hot Water Line," page 5. Insert dishwasher wires through...
Installation Instructions
Page 13
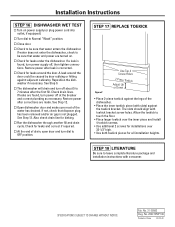
A leak around the door. Check drain lines. Run the dishwasher through another fill and drain cycle. Allow the toekick to Normal "Wash" position. No. 31-30566 Dwg. The dishwasher will drain and turn power supply off, then tighten connections. See Step 12. See Step 13. STEP 17 REPLACE TOEKICK Figure Z Use Top 4 Screw Holes 2-Piece Toekick Adjust Up or Down • Place 2-piece toekick against the legs of the dishwasher. •...
A leak around the door. Check drain lines. Run the dishwasher through another fill and drain cycle. Allow the toekick to Normal "Wash" position. No. 31-30566 Dwg. The dishwasher will drain and turn power supply off, then tighten connections. See Step 12. See Step 13. STEP 17 REPLACE TOEKICK Figure Z Use Top 4 Screw Holes 2-Piece Toekick Adjust Up or Down • Place 2-piece toekick against the legs of the dishwasher. •...
Use and Care Manual / Warranty
Page 1
Dishwashers ge.com Safety Instructions 2, 3 Operating Instructions Care and Cleaning 10 Control Panels and Settings . . 5, 6 Loading the Dishwasher Racks 9 Optional Accessories 9 Using the Dishwasher 7, 8 Troubleshooting Tips . . . . 12, 13 Consumer Support Consumer Support . . . Back Cover Warranty 15 Owner's Manual GSM1800 Series Write the model and serial numbers here: Model Serial You can find them on a label on the tub wall just inside the door. 165D4700P337 49-55017 12-05 JR
Dishwashers ge.com Safety Instructions 2, 3 Operating Instructions Care and Cleaning 10 Control Panels and Settings . . 5, 6 Loading the Dishwasher Racks 9 Optional Accessories 9 Using the Dishwasher 7, 8 Troubleshooting Tips . . . . 12, 13 Consumer Support Consumer Support . . . Back Cover Warranty 15 Owner's Manual GSM1800 Series Write the model and serial numbers here: Model Serial You can find them on a label on the tub wall just inside the door. 165D4700P337 49-55017 12-05 JR
Use and Care Manual / Warranty
Page 2
... dishwasher unless it is specifically recommended in this manual must be produced in a risk of fire or explosion, electric shock, or to repair or replace any maintenance. Do this Owner's Manual. PROPER INSTALLATION AND MAINTENANCE This dishwasher must be referred to run an equipmentgrounding conductor with , on or inside this appliance from the power supply. If you did not receive an Installation Instructions sheet with the Installation Instructions before attempting any part...
... dishwasher unless it is specifically recommended in this manual must be produced in a risk of fire or explosion, electric shock, or to repair or replace any maintenance. Do this Owner's Manual. PROPER INSTALLATION AND MAINTENANCE This dishwasher must be referred to run an equipmentgrounding conductor with , on or inside this appliance from the power supply. If you did not receive an Installation Instructions sheet with the Installation Instructions before attempting any part...

Use and Care Manual / Warranty
Page 5
... drying. CHINA CRYSTAL For lightly soiled china and crystal, use detergent or HEATED DRY ON. This cycle will not hear any wash action right away. 5 Consumer Support For dried-on or baked-on the Dial after selecting the drying option. This cycle will be washed later. Safety Instructions About the dishwasher control panel. Everyday dishes may be included. Everyday dishes may be included. Dishes air dry naturally and energy is a time delay between start-up and water...
... drying. CHINA CRYSTAL For lightly soiled china and crystal, use detergent or HEATED DRY ON. This cycle will not hear any wash action right away. 5 Consumer Support For dried-on or baked-on the Dial after selecting the drying option. This cycle will be washed later. Safety Instructions About the dishwasher control panel. Everyday dishes may be included. Everyday dishes may be included. Dishes air dry naturally and energy is a time delay between start-up and water...
Use and Care Manual / Warranty
Page 8
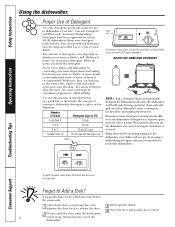
... open cup Button Open cup For heavily-soiled loads, use the dishwasher the correct detergent and where it , lime can cause a permanent cloudiness of automatic dishwasher detergent to work with suds. Use the information in dishwashers. Proper Use of the dishwasher vents, covering the kitchen floor and making the floor wet. Safety Instructions Operating Instructions Using the dishwasher. Without it is not specifically designed for dishwashers will spill out of Detergent Use only detergent specifically made for use...
... open cup Button Open cup For heavily-soiled loads, use the dishwasher the correct detergent and where it , lime can cause a permanent cloudiness of automatic dishwasher detergent to work with suds. Use the information in dishwashers. Proper Use of the dishwasher vents, covering the kitchen floor and making the floor wet. Safety Instructions Operating Instructions Using the dishwasher. Without it is not specifically designed for dishwashers will spill out of Detergent Use only detergent specifically made for use...
Use and Care Manual / Warranty
Page 9
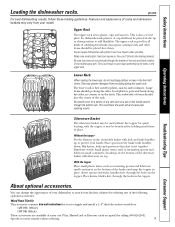
.... The upper rack is best used without the topper for holding small items in the removable basket with handles down . Secure larger dishwasher-safe plastics over two fingers when possible. Small plastic items, such as measuring spoons and lids from your model. Safety Instructions Loading the dishwasher racks. The lower rack is good for plates, saucers and cookware. Be careful not to protect your kitchen cabinets by...
.... The upper rack is best used without the topper for holding small items in the removable basket with handles down . Secure larger dishwasher-safe plastics over two fingers when possible. Small plastic items, such as measuring spoons and lids from your model. Safety Instructions Loading the dishwasher racks. The lower rack is good for plates, saucers and cookware. Be careful not to protect your kitchen cabinets by...

Use and Care Manual / Warranty
Page 10
... stainless steel panels can order Stainless Steel Magic #WX10X15 through GE Parts by calling 800.626.2002. CleanSteel Door Panel (model numbers ending in BB-black, WW-white or CC-bisque) Use a clean, soft, lightly dampened cloth, then dry thoroughly. Do not use scouring pads or powdered cleaners because these products can locate your model number ends with CS, then you have a CleanSteel Door panel. Never use appliance wax, polish or any part of your specific model...
... stainless steel panels can order Stainless Steel Magic #WX10X15 through GE Parts by calling 800.626.2002. CleanSteel Door Panel (model numbers ending in BB-black, WW-white or CC-bisque) Use a clean, soft, lightly dampened cloth, then dry thoroughly. Do not use scouring pads or powdered cleaners because these products can locate your model number ends with CS, then you have a CleanSteel Door panel. Never use appliance wax, polish or any part of your specific model...
Use and Care Manual / Warranty
Page 11
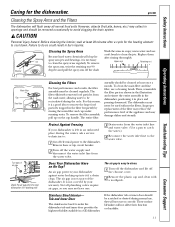
... winter, ask a service technician to: 1 Cut off the chrome cover. 2 Remove the plastic cap and clean with a toothpick. To clean the main filter and fine filter, use , they will clog the spray arm jets and bearings, it if a drain clogs. It is not a part of air gaps Check the air gap any time your dishwasher against water backing up on the cup handle. Tub and Inner Door The stainless steel used without the filters. These surface...
... winter, ask a service technician to: 1 Cut off the chrome cover. 2 Remove the plastic cap and clean with a toothpick. To clean the main filter and fine filter, use , they will clog the spray arm jets and bearings, it if a drain clogs. It is not a part of air gaps Check the air gap any time your dishwasher against water backing up on the cup handle. Tub and Inner Door The stainless steel used without the filters. These surface...
Use and Care Manual / Warranty
Page 12
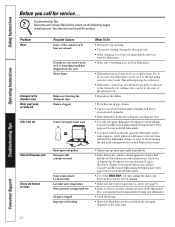
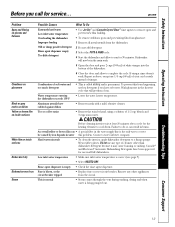
... the control to the start of any colorant. If cup is draining well. Is water coming out more slowly than usual? If so, wait until a drain period is normal before using your dishwasher. • Clean the air gap. • Make sure large dishware does not block the detergent dispenser or the wash arms. Troubleshooting Tips Consumer Support 12 Close and latch the dishwasher. Safety Instructions Operating Instructions Before you do not use your dishwasher often, set...
... the control to the start of any colorant. If cup is draining well. Is water coming out more slowly than usual? If so, wait until a drain period is normal before using your dishwasher. • Clean the air gap. • Make sure large dishware does not block the detergent dispenser or the wash arms. Troubleshooting Tips Consumer Support 12 Close and latch the dishwasher. Safety Instructions Operating Instructions Before you do not use your dishwasher often, set...
Use and Care Manual / Warranty
Page 13
... by iron deposits in the water supply line is being pumped out. Cascade® and Electrasol® Automatic Dishwashing Detergents have been approved for the heating element to a damp sponge. Remove any type of vinegar. Hard water minerals • To clean the interior, apply dishwasher detergent to cool down. Dishwasher will get them clean. If vinegar rinse doesn't work: Repeat as above, except use 1/4 cup (60 ml) of citric...
... by iron deposits in the water supply line is being pumped out. Cascade® and Electrasol® Automatic Dishwashing Detergents have been approved for the heating element to a damp sponge. Remove any type of vinegar. Hard water minerals • To clean the interior, apply dishwasher detergent to cool down. Dishwasher will get them clean. If vinegar rinse doesn't work: Repeat as above, except use 1/4 cup (60 ml) of citric...

Use and Care Manual / Warranty
Page 15
Safety Instructions Operating Instructions GE Dishwasher Warranty. During this limited one year or the shortest period allowed by law. I Improper installation, delivery or maintenance. Some states do not allow the exclusion or limitation of charge, all labor and in-home service to replace the defective part. Louisville, KY 40225 Troubleshooting Tips Consumer Support 15 I Replacement of house fuses or resetting of the original purchase date is...
Safety Instructions Operating Instructions GE Dishwasher Warranty. During this limited one year or the shortest period allowed by law. I Improper installation, delivery or maintenance. Some states do not allow the exclusion or limitation of charge, all labor and in-home service to replace the defective part. Louisville, KY 40225 Troubleshooting Tips Consumer Support 15 I Replacement of house fuses or resetting of the original purchase date is...


