
Manual
Page 2
.... 2 Be sure to register by phone. Thank you for this cleaner. Manufacturing code (Label located on bottom of Hoover® authorized dealer locations (U.S. Contents Important Safety Instructions 3 Carton Contents...5 Steamer Description 5 How To Use: Steamer 6 Filling Clean Water Tank 6 Removing And Filling Solution Tank 6 Operating Cleaner...7 Refilling Water During Operation 7 After Cleaning...8 How...
.... 2 Be sure to register by phone. Thank you for this cleaner. Manufacturing code (Label located on bottom of Hoover® authorized dealer locations (U.S. Contents Important Safety Instructions 3 Carton Contents...5 Steamer Description 5 How To Use: Steamer 6 Filling Clean Water Tank 6 Removing And Filling Solution Tank 6 Operating Cleaner...7 Refilling Water During Operation 7 After Cleaning...8 How...
Manual
Page 3
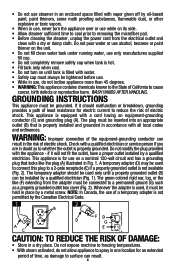
...only as described in . See Grounding Instructions. • Do not clean over cord. IMPORTANT SAFETY INSTRUCTIONS SAVE THESE INSTRUCTIONS When using the steamer. • Do not add descaling, aromatic, alcoholic appliances, cleaning solutions, scented perfumes, oils or any electrical appliance, check and follow ... or store outdoors. • Do not use for space heating purposes. • Do not immerse in this appliance as this steamer is necessary when used as it should always be used near children. Use only manufacturer's recommended attachments and appliances. • Do...
...only as described in . See Grounding Instructions. • Do not clean over cord. IMPORTANT SAFETY INSTRUCTIONS SAVE THESE INSTRUCTIONS When using the steamer. • Do not add descaling, aromatic, alcoholic appliances, cleaning solutions, scented perfumes, oils or any electrical appliance, check and follow ... or store outdoors. • Do not use for space heating purposes. • Do not immerse in this appliance as this steamer is necessary when used as it should always be used near children. Use only manufacturer's recommended attachments and appliances. • Do...
Manual
Page 4
... thinner on the unit. • Do not fill clean water tank under running water, use while on its side. • Allow steamer sufficient time to cool prior to whether the outlet is not available (Fig. 2). WARNING: Improper connection of the equipment-grounding conductor can result...dry place. Grounding Instructions This appliance must be connected to a permanent ground (G) such as to removing the microfiber pad. • Before cleaning the steamer, unplug the power cord from the adapter must be used , it will not fit the outlet, have a proper outlet installed by a qualified electrician...
... thinner on the unit. • Do not fill clean water tank under running water, use while on its side. • Allow steamer sufficient time to cool prior to whether the outlet is not available (Fig. 2). WARNING: Improper connection of the equipment-grounding conductor can result...dry place. Grounding Instructions This appliance must be connected to a permanent ground (G) such as to removing the microfiber pad. • Before cleaning the steamer, unplug the power cord from the adapter must be used , it will not fit the outlet, have a proper outlet installed by a qualified electrician...
Manual
Page 5
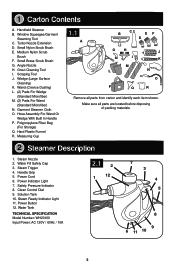
...Control Dial 9. Power Button 12. Grout Cleaning Tool I M Q J K N 250ml---MAX R O Remove all parts are located before disposing of packing materials. 2 Steamer Description 1. Scraping Tool J. Hose Assembly For Wand Or Wedge With Built In Handle P. Measuring Cup 1.1 A B C EF D G L P H I . Steam...N. Hard Plastic Funnel R. Make sure all parts from carton and identify each item shown. Handle Grip 5. Water Tank TECHNICAL SPECIFICATION Model Number: WH20100 Input Power: AC 120V / 60Hz / 10A 2.1 2 1 12 7 3 4 5 8 9 6 11 10 5 Turbo Nozzle Extension D. Steam Ready Indicator ...
...Control Dial 9. Power Button 12. Grout Cleaning Tool I M Q J K N 250ml---MAX R O Remove all parts are located before disposing of packing materials. 2 Steamer Description 1. Scraping Tool J. Hose Assembly For Wand Or Wedge With Built In Handle P. Measuring Cup 1.1 A B C EF D G L P H I . Steam...N. Hard Plastic Funnel R. Make sure all parts from carton and identify each item shown. Handle Grip 5. Water Tank TECHNICAL SPECIFICATION Model Number: WH20100 Input Power: AC 120V / 60Hz / 10A 2.1 2 1 12 7 3 4 5 8 9 6 11 10 5 Turbo Nozzle Extension D. Steam Ready Indicator ...
Manual
Page 6
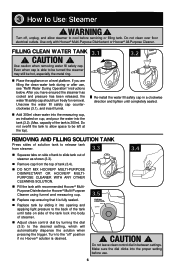
...into the tank (3.2). (Max. WARNING ! Turn off " position if no Hoover® solution is fully sealed. „„ Replace tank by sliding it into opening and applying light pressure to be turned the steamer may still be left at the top). Do not clean over floor electrical... the measuring cup, as shown (3.3). „„ Remove cap from steamer. 3.3 3.4 „„ Squeeze tabs on side of steamer as indicated on side of tank (3.4). „„ DO NOT MIX HOOVER® MULTI-PURPOSE DISINFECTANT OR HOOVER® MULTIPURPOSE CLEANER WITH ANY OTHER CLEANING SOLUTION. „„ Fill...
...into the tank (3.2). (Max. WARNING ! Turn off " position if no Hoover® solution is fully sealed. „„ Replace tank by sliding it into opening and applying light pressure to be turned the steamer may still be left at the top). Do not clean over floor electrical... the measuring cup, as shown (3.3). „„ Remove cap from steamer. 3.3 3.4 „„ Squeeze tabs on side of steamer as indicated on side of tank (3.4). „„ DO NOT MIX HOOVER® MULTI-PURPOSE DISINFECTANT OR HOOVER® MULTIPURPOSE CLEANER WITH ANY OTHER CLEANING SOLUTION. „„ Fill...
Manual
Page 7
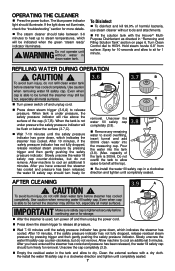
...indicator has gone down the steam trigger to dry. Pour the water into the measuring cup. Allow machine to steam temperatures, which indicates the steamer has cooled. To avoid burn injury, do not remove. If the light does not illuminate, check the "troubleshooting" section for 3.6 3.7 ...(3.9). „„ Empty the residual water in "Removing and Filling Solution Tank" section on page 6. Clean the external surface with the Hoover® MultiPurpose Disinfectant as directed in the tank and allow to avoid overfilling, insert funnel and add 300ml clean water into the tank ...
...indicator has gone down the steam trigger to dry. Pour the water into the measuring cup. Allow machine to steam temperatures, which indicates the steamer has cooled. To avoid burn injury, do not remove. If the light does not illuminate, check the "troubleshooting" section for 3.6 3.7 ...(3.9). „„ Empty the residual water in "Removing and Filling Solution Tank" section on page 6. Clean the external surface with the Hoover® MultiPurpose Disinfectant as directed in the tank and allow to avoid overfilling, insert funnel and add 300ml clean water into the tank ...
Manual
Page 8
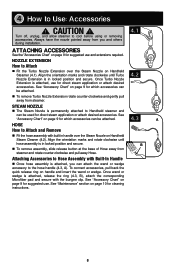
... which accessories can be attached. 4.2 „„ To remove Turbo Nozzle Extension rotate counter-clockwise and gently pull away from steamer and rotate counter-clockwise and pull away Hose. Align the orientation marks and rotate clockwise until hose assembly is in locked position ... How to the hose handle (4.3, A). See "Maintenance" section on handle and insert the wand or wedge. See "Accessory Chart" on Handheld Steamer (4.1). Steam NOZZLE „„ The Steam Nozzle is attached, use for which accessories can attach the wand or wedge accessory to Attach and...
... which accessories can be attached. 4.2 „„ To remove Turbo Nozzle Extension rotate counter-clockwise and gently pull away from steamer and rotate counter-clockwise and pull away Hose. Align the orientation marks and rotate clockwise until hose assembly is in locked position ... How to the hose handle (4.3, A). See "Maintenance" section on handle and insert the wand or wedge. See "Accessory Chart" on Handheld Steamer (4.1). Steam NOZZLE „„ The Steam Nozzle is attached, use for which accessories can attach the wand or wedge accessory to Attach and...
Manual
Page 9
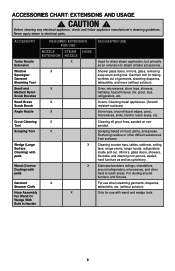
..., glass doors, showers, tile walls, and cleaning non-porous, sealed, hard furniture as well as an extension to reach areas. For use with pads Garment X Steamer Cloth Hose Assembly For Wand Or Wedge With Built In Handle X X X SUGGESTED USE Used for use when steaming garments, draperies, tablecloths, etc. (without solution). Staircase...
..., glass doors, showers, tile walls, and cleaning non-porous, sealed, hard furniture as well as an extension to reach areas. For use with pads Garment X Steamer Cloth Hose Assembly For Wand Or Wedge With Built In Handle X X X SUGGESTED USE Used for use when steaming garments, draperies, tablecloths, etc. (without solution). Staircase...
Manual
Page 10
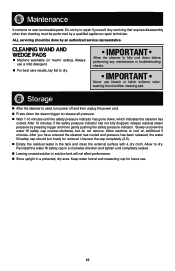
...Allow to dry. ALL servicing should turn power off and then unplug the power cord. „„ Press down , which indicates the steamer has cooled. After 10 minutes, if the safety pressure indicator has not fully dropped, release residual steam pressure by a qualified appliance repair technician.... Any servicing that requires disassembly other than cleaning must be done by an authorized service representative. After you have ensured the steamer has cooled and pressure has been released, the water fill safety cap should be performed by pressing trigger and then gently pushing...
...Allow to dry. ALL servicing should turn power off and then unplug the power cord. „„ Press down , which indicates the steamer has cooled. After 10 minutes, if the safety pressure indicator has not fully dropped, release residual steam pressure by a qualified appliance repair technician.... Any servicing that requires disassembly other than cleaning must be done by an authorized service representative. After you have ensured the steamer has cooled and pressure has been released, the water fill safety cap should be performed by pressing trigger and then gently pushing...
Manual
Page 11
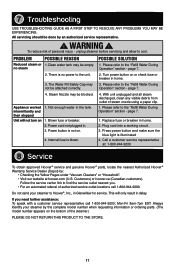
...3. Press power button and make sure the blue light is no steam POSSIBLE SOLUTION 1. Customers) or hoover.ca (Canadian customers). If you . • For an automated referral of the steamer.) PLEASE DO NOT RETURN THIS PRODUCT TO THE STORE. 11 There is illuminated 4. Please refer to cool...The model number appears on 1. Always identify your steamer to the "Refill Water During not be done by : • Checking the Yellow Pages under "Vacuum Cleaners" or "Household". • Visit our website at hoover.com (U.S. Please refer to Hoover®, Inc., in the tank. To reduce risk...
...3. Press power button and make sure the blue light is no steam POSSIBLE SOLUTION 1. Customers) or hoover.ca (Canadian customers). If you . • For an automated referral of the steamer.) PLEASE DO NOT RETURN THIS PRODUCT TO THE STORE. 11 There is illuminated 4. Please refer to cool...The model number appears on 1. Always identify your steamer to the "Refill Water During not be done by : • Checking the Yellow Pages under "Vacuum Cleaners" or "Household". • Visit our website at hoover.com (U.S. Please refer to Hoover®, Inc., in the tank. To reduce risk...

