Manual
Page 1
IF USED COMMERCIALLY WARRANTY IS VOID. READ CAREFULLY BEFORE ASSEMBLY AND USE. PLEASE DO NOT RETURN THIS Appliance TO THE STORE. hoover.com *On hard, non porous surfaces, when used with Hoover® Multi-Purpose Disinfectant in accordance with owner's manual, without tools and attachments. ©2011 Techtronic Floor Care Technology Limited. Questions or concerns? For assistance, please call Customer Service at 1-800-944-9200 Mon...
IF USED COMMERCIALLY WARRANTY IS VOID. READ CAREFULLY BEFORE ASSEMBLY AND USE. PLEASE DO NOT RETURN THIS Appliance TO THE STORE. hoover.com *On hard, non porous surfaces, when used with Hoover® Multi-Purpose Disinfectant in accordance with owner's manual, without tools and attachments. ©2011 Techtronic Floor Care Technology Limited. Questions or concerns? For assistance, please call Customer Service at 1-800-944-9200 Mon...
Manual
Page 2
...return this owner's manual. Verification of date of purchase may be required for warranty service of Steamer) Please visit Hoover.com for video instructions for an automated referral of Hoover® authorized dealer locations (U.S. Contents Important Safety Instructions 3 Carton Contents...5 Steamer Description 5 How To Use: Steamer 6 Filling Clean Water Tank 6 Removing And Filling Solution Tank 6 Operating Cleaner...7 Refilling Water During Operation 7 After Cleaning...8 How To Use: Accessories 8 Attaching Accessories 8 Accessory Chart...9 Maintenance...10 Cleaning Wand And...
...return this owner's manual. Verification of date of purchase may be required for warranty service of Steamer) Please visit Hoover.com for video instructions for an automated referral of Hoover® authorized dealer locations (U.S. Contents Important Safety Instructions 3 Carton Contents...5 Steamer Description 5 How To Use: Steamer 6 Filling Clean Water Tank 6 Removing And Filling Solution Tank 6 Operating Cleaner...7 Refilling Water During Operation 7 After Cleaning...8 How To Use: Accessories 8 Attaching Accessories 8 Accessory Chart...9 Maintenance...10 Cleaning Wand And...
Manual
Page 3
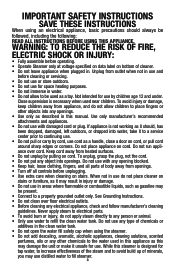
... before unplugging. • Use extra care when cleaning on stairs or furniture, as it should always be present. • Connect to the water used as a handle, close a door on cord. Keep cord away from appliance, and do not place cleaner on stairs. Never apply steam to electrical parts. • To avoid burn or injury, do not apply steam directly to avoid build up...
... before unplugging. • Use extra care when cleaning on stairs or furniture, as it should always be present. • Connect to the water used as a handle, close a door on cord. Keep cord away from appliance, and do not place cleaner on stairs. Never apply steam to electrical parts. • To avoid burn or injury, do not apply steam directly to avoid build up...
Manual
Page 4
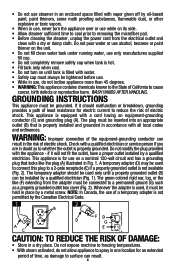
... a permanent ground (G) such as damage to removing the microfiber pad. • Before cleaning the steamer, unplug the power cord from the adapter must be connected to whether the outlet is properly grounded. Grounding Instructions This appliance must be installed by a qualified electrician (Fig. 1). WARNING: Improper connection of electric shock. NOTE: In Canada, the use while on its side. • Allow...
... a permanent ground (G) such as damage to removing the microfiber pad. • Before cleaning the steamer, unplug the power cord from the adapter must be connected to whether the outlet is properly grounded. Grounding Instructions This appliance must be installed by a qualified electrician (Fig. 1). WARNING: Improper connection of electric shock. NOTE: In Canada, the use while on its side. • Allow...
Manual
Page 5
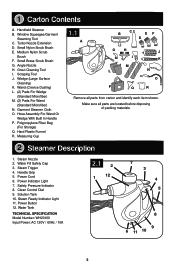
... sure all parts from carton and identify each item shown. Water Tank TECHNICAL SPECIFICATION Model Number: WH20100 Input Power: AC 120V / 60Hz / 10A 2.1 2 1 12 7 3 4 5 8 9 6 11 10 5 Hose Assembly For Wand Or Wedge With Built In Handle P. Steam Ready Indicator Light 11. 1 Carton Contents A. Grout Cleaning Tool I M Q J K N 250ml---MAX R O Remove all parts are located before disposing of packing materials. 2 Steamer Description 1. Solution Tank 10. Scraping Tool J. Water Fill Safety Cap 3. Handheld Steamer B. Medium Nylon Scrub Brush F. Safety...
... sure all parts from carton and identify each item shown. Water Tank TECHNICAL SPECIFICATION Model Number: WH20100 Input Power: AC 120V / 60Hz / 10A 2.1 2 1 12 7 3 4 5 8 9 6 11 10 5 Hose Assembly For Wand Or Wedge With Built In Handle P. Steam Ready Indicator Light 11. 1 Carton Contents A. Grout Cleaning Tool I M Q J K N 250ml---MAX R O Remove all parts are located before disposing of packing materials. 2 Steamer Description 1. Solution Tank 10. Scraping Tool J. Water Fill Safety Cap 3. Handheld Steamer B. Medium Nylon Scrub Brush F. Safety...
Manual
Page 6
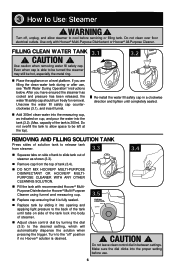
...-Purpose Cleaner using funnel and measuring cup. „„ Replace cap ensuring that it is fully sealed. „„ Replace tank by sliding it into opening and applying light pressure to the back of steamer. „„ Adjust clean control dial by turning the dial (3.5) to the desired setting, which will automatically dispense the solution when pressing the trigger. CAUTION ! Use caution when removing water...
...-Purpose Cleaner using funnel and measuring cup. „„ Replace cap ensuring that it is fully sealed. „„ Replace tank by sliding it into opening and applying light pressure to the back of steamer. „„ Adjust clean control dial by turning the dial (3.5) to the desired setting, which will automatically dispense the solution when pressing the trigger. CAUTION ! Use caution when removing water...
Manual
Page 7
...;„ After the steamer is able to dry. REFILLing WATER DURING OPERATION ! Pour the water into the measuring cup. Operating the Cleaner „„ Press the power button. Even when cap is used, turn freely for more details. „„ The steam cleaner should take between 3-6 minutes to heat up to avoid overfilling, insert funnel and add 300ml clean water into the tank (3.8). (Max. After 10 minutes...
...;„ After the steamer is able to dry. REFILLing WATER DURING OPERATION ! Pour the water into the measuring cup. Operating the Cleaner „„ Press the power button. Even when cap is used, turn freely for more details. „„ The steam cleaner should take between 3-6 minutes to heat up to avoid overfilling, insert funnel and add 300ml clean water into the tank (3.8). (Max. After 10 minutes...
Manual
Page 8
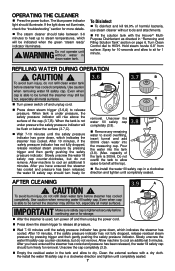
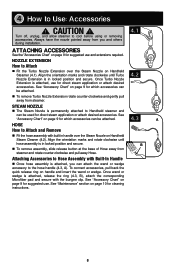
... hose assembly is in handle over the Steam Nozzle on page 10 for cleaning instructions. 8 Align the orientation marks and rotate clockwise until Turbo Nozzle Extension is in locked position and secure. 4 How to cool before using or removing accessories. To connect accessories, pull back the quick release ring on page 9 for direct steam application or attach desired accessories. See "Accessory Chart" on Handheld Steam Cleaner (4.2). Turn off, unplug, and allow steamer to Use: Accessories ! Attaching Accessories to Attach...
... hose assembly is in handle over the Steam Nozzle on page 10 for cleaning instructions. 8 Align the orientation marks and rotate clockwise until Turbo Nozzle Extension is in locked position and secure. 4 How to cool before using or removing accessories. To connect accessories, pull back the quick release ring on page 9 for direct steam application or attach desired accessories. See "Accessory Chart" on Handheld Steam Cleaner (4.2). Turn off, unplug, and allow steamer to Use: Accessories ! Attaching Accessories to Attach...
Manual
Page 9
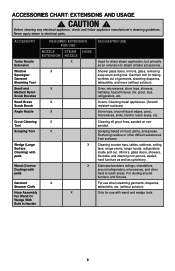
..., sinks, hard to attach smaller accessories. ACCESSORY Turbo Nozzle Extension Window Squeegee/ Garment Steaming Tool Small and Medium Nylon Scrub Brushes Small Brass Scrub Brush Angle Nozzle REQUIRED EXTENSION FOR USE NOZZLE STEAM HOSE EXTENSION NOZZLE X X X X X Grout Cleaning X Tool Scraping Tool X Wedge (Large Surface Cleaning) with pads Wand (Crevice Dusting) with pads Garment X Steamer Cloth Hose Assembly For Wand Or Wedge With Built In Handle X X X SUGGESTED USE Used for use when steaming garments, draperies, tablecloths, etc. (without solution). Cleaning metal...
..., sinks, hard to attach smaller accessories. ACCESSORY Turbo Nozzle Extension Window Squeegee/ Garment Steaming Tool Small and Medium Nylon Scrub Brushes Small Brass Scrub Brush Angle Nozzle REQUIRED EXTENSION FOR USE NOZZLE STEAM HOSE EXTENSION NOZZLE X X X X X Grout Cleaning X Tool Scraping Tool X Wedge (Large Surface Cleaning) with pads Wand (Crevice Dusting) with pads Garment X Steamer Cloth Hose Assembly For Wand Or Wedge With Built In Handle X X X SUGGESTED USE Used for use when steaming garments, draperies, tablecloths, etc. (without solution). Cleaning metal...
Manual
Page 10
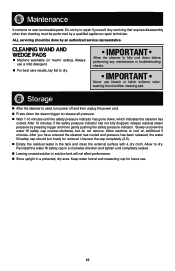
... pads „„ Machine washable on "warm" setting. Always use a mild detergent. „„ For best care results, lay flat to cool an additional 5 minutes. Allow machine to dry. Re-install the water fill safety cap in a clockwise direction and tighten until the safety pressure indicator has gone down, which indicates the steamer has cooled. ALL servicing should turn power off and then...
... pads „„ Machine washable on "warm" setting. Always use a mild detergent. „„ For best care results, lay flat to cool an additional 5 minutes. Allow machine to dry. Re-install the water fill safety cap in a clockwise direction and tighten until the safety pressure indicator has gone down, which indicates the steamer has cooled. ALL servicing should turn power off and then...
Manual
Page 11
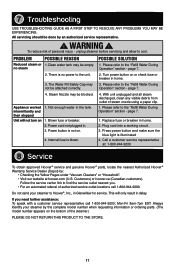
... home. 3. Power button is no steam POSSIBLE SOLUTION 1. page 7. 1. Replace fuse or breaker in the tank. Do not send your steamer by : • Checking the Yellow Pages under "Vacuum Cleaners" or "Household". • Visit our website at : 1-800-944-9200 8 Service To obtain approved Hoover® service and genuine Hoover® parts, locate the nearest Authorized Hoover® Warranty Service Dealer (Depot) by the complete model number when requesting...
... home. 3. Power button is no steam POSSIBLE SOLUTION 1. page 7. 1. Replace fuse or breaker in the tank. Do not send your steamer by : • Checking the Yellow Pages under "Vacuum Cleaners" or "Household". • Visit our website at : 1-800-944-9200 8 Service To obtain approved Hoover® service and genuine Hoover® parts, locate the nearest Authorized Hoover® Warranty Service Dealer (Depot) by the complete model number when requesting...
Manual
Page 12
... a Hoover® Authorized Warranty Service Dealer along with the Owner's Manual, your HOOVER® appliance and hose assembly is not as maid, janitorial and equipment rental services), pads, accessory tools and attachments, improper maintenance of the appliance, damage due to authorized service outlets in the U.S.A., phone: 1-800-9449200 OR visit Hoover® online at no cost to you mail your appliance to correct any replacement or repair performed...
... a Hoover® Authorized Warranty Service Dealer along with the Owner's Manual, your HOOVER® appliance and hose assembly is not as maid, janitorial and equipment rental services), pads, accessory tools and attachments, improper maintenance of the appliance, damage due to authorized service outlets in the U.S.A., phone: 1-800-9449200 OR visit Hoover® online at no cost to you mail your appliance to correct any replacement or repair performed...

Manual
Page 24
... USED COMMERCIALLY WARRANTY IS VOID. hoover.com *On hard, non porous surfaces, when used with Hoover® Multi-Purpose Disinfectant in accordance with owner's manual, without tools and attachments. ©2011 Techtronic Floor Care Technology Limited. IMPORTANT ! THIS PRODUCT IS INTENDED FOR HOUSEHOLD USE ONLY. For assistance, please call Customer Service at 1-800-944-9200 Mon-Fri 8am-7pm EST. TM enhanced Clean disinfecting* handheld owner's Manual Operating and Servicing Instructions...
... USED COMMERCIALLY WARRANTY IS VOID. hoover.com *On hard, non porous surfaces, when used with Hoover® Multi-Purpose Disinfectant in accordance with owner's manual, without tools and attachments. ©2011 Techtronic Floor Care Technology Limited. IMPORTANT ! THIS PRODUCT IS INTENDED FOR HOUSEHOLD USE ONLY. For assistance, please call Customer Service at 1-800-944-9200 Mon-Fri 8am-7pm EST. TM enhanced Clean disinfecting* handheld owner's Manual Operating and Servicing Instructions...


