Product Manual
Page 2
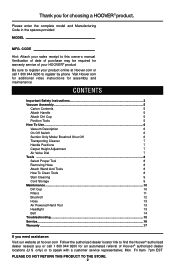
... referral of Hoover® authorized dealer locations (U S only) or to find the Hoover® authorized dealer nearest you for assembly and maintenance CONTENTS Important Safety Instructions 3 Vacuum Assembly...5 Carton Contents. 5 Attach Handle. 5 Attach Dirt Cup. 5 Position Tools. 5 How To Use...6 Vacuum Description. 6...13 Headlight. 13 Belt. 14 Troubleshooting...15 Service...16 Warranty...17 If you need assistance: Visit our website at hoover com Follow the authorized dealer locator link to speak with a customer service representative; CODE Hint: Attach your sales ...
... referral of Hoover® authorized dealer locations (U S only) or to find the Hoover® authorized dealer nearest you for assembly and maintenance CONTENTS Important Safety Instructions 3 Vacuum Assembly...5 Carton Contents. 5 Attach Handle. 5 Attach Dirt Cup. 5 Position Tools. 5 How To Use...6 Vacuum Description. 6...13 Headlight. 13 Belt. 14 Troubleshooting...15 Service...16 Warranty...17 If you need assistance: Visit our website at hoover com Follow the authorized dealer locator link to speak with a customer service representative; CODE Hint: Attach your sales ...
Product Manual
Page 5
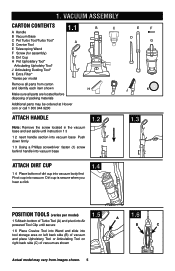
...packing materials Additional parts may be ordered at Hoover com or call 1 800 944 9200 B H C E F D G J K ATTACH HANDLE Note: Remove the screw located in the vacuum base and set aside until instruction 1 3 1 2 nsert handle section into vacuum base Push down firmly 1 3 Using a... Phillips screwdriver fasten (1) screw behind handle into vacuum base 1.2 1.3 ATTACH DIRT CUP 1 4 Place bottom of dirt cup into vacuum body first Pivot cup into vacuum Dirt cup is secure when you hear a click 1.4 ...
...packing materials Additional parts may be ordered at Hoover com or call 1 800 944 9200 B H C E F D G J K ATTACH HANDLE Note: Remove the screw located in the vacuum base and set aside until instruction 1 3 1 2 nsert handle section into vacuum base Push down firmly 1 3 Using a... Phillips screwdriver fasten (1) screw behind handle into vacuum base 1.2 1.3 ATTACH DIRT CUP 1 4 Place bottom of dirt cup into vacuum body first Pivot cup into vacuum Dirt cup is secure when you hear a click 1.4 ...
Product Manual
Page 6
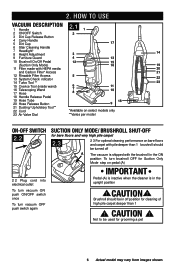
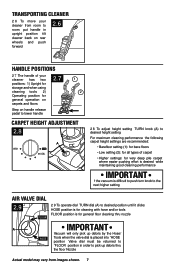
... pile carpet deeper than 1 brushroll should be used for Suction Only Mode step on bare floors and carpet with pile deeper than 1 ! HOW TO USE VACUUM DESCRIPTION 1 Handle 2.1 1 2 ON/OFF Switch 2 3 Dirt Cup Release Button 4 Carry Handle 5 Dirt Cup 17 6 Stair Cleaning Handle 7 Headlight* 8 Height Adjustment 3 ...only 23 Air Valve Dial **Varies per model ON-OFF SWITCH 2.2 2 2 Plug cord into electrical outlet To turn vacuum ON push ON/OFF switch once To turn vacuum OFF push switch again SUCTION ONLY MODE/ BRUSHROLL SHUT-OFF for bare floors and very high pile carpet 2.3 2 3...
... pile carpet deeper than 1 brushroll should be used for Suction Only Mode step on bare floors and carpet with pile deeper than 1 ! HOW TO USE VACUUM DESCRIPTION 1 Handle 2.1 1 2 ON/OFF Switch 2 3 Dirt Cup Release Button 4 Carry Handle 5 Dirt Cup 17 6 Stair Cleaning Handle 7 Headlight* 8 Height Adjustment 3 ...only 23 Air Valve Dial **Varies per model ON-OFF SWITCH 2.2 2 2 Plug cord into electrical outlet To turn vacuum ON push ON/OFF switch once To turn vacuum OFF push switch again SUCTION ONLY MODE/ BRUSHROLL SHUT-OFF for bare floors and very high pile carpet 2.3 2 3...
Product Manual
Page 7
...all types of carpet • Higher settings: for very deep pile carpet where easier pushing effort is desired while maintaining good cleaning performance IMPORTANT f the vacuum is difficult to push turn knob to the next higher setting AIR VALVE DIAL 2.9 FLOOR 2 9 To operate dial TURN dial (A) to desired position... until it clicks HOSE position is for cleaning with hose and/or tools FLOOR position is for general floor cleaning thru nozzle A IMPORTANT Vacuum will only pick up debris by the Hose/ HOSE Tools when the valve dial is placed into "HOSE position Valve dial must be ...
...all types of carpet • Higher settings: for very deep pile carpet where easier pushing effort is desired while maintaining good cleaning performance IMPORTANT f the vacuum is difficult to push turn knob to the next higher setting AIR VALVE DIAL 2.9 FLOOR 2 9 To operate dial TURN dial (A) to desired position... until it clicks HOSE position is for cleaning with hose and/or tools FLOOR position is for general floor cleaning thru nozzle A IMPORTANT Vacuum will only pick up debris by the Hose/ HOSE Tools when the valve dial is placed into "HOSE position Valve dial must be ...

Product Manual
Page 8
3. CAUTION ! TOOLS Tools allow for cleaning surfaces above the floor and for reaching hard to clean areas The vacuum is ready for tool use press the hose release button and pull hose end out 3.3 A FLOOR To lock back into place push hose into "HOSE ...position Valve dial must be used to clean hard to collapse IMPORTANT Vacuum will not rotate when the cleaner is used to give extra length to your hose D Crevice Tool may be used in tight spaces corners and...
3. CAUTION ! TOOLS Tools allow for cleaning surfaces above the floor and for reaching hard to clean areas The vacuum is ready for tool use press the hose release button and pull hose end out 3.3 A FLOOR To lock back into place push hose into "HOSE ...position Valve dial must be used to clean hard to collapse IMPORTANT Vacuum will not rotate when the cleaner is used to give extra length to your hose D Crevice Tool may be used in tight spaces corners and...
Product Manual
Page 9
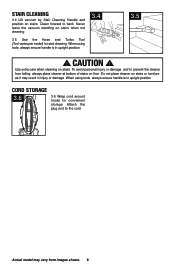
... always ensure handle is in upright position CORD STORAGE 3.6 3 6 Wrap cord around hooks for convenient storage Attach the plug end to back Never leave the vacuum standing on stairs Clean forward to the cord Actual model may vary from images shown. 9 CAUTION ! STAIR CLEANING 3 4 Lift... vacuum by Stair Cleaning Handle and position on stairs when not cleaning 3 5 Use the Hose and Turbo Tool (Tool varies per model) for stair cleaning When ...
... always ensure handle is in upright position CORD STORAGE 3.6 3 6 Wrap cord around hooks for convenient storage Attach the plug end to back Never leave the vacuum standing on stairs Clean forward to the cord Actual model may vary from images shown. 9 CAUTION ! STAIR CLEANING 3 4 Lift... vacuum by Stair Cleaning Handle and position on stairs when not cleaning 3 5 Use the Hose and Turbo Tool (Tool varies per model) for stair cleaning When ...
Product Manual
Page 10
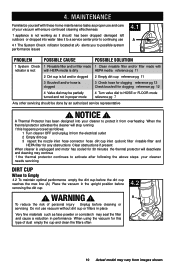
...images shown. NOTICE ! WARNING ! A Thermal Protector has been designed into water take it to a service center prior to continuing use vacuum without dirt cup or filters in place Very fine materials such as it should be partially turned and not in proper mode 4 Turn ...minutes the thermal protector will deactivate and cleaning may continue f the thermal protector continues to activate after following the above steps your vacuum will ensure continued cleaning effectiveness f appliance is not working as face powder or cornstarch may vary from overheating When the thermal protector...
...images shown. NOTICE ! WARNING ! A Thermal Protector has been designed into water take it to a service center prior to continuing use vacuum without dirt cup or filters in place Very fine materials such as it should be partially turned and not in proper mode 4 Turn ...minutes the thermal protector will deactivate and cleaning may continue f the thermal protector continues to activate after following the above steps your vacuum will ensure continued cleaning effectiveness f appliance is not working as face powder or cornstarch may vary from overheating When the thermal protector...
Product Manual
Page 11
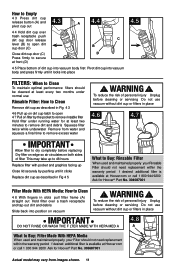
... first Pivot dirt cup into vacuum body and press firmly until it locks into place 4.5 FILTERS: When to Clean To maintain optimal performance filters should not need replacement within the warranty period f desired additional filter is available at Hoover com or call 1 800 944 9200 Ask for at least two minutes to...
... first Pivot dirt cup into vacuum body and press firmly until it locks into place 4.5 FILTERS: When to Clean To maintain optimal performance filters should not need replacement within the warranty period f desired additional filter is available at Hoover com or call 1 800 944 9200 Ask for at least two minutes to...
Product Manual
Page 12
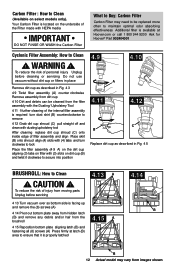
... 4 10 Dirt and debris can be replaced more often to maintain optimal odor absorbing effectiveness Additional filter is available at Hoover com or call 1 800 944 9200 Ask for Hoover® Part 902404001 Cyclonic Filter Assembly: How to Clean ! CAUTION ! To reduce the risk of personal injury Unplug before... servicing 4.13 A 4 13 Turn vacuum over so bottom side is facing up and remove the (6) screws (A) 4 14 Pivot out bottom plate ...
... 4 10 Dirt and debris can be replaced more often to maintain optimal odor absorbing effectiveness Additional filter is available at Hoover com or call 1 800 944 9200 Ask for Hoover® Part 902404001 Cyclonic Filter Assembly: How to Clean ! CAUTION ! To reduce the risk of personal injury Unplug before... servicing 4.13 A 4 13 Turn vacuum over so bottom side is facing up and remove the (6) screws (A) 4 14 Pivot out bottom plate ...
Product Manual
Page 13
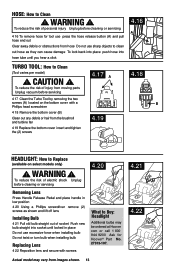
...4 19 Replace the bottom cover insert and tighten the (2) screws 4.17 A 4.19 4.18 B HEADLIGHT: How to Buy: Headlight Additional bulbs may be ordered at Hoover com or call 1 800 944 9200 Ask for tool use press the hose release button (A) and pull hose end out Clear away debris or obstructions... any debris or hair from images shown. 13 4.21 4.22 To reduce the risk of injury from moving parts Unplug vacuum before cleaning or servicing 4 16 To remove hose for Hoover® Part No. 27313-107. WARNING ! To reduce the risk of electric shock Unplug before cleaning or servicing Removing ...
...4 19 Replace the bottom cover insert and tighten the (2) screws 4.17 A 4.19 4.18 B HEADLIGHT: How to Buy: Headlight Additional bulbs may be ordered at Hoover com or call 1 800 944 9200 Ask for tool use press the hose release button (A) and pull hose end out Clear away debris or obstructions... any debris or hair from images shown. 13 4.21 4.22 To reduce the risk of injury from moving parts Unplug vacuum before cleaning or servicing 4 16 To remove hose for Hoover® Part No. 27313-107. WARNING ! To reduce the risk of electric shock Unplug before cleaning or servicing Removing ...
Product Manual
Page 14
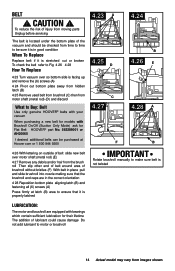
... cut or broken To check the belt refer to Fig 4 26 4 28 How To Replace 4 23 Turn vacuum over so bottom side is facing up and remove the (6) screws (A) 4 24 Pivot out bottom plate away... (metal rod) (D) and discard What to Buy: Belt Use only genuine HOOVER® belts with your vacuum When purchasing a new belt for models with Brushroll On/Off (Suction Only Mode) ask for Flat ...Belt HOOVER® part No. 562289001 or AH20065 f desired additional belts can be purchased at Hoover com or ...
... cut or broken To check the belt refer to Fig 4 26 4 28 How To Replace 4 23 Turn vacuum over so bottom side is facing up and remove the (6) screws (A) 4 24 Pivot out bottom plate away... (metal rod) (D) and discard What to Buy: Belt Use only genuine HOOVER® belts with your vacuum When purchasing a new belt for models with Brushroll On/Off (Suction Only Mode) ask for Flat ...Belt HOOVER® part No. 562289001 or AH20065 f desired additional belts can be purchased at Hoover com or ...
Product Manual
Page 15
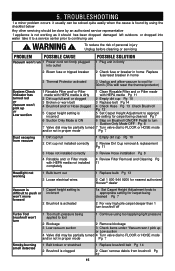
... checklist below Any other servicing should be done by an authorized service representative f appliance is not working 1 Bulb burnt out 2 Loose electrical wires Vacuum is 1 Carpet height setting is difficult to push or incorrect won't move forward 2 Brushroll is activated 1 Replace bulb Pg 13 2 Call 1... 800 944 9200 for nearest authorized Hoover® dealer 1a Set Carpet Height Adjustment knob to appropriate setting for carpet being cleaned Pg 7 2 For very high pile carpet deeper than ...
... checklist below Any other servicing should be done by an authorized service representative f appliance is not working 1 Bulb burnt out 2 Loose electrical wires Vacuum is 1 Carpet height setting is difficult to push or incorrect won't move forward 2 Brushroll is activated 1 Replace bulb Pg 13 2 Call 1... 800 944 9200 for nearest authorized Hoover® dealer 1a Set Carpet Height Adjustment knob to appropriate setting for carpet being cleaned Pg 7 2 For very high pile carpet deeper than ...

Product Manual
Page 16
...locations call 1 800 944 9200 Do not send your vacuum by : • Checking the Yellow Pages under "Vacuum Cleaners or "Household • Visit our website at hoover com (U S Customers) or hoover ca (Canadian customers) Follow the service center link to Hoover® nc Company in Glenwillow for service This will... only result in delay If you need further assistance: To speak with a customer service representative call 1 800 944 9200; Mon Fri 8am 7pm EST Always identify your vacuum to find the service ...
...locations call 1 800 944 9200 Do not send your vacuum by : • Checking the Yellow Pages under "Vacuum Cleaners or "Household • Visit our website at hoover com (U S Customers) or hoover ca (Canadian customers) Follow the service center link to Hoover® nc Company in Glenwillow for service This will... only result in delay If you need further assistance: To speak with a customer service representative call 1 800 944 9200; Mon Fri 8am 7pm EST Always identify your vacuum to find the service ...


