
Product Manual
Page 1
For assistance, please call Customer Service at 1-800-944-9200 Mon-Fri 8am-7pm EST. THIS PRODUCT IS INTENDED FOR HOUSEHOLD USE ONLY. OWNER'S MANUAL Operating and Servicing Instructions Español - IF USED COMMERCIALLY WARRANTY IS VOID. ©2018 Techtronic Floor Care Technology Limited. PLEASE DO NOT RETURN THIS PRODUCT TO THE STORE. All Rights Reserved. #961151059-R5 página E1 www.hoover.com IMPORTANT: READ CAREFULLY BEFORE ASSEMBLY AND USE. Questions or concerns?
For assistance, please call Customer Service at 1-800-944-9200 Mon-Fri 8am-7pm EST. THIS PRODUCT IS INTENDED FOR HOUSEHOLD USE ONLY. OWNER'S MANUAL Operating and Servicing Instructions Español - IF USED COMMERCIALLY WARRANTY IS VOID. ©2018 Techtronic Floor Care Technology Limited. PLEASE DO NOT RETURN THIS PRODUCT TO THE STORE. All Rights Reserved. #961151059-R5 página E1 www.hoover.com IMPORTANT: READ CAREFULLY BEFORE ASSEMBLY AND USE. Questions or concerns?
Product Manual
Page 2
... Vacuum Assembly...5 Carton Contents...5 Attach Handle...5 Attach Dirt Cup...5 Position Tools...5 How To Use...6 Vacuum Description 6 On-Off Switch...6 Suction Only Mode/ Brushroll Shut-Off 6 Transporting Cleaner 7 Handle Positions...7 Carpet Height Adjustment 7 Air Valve Dial...7 Tools ...8 Select Proper Tool...8 Removing Hose...8 Attach Wand And Tools 8 How To Clean Tools 8 Stair Cleaning...9 Cord Storage...9 Maintenance...10 Dirt Cup...10 Filters...11 Brushroll...12 Hose...13 Air-Powered Hand Tool 13 Headlight...13 Belt...14 Troubleshooting...15 Service...16 Warranty...17 If you need...
... Vacuum Assembly...5 Carton Contents...5 Attach Handle...5 Attach Dirt Cup...5 Position Tools...5 How To Use...6 Vacuum Description 6 On-Off Switch...6 Suction Only Mode/ Brushroll Shut-Off 6 Transporting Cleaner 7 Handle Positions...7 Carpet Height Adjustment 7 Air Valve Dial...7 Tools ...8 Select Proper Tool...8 Removing Hose...8 Attach Wand And Tools 8 How To Clean Tools 8 Stair Cleaning...9 Cord Storage...9 Maintenance...10 Dirt Cup...10 Filters...11 Brushroll...12 Hose...13 Air-Powered Hand Tool 13 Headlight...13 Belt...14 Troubleshooting...15 Service...16 Warranty...17 If you need...

Product Manual
Page 3
.... WASH HANDS AFTER HANDLING. 3 WARNING: TO REDUCE THE RISK OF FIRE, ELECTRIC SHOCK OR INJURY: • Fully assemble before operating. • Operate cleaner only at bottom of dust, lint, hair, and anything that may be present. • Unplug before connecting Turbo Tool. • Do not pick up anything that is not working as it should always be used near children. Do not run appliance over cord...
.... WASH HANDS AFTER HANDLING. 3 WARNING: TO REDUCE THE RISK OF FIRE, ELECTRIC SHOCK OR INJURY: • Fully assemble before operating. • Operate cleaner only at bottom of dust, lint, hair, and anything that may be present. • Unplug before connecting Turbo Tool. • Do not pick up anything that is not working as it should always be used near children. Do not run appliance over cord...

Product Manual
Page 4
...; Do not use sharp objects to clean out hose as they may cause damage. • Store appropriately indoors in one way. This plug will fit in a polarized outlet only one location for an extended period of electric shock, this product, as damage to floor can cause damage. • With brushroll on, do not allow cleaner to install the proper outlet...
...; Do not use sharp objects to clean out hose as they may cause damage. • Store appropriately indoors in one way. This plug will fit in a polarized outlet only one location for an extended period of electric shock, this product, as damage to floor can cause damage. • With brushroll on, do not allow cleaner to install the proper outlet...

Product Manual
Page 5
...Vacuum Base C. Push down firmly. 1.3 Using a Phillips screwdriver, fasten (1) screw behind handle into vacuum base. Pet Upholstery Tool* I E F D G J K 1.3 ATTACH DIRT CUP 1.4 Place bottom of packing materials. B H ATTACH HANDLE 1.2 Note: Remove the screw located in the vacuum base and set aside until secure. 1. Dirt Cup H. C I . Dirt cup is secure when you hear a click. 1.4 POSITION TOOLS (varies per model 1.1 A Remove all parts are located before disposing of dirt cup into Air powered Tool Clip until instruction 1.3 1.2 Insert handle section into vacuum...
...Vacuum Base C. Push down firmly. 1.3 Using a Phillips screwdriver, fasten (1) screw behind handle into vacuum base. Pet Upholstery Tool* I E F D G J K 1.3 ATTACH DIRT CUP 1.4 Place bottom of packing materials. B H ATTACH HANDLE 1.2 Note: Remove the screw located in the vacuum base and set aside until secure. 1. Dirt Cup H. C I . Dirt cup is secure when you hear a click. 1.4 POSITION TOOLS (varies per model 1.1 A Remove all parts are located before disposing of dirt cup into Air powered Tool Clip until instruction 1.3 1.2 Insert handle section into vacuum...
Product Manual
Page 6
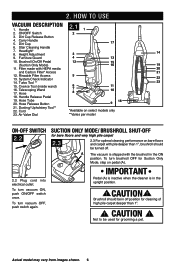
Handle 2.1 1 2. Dirt Cup 17 6. Height Adjustment 3 14 9. Turbo Tool ** 15. Air Valve Dial **Varies per model ON-OFF SWITCH 2.2 2.2 Plug cord into electrical outlet. IMPORTANT Pedal (A) is inactive when the cleaner is shipped with HEPA media 20 and Carbon Filter* Access 21 12. Furniture Guard 4 13 10. Filter made with the brushroll in the ON position. Crevice Tool (inside wand) 16. Dusting/ Upholstery Tool** 22. To turn vacuum ON, push ON/OFF...
Handle 2.1 1 2. Dirt Cup 17 6. Height Adjustment 3 14 9. Turbo Tool ** 15. Air Valve Dial **Varies per model ON-OFF SWITCH 2.2 2.2 Plug cord into electrical outlet. IMPORTANT Pedal (A) is inactive when the cleaner is shipped with HEPA media 20 and Carbon Filter* Access 21 12. Furniture Guard 4 13 10. Filter made with the brushroll in the ON position. Crevice Tool (inside wand) 16. Dusting/ Upholstery Tool** 22. To turn vacuum ON, push ON/OFF...

Product Manual
Page 7
... the vacuum is for cleaning with hose and/or tools. AIR VALVE DIAL 2.9 FLOOR 2.9 To operate dial, TURN dial (A) to desired position until it clicks. FLOOR position is for general floor cleaning thru nozzle. TRANSPORTING CLEANER 2.6 To move your cleaner has two positions: 1) Upright for storage and when using cleaning tools. 2) Operating position for general operation on carpets and floors. 2.7 Step on rear wheels and push forward. 2.6 HANDLE POSITIONS 2.7 The handle of carpet. • Higher settings: for...
... the vacuum is for cleaning with hose and/or tools. AIR VALVE DIAL 2.9 FLOOR 2.9 To operate dial, TURN dial (A) to desired position until it clicks. FLOOR position is for general floor cleaning thru nozzle. TRANSPORTING CLEANER 2.6 To move your cleaner has two positions: 1) Upright for storage and when using cleaning tools. 2) Operating position for general operation on carpets and floors. 2.7 Step on rear wheels and push forward. 2.6 HANDLE POSITIONS 2.7 The handle of carpet. • Higher settings: for...
Product Manual
Page 8
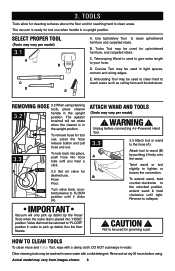
.... Turbo Tool may be used to clean hard to pick up debris by pushing it clicks (A). Crevice Tool may be used for tool use when handle is in water. REMOVING HOSE 3.2 When using . WARNING ! Rinse and air dry 24 hours before connecting Air-Powered Hand Tool. 3.3 A B 3.3 Attach tool or wand to clean upholstered furniture and carpeted stairs. D. To remove hose for grooming a pet. E. ATTACH WAND AND TOOLS (Tools may vary per model) ! Unplug before using cleaning tools, place cleaner 3.2 handle in upright position. HOSE Turn valve...
.... Turbo Tool may be used to clean hard to pick up debris by pushing it clicks (A). Crevice Tool may be used for tool use when handle is in water. REMOVING HOSE 3.2 When using . WARNING ! Rinse and air dry 24 hours before connecting Air-Powered Hand Tool. 3.3 A B 3.3 Attach tool or wand to clean upholstered furniture and carpeted stairs. D. To remove hose for grooming a pet. E. ATTACH WAND AND TOOLS (Tools may vary per model) ! Unplug before using cleaning tools, place cleaner 3.2 handle in upright position. HOSE Turn valve...

Product Manual
Page 9
... bottom of stairs on stairs when not cleaning. 3.5 Use the Hose and Turbo Tool (Tool varies per model) for convenient storage. Do not place cleaner on stairs. Attach the plug end to back. CAUTION ! Clean forward to the cord. 9 Actual model may result in upright position. 3.4 3.5 ! Never leave the vacuum standing on floor. CORD STORAGE 3.6 3.6 Wrap cord around hooks for stair cleaning. To avoid personal injury or damage, and...
... bottom of stairs on stairs when not cleaning. 3.5 Use the Hose and Turbo Tool (Tool varies per model) for convenient storage. Do not place cleaner on stairs. Attach the plug end to back. CAUTION ! Clean forward to the cord. 9 Actual model may result in upright position. 3.4 3.5 ! Never leave the vacuum standing on floor. CORD STORAGE 3.6 3.6 Wrap cord around hooks for stair cleaning. To avoid personal injury or damage, and...
Product Manual
Page 10
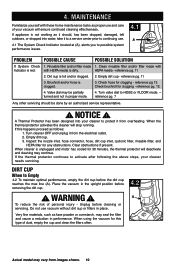
... vary from overheating. Actual model may seal the filter and cause a reduction in the upright position before cleaning or servicing. 4. reference pg. 12. 4. NOTICE ! A Thermal Protector has been designed into water, take it from the electrical outlet. 2. reference pg 13. A To reduce the risk of your cleaner needs servicing. Do not use and care of personal injury - Dirt cup is clogged. 4. Check hose for clogging - Place the vacuum in performance. Turn valve...
... vary from overheating. Actual model may seal the filter and cause a reduction in the upright position before cleaning or servicing. 4. reference pg. 12. 4. NOTICE ! A Thermal Protector has been designed into water, take it from the electrical outlet. 2. reference pg 13. A To reduce the risk of your cleaner needs servicing. Do not use and care of personal injury - Dirt cup is clogged. 4. Check hose for clogging - Place the vacuum in performance. Turn valve...
Product Manual
Page 11
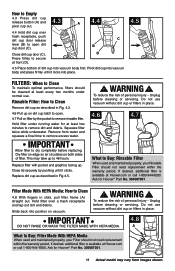
... running water for Hoover® Part No. 304087001 Filter Made With HEPA Media: How to Clean 4.8 With fingers in place. How to Empty 4.3 Press dirt cup release button (A) and pivot cup out. 4.3 A 4.4 4.4 Hold dirt cup over a trash receptacle and tap out dirt and debris. Remove from images shown. IMPORTANT Allow filter to remove dirt and debris. Replace dirt cup as described in Fig. 4.3. 4.6 Pull up on dirt cup latch to open dirt cup door (C). Do not use vacuum without dirt cup...
... running water for Hoover® Part No. 304087001 Filter Made With HEPA Media: How to Clean 4.8 With fingers in place. How to Empty 4.3 Press dirt cup release button (A) and pivot cup out. 4.3 A 4.4 4.4 Hold dirt cup over a trash receptacle and tap out dirt and debris. Remove from images shown. IMPORTANT Allow filter to remove dirt and debris. Replace dirt cup as described in Fig. 4.3. 4.6 Pull up on dirt cup latch to open dirt cup door (C). Do not use vacuum without dirt cup...
Product Manual
Page 12
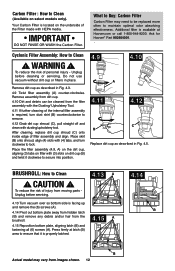
... turn dust skirt (B) counterclockwise to remove. 4.12 Grab dirt cup shroud (C), pull straight off and clean with (3) slots on filter with dusting/upholstery tool. Your Carbon Filter is required, turn clockwise to secure into position. 4.9 4.10 A 4.11 4.12 C B Replace dirt cup as described in place. WARNING ! Place skirt (B) onto shroud, align (4) slots with HEPA media. IMPORTANT DO NOT RINSE OR WASH the Carbon Filter. Ask for Hoover® Part...
... turn dust skirt (B) counterclockwise to remove. 4.12 Grab dirt cup shroud (C), pull straight off and clean with (3) slots on filter with dusting/upholstery tool. Your Carbon Filter is required, turn clockwise to secure into position. 4.9 4.10 A 4.11 4.12 C B Replace dirt cup as described in place. WARNING ! Place skirt (B) onto shroud, align (4) slots with HEPA media. IMPORTANT DO NOT RINSE OR WASH the Carbon Filter. Ask for Hoover® Part...
Product Manual
Page 13
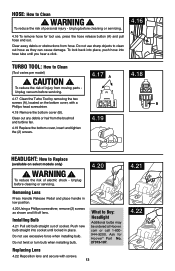
... of injury from moving parts Unplug vacuum before servicing. 4.17 Clean the Turbo Tool by removing the two screws (A), located on select models only) ! To lock back into place, push hose into socket until you hear a click. 4.16 A TURBO TOOL: How to Clean (Tool varies per model) ! Clean out any debris or hair from hose. Do not twist or turn bulb when installing bulb. What to Clean ! Replacing Lens 4.22 Reposition...
... of injury from moving parts Unplug vacuum before servicing. 4.17 Clean the Turbo Tool by removing the two screws (A), located on select models only) ! To lock back into place, push hose into socket until you hear a click. 4.16 A TURBO TOOL: How to Clean (Tool varies per model) ! Clean out any debris or hair from hose. Do not twist or turn bulb when installing bulb. What to Clean ! Replacing Lens 4.22 Reposition...
Product Manual
Page 14
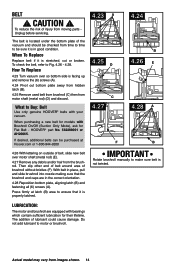
.... CAUTION ! When purchasing a new belt for models with Brushroll On/Off (Suction Only Mode), ask for their lifetime. BELT ! How To Replace 4.23 Turn vacuum over motor shaft (metal rod) (E). 4.27 Remove any debris and/or hair from moving parts Unplug before servicing. Do not add lubricant to motor or brushroll. 4.23 A 4.24 4.25 D B 4.26 E C 4.27 4.28 A F B IMPORTANT Rotate brushroll manually to ensure that...
.... CAUTION ! When purchasing a new belt for models with Brushroll On/Off (Suction Only Mode), ask for their lifetime. BELT ! How To Replace 4.23 Turn vacuum over motor shaft (metal rod) (E). 4.27 Remove any debris and/or hair from moving parts Unplug before servicing. Do not add lubricant to motor or brushroll. 4.23 A 4.24 4.25 D B 4.26 E C 4.27 4.28 A F B IMPORTANT Rotate brushroll manually to ensure that...
Product Manual
Page 15
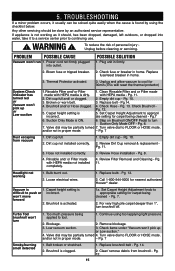
.... 4. Review Dirt Cup removal & replacement Pg. 11. 3. Valve dial may be done by using tool applying light pressure. 2. Brushroll is 1. To reduce the risk of personal injury Unplug before cleaning or servicing. Call 1-800-944-9200 for carpet being applied to FLOOR or HOSE mode. Continue using the checklist below. Low vacuum suction. 3. Belt broken or stretched. 1. Set Carpet Height Adjustment to appropriate setting for 30min.(This willl reset the thermal protector) System Check Indicator has turned red...
.... 4. Review Dirt Cup removal & replacement Pg. 11. 3. Valve dial may be done by using tool applying light pressure. 2. Brushroll is 1. To reduce the risk of personal injury Unplug before cleaning or servicing. Call 1-800-944-9200 for carpet being applied to FLOOR or HOSE mode. Continue using the checklist below. Low vacuum suction. 3. Belt broken or stretched. 1. Set Carpet Height Adjustment to appropriate setting for 30min.(This willl reset the thermal protector) System Check Indicator has turned red...

Product Manual
Page 16
... PRODUCT TO THE STORE. 16 Mon-Fri 8am-7pm EST. Always identify your vacuum to find the service outlet nearest you need further assistance: To speak with a customer service representative call 1-800-944-9200. SERVICE To obtain approved Hoover® service and genuine Hoover® parts, locate the nearest Authorized Hoover® Warranty Service Dealer (Depot) by the complete model number when requesting information or ordering parts...
... PRODUCT TO THE STORE. 16 Mon-Fri 8am-7pm EST. Always identify your vacuum to find the service outlet nearest you need further assistance: To speak with a customer service representative call 1-800-944-9200. SERVICE To obtain approved Hoover® service and genuine Hoover® parts, locate the nearest Authorized Hoover® Warranty Service Dealer (Depot) by the complete model number when requesting information or ordering parts...

Product Manual
Page 17
... or information concerning this Warranty. Military Exchange and outside a U.S. This Warranty shall be assigned. This warranty gives you . WHAT THIS WARRANTY DOES NOT COVER This Warranty does not cover: use of the product in a commercial operation (such as warranted, take or send the product to either a Hoover® Authorized Warranty Service Dealer along with the Owner's Manual, your product to a Hoover® Authorized Warranty Service Dealer, cost of consequential...
... or information concerning this Warranty. Military Exchange and outside a U.S. This Warranty shall be assigned. This warranty gives you . WHAT THIS WARRANTY DOES NOT COVER This Warranty does not cover: use of the product in a commercial operation (such as warranted, take or send the product to either a Hoover® Authorized Warranty Service Dealer along with the Owner's Manual, your product to a Hoover® Authorized Warranty Service Dealer, cost of consequential...


