Product Manual
Page 3
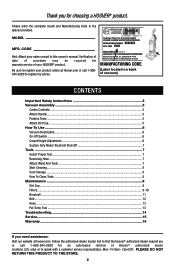
...may be required for choosing a HOOVER® product. only) or to this owner's manual. PLEASE DO NOT RETURN THIS PRODUCT TO THE STORE. 2 MANUFACTURING CODE (Label located on back of vacuum) CONTENTS Important Safety Instructions 3 Vacuum Assembly 5 Carton Contents...5 Attach ...Handle...5 Position Tools...5 Attach Dirt Cup...5 How To Use...6 Vacuum Description...6 On-Off Switch...6 Carpet Height Adjustment...6 Suction Only Mode/ ...
...may be required for choosing a HOOVER® product. only) or to this owner's manual. PLEASE DO NOT RETURN THIS PRODUCT TO THE STORE. 2 MANUFACTURING CODE (Label located on back of vacuum) CONTENTS Important Safety Instructions 3 Vacuum Assembly 5 Carton Contents...5 Attach ...Handle...5 Position Tools...5 Attach Dirt Cup...5 How To Use...6 Vacuum Description...6 On-Off Switch...6 Carpet Height Adjustment...6 Suction Only Mode/ ...

Product Manual
Page 6
... dust, lint, hair, and anything that may result in injury or damage. • Do not use to rotate when in the upright position, unless the vacuum is necessary when used as described in this manual. Do not place cleaner on stairs or furniture, as it should always be used near children...
... dust, lint, hair, and anything that may result in injury or damage. • Do not use to rotate when in the upright position, unless the vacuum is necessary when used as described in this manual. Do not place cleaner on stairs or furniture, as it should always be used near children...
Product Manual
Page 7
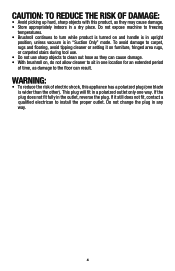
... tool use. • Do not use sharp objects to the floor can cause damage. • With brushroll on and handle is in upright position, unless vacuum is wider than the other). CAUTION: TO REDUCE THE RISK OF DAMAGE: • Avoid picking up hard, sharp objects with this appliance has a polarized plug...
... tool use. • Do not use sharp objects to the floor can cause damage. • With brushroll on and handle is in upright position, unless vacuum is wider than the other). CAUTION: TO REDUCE THE RISK OF DAMAGE: • Avoid picking up hard, sharp objects with this appliance has a polarized plug...

Product Manual
Page 10
... Wand and slide onto the unit on left back side (C) of vacuum and place Pet Turbo Tool on right back side (E) of vacuum as shown. 1.5 Place Pet Articulating Tool (F) on the handle. Telescoping Wand D. Vacuum Base C. Pet Turbo Tool F. Pet Articulating Tool G. (1) Large ...Crevice Tool E. E F H ATTACH HANDLE 1.2 Insert handle section into vacuum. Insert the hose into vacuum body first. Make sure all parts from images shown. Using a Phillips screwdriver, fasten (1) large screw behind handle into vacuum base. 1.3 Wrap hose around top of hose guide located on top of...
... Wand and slide onto the unit on left back side (C) of vacuum and place Pet Turbo Tool on right back side (E) of vacuum as shown. 1.5 Place Pet Articulating Tool (F) on the handle. Telescoping Wand D. Vacuum Base C. Pet Turbo Tool F. Pet Articulating Tool G. (1) Large ...Crevice Tool E. E F H ATTACH HANDLE 1.2 Insert handle section into vacuum. Insert the hose into vacuum body first. Make sure all parts from images shown. Using a Phillips screwdriver, fasten (1) large screw behind handle into vacuum base. 1.3 Wrap hose around top of hose guide located on top of...
Product Manual
Page 11
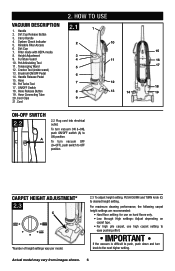
2. Filter made with HEPA media 15 8. Pet Articulating Tool 11. Handle Release Pedal 6 15. To turn vacuum OFF (O=OFF), push switch to OFF position. To turn vacuum ON (I=0N), push ON/OFF switch (A) to the next higher setting. CARPET HEIGHT ADJUSTMENT* 2.3 C *Number of height settings ...Dirt Cup 7. Hose 16. Pet Turbo Tool 7 12 17. Actual model may vary from images shown. 6 Cord Clips 9 21. IMPORTANT If the vacuum is difficult to push, push down and turn knob to ON position. Height Adjustment 3 9. Crevice Tool (inside wand) 13. System Check Indicator 5....
2. Filter made with HEPA media 15 8. Pet Articulating Tool 11. Handle Release Pedal 6 15. To turn vacuum OFF (O=OFF), push switch to OFF position. To turn vacuum ON (I=0N), push ON/OFF switch (A) to the next higher setting. CARPET HEIGHT ADJUSTMENT* 2.3 C *Number of height settings ...Dirt Cup 7. Hose 16. Pet Turbo Tool 7 12 17. Actual model may vary from images shown. 6 Cord Clips 9 21. IMPORTANT If the vacuum is difficult to push, push down and turn knob to ON position. Height Adjustment 3 9. Crevice Tool (inside wand) 13. System Check Indicator 5....
Product Manual
Page 14
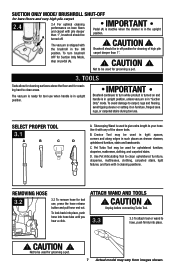
...be used for bare floors and very high pile carpet 2.4 2.4 For optimal cleaning performance on and handle is in upright position, unless vacuum is in off . REMOVING HOSE 3.2 3.2 To remove hose for Suction Only Mode, step on furniture, fringed area rugs, or carpeted..., stairs and baseboards. B. Use Pet Articulating Tool to carpet, rugs and flooring, avoid tipping cleaner or setting it with pile deeper than 1". ! The vacuum is in "Suction Only" mode. SELECT PROPER TOOL 3.1 A B C D A. ATTACH WAND AND TOOLS ! IMPORTANT Pedal (A) is inactive when the cleaner...
...be used for bare floors and very high pile carpet 2.4 2.4 For optimal cleaning performance on and handle is in upright position, unless vacuum is in off . REMOVING HOSE 3.2 3.2 To remove hose for Suction Only Mode, step on furniture, fringed area rugs, or carpeted..., stairs and baseboards. B. Use Pet Articulating Tool to carpet, rugs and flooring, avoid tipping cleaner or setting it with pile deeper than 1". ! The vacuum is in "Suction Only" mode. SELECT PROPER TOOL 3.1 A B C D A. ATTACH WAND AND TOOLS ! IMPORTANT Pedal (A) is inactive when the cleaner...
Product Manual
Page 15
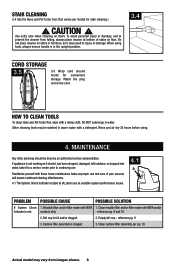
... servicing should , has been dropped, damaged, left outdoors, or dropped into water, take it may vary from falling, always place cleaner at bottom of your vacuum will ensure continued cleaning effectiveness. 4.1 The System Check Indicator located at (A), alerts you to the cord. Rinsable filter and/or filter made with a damp cloth...
... servicing should , has been dropped, damaged, left outdoors, or dropped into water, take it may vary from falling, always place cleaner at bottom of your vacuum will ensure continued cleaning effectiveness. 4.1 The System Check Indicator located at (A), alerts you to the cord. Rinsable filter and/or filter made with a damp cloth...
Product Manual
Page 18
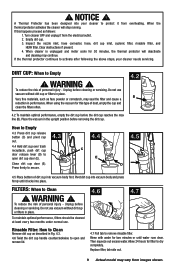
... open and remove lid. 4.7 Pull tab to secure. 4.2 B 4.5 4.5 Place bottom of personal injury - To reduce the risk of dirt cup into vacuum body and press firmly until water runs clear. Replace filter, tab side out. 9 Actual model may vary from the electrical outlet. 2. If this type ...filters often. 4.2 To maintain optimal performance, empty the dirt cup before removing the dirt cup. When using the vacuum for filter to Clean ! Do not use vacuum without dirt cup or filters in place. When the thermal protector activates the cleaner will deactivate and cleaning may seal...
... open and remove lid. 4.7 Pull tab to secure. 4.2 B 4.5 4.5 Place bottom of personal injury - To reduce the risk of dirt cup into vacuum body and press firmly until water runs clear. Replace filter, tab side out. 9 Actual model may vary from the electrical outlet. 2. If this type ...filters often. 4.2 To maintain optimal performance, empty the dirt cup before removing the dirt cup. When using the vacuum for filter to Clean ! Do not use vacuum without dirt cup or filters in place. When the thermal protector activates the cleaner will deactivate and cleaning may seal...

Product Manual
Page 19
... to open and remove lid as described in 4.6. 4.9 Pull filter assembly (G) out of filter. Ask for Hoover® Part No. 440008993. Unplug before cleaning or servicing. Do not use vacuum without dirt cup or filters in (C) until it clicks. 4.16 Filter diagram: (B) bottom filter. (C) upper... handle. ! Do not use vacuum without dirt cup or filters in Fig 4.5. Replace dirt cup as described in place. If desired, additional filter is available at Hoover.com or call 1-800-944-9200. This may vary from the filter assembly...
... to open and remove lid as described in 4.6. 4.9 Pull filter assembly (G) out of filter. Ask for Hoover® Part No. 440008993. Unplug before cleaning or servicing. Do not use vacuum without dirt cup or filters in (C) until it clicks. 4.16 Filter diagram: (B) bottom filter. (C) upper... handle. ! Do not use vacuum without dirt cup or filters in Fig 4.5. Replace dirt cup as described in place. If desired, additional filter is available at Hoover.com or call 1-800-944-9200. This may vary from the filter assembly...
Product Manual
Page 23
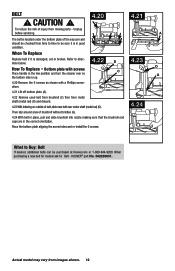
Refer to be purchased at Hoover.com or 1-800-944-9200. When purchasing a new belt for models ask for Belt - What to Buy: Belt If desired, additional belts can be sure ... the cleaner over so G the bottom side is located under the bottom plate of the vacuum and should be checked from images shown. 12 Place the bottom plate aligning the screw holes and re-install the 6 screws. HOOVER® part No. 562289001. When To Replace Replace belt if it is damaged, cut...
Refer to be purchased at Hoover.com or 1-800-944-9200. When purchasing a new belt for models ask for Belt - What to Buy: Belt If desired, additional belts can be sure ... the cleaner over so G the bottom side is located under the bottom plate of the vacuum and should be checked from images shown. 12 Place the bottom plate aligning the screw holes and re-install the 6 screws. HOOVER® part No. 562289001. When To Replace Replace belt if it is damaged, cut...

Product Manual
Page 26
... To remove hose for their lifetime. PET TURBO TOOL: How to motor or brushroll. Do not add lubricant to Clean (Tool varies per model) ! Unplug vacuum before cleaning or servicing. 4.25 A How to clean out hose as they can cause damage. Actual model may vary from hose. Do not use , press...
... To remove hose for their lifetime. PET TURBO TOOL: How to motor or brushroll. Do not add lubricant to Clean (Tool varies per model) ! Unplug vacuum before cleaning or servicing. 4.25 A How to clean out hose as they can cause damage. Actual model may vary from hose. Do not use , press...

Product Manual
Page 27
...cup - Review Hose installation - Set Carpet Height Adjustment knob to appropriate setting for carpet being applied to continuing use. Pg. 11 3. Check items under "Vacuum won 't run POSSIBLE CAUSE 1. Pg. 12. 2. Brushroll and/ or Hose clogged. 5. Belt broken or stretched. 2. Pg. 9 and 10. 2....the checklist below. ! If appliance is not working as it to a service center prior to tool. 2. Unplug before cleaning or servicing. Vacuum is clogged. Too much pressure being cleaned - Check fuse or breaker in firmly. 2. Replace fuse/reset breaker in home. 3. Empty ...
...cup - Review Hose installation - Set Carpet Height Adjustment knob to appropriate setting for carpet being applied to continuing use. Pg. 11 3. Check items under "Vacuum won 't run POSSIBLE CAUSE 1. Pg. 12. 2. Brushroll and/ or Hose clogged. 5. Belt broken or stretched. 2. Pg. 9 and 10. 2....the checklist below. ! If appliance is not working as it to a service center prior to tool. 2. Unplug before cleaning or servicing. Vacuum is clogged. Too much pressure being cleaned - Check fuse or breaker in firmly. 2. Replace fuse/reset breaker in home. 3. Empty ...

Product Manual
Page 30
...with a customer service representative call 1-800-944-9200. Customers) or hoover.ca (Canadian customers). Follow the service center link to Hoover®, Inc., Company in delay. If you . • For an automated referral of the vacuum.) PLEASE DO NOT RETURN THIS PRODUCT TO THE STORE. 15 6. ...SERVICE To obtain approved Hoover® service and genuine Hoover® parts, locate the nearest Authorized Hoover® Warranty Service Dealer (Depot) by the complete model number ...
...with a customer service representative call 1-800-944-9200. Customers) or hoover.ca (Canadian customers). Follow the service center link to Hoover®, Inc., Company in delay. If you . • For an automated referral of the vacuum.) PLEASE DO NOT RETURN THIS PRODUCT TO THE STORE. 15 6. ...SERVICE To obtain approved Hoover® service and genuine Hoover® parts, locate the nearest Authorized Hoover® Warranty Service Dealer (Depot) by the complete model number ...


