Product Manual
Page 3
...13 Troubleshooting 14 Service...15 Warranty...16 If you need assistance: Visit our website at Hoover.com or call 1-800-944-9200 for choosing a HOOVER® product. Mon- Please enter the complete model and Manufacturing Code in the spaces provided. Verification of date of purchase may be required... for warranty service of your sales receipt to register your product online at hoover.com. PLEASE DO NOT RETURN...
...13 Troubleshooting 14 Service...15 Warranty...16 If you need assistance: Visit our website at Hoover.com or call 1-800-944-9200 for choosing a HOOVER® product. Mon- Please enter the complete model and Manufacturing Code in the spaces provided. Verification of date of purchase may be required... for warranty service of your sales receipt to register your product online at hoover.com. PLEASE DO NOT RETURN...

Product Manual
Page 10
Vacuum Base C. Dirt Cup 1.1 B A C D *Varies per model. Remove all parts are located before G disposing of packing materials. Push down firmly. Dirt cup is secure when you hear a click. 1.2 1.3 POSITION TOOLS 1.4 Place Crevice ... a Phillips screwdriver, fasten (1) large screw behind handle into vacuum base. 1.3 Wrap hose around top of dirt cup into hose tube until you hear a click. 1.6 E 1.5 F 5 Actual model may vary from carton and identify each item shown. Insert the hose into vacuum body first. Pivot cup into vacuum base. Pet Turbo Tool F. 1. Crevice...
Vacuum Base C. Dirt Cup 1.1 B A C D *Varies per model. Remove all parts are located before G disposing of packing materials. Push down firmly. Dirt cup is secure when you hear a click. 1.2 1.3 POSITION TOOLS 1.4 Place Crevice ... a Phillips screwdriver, fasten (1) large screw behind handle into vacuum base. 1.3 Wrap hose around top of dirt cup into hose tube until you hear a click. 1.6 E 1.5 F 5 Actual model may vary from carton and identify each item shown. Insert the hose into vacuum body first. Pivot cup into vacuum base. Pet Turbo Tool F. 1. Crevice...
Product Manual
Page 11
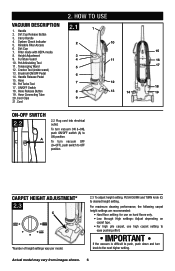
Dirt Cup Release Button 3. Hose 16. Cord Clips 9 21. To turn vacuum OFF (O=OFF), push switch to ON position. Actual model may vary from images shown. 6 Carry Handle 4. Furniture Guard 4 11 16 10. Hose Release Button 8 19. To turn knob to ...with HEPA media 15 8. ON/OFF Switch 18 18. HOW TO USE VACUUM DESCRIPTION 2.1 1 1. CARPET HEIGHT ADJUSTMENT* 2.3 C *Number of height settings vary per model. 2.3 To adjust height setting, PUSH DOWN and TURN knob (C) to the next higher setting. System Check Indicator 5. Telescoping Wand 5 17 12. Hose Connecting Tube...
Dirt Cup Release Button 3. Hose 16. Cord Clips 9 21. To turn vacuum OFF (O=OFF), push switch to ON position. Actual model may vary from images shown. 6 Carry Handle 4. Furniture Guard 4 11 16 10. Hose Release Button 8 19. To turn knob to ...with HEPA media 15 8. ON/OFF Switch 18 18. HOW TO USE VACUUM DESCRIPTION 2.1 1 1. CARPET HEIGHT ADJUSTMENT* 2.3 C *Number of height settings vary per model. 2.3 To adjust height setting, PUSH DOWN and TURN knob (C) to the next higher setting. System Check Indicator 5. Telescoping Wand 5 17 12. Hose Connecting Tube...
Product Manual
Page 14
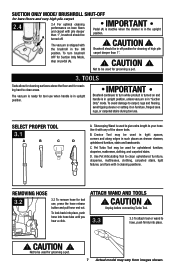
... while product is turned on bare floors and carpet with any of high pile carpet deeper than 1", brushroll should be used for grooming a pet. 7 Actual model may vary from images shown. CAUTION ! B. Brushroll should be in off position for cleaning of the above the floor and for reaching hard to hose...
... while product is turned on bare floors and carpet with any of high pile carpet deeper than 1", brushroll should be used for grooming a pet. 7 Actual model may vary from images shown. CAUTION ! B. Brushroll should be in off position for cleaning of the above the floor and for reaching hard to hose...
Product Manual
Page 15
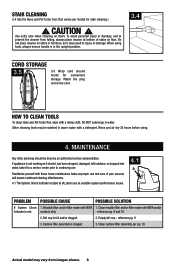
... Check 1. CAUTION ! Rinse and air dry 24 hours before using tools, always ensure handle is full and/or clogged. 2. Dirt cup is in water. Actual model may be done by an authorized service representative. STAIR CLEANING 3.4 Use the Hose and Pet Turbo Tool (Tool varies per pg. 10. To avoid personal.../or filter made with HEPA media Indicator is red: media is clogged. 3. Empty dirt cup - Cyclone filter assembly is dirty. - Clean cyclone filter assembly per model) for convenient storage.
... Check 1. CAUTION ! Rinse and air dry 24 hours before using tools, always ensure handle is full and/or clogged. 2. Dirt cup is in water. Actual model may be done by an authorized service representative. STAIR CLEANING 3.4 Use the Hose and Pet Turbo Tool (Tool varies per pg. 10. To avoid personal.../or filter made with HEPA media Indicator is red: media is clogged. 3. Empty dirt cup - Cyclone filter assembly is dirty. - Clean cyclone filter assembly per model) for convenient storage.
Product Manual
Page 18
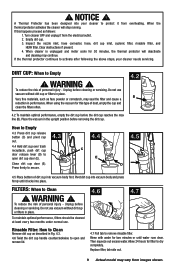
... protector will stop running. Empty dirt cup. 3. To reduce the risk of personal injury - Unplug before cleaning or servicing. Replace filter, tab side out. 9 Actual model may continue. When the thermal protector activates the cleaner will deactivate and cleaning may vary from the electrical outlet. 2. DIRT CUP: When to Clean ! ! A Thermal...
... protector will stop running. Empty dirt cup. 3. To reduce the risk of personal injury - Unplug before cleaning or servicing. Replace filter, tab side out. 9 Actual model may continue. When the thermal protector activates the cleaner will deactivate and cleaning may vary from the electrical outlet. 2. DIRT CUP: When to Clean ! ! A Thermal...

Product Manual
Page 19
... until it clicks. 4.16 Filter diagram: (B) bottom filter. (C) upper handle. ! Do not use vacuum without dirt cup or filters in place. Ask for Hoover® Part No. 304087001. 4.10 G H 4.12 Filter Made With HEPA Media: How to Clean 4.13 With fingers under filter door lip, pull filter ... 4.9 4.11 What to Buy: Rinsable Filter When used and maintained properly, your Rinsable Filter should not need replacement within the warranty period. Actual model may take up tabs (H) on both sides of dirt cup and remove. 4.10 Dirt and debris can be pushed back into place first. 4....
... until it clicks. 4.16 Filter diagram: (B) bottom filter. (C) upper handle. ! Do not use vacuum without dirt cup or filters in place. Ask for Hoover® Part No. 304087001. 4.10 G H 4.12 Filter Made With HEPA Media: How to Clean 4.13 With fingers under filter door lip, pull filter ... 4.9 4.11 What to Buy: Rinsable Filter When used and maintained properly, your Rinsable Filter should not need replacement within the warranty period. Actual model may take up tabs (H) on both sides of dirt cup and remove. 4.10 Dirt and debris can be pushed back into place first. 4....

Product Manual
Page 22
To reduce the risk of injury from brushroll. Bottom plate with screws Place handle in the low position and turn the cleaner over so the bottom side is up. 4.17 Remove the 6 screws as shown. 4.17 4.19 4.18 11 Actual model may vary from images shown. CAUTION ! Brushroll - Unplug before servicing. Replace the bottom plate aligning the screw holes and install the 6 screws as shown with a Phillips screwdriver. 4.18 Pivot off bottom plate. 4.19 Remove any debris and/or hair from moving parts - BRUSHROLL: How to Clean !
To reduce the risk of injury from brushroll. Bottom plate with screws Place handle in the low position and turn the cleaner over so the bottom side is up. 4.17 Remove the 6 screws as shown. 4.17 4.19 4.18 11 Actual model may vary from images shown. CAUTION ! Brushroll - Unplug before servicing. Replace the bottom plate aligning the screw holes and install the 6 screws as shown with a Phillips screwdriver. 4.18 Pivot off bottom plate. 4.19 Remove any debris and/or hair from moving parts - BRUSHROLL: How to Clean !
Product Manual
Page 23
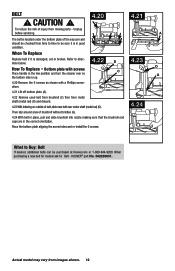
... in good condition. When To Replace Replace belt if it is damaged, cut or broken. Actual model may vary from moving parts - Place the bottom plate aligning the screw holes and re-install the 6 screws. HOOVER® part No. 562289001. Unplug before servicing. 4.20 4.21 A The belt is up. 4....4.21 Lift off bottom plate (A). 4.22 Remove used belt from brushroll (C) then from time to time to be purchased at Hoover.com or 1-800-944-9200. When purchasing a new belt for models ask for Belt - Bottom plate with screws C D Place handle in the low position and turn the cleaner over so G...
... in good condition. When To Replace Replace belt if it is damaged, cut or broken. Actual model may vary from moving parts - Place the bottom plate aligning the screw holes and re-install the 6 screws. HOOVER® part No. 562289001. Unplug before servicing. 4.20 4.21 A The belt is up. 4....4.21 Lift off bottom plate (A). 4.22 Remove used belt from brushroll (C) then from time to time to be purchased at Hoover.com or 1-800-944-9200. When purchasing a new belt for models ask for Belt - Bottom plate with screws C D Place handle in the low position and turn the cleaner over so G...

Product Manual
Page 26
... sharp objects to Clean 4.25 To remove hose for their lifetime. CAUTION ! Do not add lubricant to Clean (Tool varies per model) ! PET TURBO TOOL: How to motor or brushroll. Actual model may vary from the brushroll and turbine fan. 4.28 Replace the bottom cover, insert and tighten the (2) screws. 4.26 A 4.28...
... sharp objects to Clean 4.25 To remove hose for their lifetime. CAUTION ! Do not add lubricant to Clean (Tool varies per model) ! PET TURBO TOOL: How to motor or brushroll. Actual model may vary from the brushroll and turbine fan. 4.28 Replace the bottom cover, insert and tighten the (2) screws. 4.26 A 4.28...

Product Manual
Page 27
... Carpet Height Adjustment knob to tool. 2. Continue using the checklist below. ! Remove blockage - Check items under "Vacuum won 't run POSSIBLE CAUSE 1. Pg. 11. 14 Actual model may vary from vacuum 1.Rinsable Filter and/ or Filter made with HEPA media is dirty. 2. Blown fuse or tripped breaker. 3. Broken or worn belt. 4. Dirt...
... Carpet Height Adjustment knob to tool. 2. Continue using the checklist below. ! Remove blockage - Check items under "Vacuum won 't run POSSIBLE CAUSE 1. Pg. 11. 14 Actual model may vary from vacuum 1.Rinsable Filter and/ or Filter made with HEPA media is dirty. 2. Blown fuse or tripped breaker. 3. Broken or worn belt. 4. Dirt...

Product Manual
Page 30
...; Checking the Yellow Pages under "Vacuum Cleaners" or "Household". • Visit our website at hoover.com (U.S. This will only result in Glenwillow for service. Customers) or hoover.ca (Canadian customers). Mon-Fri 8am-7pm EST. Always identify your vacuum to find the service ...center link to Hoover®, Inc., Company in delay. SERVICE To obtain approved Hoover® service and genuine Hoover® parts, locate the nearest Authorized Hoover® Warranty Service Dealer (Depot) by the complete model number when requesting information or ordering parts. (The model number appears on...
...; Checking the Yellow Pages under "Vacuum Cleaners" or "Household". • Visit our website at hoover.com (U.S. This will only result in Glenwillow for service. Customers) or hoover.ca (Canadian customers). Mon-Fri 8am-7pm EST. Always identify your vacuum to find the service ...center link to Hoover®, Inc., Company in delay. SERVICE To obtain approved Hoover® service and genuine Hoover® parts, locate the nearest Authorized Hoover® Warranty Service Dealer (Depot) by the complete model number when requesting information or ordering parts. (The model number appears on...

