Product Manual
Page 3
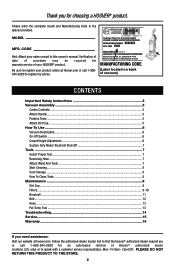
... call 1-800944-9200 to speak with a customer service representative; CODE Hint: Attach your HOOVER® product. MODEL MFG. Be sure to register your product online at hoover.com. Mon- MANUFACTURING CODE (Label located on back of vacuum) CONTENTS Important Safety Instructions 3 Vacuum Assembly 5 Carton Contents...5 Attach Handle...5 Position Tools...5 Attach Dirt Cup...5 How To...
... call 1-800944-9200 to speak with a customer service representative; CODE Hint: Attach your HOOVER® product. MODEL MFG. Be sure to register your product online at hoover.com. Mon- MANUFACTURING CODE (Label located on back of vacuum) CONTENTS Important Safety Instructions 3 Vacuum Assembly 5 Carton Contents...5 Attach Handle...5 Position Tools...5 Attach Dirt Cup...5 How To...

Product Manual
Page 6
... not leave appliance when plugged in "Suction Only" mode. • Turn off all parts of California to rotate when in the upright position, unless the vacuum is not working as it should always be present. • Unplug before operating. • Operate cleaner only at bottom of dust, lint, hair, and anything...
... not leave appliance when plugged in "Suction Only" mode. • Turn off all parts of California to rotate when in the upright position, unless the vacuum is not working as it should always be present. • Unplug before operating. • Operate cleaner only at bottom of dust, lint, hair, and anything...
Product Manual
Page 7
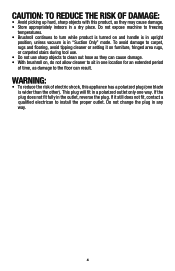
... only one location for an extended period of electric shock, this product, as they may cause damage. • Store appropriately indoors in upright position, unless vacuum is wider than the other).
... only one location for an extended period of electric shock, this product, as they may cause damage. • Store appropriately indoors in upright position, unless vacuum is wider than the other).

Product Manual
Page 10
... H. Make sure all parts from images shown. Dirt cup is secure when you hear a click. 1.2 1.3 POSITION TOOLS 1.4 Place Crevice Tool into vacuum base. 1.3 Wrap hose around top of hose guide located on top of wand. 1.4 C ATTACH DIRT CUP 1.6 Place bottom of packing materials. Remove...you hear a click. 1.6 E 1.5 F 5 Actual model may vary from carton and identify each item shown. Pivot cup into vacuum base. Push down firmly. Vacuum Base C. Using a Phillips screwdriver, fasten (1) large screw behind handle into the bottom of the Telescoping Wand and slide onto the...
... H. Make sure all parts from images shown. Dirt cup is secure when you hear a click. 1.2 1.3 POSITION TOOLS 1.4 Place Crevice Tool into vacuum base. 1.3 Wrap hose around top of hose guide located on top of wand. 1.4 C ATTACH DIRT CUP 1.6 Place bottom of packing materials. Remove...you hear a click. 1.6 E 1.5 F 5 Actual model may vary from carton and identify each item shown. Pivot cup into vacuum base. Push down firmly. Vacuum Base C. Using a Phillips screwdriver, fasten (1) large screw behind handle into the bottom of the Telescoping Wand and slide onto the...
Product Manual
Page 11
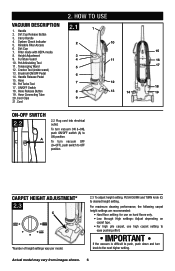
System Check Indicator 5. Filter made with HEPA media 15 8. Pet Articulating Tool 11. Cord Clips 9 21. To turn vacuum ON (I=0N), push ON/OFF switch (A) to OFF position. To turn knob to desired height setting. Actual model may vary from images shown. 6 Handle 2. ... 2 10 6. Brushroll ON/OFF Pedal 14. ON/OFF Switch 18 18. Hose Connecting Tube 13 14 19 20. IMPORTANT If the vacuum is difficult to push, push down and turn vacuum OFF (O=OFF), push switch to ON position. Carry Handle 4. Pet Turbo Tool 7 12 17. CARPET HEIGHT ADJUSTMENT* 2.3 C *Number of height...
System Check Indicator 5. Filter made with HEPA media 15 8. Pet Articulating Tool 11. Cord Clips 9 21. To turn vacuum ON (I=0N), push ON/OFF switch (A) to OFF position. To turn knob to desired height setting. Actual model may vary from images shown. 6 Handle 2. ... 2 10 6. Brushroll ON/OFF Pedal 14. ON/OFF Switch 18 18. Hose Connecting Tube 13 14 19 20. IMPORTANT If the vacuum is difficult to push, push down and turn vacuum OFF (O=OFF), push switch to ON position. Carry Handle 4. Pet Turbo Tool 7 12 17. CARPET HEIGHT ADJUSTMENT* 2.3 C *Number of height...
Product Manual
Page 14
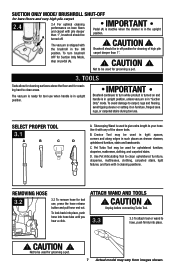
..., push firmly into hose tube until you hear a click. SELECT PROPER TOOL 3.1 A B C D A. D. ATTACH WAND AND TOOLS ! The vacuum is ready for tool use when handle is used for upholstered furniture, draperies, mattresses, clothing, and carpeted stairs. B. Use Pet Articulating Tool to clean... and carpet with pile deeper than 1". ! CAUTION ! To turn while product is turned on and handle is in upright position, unless vacuum is in such places as dresser drawers, upholstered furniture, stairs and baseboards. CAUTION ! Unplug before connecting Turbo Tool. 3.3 3.3 To attach...
..., push firmly into hose tube until you hear a click. SELECT PROPER TOOL 3.1 A B C D A. D. ATTACH WAND AND TOOLS ! The vacuum is ready for tool use when handle is used for upholstered furniture, draperies, mattresses, clothing, and carpeted stairs. B. Use Pet Articulating Tool to clean... and carpet with pile deeper than 1". ! CAUTION ! To turn while product is turned on and handle is in upright position, unless vacuum is in such places as dresser drawers, upholstered furniture, stairs and baseboards. CAUTION ! Unplug before connecting Turbo Tool. 3.3 3.3 To attach...
Product Manual
Page 15
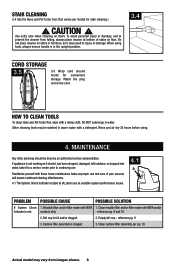
Attach the plug end to continuing use and care of your vacuum will ensure continued cleaning effectiveness. 4.1 The System Check Indicator located at bottom of stairs on floor. DO NOT submerge in the upright position. 3.4 CORD STORAGE 3.5 3.5 ...
Attach the plug end to continuing use and care of your vacuum will ensure continued cleaning effectiveness. 4.1 The System Check Indicator located at bottom of stairs on floor. DO NOT submerge in the upright position. 3.4 CORD STORAGE 3.5 3.5 ...
Product Manual
Page 18
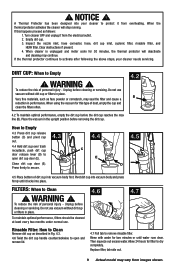
... designed into place. If this type of personal injury - DIRT CUP: When to Clean ! To reduce the risk of dirt cup into vacuum body first. C E Close dirt cup door (E). FILTERS: When to Empty ! Unplug before the dirt cup reaches the max line (B). Replace filter,...reduction in place. When cleaner is unplugged and motor cools for filter to secure. 4.2 B 4.5 4.5 Place bottom of personal injury - Place the vacuum in Fig. 4.3. 4.6 Twist the dirt cup handle counterclockwise to protect it from images shown. Then squeeze out excess water. ! When the thermal ...
... designed into place. If this type of personal injury - DIRT CUP: When to Clean ! To reduce the risk of dirt cup into vacuum body first. C E Close dirt cup door (E). FILTERS: When to Empty ! Unplug before the dirt cup reaches the max line (B). Replace filter,...reduction in place. When cleaner is unplugged and motor cools for filter to secure. 4.2 B 4.5 4.5 Place bottom of personal injury - Place the vacuum in Fig. 4.3. 4.6 Twist the dirt cup handle counterclockwise to protect it from images shown. Then squeeze out excess water. ! When the thermal ...

Product Manual
Page 19
... over a trash receptacle and tap out dirt and debris. 4.14 Bottom filter (B) must be cleaned from vacuum body. Unplug before cleaning or servicing. If desired, additional filter is available at Hoover.com or call 1-800-944-9200. Line up to 24 hours. 4.8 Cyclonic Filter Assembly: How to ...dry completely before replacing. Do not use vacuum without dirt cup or filters in Fig 4.5. Remove dirt cup and ...
... over a trash receptacle and tap out dirt and debris. 4.14 Bottom filter (B) must be cleaned from vacuum body. Unplug before cleaning or servicing. If desired, additional filter is available at Hoover.com or call 1-800-944-9200. Line up to 24 hours. 4.8 Cyclonic Filter Assembly: How to ...dry completely before replacing. Do not use vacuum without dirt cup or filters in Fig 4.5. Remove dirt cup and ...
Product Manual
Page 23
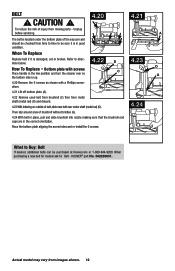
... cut or broken. Unplug before servicing. 4.20 4.21 A The belt is located under the bottom plate of the vacuum and should be checked from time to time to be purchased at Hoover.com or 1-800-944-9200. To reduce the risk of brushroll without bristles (G). 4.24 With belt in place, ... below. 4.22 D 4.23 How To Replace - BELT ! Refer to Buy: Belt If desired, additional belts can be sure it is in good condition. HOOVER® part No. 562289001. CAUTION ! Place the bottom plate aligning the screw holes and re-install the 6 screws. When purchasing a new belt for models ...
... cut or broken. Unplug before servicing. 4.20 4.21 A The belt is located under the bottom plate of the vacuum and should be checked from time to time to be purchased at Hoover.com or 1-800-944-9200. To reduce the risk of brushroll without bristles (G). 4.24 With belt in place, ... below. 4.22 D 4.23 How To Replace - BELT ! Refer to Buy: Belt If desired, additional belts can be sure it is in good condition. HOOVER® part No. 562289001. CAUTION ! Place the bottom plate aligning the screw holes and re-install the 6 screws. When purchasing a new belt for models ...

Product Manual
Page 26
... any debris or hair from images shown. 13 PET TURBO TOOL: How to motor or brushroll. To reduce the risk of injury from hose. Unplug vacuum before cleaning or servicing. 4.25 A How to clean out hose as they can cause damage. The addition of personal injury - Clear away debris or obstructions...
... any debris or hair from images shown. 13 PET TURBO TOOL: How to motor or brushroll. To reduce the risk of injury from hose. Unplug vacuum before cleaning or servicing. 4.25 A How to clean out hose as they can cause damage. The addition of personal injury - Clear away debris or obstructions...

Product Manual
Page 27
...Empty dirt cup - Pg. 9. 3. Review Filter Removal and Cleaning - Continue using the checklist below. ! Check items under "Vacuum won 't run POSSIBLE CAUSE 1. If a minor problem occurs, it to a service center prior to appropriate setting for 30min. (...or tripped breaker. 3. Pg. 9. 2. Review Dirt Cup removal & replacement - Review Hose installation - Blockage. 3. Empty dirt cup - Low vacuum suction. Pg. 9. 3. Replace brushroll belt - TROUBLESHOOTING Any other servicing should , has been dropped, damaged, left outdoors, or dropped into outlet...
...Empty dirt cup - Pg. 9. 3. Review Filter Removal and Cleaning - Continue using the checklist below. ! Check items under "Vacuum won 't run POSSIBLE CAUSE 1. If a minor problem occurs, it to a service center prior to appropriate setting for 30min. (...or tripped breaker. 3. Pg. 9. 2. Review Dirt Cup removal & replacement - Review Hose installation - Blockage. 3. Empty dirt cup - Low vacuum suction. Pg. 9. 3. Replace brushroll belt - TROUBLESHOOTING Any other servicing should , has been dropped, damaged, left outdoors, or dropped into outlet...

Product Manual
Page 30
... (Canadian customers). Do not send your vacuum by : • Checking the Yellow Pages under "Vacuum Cleaners" or "Household". • Visit our website at hoover.com (U.S. This will only result in Glenwillow for service. Always identify your vacuum to find the service outlet nearest you need further assistance: To ... appears on the bottom of authorized service outlet locations call 1-800-944-9200; Follow the service center link to Hoover®, Inc., Company in delay. If you . • For an automated referral of the vacuum.) PLEASE DO NOT RETURN THIS PRODUCT TO THE STORE. 15 6.
... (Canadian customers). Do not send your vacuum by : • Checking the Yellow Pages under "Vacuum Cleaners" or "Household". • Visit our website at hoover.com (U.S. This will only result in Glenwillow for service. Always identify your vacuum to find the service outlet nearest you need further assistance: To ... appears on the bottom of authorized service outlet locations call 1-800-944-9200; Follow the service center link to Hoover®, Inc., Company in delay. If you . • For an automated referral of the vacuum.) PLEASE DO NOT RETURN THIS PRODUCT TO THE STORE. 15 6.


