
Product Manual
Page 1
PLEASE DO NOT RETURN THIS PRODUCT TO THE STORE. IF USED COMMERCIALLY WARRANTY IS VOID. ©2019 Techtronic Floor Care Technology Limited. página 29 hoover.com IMPORTANT: READ CAREFULLY BEFORE ASSEMBLY AND USE. OWNER'S MANUAL Operating and Servicing Instructions French - 15 Español - THIS PRODUCT IS INTENDED FOR HOUSEHOLD USE ONLY. Questions or concerns? For assistance, please call Customer Service at 1-800-944-9200 Mon-Fri 8am-7pm EST. All Rights Reserved. #961152124-R1
PLEASE DO NOT RETURN THIS PRODUCT TO THE STORE. IF USED COMMERCIALLY WARRANTY IS VOID. ©2019 Techtronic Floor Care Technology Limited. página 29 hoover.com IMPORTANT: READ CAREFULLY BEFORE ASSEMBLY AND USE. OWNER'S MANUAL Operating and Servicing Instructions French - 15 Español - THIS PRODUCT IS INTENDED FOR HOUSEHOLD USE ONLY. Questions or concerns? For assistance, please call Customer Service at 1-800-944-9200 Mon-Fri 8am-7pm EST. All Rights Reserved. #961152124-R1

Product Manual
Page 2
... to this owner's manual. Fri 8am- 7pm EST. MANUFACTURING CODE (Label located on bottom of vacuum) CONTENTS Important Safety Instructions 3 Vacuum Assembly 5 Carton Contents...5 Attach Handle...5 Position Tools...5 Attach Dirt Cup...5 How To Use...6 Vacuum Description...6 On-Off Switch...6 Cord Release...6 Carpet Height Adjustment...6 Tools ...7 Select Proper Tool...7 Removing Hose...7 Attach Wand And Tools...7 How To Clean Tools...7 Maintenance...8 Dirt Cup...9 Filters...9-10 Brushroll...11 Belt ...11 Hose...12 Troubleshooting 13 Service & Warranty 14 If you need assistance: Visit...
... to this owner's manual. Fri 8am- 7pm EST. MANUFACTURING CODE (Label located on bottom of vacuum) CONTENTS Important Safety Instructions 3 Vacuum Assembly 5 Carton Contents...5 Attach Handle...5 Position Tools...5 Attach Dirt Cup...5 How To Use...6 Vacuum Description...6 On-Off Switch...6 Cord Release...6 Carpet Height Adjustment...6 Tools ...7 Select Proper Tool...7 Removing Hose...7 Attach Wand And Tools...7 How To Clean Tools...7 Maintenance...8 Dirt Cup...9 Filters...9-10 Brushroll...11 Belt ...11 Hose...12 Troubleshooting 13 Service & Warranty 14 If you need assistance: Visit...
Product Manual
Page 3
..., grasp the plug, not the cord. • Do not handle plug or appliance with wet hands. • Do not put any object into any opening blocked; Not intended for use without dirt cup and/or filters in use and before unplugging. • Use extra care when cleaning on stairs. Use only manufacturer's recommended attachments and products. • Do not use with damaged cord or plug. Do not use with any openings. •...
..., grasp the plug, not the cord. • Do not handle plug or appliance with wet hands. • Do not put any object into any opening blocked; Not intended for use without dirt cup and/or filters in use and before unplugging. • Use extra care when cleaning on stairs. Use only manufacturer's recommended attachments and products. • Do not use with damaged cord or plug. Do not use with any openings. •...
Product Manual
Page 4
... OF DAMAGE: • Avoid picking up hard, sharp objects with the power cord secured around the two cord hooks. Do not change the plug in a polarized outlet only one way. Always store vacuum with this appliance has a polarized plug (one location for an extended period of electric shock, this product, as damage to install the proper outlet. This plug will fit in any...
... OF DAMAGE: • Avoid picking up hard, sharp objects with the power cord secured around the two cord hooks. Do not change the plug in a polarized outlet only one way. Always store vacuum with this appliance has a polarized plug (one location for an extended period of electric shock, this product, as damage to install the proper outlet. This plug will fit in any...

Product Manual
Page 5
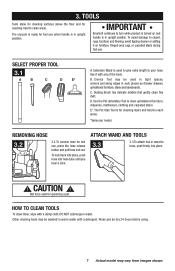
... the Dusting Brush on right back side (E) of vacuum as shown. 1.5 Place Pet Upholstery Tool*/ Pet Stair Tool* (F) on the handle. Dirt cup is secure when you hear a click. 1.2 1.3 POSITION TOOLS 1.4 Place Crevice Tool into vacuum body first. Remove all parts are located before disposing of the wand. *Varies per model. Extension Wand D. Handle* B. Pivot cup into vacuum base. 1.3 Wrap hose around top of hose guide located on top of packing materials. 1. VACUUM ASSEMBLY CARTON CONTENTS A. Vacuum Base C. Dusting Brush* G. (1) Large...
... the Dusting Brush on right back side (E) of vacuum as shown. 1.5 Place Pet Upholstery Tool*/ Pet Stair Tool* (F) on the handle. Dirt cup is secure when you hear a click. 1.2 1.3 POSITION TOOLS 1.4 Place Crevice Tool into vacuum body first. Remove all parts are located before disposing of the wand. *Varies per model. Extension Wand D. Handle* B. Pivot cup into vacuum base. 1.3 Wrap hose around top of hose guide located on top of packing materials. 1. VACUUM ASSEMBLY CARTON CONTENTS A. Vacuum Base C. Dusting Brush* G. (1) Large...

Product Manual
Page 6
... 12. Hose Release Button 7 12 18. To turn vacuum OFF (O=OFF), push switch to desired height setting. IMPORTANT If the vacuum is difficult to push, push down and turn knob to ease pushing effort. System Check Indicator 5. Handle 2.1 1 2. Crevice Tool (inside wand)* 13. HOW TO USE VACUUM DESCRIPTION 1. Pet Upholstery Tool/Pet Stair Tool* 11. CARPET HEIGHT ADJUSTMENT* 2.3 C *Number of height settings vary per model. 9 18 13 ON-OFF SWITCH 2.2 A 2.2 Plug cord into electrical outlet. Exhaust Filter 14 8. Dirt Cup Release Button 3. 2.
... 12. Hose Release Button 7 12 18. To turn vacuum OFF (O=OFF), push switch to desired height setting. IMPORTANT If the vacuum is difficult to push, push down and turn knob to ease pushing effort. System Check Indicator 5. Handle 2.1 1 2. Crevice Tool (inside wand)* 13. HOW TO USE VACUUM DESCRIPTION 1. Pet Upholstery Tool/Pet Stair Tool* 11. CARPET HEIGHT ADJUSTMENT* 2.3 C *Number of height settings vary per model. 9 18 13 ON-OFF SWITCH 2.2 A 2.2 Plug cord into electrical outlet. Exhaust Filter 14 8. Dirt Cup Release Button 3. 2.
Product Manual
Page 7
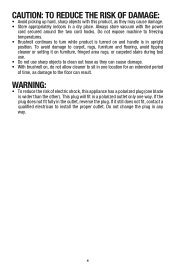
... continues to clean areas. SELECT PROPER TOOL 3.1 A B C D E* A. Dusting Brush has delicate bristles that gently clean fine dust. REMOVING HOSE 3.2 3.2 To remove hose for reaching hard to turn while product is turned on furniture, fringed area rugs, or carpeted stairs during tool use. CAUTION ! Other cleaning tools may be washed in warm water with any of the tools. C. E*. To lock back into place, push hose into place. ! ATTACH WAND AND TOOLS 3.3 3.3 To attach tool or wand to clean upholstered furniture...
... continues to clean areas. SELECT PROPER TOOL 3.1 A B C D E* A. Dusting Brush has delicate bristles that gently clean fine dust. REMOVING HOSE 3.2 3.2 To remove hose for reaching hard to turn while product is turned on furniture, fringed area rugs, or carpeted stairs during tool use. CAUTION ! Other cleaning tools may be washed in warm water with any of the tools. C. E*. To lock back into place, push hose into place. ! ATTACH WAND AND TOOLS 3.3 3.3 To attach tool or wand to clean upholstered furniture...
Product Manual
Page 8
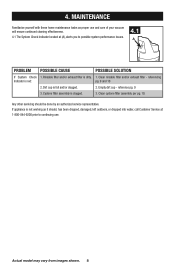
... and/or clogged. 2. Dirt cup is red: pg. 9 and 10 2. Cyclone filter assembly is not working as proper use and care of your vacuum will ensure continued cleaning effectiveness. 4.1 The System Check Indicator located at 1-800-844-9200 prior to possible system performance issues. 4.1 A PROBLEM POSSIBLE CAUSE POSSIBLE SOLUTION If System Check 1. Clean rinsable filter and/or exhaust filter - Empty dirt cup - Actual model may vary from images shown. 8 Clean cyclone filter assembly per pg...
... and/or clogged. 2. Dirt cup is red: pg. 9 and 10 2. Cyclone filter assembly is not working as proper use and care of your vacuum will ensure continued cleaning effectiveness. 4.1 The System Check Indicator located at 1-800-844-9200 prior to possible system performance issues. 4.1 A PROBLEM POSSIBLE CAUSE POSSIBLE SOLUTION If System Check 1. Clean rinsable filter and/or exhaust filter - Empty dirt cup - Actual model may vary from images shown. 8 Clean cyclone filter assembly per pg...
Product Manual
Page 9
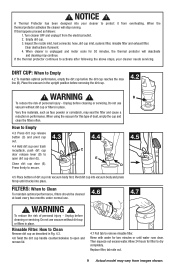
Inspect the nozzle inlet, host connector, hose, dirt cup inlet, cyclonic filter, rinsable filter and exhaust filter. When cleaner is unplugged and motor cools for two minutes or until it from the electrical outlet. 2. Place the vacuum in performance. When using the vacuum for filter to secure. Replace filter, tab side out. 9 Actual model may vary from overheating. NOTICE ! Turn cleaner OFF and unplug it locks into vacuum body first. Do not use . 4.6 4.7 ! How...
Inspect the nozzle inlet, host connector, hose, dirt cup inlet, cyclonic filter, rinsable filter and exhaust filter. When cleaner is unplugged and motor cools for two minutes or until it from the electrical outlet. 2. Place the vacuum in performance. When using the vacuum for filter to secure. Replace filter, tab side out. 9 Actual model may vary from overheating. NOTICE ! Turn cleaner OFF and unplug it locks into vacuum body first. Do not use . 4.6 4.7 ! How...
Product Manual
Page 10
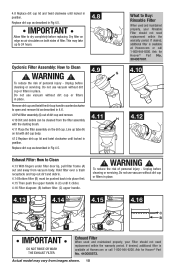
... Filter When used and maintained properly, your Filter should not need replacement within the warranty period. WARNING ! Unplug before cleaning or servicing. Do not use vacuum without dirt cup or filters in place. 4.13 4.14 4.15 4.16 C B A B C IMPORTANT DO NOT RINSE OR WASH THE EXHAUST FILTER. Line up to 24 hours. 4.8 Cyclonic Filter Assembly: How to Buy: Rinsable Filter When used and maintained properly, your Rinsable Filter should not need replacement within the warranty period. 4.8 Replace dirt cup...
... Filter When used and maintained properly, your Filter should not need replacement within the warranty period. WARNING ! Unplug before cleaning or servicing. Do not use vacuum without dirt cup or filters in place. 4.13 4.14 4.15 4.16 C B A B C IMPORTANT DO NOT RINSE OR WASH THE EXHAUST FILTER. Line up to 24 hours. 4.8 Cyclonic Filter Assembly: How to Buy: Rinsable Filter When used and maintained properly, your Rinsable Filter should not need replacement within the warranty period. 4.8 Replace dirt cup...
Product Manual
Page 11
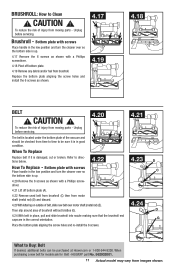
... slide brushroll into nozzle making sure that the brushroll end caps are in the low position and turn the cleaner over motor shaft (metal rod) (E). Then slip around area of belt, slide new belt over so C the bottom side is up. 4.17 Remove the 6 screws as shown. 4.17 4.19 4.18 BELT ! Unplug before servicing. Refer to Clean ! Replace the bottom plate aligning the screw...
... slide brushroll into nozzle making sure that the brushroll end caps are in the low position and turn the cleaner over motor shaft (metal rod) (E). Then slip around area of belt, slide new belt over so C the bottom side is up. 4.17 Remove the 6 screws as shown. 4.17 4.19 4.18 BELT ! Unplug before servicing. Refer to Clean ! Replace the bottom plate aligning the screw...

Product Manual
Page 12
Do not use , press the hose release button (A) and pull hose end out. How to Clean 4.25 A 4.25 To remove hose for their lifetime. Clear away debris or obstructions from images shown. 12 The addition of personal injury - Actual model may vary from hose. LUBRICATION The motor and brushroll are equipped with bearings which contain sufficient lubrication for tool use sharp objects to motor or...
Do not use , press the hose release button (A) and pull hose end out. How to Clean 4.25 A 4.25 To remove hose for their lifetime. Clear away debris or obstructions from images shown. 12 The addition of personal injury - Actual model may vary from hose. LUBRICATION The motor and brushroll are equipped with bearings which contain sufficient lubrication for tool use sharp objects to motor or...

Product Manual
Page 13
... reset the thermal protector) 1. Pg. 7. 4. Pg. 11. 13 Actual model may vary from brushroll - Dirt cup not installed correctly. 3. Replace belt - WARNING ! Dirt cup full. 2. Hose not installed correctly. 4. Rinsable Filter and/or Exhaust Filter not installed completely. 1. Pg. 9. 3. Pg. 13. Pg.6. 1. Pg. 12. 2. Power cord not firmly plugged into water, call Customer Service at 1-800-844-9200 prior to cool for carpet being cleaned - Plug unit in firmly. 2. Review Dirt Cup removal & replacement - Pg. 9 and 10. 1. Review Hose installation...
... reset the thermal protector) 1. Pg. 7. 4. Pg. 11. 13 Actual model may vary from brushroll - Dirt cup not installed correctly. 3. Replace belt - WARNING ! Dirt cup full. 2. Hose not installed correctly. 4. Rinsable Filter and/or Exhaust Filter not installed completely. 1. Pg. 9. 3. Pg. 13. Pg.6. 1. Pg. 12. 2. Power cord not firmly plugged into water, call Customer Service at 1-800-844-9200 prior to cool for carpet being cleaned - Plug unit in firmly. 2. Review Dirt Cup removal & replacement - Pg. 9 and 10. 1. Review Hose installation...

Product Manual
Page 14
... apply to the original retail purchaser, with original proof of Hoover products, in which vary from Hoover or an authorized dealer of purchase from state to , belts, filters, brush rolls, blower fans, blower and vacuum tubes, and vacuum bags and straps. TO THE EXTENT PERMITTED BY APPLICABLE LAW, NO WARRANTIES THAT ARISE BY OPERATION OF LAW, IF APPLICABLE, SHALL EXCEED THE DURATION OF...
... apply to the original retail purchaser, with original proof of Hoover products, in which vary from Hoover or an authorized dealer of purchase from state to , belts, filters, brush rolls, blower fans, blower and vacuum tubes, and vacuum bags and straps. TO THE EXTENT PERMITTED BY APPLICABLE LAW, NO WARRANTIES THAT ARISE BY OPERATION OF LAW, IF APPLICABLE, SHALL EXCEED THE DURATION OF...


