Product Manual
Page 3
... 1-800-944-9200 for choosing a HOOVER® product. Please enter the complete model and Manufacturing Code in the spaces provided. CODE Hint: Attach your sales receipt to register by phone. Be sure to register your HOOVER® product. MANUFACTURING CODE (Label located on back of vacuum) CONTENTS Important Safety Instructions 3 Vacuum Assembly...5 Carton Contents ...5 Attach...
... 1-800-944-9200 for choosing a HOOVER® product. Please enter the complete model and Manufacturing Code in the spaces provided. CODE Hint: Attach your sales receipt to register by phone. Be sure to register your HOOVER® product. MANUFACTURING CODE (Label located on back of vacuum) CONTENTS Important Safety Instructions 3 Vacuum Assembly...5 Carton Contents ...5 Attach...
Product Manual
Page 10
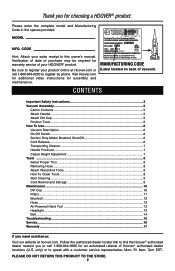
... firmly. 1.3 Using a Phillips screwdriver, fasten (1) screw behind handle into tool storage area on left back side (B) of vacuum and place Upholstery Tool on right back side (C) of vacuum as shown. 1.5 A 1.6 C B 5 Actual model may be ordered at Hoover.com or call 1-800-944-9200. Dirt cup is secure when you hear a click. 1.4 POSITION TOOLS (varies...
... firmly. 1.3 Using a Phillips screwdriver, fasten (1) screw behind handle into tool storage area on left back side (B) of vacuum and place Upholstery Tool on right back side (C) of vacuum as shown. 1.5 A 1.6 C B 5 Actual model may be ordered at Hoover.com or call 1-800-944-9200. Dirt cup is secure when you hear a click. 1.4 POSITION TOOLS (varies...
Product Manual
Page 11
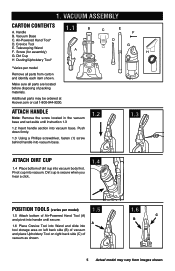
... red tape. Crevice Tool (inside wand) 15. Hose Release Button 22. Handle Release Pedal **Varies per model ON-OFF SWITCH 2.2 A SUCTION ONLY MODE/ BRUSHROLL SHUT-OFF for bare floors and very high pile carpet... 2. Dusting/ Upholstery Tool** 12 19 23 21. CAUTION ! Cord Rewind Pedal 18. Carry Handle 6. The vacuum is almost fully extended. To turn vacuum ON, push ON/OFF button (A) once. Dirt Cup Release Button 5. Headlight* 15 20 12. Cord Rewind 4...) 19. IMPORTANT When pulling on select models only 23. HOW TO USE VACUUM DESCRIPTION 1.
... red tape. Crevice Tool (inside wand) 15. Hose Release Button 22. Handle Release Pedal **Varies per model ON-OFF SWITCH 2.2 A SUCTION ONLY MODE/ BRUSHROLL SHUT-OFF for bare floors and very high pile carpet... 2. Dusting/ Upholstery Tool** 12 19 23 21. CAUTION ! Cord Rewind Pedal 18. Carry Handle 6. The vacuum is almost fully extended. To turn vacuum ON, push ON/OFF button (A) once. Dirt Cup Release Button 5. Headlight* 15 20 12. Cord Rewind 4...) 19. IMPORTANT When pulling on select models only 23. HOW TO USE VACUUM DESCRIPTION 1.
Product Manual
Page 14
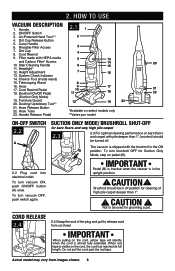
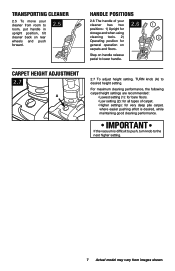
... tools. 2) Operating position for very deep pile carpet, where easier pushing effort is difficult to push, turn knob to desired height setting. IMPORTANT If the vacuum is desired, while maintaining good cleaning performance. For maximum cleaning performance, the following carpet height settings are recommended: • Lowest setting (1): for bare floors. •... and floors. 2.6 Step on handle release pedal to lower handle. 1 2 CARPET HEIGHT ADJUSTMENT 2.7 A 2.7 To adjust height setting, TURN knob (A) to the next higher setting. 7 Actual model may vary from images shown.
... tools. 2) Operating position for very deep pile carpet, where easier pushing effort is difficult to push, turn knob to desired height setting. IMPORTANT If the vacuum is desired, while maintaining good cleaning performance. For maximum cleaning performance, the following carpet height settings are recommended: • Lowest setting (1): for bare floors. •... and floors. 2.6 Step on handle release pedal to lower handle. 1 2 CARPET HEIGHT ADJUSTMENT 2.7 A 2.7 To adjust height setting, TURN knob (A) to the next higher setting. 7 Actual model may vary from images shown.
Product Manual
Page 15
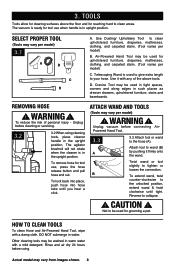
.../ Upholstery Tool to clean upholstered furniture, draperies, mattresses, clothing, and carpeted stairs. (Tool varies per model) 3.1 A B C D A. D. ATTACH WAND AND TOOLS (Tools may vary per model) B. Unplug vacuum before using cleaning tools, place cleaner handle in upright position. B To extend wand, twist counter-clockwise...and Air-Powered Hand Tool, wipe with a mild detergent. Actual model may be used in tight spaces, corners and along edges in warm water with a damp cloth. 3. The vacuum is in the upright position. Reverse to tighten or loosen the ...
.../ Upholstery Tool to clean upholstered furniture, draperies, mattresses, clothing, and carpeted stairs. (Tool varies per model) 3.1 A B C D A. D. ATTACH WAND AND TOOLS (Tools may vary per model) B. Unplug vacuum before using cleaning tools, place cleaner handle in upright position. B To extend wand, twist counter-clockwise...and Air-Powered Hand Tool, wipe with a mild detergent. Actual model may be used in tight spaces, corners and along edges in warm water with a damp cloth. 3. The vacuum is in the upright position. Reverse to tighten or loosen the ...
Product Manual
Page 18
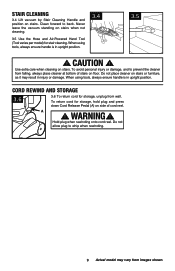
...Handle and position on stairs. Do not place cleaner on stairs when not cleaning. 3.5 Use the Hose and Air-Powered Hand Tool (Tool varies per model) for storage, hold plug and press down Cord Release Pedal (A) on side of stairs on floor. Do not allow plug to whip when rewinding.... at bottom of cord reel. When using tools, always ensure handle is in upright position. Hold plug when rewinding onto cord reel. Never leave the vacuum standing on stairs or furniture, as it may vary from wall. When using tools, always ensure handle is in upright position. 3.4 3.5 ! To avoid...
...Handle and position on stairs. Do not place cleaner on stairs when not cleaning. 3.5 Use the Hose and Air-Powered Hand Tool (Tool varies per model) for storage, hold plug and press down Cord Release Pedal (A) on side of stairs on floor. Do not allow plug to whip when rewinding.... at bottom of cord reel. When using tools, always ensure handle is in upright position. Hold plug when rewinding onto cord reel. Never leave the vacuum standing on stairs or furniture, as it may vary from wall. When using tools, always ensure handle is in upright position. 3.4 3.5 ! To avoid...
Product Manual
Page 19
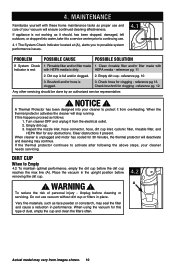
... If this type of dust, empty the cup and clean the filters often. 4.2 A Actual model may vary from images shown. 10 Clear obstructions if present. When cleaner is dirty. Do not use vacuum without dirt cup or filters in the upright position before removing the dirt cup. ! When using... the vacuum for this happens proceed as face powder or cornstarch, may continue. PROBLEM POSSIBLE CAUSE ...
... If this type of dust, empty the cup and clean the filters often. 4.2 A Actual model may vary from images shown. 10 Clear obstructions if present. When cleaner is dirty. Do not use vacuum without dirt cup or filters in the upright position before removing the dirt cup. ! When using... the vacuum for this happens proceed as face powder or cornstarch, may continue. PROBLEM POSSIBLE CAUSE ...

Product Manual
Page 22
..., your Filter should be cleaned at Hoover.com or call 1-800-944-9200. Ask for Hoover® Part No. 303903001. Pivot dirt cup into vacuum body and press firmly until it locks into vacuum body first. Dry filter on edge so air circulates on vacuum and press firmly. ! Hold filter ...over trash receptacle, push dirt cup door release lever (B) to secure lever. Squeeze filter twice while underwater. Ask for Hoover® Part No. 305687001. 11 Actual model may take up to Clean 4.8 With fingers in...
..., your Filter should be cleaned at Hoover.com or call 1-800-944-9200. Ask for Hoover® Part No. 303903001. Pivot dirt cup into vacuum body and press firmly until it locks into vacuum body first. Dry filter on edge so air circulates on vacuum and press firmly. ! Hold filter ...over trash receptacle, push dirt cup door release lever (B) to secure lever. Squeeze filter twice while underwater. Ask for Hoover® Part No. 305687001. 11 Actual model may take up to Clean 4.8 With fingers in...
Product Manual
Page 23
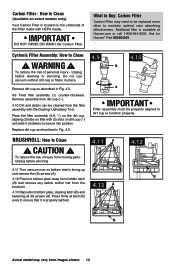
... or call 1-800-944-9200. To reduce the risk of personal injury - Ask for Hoover® Part 902404001. . Carbon Filter : How to Clean ! Cyclonic Filter Assembly: How to Clean (Available on select models only). Remove assembly from moving parts Unplug before cleaning or servicing. Replace dirt cup as described...IMPORTANT DO NOT RINSE OR WASH the Carbon Filter. Additional filter is properly latched. Unplug before servicing. 4.11 A 4.12 4.11 Turn vacuum over so bottom side is located on dirt cup (A) and twist it is available at latch (B) area to ensure that it clockwise to ...
... or call 1-800-944-9200. To reduce the risk of personal injury - Ask for Hoover® Part 902404001. . Carbon Filter : How to Clean ! Cyclonic Filter Assembly: How to Clean (Available on select models only). Remove assembly from moving parts Unplug before cleaning or servicing. Replace dirt cup as described...IMPORTANT DO NOT RINSE OR WASH the Carbon Filter. Additional filter is properly latched. Unplug before servicing. 4.11 A 4.12 4.11 Turn vacuum over so bottom side is located on dirt cup (A) and twist it is available at latch (B) area to ensure that it clockwise to ...
Product Manual
Page 27
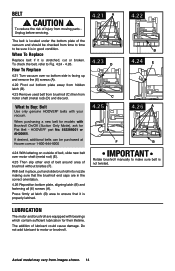
...-9200 4.24 With lettering on outside of belt, slide new belt over so bottom side is in good condition. HOOVER® part No. 562289001 or AH20065. Actual model may vary from moving parts Unplug before servicing. The belt is located under the bottom plate of brushroll without bristles ...(F). How To Replace 4.21 Turn vacuum over motor shaft (metal rod) (E). 4.25 Then slip other end of belt around area of the vacuum and should ...
...-9200 4.24 With lettering on outside of belt, slide new belt over so bottom side is in good condition. HOOVER® part No. 562289001 or AH20065. Actual model may vary from moving parts Unplug before servicing. The belt is located under the bottom plate of brushroll without bristles ...(F). How To Replace 4.21 Turn vacuum over motor shaft (metal rod) (E). 4.25 Then slip other end of belt around area of the vacuum and should ...

Product Manual
Page 31
... EST. Always identify your vacuum to find the service outlet nearest you need further assistance: To speak with a customer service representative call 1-800-944-9200. SERVICE To obtain approved Hoover® service and genuine Hoover® parts, locate the nearest Authorized Hoover® Warranty Service Dealer (Depot) by the complete model number when requesting information...
... EST. Always identify your vacuum to find the service outlet nearest you need further assistance: To speak with a customer service representative call 1-800-944-9200. SERVICE To obtain approved Hoover® service and genuine Hoover® parts, locate the nearest Authorized Hoover® Warranty Service Dealer (Depot) by the complete model number when requesting information...


