Product Manual
Page 3
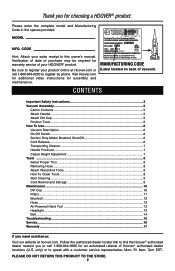
...Attach your HOOVER® product. Visit Hoover.com for additional video instructions for choosing a HOOVER® product. MANUFACTURING CODE (Label located on back of vacuum) CONTENTS Important Safety Instructions 3 Vacuum Assembly...5 Carton Contents ...5 Attach Handle ...5 Attach Dirt Cup ...5 Position Tools ...5 How To Use ...6 Vacuum Description 6 ... referral of your sales receipt to register by phone. Follow the authorized dealer locator link to find the Hoover® authorized dealer nearest you or call 1-800-944-9200 to this owner's manual. Please enter the...
...Attach your HOOVER® product. Visit Hoover.com for additional video instructions for choosing a HOOVER® product. MANUFACTURING CODE (Label located on back of vacuum) CONTENTS Important Safety Instructions 3 Vacuum Assembly...5 Carton Contents ...5 Attach Handle ...5 Attach Dirt Cup ...5 Position Tools ...5 How To Use ...6 Vacuum Description 6 ... referral of your sales receipt to register by phone. Follow the authorized dealer locator link to find the Hoover® authorized dealer nearest you or call 1-800-944-9200 to this owner's manual. Please enter the...
Product Manual
Page 10
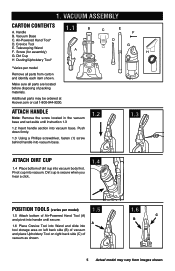
... TOOLS (varies per model Remove all parts are located before disposing of dirt cup into vacuum. VACUUM ASSEMBLY CARTON CONTENTS 1.1 A. Screw (for assembly) H G. Vacuum Base C. Dirt Cup H Dusting/Upholstery Tool* *Varies per model) 1.5 Attach bottom of vacuum as shown. 1.5 A 1.6 C B 5 Actual model may be ordered at Hoover.com or call 1-800-944-9200. Pivot cup into...
... TOOLS (varies per model Remove all parts are located before disposing of dirt cup into vacuum. VACUUM ASSEMBLY CARTON CONTENTS 1.1 A. Screw (for assembly) H G. Vacuum Base C. Dirt Cup H Dusting/Upholstery Tool* *Varies per model) 1.5 Attach bottom of vacuum as shown. 1.5 A 1.6 C B 5 Actual model may be ordered at Hoover.com or call 1-800-944-9200. Pivot cup into...
Product Manual
Page 11
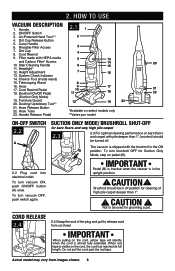
...14 10. IMPORTANT When pulling on pedal (B). 2.2 Plug cord into electrical outlet. 2. Rinsable Filter Access 3 7. Cord Rewind Pedal 18. To turn vacuum OFF, push switch again. Do not pull the cord past the red tape. Carry Handle 6. Stair Cleaning Handle 6 11. Dusting/ Upholstery Tool** ...11 18 21 22 (Suction Only Mode) 19. Not to release cord from images shown. 6 Crevice Tool (inside wand) 15. HOW TO USE VACUUM DESCRIPTION 1. When red tape is in the ON B position. Handle 2.1 1 2. To turn brushroll OFF for grooming a pet. IMPORTANT Pedal (B) is...
...14 10. IMPORTANT When pulling on pedal (B). 2.2 Plug cord into electrical outlet. 2. Rinsable Filter Access 3 7. Cord Rewind Pedal 18. To turn vacuum OFF, push switch again. Do not pull the cord past the red tape. Carry Handle 6. Stair Cleaning Handle 6 11. Dusting/ Upholstery Tool** ...11 18 21 22 (Suction Only Mode) 19. Not to release cord from images shown. 6 Crevice Tool (inside wand) 15. HOW TO USE VACUUM DESCRIPTION 1. When red tape is in the ON B position. Handle 2.1 1 2. To turn brushroll OFF for grooming a pet. IMPORTANT Pedal (B) is...
Product Manual
Page 14
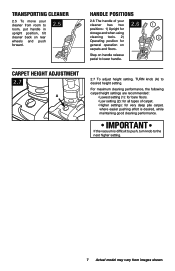
... in upright position, tilt cleaner back on rear wheels and push forward. 2.5 HANDLE POSITIONS 2.6 The handle of your cleaner from images shown. IMPORTANT If the vacuum is desired, while maintaining good cleaning performance. TRANSPORTING CLEANER 2.5 To move your cleaner has two positions: 1) Upright for storage and when using cleaning tools. 2) Operating...
... in upright position, tilt cleaner back on rear wheels and push forward. 2.5 HANDLE POSITIONS 2.6 The handle of your cleaner from images shown. IMPORTANT If the vacuum is desired, while maintaining good cleaning performance. TRANSPORTING CLEANER 2.5 To move your cleaner has two positions: 1) Upright for storage and when using cleaning tools. 2) Operating...
Product Manual
Page 15
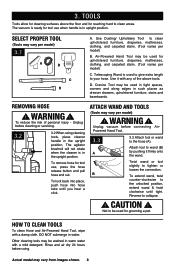
... mattresses, clothing, and carpeted stairs. (Tool varies per model) C. To lock back into place, push hose into hose tube until tight. Unplug vacuum before connecting AirPowered Hand Tool. 3.3 3.3 Attach tool or wand to tighten or loosen the connection. CAUTION ! HOW TO CLEAN TOOLS To clean Hose...baseboards. Use it firmly onto the wand. To remove hose for tool use when handle is ready for reaching hard to collapse. ! The vacuum is in water. 3. Twist wand or tool slightly to the hose (A). Actual model may be used to give extra length to wand (B) ...
... mattresses, clothing, and carpeted stairs. (Tool varies per model) C. To lock back into place, push hose into hose tube until tight. Unplug vacuum before connecting AirPowered Hand Tool. 3.3 3.3 Attach tool or wand to tighten or loosen the connection. CAUTION ! HOW TO CLEAN TOOLS To clean Hose...baseboards. Use it firmly onto the wand. To remove hose for tool use when handle is ready for reaching hard to collapse. ! The vacuum is in water. 3. Twist wand or tool slightly to the hose (A). Actual model may be used to give extra length to wand (B) ...
Product Manual
Page 18
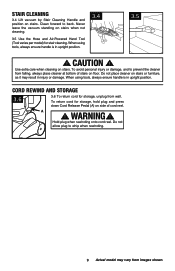
... plug when rewinding onto cord reel. When using tools, always ensure handle is in upright position. To return cord for stair cleaning. Never leave the vacuum standing on stairs when not cleaning. 3.5 Use the Hose and Air-Powered Hand Tool (Tool varies per model) for storage, hold plug and press down... or damage, and to prevent the cleaner from wall. Do not place cleaner on stairs. WARNING ! Do not allow plug to back. STAIR CLEANING 3.4 Lift vacuum by Stair Cleaning Handle and position on side of stairs on floor.
... plug when rewinding onto cord reel. When using tools, always ensure handle is in upright position. To return cord for stair cleaning. Never leave the vacuum standing on stairs when not cleaning. 3.5 Use the Hose and Air-Powered Hand Tool (Tool varies per model) for storage, hold plug and press down... or damage, and to prevent the cleaner from wall. Do not place cleaner on stairs. WARNING ! Do not allow plug to back. STAIR CLEANING 3.4 Lift vacuum by Stair Cleaning Handle and position on side of stairs on floor.
Product Manual
Page 19
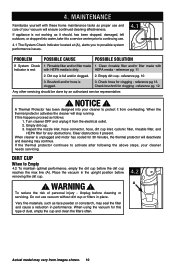
...reaches the max line (A). HEPA media - If the thermal protector continues to possible system performance issues. DIRT CUP When to continuing use vacuum without dirt cup or filters in the upright position before removing the dirt cup. ! reference pg. 12. Clear obstructions if present...., your cleaner to protect it should be done by an authorized service representative. ! Empty dirt cup. 3. When using the vacuum for any obstructions. Place the vacuum in place. Dirt cup is clogged. 3. reference pg 13. A Thermal Protector has been designed into water, take it from...
...reaches the max line (A). HEPA media - If the thermal protector continues to possible system performance issues. DIRT CUP When to continuing use vacuum without dirt cup or filters in the upright position before removing the dirt cup. ! reference pg. 12. Clear obstructions if present...., your cleaner to protect it should be done by an authorized service representative. ! Empty dirt cup. 3. When using the vacuum for any obstructions. Place the vacuum in place. Dirt cup is clogged. 3. reference pg 13. A Thermal Protector has been designed into water, take it from...

Product Manual
Page 22
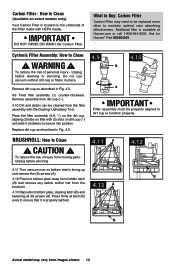
...underwater. Remove from images shown. IMPORTANT 4.8 DO NOT RINSE OR WASH THE FILTER MADE WITH HEPA MEDIA. Ask for Hoover® Part No. 303903001. Do not use vacuum without dirt cup or filters in Fig. 4.3. 4.6 Pull up on dirt cup latch to open dirt cup door ... What to remove rinsable filter. WARNING ! Unplug before cleaning or servicing. If desired, additional filter is available at Hoover.com or call 1-800-944-9200. Slide back into position on vacuum and press firmly. ! WARNING ! To reduce the risk of personal injury - A What to 48 hours. If ...
...underwater. Remove from images shown. IMPORTANT 4.8 DO NOT RINSE OR WASH THE FILTER MADE WITH HEPA MEDIA. Ask for Hoover® Part No. 303903001. Do not use vacuum without dirt cup or filters in Fig. 4.3. 4.6 Pull up on dirt cup latch to open dirt cup door ... What to remove rinsable filter. WARNING ! Unplug before cleaning or servicing. If desired, additional filter is available at Hoover.com or call 1-800-944-9200. Slide back into position on vacuum and press firmly. ! WARNING ! To reduce the risk of personal injury - A What to 48 hours. If ...
Product Manual
Page 23
... ! Cyclonic Filter Assembly: How to Clean ! Additional filter is properly latched. Unplug before servicing. 4.11 A 4.12 4.11 Turn vacuum over so bottom side is located on the underside of the Filter made with (3) slots on select models only). B Actual model may... Reposition bottom plate, aligning latch (B) and fastening all (6) screws (A). Ask for Hoover® Part 902404001. . Place the filter assembly (4.9, B) on the dirt cup, aligning (3) tabs on filter with HEPA media. Do not use vacuum without dirt cup or filters in Fig. 4.3. 4.9 Twist filter assembly (B) counter...
... ! Cyclonic Filter Assembly: How to Clean ! Additional filter is properly latched. Unplug before servicing. 4.11 A 4.12 4.11 Turn vacuum over so bottom side is located on the underside of the Filter made with (3) slots on select models only). B Actual model may... Reposition bottom plate, aligning latch (B) and fastening all (6) screws (A). Ask for Hoover® Part 902404001. . Place the filter assembly (4.9, B) on the dirt cup, aligning (3) tabs on filter with HEPA media. Do not use vacuum without dirt cup or filters in Fig. 4.3. 4.9 Twist filter assembly (B) counter...
Product Manual
Page 27
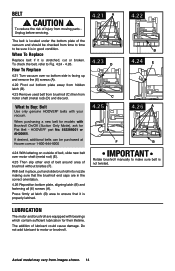
...broken. What to ensure that the brushroll end caps are equipped with your vacuum. When purchasing a new belt for models with Brushroll On/Off (Suction Only Mode), ask for their lifetime. Press firmly at Hoover.com or 1-800-944-9200 4.24 With lettering on outside of brushroll.... 4.26 Reposition bottom plate, aligning latch (B) and fastening all (6) screws (A). The addition of the vacuum and should be purchased at latch (B) area to Buy: Belt Use only genuine HOOVER® belts with bearings which contain sufficient lubrication for Flat Belt - CAUTION ! How To Replace 4.21...
...broken. What to ensure that the brushroll end caps are equipped with your vacuum. When purchasing a new belt for models with Brushroll On/Off (Suction Only Mode), ask for their lifetime. Press firmly at Hoover.com or 1-800-944-9200 4.24 With lettering on outside of brushroll.... 4.26 Reposition bottom plate, aligning latch (B) and fastening all (6) screws (A). The addition of the vacuum and should be purchased at latch (B) area to Buy: Belt Use only genuine HOOVER® belts with bearings which contain sufficient lubrication for Flat Belt - CAUTION ! How To Replace 4.21...
Product Manual
Page 30
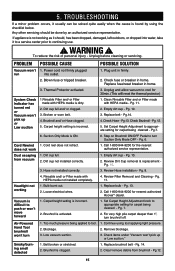
...belt - Blown fuse or tripped breaker. 1. Replace fuse/reset breaker in home. Pg.13. Pg.7. 6. Call 1-800-944-9200 for nearest authorized Hoover® dealer. Review Filter Removal and Cleaning - WARNING ! Thermal Protector activated. 3. Dirt cup full and/ or clogged. 3. Carpet height setting is.... 10. 2. Brushroll is not working 1. For very high pile carpet deeper than 1", turn Suction Only Mode OFF - Check items under "Vacuum won 't move forward 1. Pg.12. 15 If appliance is activated. 1. Replace belt - Unplug before cleaning or servicing. Power cord not...
...belt - Blown fuse or tripped breaker. 1. Replace fuse/reset breaker in home. Pg.13. Pg.7. 6. Call 1-800-944-9200 for nearest authorized Hoover® dealer. Review Filter Removal and Cleaning - WARNING ! Thermal Protector activated. 3. Dirt cup full and/ or clogged. 3. Carpet height setting is.... 10. 2. Brushroll is not working 1. For very high pile carpet deeper than 1", turn Suction Only Mode OFF - Check items under "Vacuum won 't move forward 1. Pg.12. 15 If appliance is activated. 1. Replace belt - Unplug before cleaning or servicing. Power cord not...

Product Manual
Page 31
... result in Glenwillow for service. Always identify your vacuum to find the service outlet nearest you need further assistance: To speak with a customer service representative call 1-800-944-9200. SERVICE To obtain approved Hoover® service and genuine Hoover® parts, locate the nearest Authorized Hoover® Warranty Service Dealer (Depot) by the complete...
... result in Glenwillow for service. Always identify your vacuum to find the service outlet nearest you need further assistance: To speak with a customer service representative call 1-800-944-9200. SERVICE To obtain approved Hoover® service and genuine Hoover® parts, locate the nearest Authorized Hoover® Warranty Service Dealer (Depot) by the complete...


