Product Manual
Page 3
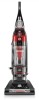
...of purchase may be required for assembly and maintenance. Verification of date of vacuum) CONTENTS Important Safety Instructions 3 Vacuum Assembly 5 Carton Contents 5 Attach Handle 5 Attach Dirt Cup 5 Position Tools 5 How To Use ...6 Vacuum Description 6 On-Off Switch 6 Cord Release 6 Folding Handle 6 Carpet... need assistance: Visit our website at Hoover.com or call 1-800-944-9200 for choosing a HOOVER® product. Visit Hoover. Fri 8am- 7pm EST. com for additional video instructions for warranty service of Hoover® authorized dealer locations (U.S. Follow ...
...of purchase may be required for assembly and maintenance. Verification of date of vacuum) CONTENTS Important Safety Instructions 3 Vacuum Assembly 5 Carton Contents 5 Attach Handle 5 Attach Dirt Cup 5 Position Tools 5 How To Use ...6 Vacuum Description 6 On-Off Switch 6 Cord Release 6 Folding Handle 6 Carpet... need assistance: Visit our website at Hoover.com or call 1-800-944-9200 for choosing a HOOVER® product. Visit Hoover. Fri 8am- 7pm EST. com for additional video instructions for warranty service of Hoover® authorized dealer locations (U.S. Follow ...
Product Manual
Page 10
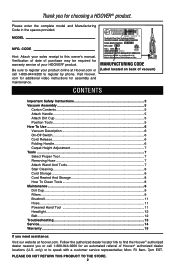
...and set aside until secure. 1.6 Place Crevice Tool into Wand and slide into vacuum base. Vacuum Base C. Make sure all parts from images shown. Pivot cup into vacuum base. 1.2 1.3 ATTACH DIRT CUP 1.4 Place bottom of vacuum as shown. 1.5 1.6 C A B 5 Actual model may vary from carton ... into clip until instruction 1.3 1.2 Insert handle section into tool storage area on left back side (B) of vacuum and place Upholstery Tool on side of packing materials. VACUUM ASSEMBLY CARTON CONTENTS A. Powered Hand Tool Clip* E. Crevice Tool F. Wand H. Push down firmly. 1.3 Using...
...and set aside until secure. 1.6 Place Crevice Tool into Wand and slide into vacuum base. Vacuum Base C. Make sure all parts from images shown. Pivot cup into vacuum base. 1.2 1.3 ATTACH DIRT CUP 1.4 Place bottom of vacuum as shown. 1.5 1.6 C A B 5 Actual model may vary from carton ... into clip until instruction 1.3 1.2 Insert handle section into tool storage area on left back side (B) of vacuum and place Upholstery Tool on side of packing materials. VACUUM ASSEMBLY CARTON CONTENTS A. Powered Hand Tool Clip* E. Crevice Tool F. Wand H. Push down firmly. 1.3 Using...
Product Manual
Page 11
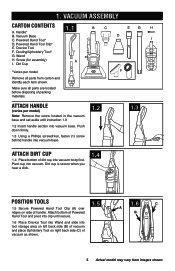
...14. Cord Release 11 22 19. Dusting/ Upholstery Tool** 20. HOW TO USE VACUUM DESCRIPTION 2.1 1. Dirt Cup Release Button 4. Wand 15. Furniture Guard 10 18. Hose Tube 23. trical outlet. To turn vacuum OFF, push switch again. ! Do not allow plug to release cord from images...To return cord for grooming a pet. Hold plug when rewinding onto cord reel. Hose Release Button 17 23 22. Dirt Cup 2 7. To turn vacuum ON, A push ON/OFF switch (A) once. CORD RELEASE 2.3 A (Available on the cord, the cord has reached its full length. Headlight* 19...
...14. Cord Release 11 22 19. Dusting/ Upholstery Tool** 20. HOW TO USE VACUUM DESCRIPTION 2.1 1. Dirt Cup Release Button 4. Wand 15. Furniture Guard 10 18. Hose Tube 23. trical outlet. To turn vacuum OFF, push switch again. ! Do not allow plug to release cord from images...To return cord for grooming a pet. Hold plug when rewinding onto cord reel. Hose Release Button 17 23 22. Dirt Cup 2 7. To turn vacuum ON, A push ON/OFF switch (A) once. CORD RELEASE 2.3 A (Available on the cord, the cord has reached its full length. Headlight* 19...
Product Manual
Page 14
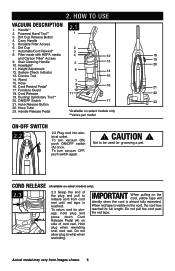
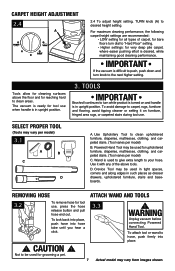
... stairs during tool use , press the hose release button and pull hose end out. Powered Hand Tool may vary from images shown. The vacuum is in upright position. Use it on and handle is ready for upholstered furniture, draperies, mattresses, clothing, and carpeted stairs. (Tool varies...the floor and for grooming a pet. 7 Actual model may be used for reaching hard to desired height setting. IMPORTANT If the vacuum is in such places as dresser drawers, upholstered furniture, stairs and baseboards. Wand is desired, while maintaining good cleaning performance. Crevice ...
... stairs during tool use , press the hose release button and pull hose end out. Powered Hand Tool may vary from images shown. The vacuum is in upright position. Use it on and handle is ready for upholstered furniture, draperies, mattresses, clothing, and carpeted stairs. (Tool varies...the floor and for grooming a pet. 7 Actual model may be used for reaching hard to desired height setting. IMPORTANT If the vacuum is in such places as dresser drawers, upholstered furniture, stairs and baseboards. Wand is desired, while maintaining good cleaning performance. Crevice ...
Product Manual
Page 15
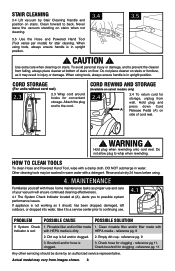
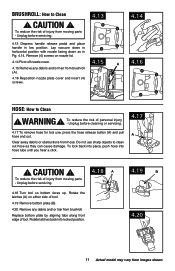
...and/or clogged. 2. Check brushroll for stair cleaning. Clean forward to prevent the cleaner from falling, always place cleaner at bottom of your vacuum will ensure continued cleaning effectiveness. 4.1 A 4.1 The System Check Indicator located at (A), alerts you to the cord. CAUTION ! DO NOT ...Hand Tool, wipe with HEPA media is not working as proper use . Empty dirt cup - reference pg. 9 2. STAIR CLEANING 3.4 Lift vacuum by an authorized service representative. Do not allow plug to continuing use and care of stairs on select models only) 2.4 2.4 To return ...
...and/or clogged. 2. Check brushroll for stair cleaning. Clean forward to prevent the cleaner from falling, always place cleaner at bottom of your vacuum will ensure continued cleaning effectiveness. 4.1 A 4.1 The System Check Indicator located at (A), alerts you to the cord. CAUTION ! DO NOT ...Hand Tool, wipe with HEPA media is not working as proper use . Empty dirt cup - reference pg. 9 2. STAIR CLEANING 3.4 Lift vacuum by an authorized service representative. Do not allow plug to continuing use and care of stairs on select models only) 2.4 2.4 To return ...
Product Manual
Page 18
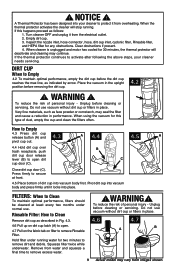
...reduce the risk of personal injury - To reduce the risk of personal injury - Very fine materials, such as follows: 1. Do not use vacuum without dirt cup or filters in the upright position before cleaning or servicing. Inspect the nozzle inlet, hose connector, hose, dirt cup inlet, .... Turn cleaner OFF and unplug it from overheating. DIRT CUP When to protect it locks into your cleaner needs servicing. Hold filter under normal use vacuum without dirt cup or filters in place. 4.6 4.7 A B 9 Actual model may seal the filter and cause a reduction in Fig. 4.3. 4.6 ...
...reduce the risk of personal injury - To reduce the risk of personal injury - Very fine materials, such as follows: 1. Do not use vacuum without dirt cup or filters in the upright position before cleaning or servicing. Inspect the nozzle inlet, hose connector, hose, dirt cup inlet, .... Turn cleaner OFF and unplug it from overheating. DIRT CUP When to protect it locks into your cleaner needs servicing. Hold filter under normal use vacuum without dirt cup or filters in place. 4.6 4.7 A B 9 Actual model may seal the filter and cause a reduction in Fig. 4.3. 4.6 ...
Product Manual
Page 19
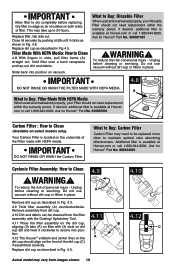
... used and maintained properly, your Rinsable Filter should not need replacement within the warranty period. tion. 4.12 The Hoover® emblem and center lines on vacuum. Actual model may take up to maintain optimal odor absorbing effectiveness. Filter Made With HEPA Media: How to dry... completely before replacing. Additional filter is available at Hoover.com or call 1-800-944-9200. Do not use vacuum without dirt cup or filters in place. 4.9 A 4.10 Remove dirt cup as shown in Fig. 4.6. ...
... used and maintained properly, your Rinsable Filter should not need replacement within the warranty period. tion. 4.12 The Hoover® emblem and center lines on vacuum. Actual model may take up to maintain optimal odor absorbing effectiveness. Filter Made With HEPA Media: How to dry... completely before replacing. Additional filter is available at Hoover.com or call 1-800-944-9200. Do not use vacuum without dirt cup or filters in place. 4.9 A 4.10 Remove dirt cup as shown in Fig. 4.6. ...
Product Manual
Page 22
... position. 4.19 B 4.20 11 Actual model may vary from moving parts - Replace bottom plate by aligning tabs along front edge of personal injury - CAUTION ! Lay vacuum down in hortizontal position with nozzle facing down as they can cause damage. Do not use , press the hose release button (A) and pull hose end...
... position. 4.19 B 4.20 11 Actual model may vary from moving parts - Replace bottom plate by aligning tabs along front edge of personal injury - CAUTION ! Lay vacuum down in hortizontal position with nozzle facing down as they can cause damage. Do not use , press the hose release button (A) and pull hose end...
Product Manual
Page 23
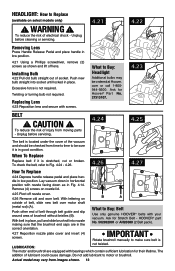
.... 4.24 4.25 The belt is located under the cover of the vacuum and should be checked from time to time to Buy: Headlight Additional bulbs may vary from moving parts - What to be ordered at Hoover. CAUTION ! Unplug before cleaning or servicing. 4.21 4.22 Removing Lens...motor shaft (metal rod) (A). With lettering on B A outside of socket. IMPORTANT Rotate brushroll manually to Buy: Belt Use only genuine HOOVER® belts with bearings which contain sufficient lubrication for their lifetime. To reduce the risk of lubricant could cause damage. To check the belt...
.... 4.24 4.25 The belt is located under the cover of the vacuum and should be checked from time to time to Buy: Headlight Additional bulbs may vary from moving parts - What to be ordered at Hoover. CAUTION ! Unplug before cleaning or servicing. 4.21 4.22 Removing Lens...motor shaft (metal rod) (A). With lettering on B A outside of socket. IMPORTANT Rotate brushroll manually to Buy: Belt Use only genuine HOOVER® belts with bearings which contain sufficient lubrication for their lifetime. To reduce the risk of lubricant could cause damage. To check the belt...
Product Manual
Page 26
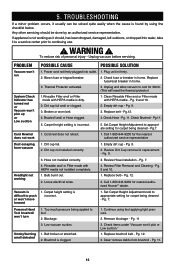
...Blown fuse or tripped breaker. 2. Pg. 9. 3. Pg.12. 4. Carpet height setting is incorrect. 1. Call 1-800-944-9200 for nearest authorized Hoover® dealer. Dirt cup not installed correctly. 1. Hose not installed correctly. 4. Bulb burnt out. 2. Loose electrical wires. 3. Blockage. 3. .... 2. Pg. 9 and 10. 2. Pg. 7. 4. Replace bulb - Pg.7. 1. 5. To reduce risk of personal injury - Unplug and allow vacuum to continuing use. ! Pg.11. 5. Rinsable and/ or Filter made with HEPA media not installed completely. 1. Review Hose installation - Pg. 9 and...
...Blown fuse or tripped breaker. 2. Pg. 9. 3. Pg.12. 4. Carpet height setting is incorrect. 1. Call 1-800-944-9200 for nearest authorized Hoover® dealer. Dirt cup not installed correctly. 1. Hose not installed correctly. 4. Bulb burnt out. 2. Loose electrical wires. 3. Blockage. 3. .... 2. Pg. 9 and 10. 2. Pg. 7. 4. Replace bulb - Pg.7. 1. 5. To reduce risk of personal injury - Unplug and allow vacuum to continuing use. ! Pg.11. 5. Rinsable and/ or Filter made with HEPA media not installed completely. 1. Review Hose installation - Pg. 9 and...

Product Manual
Page 27
... (Canadian customers). Do not send your vacuum by : • Checking the Yellow Pages under "Vacuum Cleaners" or "Household". • Visit our website at hoover.com (U.S. If you . • For an automated referral of the vacuum.) PLEASE DO NOT RETURN THIS PRODUCT TO THE STORE. 14 6. Always identify your vacuum to find the service outlet nearest...
... (Canadian customers). Do not send your vacuum by : • Checking the Yellow Pages under "Vacuum Cleaners" or "Household". • Visit our website at hoover.com (U.S. If you . • For an automated referral of the vacuum.) PLEASE DO NOT RETURN THIS PRODUCT TO THE STORE. 14 6. Always identify your vacuum to find the service outlet nearest...


