
Product Manual
Page 3
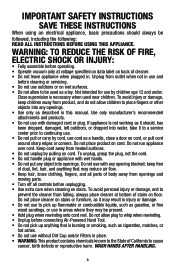
WARNING: TO REDUCE THE RISK OF FIRE, ELECTRIC SHOCK OR INJURY: • Fully assemble before operating. • Operate vacuum only at bottom of dust, lint, hair, and anything that may be present. • Hold plug when rewinding onto cord reel. Close supervision is not ... run appliance over cord. WASH HANDS AFTER HANDLING. 3 To avoid personal injury or damage, and to prevent the cleaner from openings and moving parts. • Turn off all parts of body away from falling, always place cleaner at voltage specified on data label on back of California to whip when rewinding. •...
WARNING: TO REDUCE THE RISK OF FIRE, ELECTRIC SHOCK OR INJURY: • Fully assemble before operating. • Operate vacuum only at bottom of dust, lint, hair, and anything that may be present. • Hold plug when rewinding onto cord reel. Close supervision is not ... run appliance over cord. WASH HANDS AFTER HANDLING. 3 To avoid personal injury or damage, and to prevent the cleaner from openings and moving parts. • Turn off all parts of body away from falling, always place cleaner at voltage specified on data label on back of California to whip when rewinding. •...
Product Manual
Page 5
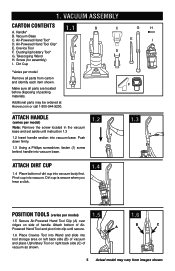
...storage area on left back side (B) of vacuum and place Upholstery Tool on side of packing materials. F Make sure all parts from images shown. Handle* B. Additional parts may vary from carton and identify each item... shown. B C A 1.6 Place Crevice Tool into Wand and slide into vacuum base. Air-Powered Hand Tool* E I . Push down firmly. 1.3 Using a Phillips screwdriver, fasten (1) screw behind handle into vacuum base. 1.2 1.3 Attach dirt cup 1.4 Place bottom of vacuum as shown. 5 Actual model may be ordered at Hoover...
...storage area on left back side (B) of vacuum and place Upholstery Tool on side of packing materials. F Make sure all parts from images shown. Handle* B. Additional parts may vary from carton and identify each item... shown. B C A 1.6 Place Crevice Tool into Wand and slide into vacuum base. Air-Powered Hand Tool* E I . Push down firmly. 1.3 Using a Phillips screwdriver, fasten (1) screw behind handle into vacuum base. 1.2 1.3 Attach dirt cup 1.4 Place bottom of vacuum as shown. 5 Actual model may be ordered at Hoover...
Product Manual
Page 8
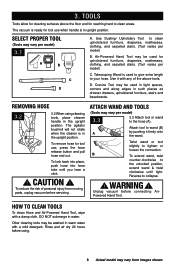
...to wand (B) A by pushing it with any of personal injury from images shown. WARNING ! Other cleaning tools may vary from moving parts, unplug vacuum before servicing. 3. Removing Hose 3.2 3.2 When using . 8 Actual model may be used for upholstered furniture, draperies, mattresses, clothing, ...the unlocked position, extend wand & twist clockwise until you hear a click. ! Reverse to tighten or loosen the connection. Unplug vacuum before using cleaning tools, place cleaner handle in warm water with a damp cloth. Rinse and air dry 24 hours before connecting AirPowered...
...to wand (B) A by pushing it with any of personal injury from images shown. WARNING ! Other cleaning tools may vary from moving parts, unplug vacuum before servicing. 3. Removing Hose 3.2 3.2 When using . 8 Actual model may be used for upholstered furniture, draperies, mattresses, clothing, ...the unlocked position, extend wand & twist clockwise until you hear a click. ! Reverse to tighten or loosen the connection. Unplug vacuum before using cleaning tools, place cleaner handle in warm water with a damp cloth. Rinse and air dry 24 hours before connecting AirPowered...

Product Manual
Page 11
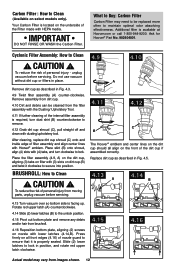
... Made With HEPA Media When used and maintained properly, your Filter should not need replacement within the warranty period. Ask for Hoover® Part No. 304087001 Filter Made With HEPA Media: How to Clean 4.8 With fingers in place. Replace filter with pocket and graphics...use vacuum without dirt cup or filters in slots, pull filter frame (A) straight out. Rinsable Filter: How to Clean Remove dirt cup as described in place. 4.6 4.7 What to remove dirt and debris. Close dirt cup door (C). Press firmly to remove rinsable filter. Ask for Hoover® Part ...
... Made With HEPA Media When used and maintained properly, your Filter should not need replacement within the warranty period. Ask for Hoover® Part No. 304087001 Filter Made With HEPA Media: How to Clean 4.8 With fingers in place. Replace filter with pocket and graphics...use vacuum without dirt cup or filters in slots, pull filter frame (A) straight out. Rinsable Filter: How to Clean Remove dirt cup as described in place. 4.6 4.7 What to remove dirt and debris. Close dirt cup door (C). Press firmly to remove rinsable filter. Ask for Hoover® Part ...
Product Manual
Page 12
...and twist it is required, turn clockwise to Buy: Carbon Filter Carbon Filter may vary from moving parts, unplug vacuum before servicing. Slide (2) lower latches to lock in Fig. 4.5. 4.13 A 4.14 B 4.13 Turn vacuum over so bottom side is facing up. Rotate red upper latch (A) counterclockwise. 4.14 Slide (2) ...4.15 Pivot out bottom plate and remove any debris and/or hair from the filter assembly with HEPA media. unplug vacuum before servicing. 4.11 4.12 C B The Hoover® emblem and center lines on the dirt cup should all front edges (4.16) of filter assembly and align ...
...and twist it is required, turn clockwise to Buy: Carbon Filter Carbon Filter may vary from moving parts, unplug vacuum before servicing. Slide (2) lower latches to lock in Fig. 4.5. 4.13 A 4.14 B 4.13 Turn vacuum over so bottom side is facing up. Rotate red upper latch (A) counterclockwise. 4.14 Slide (2) ...4.15 Pivot out bottom plate and remove any debris and/or hair from the filter assembly with HEPA media. unplug vacuum before servicing. 4.11 4.12 C B The Hoover® emblem and center lines on the dirt cup should all front edges (4.16) of filter assembly and align ...
Product Manual
Page 13
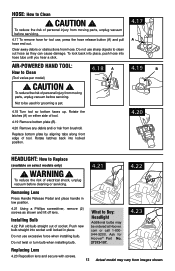
... tabs along front edge of socket. Do not twist or turn bulb when installing bulb. Not to Buy: Headlight Additional bulbs may vary from moving parts, unplug vacuum before servicing. 4.17 To remove hose for tool use excessive force when installing bulb. Installing Bulb 4.22 Pull old bulb straight out of tool...-Powered Hand Tool: How to clean out hose as shown and lift off lens. com or call 1-800944-9200. WARNING ! What to be used for Hoover® Part No. 27313-107. 4.23 Replacing Lens 4.23 Reposition lens and secure with screws. 13 Actual model may be ordered at...
... tabs along front edge of socket. Do not twist or turn bulb when installing bulb. Not to Buy: Headlight Additional bulbs may vary from moving parts, unplug vacuum before servicing. 4.17 To remove hose for tool use excessive force when installing bulb. Installing Bulb 4.22 Pull old bulb straight out of tool...-Powered Hand Tool: How to clean out hose as shown and lift off lens. com or call 1-800944-9200. WARNING ! What to be used for Hoover® Part No. 27313-107. 4.23 Replacing Lens 4.23 Reposition lens and secure with screws. 13 Actual model may be ordered at...
Product Manual
Page 14
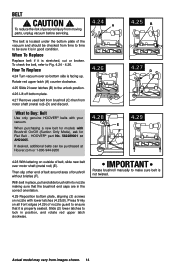
...; belts with your vacuum. What to the unlock position. 4.26 Lift off bottom plate. 4.27 Remove used belt from brushroll (C) then from time to time to make sure belt is in position, and rotate red upper latch clockwise. HOOVER® part No. 562289001 or AH20065. If desired, ...additional belts can be checked from motor shaft (metal rod) (D) and discard. Slide (2) lower latches to Fig. 4.24 - 4.26. Actual model may vary from moving parts, unplug vacuum before servicing. To check the belt,...
...; belts with your vacuum. What to the unlock position. 4.26 Lift off bottom plate. 4.27 Remove used belt from brushroll (C) then from time to time to make sure belt is in position, and rotate red upper latch clockwise. HOOVER® part No. 562289001 or AH20065. If desired, ...additional belts can be checked from motor shaft (metal rod) (D) and discard. Slide (2) lower latches to Fig. 4.24 - 4.26. Actual model may vary from moving parts, unplug vacuum before servicing. To check the belt,...
Product Manual
Page 16
...TO THE STORE. 16 Always identify your vacuum to find the service outlet nearest you need further assistance: To speak with a customer service representative call 1-800-944-9200. 6. Mon-Fri 8am-7pm EST. Customers) or hoover.ca (Canadian customers). This will only result... service center link to Hoover®, Inc., Company in delay. Service To obtain approved Hoover® service and genuine Hoover® parts, locate the nearest Authorized Hoover® Warranty Service Dealer (Depot) by the complete model number when requesting information or ordering parts. (The model number appears...
...TO THE STORE. 16 Always identify your vacuum to find the service outlet nearest you need further assistance: To speak with a customer service representative call 1-800-944-9200. 6. Mon-Fri 8am-7pm EST. Customers) or hoover.ca (Canadian customers). This will only result... service center link to Hoover®, Inc., Company in delay. Service To obtain approved Hoover® service and genuine Hoover® parts, locate the nearest Authorized Hoover® Warranty Service Dealer (Depot) by the complete model number when requesting information or ordering parts. (The model number appears...


