Manual
Page 2
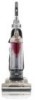
... choosing a HOOVER® product. Model 1-800-944-9200 MFG. Please do not return this owner's manual. Please enter the complete model and Manufacturing Code in China Manufacturing code (Label located on back of vacuum) Contents Important Safety Instructions 3 Vacuum Assembly 5 ...Carton Contents 5 Attach Handle 5 Attach Dirt Cup 5 Position Tools 5 How To Use...6 Vacuum Description 6 On-Off Switch 6 Suction Only Mode 6 Cord Rewind...
... choosing a HOOVER® product. Model 1-800-944-9200 MFG. Please do not return this owner's manual. Please enter the complete model and Manufacturing Code in China Manufacturing code (Label located on back of vacuum) Contents Important Safety Instructions 3 Vacuum Assembly 5 ...Carton Contents 5 Attach Handle 5 Attach Dirt Cup 5 Position Tools 5 How To Use...6 Vacuum Description 6 On-Off Switch 6 Suction Only Mode 6 Cord Rewind...
Manual
Page 3
... wood sandings, or use in areas where they may reduce air flow. • Keep hair, loose clothing, fingers, and all controls before operating. • Operate vacuum only at bottom of stairs on wet surfaces. • Do not allow to place fingers or other objects into any openings. • Use only as...
... wood sandings, or use in areas where they may reduce air flow. • Keep hair, loose clothing, fingers, and all controls before operating. • Operate vacuum only at bottom of stairs on wet surfaces. • Do not allow to place fingers or other objects into any openings. • Use only as...
Manual
Page 5
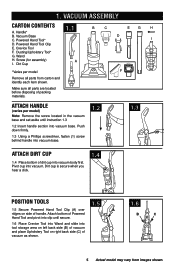
... from images shown. Handle* B. Wand H. 1. Powered Hand Tool* D. Screw (for assembly) I F Attach handle (varies per model Remove all parts are located before disposing of vacuum as shown. 1.6 B C 5 Actual model may vary from carton and identify each item shown. B C EG H D I . Dirt cup is secure when you hear a click...(A) over A ridges on right back side (C) of packing materials. Pivot cup into tool storage area on left back side (B) of vacuum and place Upholstery Tool on side of Powered Hand Tool and pivot into clip until instruction 1.3 1.2 Insert handle section into...
... from images shown. Handle* B. Wand H. 1. Powered Hand Tool* D. Screw (for assembly) I F Attach handle (varies per model Remove all parts are located before disposing of vacuum as shown. 1.6 B C 5 Actual model may vary from carton and identify each item shown. B C EG H D I . Dirt cup is secure when you hear a click...(A) over A ridges on right back side (C) of packing materials. Pivot cup into tool storage area on left back side (B) of vacuum and place Upholstery Tool on side of Powered Hand Tool and pivot into clip until instruction 1.3 1.2 Insert handle section into...
Manual
Page 6
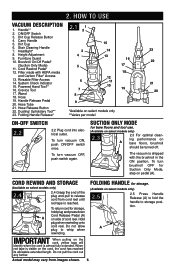
...15. Do not allow plug to release cord from images shown. 6 Headlight* 8. Wand 18. Height Adjustment 9. To turn vacuum ON, push ON/OFF switch once. The vacuum is reached. Cord Rewind AND STORAGE (Available on A bare floors, brushroll should be turned off. When red tape is almost... of the plug and pull to whip when rewinding. Dirt Cup Release Button 4. Powered Hand Tool** 16. To turn vacuum OFF, push switch again. HOW TO USE Vacuum Description 1. 2. Carry Handle 5. Stair Cleaning Handle 7. Filter made with the brushroll in the ON position. To return ...
...15. Do not allow plug to release cord from images shown. 6 Headlight* 8. Wand 18. Height Adjustment 9. To turn vacuum ON, push ON/OFF switch once. The vacuum is reached. Cord Rewind AND STORAGE (Available on A bare floors, brushroll should be turned off. When red tape is almost... of the plug and pull to whip when rewinding. Dirt Cup Release Button 4. Powered Hand Tool** 16. To turn vacuum OFF, push switch again. HOW TO USE Vacuum Description 1. 2. Carry Handle 5. Stair Cleaning Handle 7. Filter made with the brushroll in the ON position. To return ...
Manual
Page 7
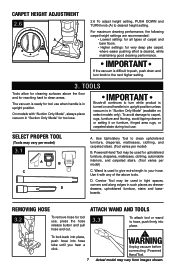
...and turn while product is turned on and handle is in upright position unless vacuum is desired, while maintaining good cleaning performance. Use it on select models only). WARNING Unplug vacuum before connecting Powered Hand Tool. TOOLS Tools allow for cleaning surfaces above tools... D. Actual model may vary per model) B. CARPET HEIGHT ADJUSTMENT 2.6 A 2.6 To adjust height setting, PUSH DOWN and TURN knob (A) to your hose. The vacuum is used in tight spaces, corners and along edges in "Suction Only Mode" for tool use , press the hose release button and pull hose end...
...and turn while product is turned on and handle is in upright position unless vacuum is desired, while maintaining good cleaning performance. Use it on select models only). WARNING Unplug vacuum before connecting Powered Hand Tool. TOOLS Tools allow for cleaning surfaces above tools... D. Actual model may vary per model) B. CARPET HEIGHT ADJUSTMENT 2.6 A 2.6 To adjust height setting, PUSH DOWN and TURN knob (A) to your hose. The vacuum is used in tight spaces, corners and along edges in "Suction Only Mode" for tool use , press the hose release button and pull hose end...
Manual
Page 8
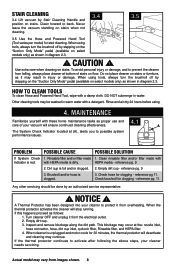
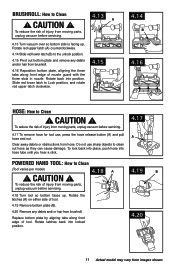
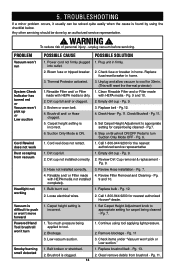
... PROBLEM POSSIBLE CAUSE POSSIBLE SOLUTION If System Check 1. reference pg. 11. When using . 4. A The System Check Indicator located at bottom of your vacuum will stop running. Empty dirt cup - Check brushroll for clogging - NOTICE ! How to Clean Tools To clean Hose and Powered Hand Tool, wipe ... Hand Tool (Tool varies per model) for 30 minutes, the thermal protector will deactivate and cleaning may continue. Never leave the vacuum standing on stairs. Rinse and air dry 24 hours before using tools, always turn the brushroll off by stepping on the "Suction...
... PROBLEM POSSIBLE CAUSE POSSIBLE SOLUTION If System Check 1. reference pg. 11. When using . 4. A The System Check Indicator located at bottom of your vacuum will stop running. Empty dirt cup - Check brushroll for clogging - NOTICE ! How to Clean Tools To clean Hose and Powered Hand Tool, wipe ... Hand Tool (Tool varies per model) for 30 minutes, the thermal protector will deactivate and cleaning may continue. Never leave the vacuum standing on stairs. Rinse and air dry 24 hours before using tools, always turn the brushroll off by stepping on the "Suction...
Manual
Page 9
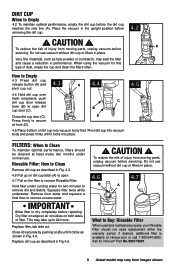
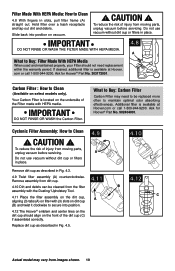
When using the vacuum for Hoover® Part No.303173001. 9 Actual model may take up on dirt cup latch (A) to open dirt cup door (C). Squeeze filter twice while underwater. CAUTION ! Do not use vacuum without dirt cup or filters in performance. Place the vacuum in place. 4.6 4.7 B... C B D 4.5 Place bottom of injury from water and squeeze a final time to remove Rinsable Filter. Remove from moving parts, unplug vacuum before removing the dirt cup. 4.2 ! Ask for this type of filter. Close lid securely by pushing at least every two months under...
When using the vacuum for Hoover® Part No.303173001. 9 Actual model may take up on dirt cup latch (A) to open dirt cup door (C). Squeeze filter twice while underwater. CAUTION ! Do not use vacuum without dirt cup or filters in performance. Place the vacuum in place. 4.6 4.7 B... C B D 4.5 Place bottom of injury from water and squeeze a final time to remove Rinsable Filter. Remove from moving parts, unplug vacuum before removing the dirt cup. 4.2 ! Ask for this type of filter. Close lid securely by pushing at least every two months under...
Manual
Page 10
To reduce the risk of injury from moving parts, unplug vacuum before servicing. com or call 1-800-944-9200. CAUTION ! Replace dirt cup as described in Fig. 4.5. Slide back into position. 4.12 The Hoover® emblem and center lines on the dirt cup should not need to ...Clean ! Do not use vacuum without dirt cup or filters in slots, pull filter frame (A) straight out. If desired, additional filter is available at Hoover.com or call 1-800-944-9200. Ask for Hoover® Part No. 902404001. Your Carbon Filter is available at Hoover. IMPORTANT DO NOT RINSE...
To reduce the risk of injury from moving parts, unplug vacuum before servicing. com or call 1-800-944-9200. CAUTION ! Replace dirt cup as described in Fig. 4.5. Slide back into position. 4.12 The Hoover® emblem and center lines on the dirt cup should not need to ...Clean ! Do not use vacuum without dirt cup or filters in slots, pull filter frame (A) straight out. If desired, additional filter is available at Hoover.com or call 1-800-944-9200. Ask for Hoover® Part No. 902404001. Your Carbon Filter is available at Hoover. IMPORTANT DO NOT RINSE...
Manual
Page 11
...Powered Hand Tool: How to Clean (Tool varies per model) ! CAUTION ! CAUTION ! 4.18 A To reduce the risk of injury from moving parts, unplug vacuum before servicing. 4.17 To remove hose for tool use sharp objects to Clean ! Clear away debris or obstructions from images shown. Rotate the latches (A) on... either side of tool. To reduce the risk of injury from moving parts, unplug vacuum before servicing. 4.13 A 4.13 Turn vacuum over so bottom side is facing up . Replace bottom plate by aligning tabs along front edge of tool. 4.19 Remove...
...Powered Hand Tool: How to Clean (Tool varies per model) ! CAUTION ! CAUTION ! 4.18 A To reduce the risk of injury from moving parts, unplug vacuum before servicing. 4.17 To remove hose for tool use sharp objects to Clean ! Clear away debris or obstructions from images shown. Rotate the latches (A) on... either side of tool. To reduce the risk of injury from moving parts, unplug vacuum before servicing. 4.13 A 4.13 Turn vacuum over so bottom side is facing up . Replace bottom plate by aligning tabs along front edge of tool. 4.19 Remove...
Manual
Page 12
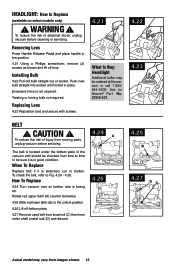
installing bulb 4.22 Pull old bulb straight out of the vacuum and should be checked from images shown. 12 Excessive force is in good condition. Ask for Hoover® Part No. 27313-107. 4.22 4.23 belt ! CAUTION ! To reduce the risk of injury from motor shaft (metal rod) (D) and discard. ...shown and lift off bottom plate. 4.27 Remove used belt from brushroll (C) then from moving parts, unplug vacuum before cleaning or servicing. com or call 1-800944-9200. when to be ordered at Hoover. headliGht: how to Fig. 4.24 - 4.26. WARNING ! removing lens Press Handle Release Pedal and place...
installing bulb 4.22 Pull old bulb straight out of the vacuum and should be checked from images shown. 12 Excessive force is in good condition. Ask for Hoover® Part No. 27313-107. 4.22 4.23 belt ! CAUTION ! To reduce the risk of injury from motor shaft (metal rod) (D) and discard. ...shown and lift off bottom plate. 4.27 Remove used belt from brushroll (C) then from moving parts, unplug vacuum before cleaning or servicing. com or call 1-800944-9200. when to be ordered at Hoover. headliGht: how to Fig. 4.24 - 4.26. WARNING ! removing lens Press Handle Release Pedal and place...
Manual
Page 13
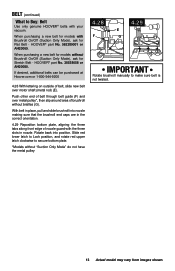
... position, and rotate red upper latch clockwise to secure bottom plate. *Models without Brushroll On/Off (Suction Only Mode), ask for Stretch Belt - HOOVER® part No. 562289001 or AH20065. Push other end of belt through belt guide (F) and over metal pulley*, then slip around area of belt... HOOVER® belts with the three slots in nozzle. When purchasing a new belt for Flat Belt - Rotate back into nozzle making sure that the brushroll end caps are in the correct orientation. 4.29 Reposition bottom plate, aligning the three tabs along front edge of nozzle guard with your vacuum....
... position, and rotate red upper latch clockwise to secure bottom plate. *Models without Brushroll On/Off (Suction Only Mode), ask for Stretch Belt - HOOVER® part No. 562289001 or AH20065. Push other end of belt through belt guide (F) and over metal pulley*, then slip around area of belt... HOOVER® belts with the three slots in nozzle. When purchasing a new belt for Flat Belt - Rotate back into nozzle making sure that the brushroll end caps are in the correct orientation. 4.29 Reposition bottom plate, aligning the three tabs along front edge of nozzle guard with your vacuum....
Manual
Page 14
... Pg. 9. 3. Call 1-800-944-9200 for the nearest authorized service representative 1. Continue using the checklist below. Pg. 11 3. unplug vacuum before servicing. Plug unit in home. 3. Pg. 9. 3. Carpet height setting is incorrect. 2. Cord reel does not retract. 1. Hose...belt. 3. Replace belt - Check Brushroll - Call 1-800-944-9200 for nearest authorized Hoover® dealer. 1. completely. 1. Brushroll is ON. 6. Remove blockage - Check items under "Vacuum won 't pick up or Low suction Cord Rewind does not work Dust escaping from brushroll...
... Pg. 9. 3. Call 1-800-944-9200 for the nearest authorized service representative 1. Continue using the checklist below. Pg. 11 3. unplug vacuum before servicing. Plug unit in home. 3. Pg. 9. 3. Carpet height setting is incorrect. 2. Cord reel does not retract. 1. Hose...belt. 3. Replace belt - Check Brushroll - Call 1-800-944-9200 for nearest authorized Hoover® dealer. 1. completely. 1. Brushroll is ON. 6. Remove blockage - Check items under "Vacuum won 't pick up or Low suction Cord Rewind does not work Dust escaping from brushroll...
Manual
Page 15
... (The model number appears on the bottom of authorized service outlet locations call 1-800-944-9200; Customers) or hoover.ca (Canadian customers). Always identify your vacuum to find the service outlet nearest you need further assistance: To speak with a customer service representative call 1-800-944...-9200. Do not send your vacuum by : • Checking the Yellow Pages under "Vacuum Cleaners" or "Household". • Visit our website at hoover.com (U.S. Mon-Fri 8am-7pm EST. 6. If you . • For an automated ...
... (The model number appears on the bottom of authorized service outlet locations call 1-800-944-9200; Customers) or hoover.ca (Canadian customers). Always identify your vacuum to find the service outlet nearest you need further assistance: To speak with a customer service representative call 1-800-944...-9200. Do not send your vacuum by : • Checking the Yellow Pages under "Vacuum Cleaners" or "Household". • Visit our website at hoover.com (U.S. Mon-Fri 8am-7pm EST. 6. If you . • For an automated ...


