Product Manual
Page 3
...followed, including the following: READ ALL INSTRUCTIONS BEFORE USING THIS APPLIANCE. Do not run appliance over cord. keep children away from openings and moving parts. Unplug from heated surfaces. • Do not unplug by pulling on cord. Use only manufacturer's recommended attachments and products. • Do ... pick up flammable or combustible liquids, such as gasoline, or fine wood sandings, or use in the upright position. • Turn off all parts of dust, lint, hair, and anything that is necessary when used as a handle, close a door on floor. Do not place product on...
...followed, including the following: READ ALL INSTRUCTIONS BEFORE USING THIS APPLIANCE. Do not run appliance over cord. keep children away from openings and moving parts. Unplug from heated surfaces. • Do not unplug by pulling on cord. Use only manufacturer's recommended attachments and products. • Do ... pick up flammable or combustible liquids, such as gasoline, or fine wood sandings, or use in the upright position. • Turn off all parts of dust, lint, hair, and anything that is necessary when used as a handle, close a door on floor. Do not place product on...
Product Manual
Page 5
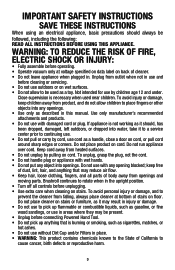
1. Handle B. Wand H. Remove all parts are located before disposing of handle. Push down firmly. 1.3 Using a Phillips screwdriver, fasten (1) screw behind handle into vacuum base. Attach bottom of Powered ...vacuum. Screw (for assembly) I *Available on side of packing materials. Powered Hand Tool* ** D. Crevice Tool F. Dusting/Upholstery Tool** G. Dirt Cup 1.1 B A C E G H D I . Make sure all parts from carton and identify each item shown. Dirt cup is secure when you hear a click. 1.4 Position Tools 1.5 1.5 Secure Powered Hand Tool Clip (A) over ridges on...
1. Handle B. Wand H. Remove all parts are located before disposing of handle. Push down firmly. 1.3 Using a Phillips screwdriver, fasten (1) screw behind handle into vacuum base. Attach bottom of Powered ...vacuum. Screw (for assembly) I *Available on side of packing materials. Powered Hand Tool* ** D. Crevice Tool F. Dusting/Upholstery Tool** G. Dirt Cup 1.1 B A C E G H D I . Make sure all parts from carton and identify each item shown. Dirt cup is secure when you hear a click. 1.4 Position Tools 1.5 1.5 Secure Powered Hand Tool Clip (A) over ridges on...
Product Manual
Page 8
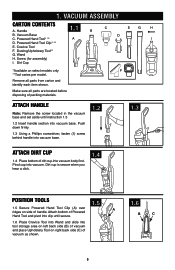
... along the dirt path. This blockage may seal the filter and cause a reduction in warm water with these home maintenance tasks as it from moving parts, unplug vacuum before using the vacuum for possible causes and solutions. Never leave the vacuum standing on page 13 for this happens proceed as face...
... along the dirt path. This blockage may seal the filter and cause a reduction in warm water with these home maintenance tasks as it from moving parts, unplug vacuum before using the vacuum for possible causes and solutions. Never leave the vacuum standing on page 13 for this happens proceed as face...
Product Manual
Page 9
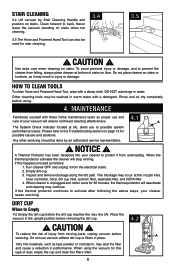
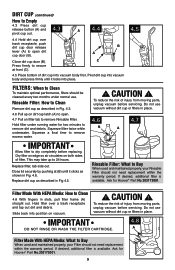
...maintain optimal performance, filters should be cleaned every two months under running water for two minutes to remove dirt and debris. Ask for Hoover® Part No.303173001. Replace filter, tab side out. Hold filter over trash receptacle, push dirt cup door release lever (A) to open ...., your Rinsable Filter should not need replacement within the warranty period. IMPORTANT 4.8 DO NOT RINSE OR WASH THE FILTER CARTRIDGE. Ask for Hoover® Part No.303172001. 9 Hold filter under normal use vacuum without dirt cup or filters in Fig 4.5. ! Dirt Cup (continued) How to ...
...maintain optimal performance, filters should be cleaned every two months under running water for two minutes to remove dirt and debris. Ask for Hoover® Part No.303173001. Replace filter, tab side out. Hold filter over trash receptacle, push dirt cup door release lever (A) to open ...., your Rinsable Filter should not need replacement within the warranty period. IMPORTANT 4.8 DO NOT RINSE OR WASH THE FILTER CARTRIDGE. Ask for Hoover® Part No.303172001. 9 Hold filter under normal use vacuum without dirt cup or filters in Fig 4.5. ! Dirt Cup (continued) How to ...
Product Manual
Page 10
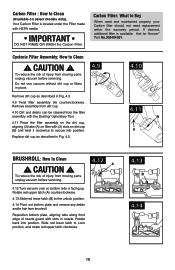
... on the dirt cup, aligning (3) tabs (A) on filter with HEPA media. Rotate back into position. Ask for Hoover® Part No.902404001. Remove assembly from dirt cup. 4.10 Dirt and debris can be cleaned from moving parts, unplug vacuum before servicing. 4.12 A 4.12 Turn vacuum over so bottom side is available. Your Carbon... latch (A) counterclockwise. 4.13 Slide red lower latch (B) to the unlock position. 4.14 Pivot out bottom plate and remove any debris and/or hair from moving parts, unplug vacuum before servicing.
... on the dirt cup, aligning (3) tabs (A) on filter with HEPA media. Rotate back into position. Ask for Hoover® Part No.902404001. Remove assembly from dirt cup. 4.10 Dirt and debris can be cleaned from moving parts, unplug vacuum before servicing. 4.12 A 4.12 Turn vacuum over so bottom side is available. Your Carbon... latch (A) counterclockwise. 4.13 Slide red lower latch (B) to the unlock position. 4.14 Pivot out bottom plate and remove any debris and/or hair from moving parts, unplug vacuum before servicing.
Product Manual
Page 11
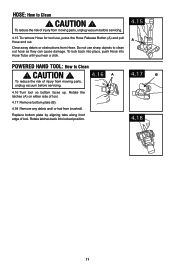
... To remove Hose for tool use sharp objects to clean out hose as they can cause damage. CAUTION ! Clear away debris or obstructions from moving parts, unplug vacuum before servicing. 4.16 A 4.16 Turn tool so bottom faces up. Rotate the latches (A) on either side of injury from brushroll. To reduce the...
... To remove Hose for tool use sharp objects to clean out hose as they can cause damage. CAUTION ! Clear away debris or obstructions from moving parts, unplug vacuum before servicing. 4.16 A 4.16 Turn tool so bottom faces up. Rotate the latches (A) on either side of injury from brushroll. To reduce the...
Product Manual
Page 12
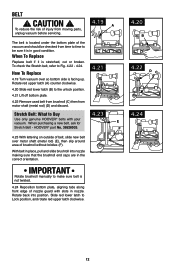
... belt, slide new belt over so bottom side is in nozzle. Stretch Belt: What to be checked from motor shaft (metal rod) (D) and discard. HOOVER® part No. 38528033. 4.21 4.23 4.23 With lettering on outside of nozzle guard with your vacuum. Slide red lower latch to Fig. 4.22 - 4.24...to the unlock position. 4.21 Lift off bottom plate. 4.22 Remove used belt from brushroll (C) then from time to time to Buy Use only genuine HOOVER® belts with slots in good condition. CAUTION ! How To Replace 4.19 Turn vacuum over motor shaft (metal rod) (E), then slip around area ...
... belt, slide new belt over so bottom side is in nozzle. Stretch Belt: What to be checked from motor shaft (metal rod) (D) and discard. HOOVER® part No. 38528033. 4.21 4.23 4.23 With lettering on outside of nozzle guard with your vacuum. Slide red lower latch to Fig. 4.22 - 4.24...to the unlock position. 4.21 Lift off bottom plate. 4.22 Remove used belt from brushroll (C) then from time to time to Buy Use only genuine HOOVER® belts with slots in good condition. CAUTION ! How To Replace 4.19 Turn vacuum over motor shaft (metal rod) (E), then slip around area ...

Product Manual
Page 14
...9200. This will only result in Glenwillow for service. Customers) or hoover.ca (Canadian customers). 6. Service To obtain approved Hoover® service and genuine Hoover® parts, locate the nearest Authorized Hoover® Warranty Service Dealer (Depot) by the complete model number when ...requesting information or ordering parts. (The model number appears on the back ...
...9200. This will only result in Glenwillow for service. Customers) or hoover.ca (Canadian customers). 6. Service To obtain approved Hoover® service and genuine Hoover® parts, locate the nearest Authorized Hoover® Warranty Service Dealer (Depot) by the complete model number when ...requesting information or ordering parts. (The model number appears on the back ...


