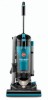
Manual
Page 2
...Agitator Brush Roll 10 Replacing Power Hand Tool Belt ..10 Replacing Headlight 8 Thermal Protector 11 Warranty 12 Parts & accessories mail order form 29 © 2005 The Hoover Company hoover.com 2 Important Safeguards! When using an electrical appliance, always follow basic precautions, including the following: READ...heated surfaces. • Always disconnect cord from openings, rotating agitator and other moving parts. others may be used by cord, use in the spaces provided. Do not use with your HOOVER product. If appliance is not recommended. • Do not use with any ...
...Agitator Brush Roll 10 Replacing Power Hand Tool Belt ..10 Replacing Headlight 8 Thermal Protector 11 Warranty 12 Parts & accessories mail order form 29 © 2005 The Hoover Company hoover.com 2 Important Safeguards! When using an electrical appliance, always follow basic precautions, including the following: READ...heated surfaces. • Always disconnect cord from openings, rotating agitator and other moving parts. others may be used by cord, use in the spaces provided. Do not use with your HOOVER product. If appliance is not recommended. • Do not use with any ...
Manual
Page 3
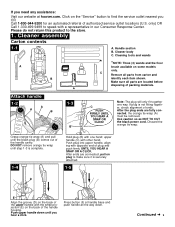
...a representative in our Consumer Response Center. upper handle (C) with opposite end of authorized service outlet locations (U.S. Make sure all parts from carton and B identify each item shown. Push upper handle down . Click on the "Service" button to make sure...UNTIL YOU HEAR A SNAP OR CLICK! Please do not return this product to speak with one way. C Remove all parts are located before disposing of the upper handle with the small projection (E) on some models only. If you need any ...alignment of the handle cavity. Press button (F) at hoover.com. Continued § 3
...a representative in our Consumer Response Center. upper handle (C) with opposite end of authorized service outlet locations (U.S. Make sure all parts from carton and B identify each item shown. Push upper handle down . Click on the "Service" button to make sure...UNTIL YOU HEAR A SNAP OR CLICK! Please do not return this product to speak with one way. C Remove all parts are located before disposing of the upper handle with the small projection (E) on some models only. If you need any ...alignment of the handle cavity. Press button (F) at hoover.com. Continued § 3
Manual
Page 8
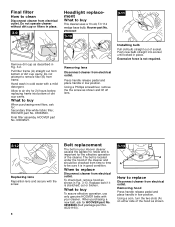
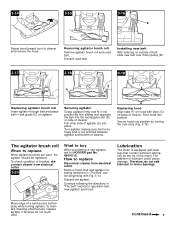
...purchasing new filters, ask for the effective operation of the cleaner and should be sure it is stretched, cut or broken. Final filter assemby, HOOVER part No. 93002521. The belt is located under the hood of the cleaner. To check belt, remove hood as shown. What to buy This... cleaner uses a 13 volt, T-3 114 wedge base bulb, Hoover part No. 27313107. 3-10 Removing lens Disconnect cleaner from electrical outlet. When purchasing a new belt, ask for 24 hours before replacing frame into socket until...
...purchasing new filters, ask for the effective operation of the cleaner and should be sure it is stretched, cut or broken. Final filter assemby, HOOVER part No. 93002521. The belt is located under the hood of the cleaner. To check belt, remove hood as shown. What to buy This... cleaner uses a 13 volt, T-3 114 wedge base bulb, Hoover part No. 27313107. 3-10 Removing lens Disconnect cleaner from electrical outlet. When purchasing a new belt, ask for 24 hours before replacing frame into socket until...
Manual
Page 9
..., ask for the life of cleaner and remove the hood. Continue following directions in "The belt" section beginning with bearings that contain sufficient lubrication for HOOVER part No. 48414115. Securing agitator Grasp agitator firmly and fit it into place. The agitator brush roll When to reposition belt, new agitator and hood. Lubrication...
..., ask for the life of cleaner and remove the hood. Continue following directions in "The belt" section beginning with bearings that contain sufficient lubrication for HOOVER part No. 48414115. Securing agitator Grasp agitator firmly and fit it into place. The agitator brush roll When to reposition belt, new agitator and hood. Lubrication...

Manual
Page 10
... nozzle or by removing the bottom plate and belt guard (Figs. 3-21 and 3-22). 10 7. Replace with new belt. 8. Ask for HOOVER part No. 38528037. 1. Insert brush roll through 3-26. Press the latches on front of tool and remove bottom plate (A). 3-24 3-25 B ... C 3. Remove agitator including end plates (C) and discard. 4. Replace belt guard (B) making sure not to replace 1. Replace belt When replacing belt, ask for HOOVER part No. 48414088. 3-21 A 3-22 B 2. Grasp turbine (E) and pull firmly to make sure it (see following section). 5. To replace bottom plate (A), ...
... nozzle or by removing the bottom plate and belt guard (Figs. 3-21 and 3-22). 10 7. Replace with new belt. 8. Ask for HOOVER part No. 38528037. 1. Insert brush roll through 3-26. Press the latches on front of tool and remove bottom plate (A). 3-24 3-25 B ... C 3. Remove agitator including end plates (C) and discard. 4. Replace belt guard (B) making sure not to replace 1. Replace belt When replacing belt, ask for HOOVER part No. 48414088. 3-21 A 3-22 B 2. Grasp turbine (E) and pull firmly to make sure it (see following section). 5. To replace bottom plate (A), ...
Manual
Page 11
... cleaner to pressure tool being • Continue using the checklist below. only). Service To obtain approved HOOVER service and genuine HOOVER parts, locate the nearest Hoover Sales and Service Center or Authorized Hoover Warranty Service Dealer (Depot) by using tool applying light pressure. • Blockage in wall receptacle ... protector has been designed into your cleaner by the complete model number when requesting information or ordering parts. (The model number appears on -line at hoover.com OR • calling 1-800-944-9200 for an automated referral of the cleaner.) 4.
... cleaner to pressure tool being • Continue using the checklist below. only). Service To obtain approved HOOVER service and genuine HOOVER parts, locate the nearest Hoover Sales and Service Center or Authorized Hoover Warranty Service Dealer (Depot) by using tool applying light pressure. • Blockage in wall receptacle ... protector has been designed into your cleaner by the complete model number when requesting information or ordering parts. (The model number appears on -line at hoover.com OR • calling 1-800-944-9200 for an automated referral of the cleaner.) 4.

Manual
Page 12
...guard and turbine as described in and turn ON. Remove any blockage. 4-2 C Checking airflow path through 3-15). Full One Year Warranty (Domestic Use) Your HOOVER® appliance is found: 1. Turn cleaner OFF and unplug. Reposition tube on -line at no cost to you may be seen in use : 4-4 A...OFF and unplug. 9. Remove hood, belt and agitator (Figs. 3-13 through hose inlet tube on back of parts only. Check for blockages and remove. 10. This warranty provides, at hoover.com This warranty does not cover pick up may also have other rights which covers the cost of cleaner 4. ...
...guard and turbine as described in and turn ON. Remove any blockage. 4-2 C Checking airflow path through 3-15). Full One Year Warranty (Domestic Use) Your HOOVER® appliance is found: 1. Turn cleaner OFF and unplug. Reposition tube on -line at no cost to you may be seen in use : 4-4 A...OFF and unplug. 9. Remove hood, belt and agitator (Figs. 3-13 through hose inlet tube on back of parts only. Check for blockages and remove. 10. This warranty provides, at hoover.com This warranty does not cover pick up may also have other rights which covers the cost of cleaner 4. ...


