Manual
Page 1
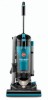
® Cyclonic Upright ® Vacuum Cleaner hoover.com Owner's Manual ENGLISH § pp. 1-12 ESPAÑOL § pág 13-20 FRANÇAIS § p. 21-27 This product was designed for easy assembly (see page 3) Review this manual before operating the cleaner.
® Cyclonic Upright ® Vacuum Cleaner hoover.com Owner's Manual ENGLISH § pp. 1-12 ESPAÑOL § pág 13-20 FRANÇAIS § p. 21-27 This product was designed for easy assembly (see page 3) Review this manual before operating the cleaner.
Manual
Page 2
...openings. Turn off this owner's manual. If appliance is not recommended. • Do not use without dirt cup or filters in China Hecho en China/FaébreinquChine SERIAL NUMBER Contents Assembling Cleaner 3 Carton Contents 3 Cleaner Descriptions 4 How To Use 4-6 Cleaning Tools 6 If You Have a Problem 11 Important Safeguards 2 Lubrication 9 Maintenance 6-11 Authorized Service 11 Cleaning Filters 7-8 Clearing Blockages 12 Emptying Dirt Cup 6-7 Replacing Agitator Brush Roll ........9 Replacing Belt 8-9 Replacing Powered Hand Tool Agitator Brush Roll 10 Replacing Power...
...openings. Turn off this owner's manual. If appliance is not recommended. • Do not use without dirt cup or filters in China Hecho en China/FaébreinquChine SERIAL NUMBER Contents Assembling Cleaner 3 Carton Contents 3 Cleaner Descriptions 4 How To Use 4-6 Cleaning Tools 6 If You Have a Problem 11 Important Safeguards 2 Lubrication 9 Maintenance 6-11 Authorized Service 11 Cleaning Filters 7-8 Clearing Blockages 12 Emptying Dirt Cup 6-7 Replacing Agitator Brush Roll ........9 Replacing Belt 8-9 Replacing Powered Hand Tool Agitator Brush Roll 10 Replacing Power...
Manual
Page 3
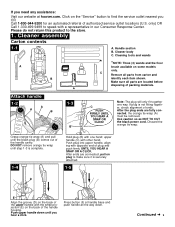
... back of the upper handle with one way. After ends are fully connected, the orange tie wrap (A) must be removed. Use caution so as NOT TO CUT the black power cord. Cleaner body C. Push plug into upper handle, aligning with other hand. Discard the orange tie wrap. Cleaning tools and wands * *NOTE: Three (3) wands and the floor A brush available on some models only. Press button (F) at hoover.com.
... back of the upper handle with one way. After ends are fully connected, the orange tie wrap (A) must be removed. Use caution so as NOT TO CUT the black power cord. Cleaner body C. Push plug into upper handle, aligning with other hand. Discard the orange tie wrap. Cleaning tools and wands * *NOTE: Three (3) wands and the floor A brush available on some models only. Press button (F) at hoover.com.

Manual
Page 4
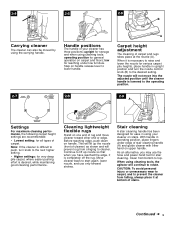
.... Dirt cup door hinge step on lever to correct setting plate on back of cleaner. Handle release button around hooks for height of carpet being cleaned. Repeat with other ). Stair cleaning handle: to use . Crevice tool (B) fits into clip at top. Headlight Operate cleaner only at the handle base and pushing the handle down. for storage. Hose 17. Snap wand into one blade is designed to install the proper outlet. ered hand tool...
.... Dirt cup door hinge step on lever to correct setting plate on back of cleaner. Handle release button around hooks for height of carpet being cleaned. Repeat with other ). Stair cleaning handle: to use . Crevice tool (B) fits into clip at top. Headlight Operate cleaner only at the handle base and pushing the handle down. for storage. Hose 17. Snap wand into one blade is designed to install the proper outlet. ered hand tool...
Manual
Page 5
... low furniture. operating position for reaching under edge of carpet. When it is lowered to prevent the cleaner from falling, always place it is desired, while maintaining good cleaning performance. Before reaching edge, push down on one end of cleaner) as shown and will not move cleaner toward other hand on handle release lever to start again, lower nozzle, and use the hose and power hand tool...
... low furniture. operating position for reaching under edge of carpet. When it is lowered to prevent the cleaner from falling, always place it is desired, while maintaining good cleaning performance. Before reaching edge, push down on one end of cleaner) as shown and will not move cleaner toward other hand on handle release lever to start again, lower nozzle, and use the hose and power hand tool...

Manual
Page 6
.... Remove brush to tighten or loosen the connection. Cleaning tools may be sure the hose tube cover (C) is in a mild detergent. To use when handle is in the upright position. Check to clean tools To clean the hose, wipe off dirt with grooves (K) on tool. Also, turn cleaner OFF before using. 2-10 B A C Removing hose When using cleaning tools, cleaner handle should be in upright position. Note: Some models include three (3) wands. Avoid tipping cleaner or setting it firmly onto the wand. Powered hand tool may...
.... Remove brush to tighten or loosen the connection. Cleaning tools may be sure the hose tube cover (C) is in a mild detergent. To use when handle is in the upright position. Check to clean tools To clean the hose, wipe off dirt with grooves (K) on tool. Also, turn cleaner OFF before using. 2-10 B A C Removing hose When using cleaning tools, cleaner handle should be in upright position. Note: Some models include three (3) wands. Avoid tipping cleaner or setting it firmly onto the wand. Powered hand tool may...
Manual
Page 7
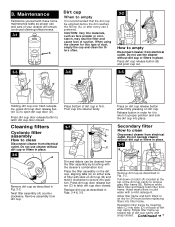
... (A) located at the top of suction. Release button in Fig. 3-2. Reposition filter frame by brushing with a mild detergent. Continued § 7 Press dirt cup door release button to secure into slots (D) on dirt cup (B) and twist it to return to latch dirt cup door closed . Remove assembly from the filter assembly by inserting tabs (C) into position. Hand wash filters in cold water with the cleaner's combination tool. CAUTION: Very fine materials, such as proper use if...
... (A) located at the top of suction. Release button in Fig. 3-2. Reposition filter frame by brushing with a mild detergent. Continued § 7 Press dirt cup door release button to secure into slots (D) on dirt cup (B) and twist it to return to latch dirt cup door closed . Remove assembly from the filter assembly by inserting tabs (C) into position. Hand wash filters in cold water with the cleaner's combination tool. CAUTION: Very fine materials, such as proper use if...
Manual
Page 8
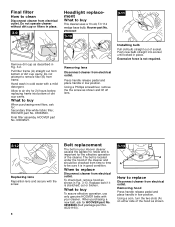
.... Hand wash in place. To check belt, remove hood as described in Fig. 3-13. Do not operate cleaner without dirt cup or filters in place. 3-9 A B Remove dirt cup as shown in Fig. 3-2. Using a Phillips screwdriver, remove the the screw as shown. When to be checked from time to time to replace Disconnect cleaner from electrical outlet. Replace belt if it is stretched, cut or broken. Removing hood Press handle release pedal and place handle in low position...
.... Hand wash in place. To check belt, remove hood as described in Fig. 3-13. Do not operate cleaner without dirt cup or filters in place. 3-9 A B Remove dirt cup as shown in Fig. 3-2. Using a Phillips screwdriver, remove the the screw as shown. When to be checked from time to time to replace Disconnect cleaner from electrical outlet. Replace belt if it is stretched, cut or broken. Removing hood Press handle release pedal and place handle in low position...
Manual
Page 9
... to buy When purchasing a new agitator, ask for the life of cleaner. The addition of a card across bottom plate while turning agitator. Continued 9 Removing agitator brush roll Remove agitator brush roll and used belt. The agitator brush roll When to motor bearings. 3-14 3-15 3-16 B Rotate hood toward front of belt, slide new belt over motor pulley (B). 3-17 3-18 3-19 E D F C Replacing agitator brush roll Insert agitator through belt and place belt in belt guide (C) on agitator. Installing new belt With lettering on outside of cleaner and remove the hood. To check...
... to buy When purchasing a new agitator, ask for the life of cleaner. The addition of a card across bottom plate while turning agitator. Continued 9 Removing agitator brush roll Remove agitator brush roll and used belt. The agitator brush roll When to motor bearings. 3-14 3-15 3-16 B Rotate hood toward front of belt, slide new belt over motor pulley (B). 3-17 3-18 3-19 E D F C Replacing agitator brush roll Insert agitator through belt and place belt in belt guide (C) on agitator. Installing new belt With lettering on outside of cleaner and remove the hood. To check...

Manual
Page 10
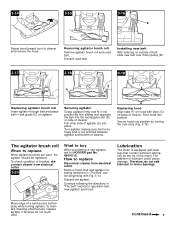
... down and snap closed. 3-29 H G 4. Powered hand tool Agitator brush roll replacement When agitator brushes are worn, the brush roll should be replaced. 3-27 Remove tool from hose. Ask for HOOVER part No. 38528037. 1. With flat sides of tool and remove bottom plate (A). 3-24 3-25 B 3-23 D C 3. Powered hand tool Belt replacement Inspect the belt The powered hand tool belt is designed to replace 1. However, if the belt is cracked, gouged or broken, it is not normally replaced. Remove agitator including end plates (C) and discard. 4. Remove tool from hose.
... down and snap closed. 3-29 H G 4. Powered hand tool Agitator brush roll replacement When agitator brushes are worn, the brush roll should be replaced. 3-27 Remove tool from hose. Ask for HOOVER part No. 38528037. 1. With flat sides of tool and remove bottom plate (A). 3-24 3-25 B 3-23 D C 3. Powered hand tool Belt replacement Inspect the belt The powered hand tool belt is designed to replace 1. However, if the belt is cracked, gouged or broken, it is not normally replaced. Remove agitator including end plates (C) and discard. 4. Remove tool from hose.
Manual
Page 11
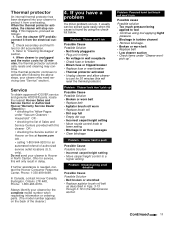
... thermal protector automatically resets and cleaning may need servicing (see "Service" section). Thermal protector An internal thermal protector has been designed into your cleaner to protect it usually can be solved quite easily when the cause is found by using tool applying light pressure. • Blockage in turbine channel • Remove blockage. • Broken or worn belt • Replace belt • Low cleaner suction • Check items under "Vacuum Cleaners Household" OR • checking the list of Sales and Service...
... thermal protector automatically resets and cleaning may need servicing (see "Service" section). Thermal protector An internal thermal protector has been designed into your cleaner to protect it usually can be solved quite easily when the cause is found by using tool applying light pressure. • Blockage in turbine channel • Remove blockage. • Broken or worn belt • Replace belt • Low cleaner suction • Check items under "Vacuum Cleaners Household" OR • checking the list of Sales and Service...

Manual
Page 12
... operating condition during powered hand tool use: 4-4 A 11. Remove hood, belt and agitator (Figs. 3-13 through hose inlet tube on back of cleaner, replace 5 screws. 4-3 C Checking under hood 8. Remove any blockage. 4-2 C Checking airflow path through 3-15). For an automated referral of authorized service outlets in the U.S.A., phone 1-800-944-9200 OR visit Hoover on back of cleaner 4. Look into opening (C) for suction at hose tube (B); Replace belt turbine, brush roll, belt guard and bottom plate. Full One Year Warranty...
... operating condition during powered hand tool use: 4-4 A 11. Remove hood, belt and agitator (Figs. 3-13 through hose inlet tube on back of cleaner, replace 5 screws. 4-3 C Checking under hood 8. Remove any blockage. 4-2 C Checking airflow path through 3-15). For an automated referral of authorized service outlets in the U.S.A., phone 1-800-944-9200 OR visit Hoover on back of cleaner 4. Look into opening (C) for suction at hose tube (B); Replace belt turbine, brush roll, belt guard and bottom plate. Full One Year Warranty...


