Manual
Page 2
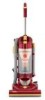
...or filters in the instructions. Wash hands after handling. Model Serial number Hint: Attach your sales receipt to cause cancer. hoover.com 2 Important Safeguards! Empty cup and clean filter frequently when picking up anything that is used as powder. •...Service 11 Cleaning Filters 7-8 Clearing Blockages 12 Emptying Dirt Cup 6-7 Replacing Agitator Brush Roll ........9 Replacing Belt 8-9 Replacing Powered Hand Tool Agitator Brush Roll 10 Replacing Power Hand Tool Belt ..10 Replacing Headlight 8 Thermal Protector 11 Warranty 12 Parts & accessories mail order form 29 &#...
...or filters in the instructions. Wash hands after handling. Model Serial number Hint: Attach your sales receipt to cause cancer. hoover.com 2 Important Safeguards! Empty cup and clean filter frequently when picking up anything that is used as powder. •...Service 11 Cleaning Filters 7-8 Clearing Blockages 12 Emptying Dirt Cup 6-7 Replacing Agitator Brush Roll ........9 Replacing Belt 8-9 Replacing Powered Hand Tool Agitator Brush Roll 10 Replacing Power Hand Tool Belt ..10 Replacing Headlight 8 Thermal Protector 11 Warranty 12 Parts & accessories mail order form 29 &#...
Manual
Page 8
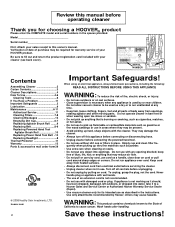
... for the effective operation of socket. The belt is located under the hood of dirt cup cavity. To check belt, remove hood as shown. What to buy To assure effective operation, use only genuine HOOVER belts with the screw. 8 Belt replacement The belt on either side of dirt cup cavity. ... What to replace Disconnect cleaner from electrical outlet. Excessive force is in Fig. 3-2. When to buy When purchasing new filters, ask for HOOVER part No. 38528040 (belt package part No. 40201190). 3-13 A A How to replace Disconnect cleaner from time to time to rotate and is stretched, cut or...
... for the effective operation of socket. The belt is located under the hood of dirt cup cavity. To check belt, remove hood as shown. What to buy To assure effective operation, use only genuine HOOVER belts with the screw. 8 Belt replacement The belt on either side of dirt cup cavity. ... What to replace Disconnect cleaner from electrical outlet. Excessive force is in Fig. 3-2. When to buy When purchasing new filters, ask for HOOVER part No. 38528040 (belt package part No. 40201190). 3-13 A A How to replace Disconnect cleaner from time to time to rotate and is stretched, cut or...
Manual
Page 9
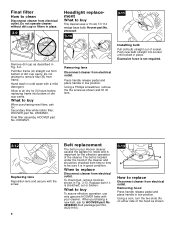
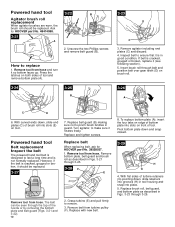
.... Lubrication The motor is not pinched between agitator and bottom of belt, slide new belt over motor pulley (B). 3-17 3-18 3-19 E D F C Replacing agitator brush roll Insert agitator through belt and place belt in "The belt" section beginning with bearings that contain sufficient lubrication for HOOVER part No. 48414115. Securing agitator Grasp agitator firmly and fit it...
.... Lubrication The motor is not pinched between agitator and bottom of belt, slide new belt over motor pulley (B). 3-17 3-18 3-19 E D F C Replacing agitator brush roll Insert agitator through belt and place belt in "The belt" section beginning with bearings that contain sufficient lubrication for HOOVER part No. 48414115. Securing agitator Grasp agitator firmly and fit it...
Manual
Page 10
...remove bottom plate (A). 3-24 3-25 B 3-23 D C 3. Replace with new belt. 8. Pivot bottom plate down , slide retainers into grooves (H) in good condition. Ask for HOOVER part No. 38528037. 1. If belt is cracked, gouged or broken, replace it is not normally replaced. Insert brush roll...and is in tool housing and snap into place. 5. Replace belt When replacing belt, ask for HOOVER part No. 48414088. 3-21 A 3-22 B 2. Remove belt from hose. Unscrew the two Phillips screws and remove belt guard (B). Replace belt guard (B) making sure not to replace 1. Remove tool from ...
...remove bottom plate (A). 3-24 3-25 B 3-23 D C 3. Replace with new belt. 8. Pivot bottom plate down , slide retainers into grooves (H) in good condition. Ask for HOOVER part No. 38528037. 1. If belt is cracked, gouged or broken, replace it is not normally replaced. Insert brush roll...and is in tool housing and snap into place. 5. Replace belt When replacing belt, ask for HOOVER part No. 48414088. 3-21 A 3-22 B 2. Remove belt from hose. Unscrew the two Phillips screws and remove belt guard (B). Replace belt guard (B) making sure not to replace 1. Remove tool from ...
Manual
Page 11
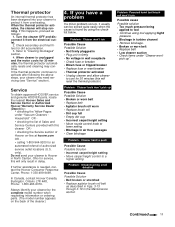
...; Replace belt • Low cleaner suction • Check items under "Vacuum Cleaners Household" OR • checking the list of Sales and Service Centers provided with this cleaner OR • checking the Service section of Hoover on the back of authorized service outlet locations ...(U.S. When the thermal protector activates, the cleaner will reset the thermal protector) Problem: Cleaner/tools won 't pick up Problem: Smoky Possible Cause Possible Solution • Broken or worn belt • Replace belt • ...
...; Replace belt • Low cleaner suction • Check items under "Vacuum Cleaners Household" OR • checking the list of Sales and Service Centers provided with this cleaner OR • checking the Service section of Hoover on the back of authorized service outlet locations ...(U.S. When the thermal protector activates, the cleaner will reset the thermal protector) Problem: Cleaner/tools won 't pick up Problem: Smoky Possible Cause Possible Solution • Broken or worn belt • Replace belt • ...
Manual
Page 12
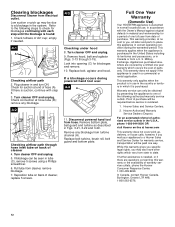
... at end of parts only. Reposition tube on back of dirt cup; Remove any blockage. 4-2 C Checking airflow path through 3-15). Hoover Authorized Warranty Service Dealers (Depots). Pull tube from turbine channel (A). Look into opening (C) for warranty service, transportation will be paid one ... . 4-1 A B Checking airflow path 2. Turn cleaner OFF and unplug. 5. Remove bottom plate, belt guard and turbine as described in and turn ON. This warranty provides, at hoover.com This warranty does not cover pick up may also have other rights which vary from a U. ...
... at end of parts only. Reposition tube on back of dirt cup; Remove any blockage. 4-2 C Checking airflow path through 3-15). Hoover Authorized Warranty Service Dealers (Depots). Pull tube from turbine channel (A). Look into opening (C) for warranty service, transportation will be paid one ... . 4-1 A B Checking airflow path 2. Turn cleaner OFF and unplug. 5. Remove bottom plate, belt guard and turbine as described in and turn ON. This warranty provides, at hoover.com This warranty does not cover pick up may also have other rights which vary from a U. ...

