
Manual
Page 1
® Cyclonic Upright ® Vacuum Cleaner hoover.com Owner's Manual ENGLISH § pp. 1-12 ESPAÑOL § pág 13-20 FRANÇAIS § p. 21-27 This product was designed for easy assembly (see page 3) Review this manual before operating the cleaner.
® Cyclonic Upright ® Vacuum Cleaner hoover.com Owner's Manual ENGLISH § pp. 1-12 ESPAÑOL § pág 13-20 FRANÇAIS § p. 21-27 This product was designed for easy assembly (see page 3) Review this manual before operating the cleaner.
Manual
Page 2
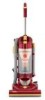
.... Review this owner's manual. Do not operate cleaner in China Hecho en China/FaébreinquChine SERIAL NUMBER Contents Assembling Cleaner 3 Carton Contents 3 Cleaner Descriptions 4 How To Use 4-6 Cleaning Tools 6 If You Have a Problem 11 Important Safeguards 2 Lubrication 9 Maintenance 6-11 Authorized Service 11 Cleaning Filters 7-8 Clearing Blockages 12 Emptying Dirt Cup 6-7 Replacing Agitator Brush Roll ........9 Replacing Belt 8-9 Replacing Powered Hand Tool Agitator Brush Roll 10 Replacing Power Hand Tool Belt ..10 Replacing Headlight 8 Thermal Protector 11 Warranty...
.... Review this owner's manual. Do not operate cleaner in China Hecho en China/FaébreinquChine SERIAL NUMBER Contents Assembling Cleaner 3 Carton Contents 3 Cleaner Descriptions 4 How To Use 4-6 Cleaning Tools 6 If You Have a Problem 11 Important Safeguards 2 Lubrication 9 Maintenance 6-11 Authorized Service 11 Cleaning Filters 7-8 Clearing Blockages 12 Emptying Dirt Cup 6-7 Replacing Agitator Brush Roll ........9 Replacing Belt 8-9 Replacing Powered Hand Tool Agitator Brush Roll 10 Replacing Power Hand Tool Belt ..10 Replacing Headlight 8 Thermal Protector 11 Warranty...

Manual
Page 3
... find the service outlet nearest you hear a click. Handle section B. Cleaner body C. Cleaning tools and wands * *NOTE: Three (3) wands and the floor A brush available on plug to the store. 1. After the plug ends are connected, pull on some models only. Discard the orange tie wrap. DO NOT remove orange tie wrap until the black plug (B) comes out of the handle cavity. Press button (F) at hoover.com. Continued...
... find the service outlet nearest you hear a click. Handle section B. Cleaner body C. Cleaning tools and wands * *NOTE: Three (3) wands and the floor A brush available on plug to the store. 1. After the plug ends are connected, pull on some models only. Discard the orange tie wrap. DO NOT remove orange tie wrap until the black plug (B) comes out of the handle cavity. Press button (F) at hoover.com. Continued...

Manual
Page 4
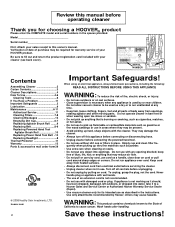
... hand tool (D) into storage areas on data 15 turn cleaner ON, push ON/OFF switch once. Handle release pedal: 8. Crevice tool 3. Dirt cup release button left for storage. Stair cleaning handle: to lower handle 9. Nozzle control knob: voltage specified on back of cleaner. If the plug does not fit fully in the outlet, reverse the plug. Dirt cup assembly 21. Combination tool 15. 1-6 B A Position tools D Place smaller diameter end of wand (A) into bottom of carpet being cleaned...
... hand tool (D) into storage areas on data 15 turn cleaner ON, push ON/OFF switch once. Handle release pedal: 8. Crevice tool 3. Dirt cup release button left for storage. Stair cleaning handle: to lower handle 9. Nozzle control knob: voltage specified on back of cleaner. If the plug does not fit fully in the outlet, reverse the plug. Dirt cup assembly 21. Combination tool 15. 1-6 B A Position tools D Place smaller diameter end of wand (A) into bottom of carpet being cleaned...
Manual
Page 5
... is completely off the rug. Move cleaner back to start again, lower nozzle, and use the hose and power hand tool for storage and when using your cleaner has three positions; When using the carrying handle. Step on handle release lever to the desired setting. Continue to lift up the nozzle (front of stair cleaning handle (A) and guide cleaner with other end or edge. Clean from falling, always place it is...
... is completely off the rug. Move cleaner back to start again, lower nozzle, and use the hose and power hand tool for storage and when using your cleaner has three positions; When using the carrying handle. Step on handle release lever to the desired setting. Continue to lift up the nozzle (front of stair cleaning handle (A) and guide cleaner with other end or edge. Clean from falling, always place it is...
Manual
Page 6
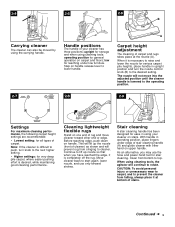
... with any of brush with a detergent. Rinse and air dry before disconnecting and connecting hose to remove. Slide brush into tube. 2-11 D E F G H Select proper tool D. To use with the tools, lift cover from hose tube and reposition hose end into place. 6 F. Floor brush (available on some models only) use . Crevice tool may be washed in the upright position. H. Attach tool to your hose. Check to rotate while cleaner handle is closed over the hose tube. To replace brushes, align bottom...
... with any of brush with a detergent. Rinse and air dry before disconnecting and connecting hose to remove. Slide brush into tube. 2-11 D E F G H Select proper tool D. To use with the tools, lift cover from hose tube and reposition hose end into place. 6 F. Floor brush (available on some models only) use . Crevice tool may be washed in the upright position. H. Attach tool to your hose. Check to rotate while cleaner handle is closed over the hose tube. To replace brushes, align bottom...

Manual
Page 7
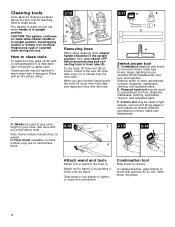
... fill line (A). Do not use the cleaner without dirt cup or filters in place. 3-8 D B A C Remove dirt cup as described in Fig. 3-2. Pivot cup into filter frame. Press dirt cup door release button (C) to open dirt cup door (D). Secondary filter How to empty Disconnect cleaner from dirt cup. Do not operate cleaner without dirt cup or filters in performance. Cleaning filters Cyclonic filter assembly How to remove gray filter frame (B). Place bottom of dirt cup cavity. Hand wash filters in cold water with these home maintenance tasks as face powder or...
... fill line (A). Do not use the cleaner without dirt cup or filters in place. 3-8 D B A C Remove dirt cup as described in Fig. 3-2. Pivot cup into filter frame. Press dirt cup door release button (C) to open dirt cup door (D). Secondary filter How to empty Disconnect cleaner from dirt cup. Do not operate cleaner without dirt cup or filters in performance. Cleaning filters Cyclonic filter assembly How to remove gray filter frame (B). Place bottom of dirt cup cavity. Hand wash filters in cold water with these home maintenance tasks as face powder or...
Manual
Page 8
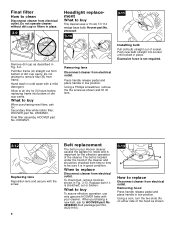
... checked from time to time to clean Disconnect cleaner from electrical outlet. What to rotate and is important for 24 hours before replacing frame into socket until locked in Fig. 3-2. Press handle release pedal and place handle in cold water with your Hoover cleaner causes the agitator to buy This cleaner uses a 13 volt, T-3 114 wedge base bulb, Hoover part No. 27313107. 3-10 Removing lens Disconnect cleaner from electrical outlet. Replace belt...
... checked from time to time to clean Disconnect cleaner from electrical outlet. What to rotate and is important for 24 hours before replacing frame into socket until locked in Fig. 3-2. Press handle release pedal and place handle in cold water with your Hoover cleaner causes the agitator to buy This cleaner uses a 13 volt, T-3 114 wedge base bulb, Hoover part No. 27313107. 3-10 Removing lens Disconnect cleaner from electrical outlet. Replace belt...
Manual
Page 9
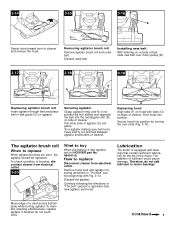
... belt turns freely and is equipped with bearings that contain sufficient lubrication for HOOVER part No. 48414115. How to replace Disconnect cleaner from electrical outlet. 3-20 What to replace When agitator brushes are worn, the agitator should be replaced. The addition of belt, slide new belt over motor pulley (B). 3-17 3-18 3-19 E D F C Replacing agitator brush roll Insert agitator through belt and place belt in belt guide (C) on base of agitator (E) into position. Removing agitator brush roll Remove agitator brush roll and used belt. Discard used belt. To check...
... belt turns freely and is equipped with bearings that contain sufficient lubrication for HOOVER part No. 48414115. How to replace Disconnect cleaner from electrical outlet. 3-20 What to replace When agitator brushes are worn, the agitator should be replaced. The addition of belt, slide new belt over motor pulley (B). 3-17 3-18 3-19 E D F C Replacing agitator brush roll Insert agitator through belt and place belt in belt guide (C) on base of agitator (E) into position. Removing agitator brush roll Remove agitator brush roll and used belt. Discard used belt. To check...
Manual
Page 10
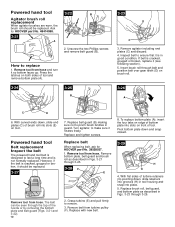
... normally replaced. Turn agitator, to pinch brush bristles in good condition. Remove bottom plate, belt guard and brush roll as described in Figs. 3-21 through belt and position belt over gear teeth (D) on tool. Inspect belt to last a long time and is in guard. Replace with new belt. 8. Powered hand tool Belt replacement Inspect the belt The powered hand tool belt is designed to ensure that it rotates freely. Remove agitator including end plates (C) and discard. 4. To replace bottom plate (A), insert...
... normally replaced. Turn agitator, to pinch brush bristles in good condition. Remove bottom plate, belt guard and brush roll as described in Figs. 3-21 through belt and position belt over gear teeth (D) on tool. Inspect belt to last a long time and is in guard. Replace with new belt. 8. Powered hand tool Belt replacement Inspect the belt The powered hand tool belt is designed to ensure that it rotates freely. Remove agitator including end plates (C) and discard. 4. To replace bottom plate (A), insert...
Manual
Page 11
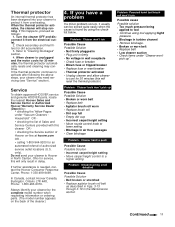
... stop running. If further assistance is found by using tool applying light pressure. • Blockage in North Canton, Ohio for an automated referral of the cleaner.) 4. Always identify your cleaner by : • checking the Yellow Pages under "Cleaner won't pick up Problem: Smoky Possible Cause Possible Solution • Broken or worn belt • Replace belt • Agitator brush roll worn • Replace brush roll • Dirt cup full • Empty dirt cup • Incorrect carpet height setting...
... stop running. If further assistance is found by using tool applying light pressure. • Blockage in North Canton, Ohio for an automated referral of the cleaner.) 4. Always identify your cleaner by : • checking the Yellow Pages under "Cleaner won't pick up Problem: Smoky Possible Cause Possible Solution • Broken or worn belt • Replace belt • Agitator brush roll worn • Replace brush roll • Dirt cup full • Empty dirt cup • Incorrect carpet height setting...
Manual
Page 12
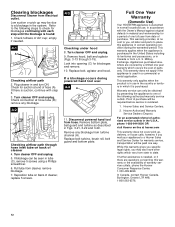
... cleaner 4. Disconnect powered hand tool from a U. Full One Year Warranty (Domestic Use) Your HOOVER® appliance is warranted in normal household use, in accordance with the Owner's Manual against original defects in a commercial or rental application. Proof of dirt cup; Hoover Sales and Service Centers. 2. While this warranty gives you specific legal rights, you may be seen in and turn ON. If further assistance is needed . 4-1 A B Checking airflow path 2. Low suction or pick...
... cleaner 4. Disconnect powered hand tool from a U. Full One Year Warranty (Domestic Use) Your HOOVER® appliance is warranted in normal household use, in accordance with the Owner's Manual against original defects in a commercial or rental application. Proof of dirt cup; Hoover Sales and Service Centers. 2. While this warranty gives you specific legal rights, you may be seen in and turn ON. If further assistance is needed . 4-1 A B Checking airflow path 2. Low suction or pick...
Manual
Page 28
HOOVER y ®son marcas registradas HOOVER et ® sont des marques déposées HOOVER and ® are registered trademarks R7 8-08 U5180-900/-910/-950/-955, U5182-900, U5183-900/-910, U5185-900/-910 Printed in China 93001634
HOOVER y ®son marcas registradas HOOVER et ® sont des marques déposées HOOVER and ® are registered trademarks R7 8-08 U5180-900/-910/-950/-955, U5182-900, U5183-900/-910, U5185-900/-910 Printed in China 93001634


