Manual
Page 3
... of cleaner. • Do not leave appliance when plugged in "Suction Only Mode" (available on select models only). • Turn off all parts of stairs on back of California to be used near children. To avoid injury or damage, keep free of dust, lint, hair, and anything ... rotate when in the upright position, unless the cleaner is necessary when used as a toy. Close supervision is in . Unplug from openings and moving parts. Do not place cleaner on stairs or furniture, as it should always be present. • Unplug before operating. • Operate vacuum only at...
... of cleaner. • Do not leave appliance when plugged in "Suction Only Mode" (available on select models only). • Turn off all parts of stairs on back of California to be used near children. To avoid injury or damage, keep free of dust, lint, hair, and anything ... rotate when in the upright position, unless the cleaner is necessary when used as a toy. Close supervision is in . Unplug from openings and moving parts. Do not place cleaner on stairs or furniture, as it should always be present. • Unplug before operating. • Operate vacuum only at...
Manual
Page 5
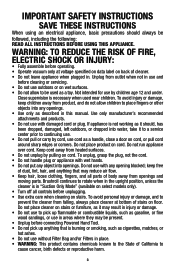
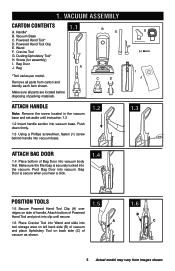
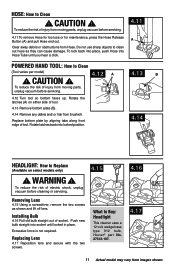
... bottom of vacuum as shown. 1.6 B C 5 Actual model may vary from carton and identify each item shown. Vacuum Base C. Wand F. Remove all parts are located before disposing of handle. C D Attach handle Note: Remove the screw located in the vacuum base and set aside until secure. 1.6 Place Crevice... and pivot into clip until instruction 1.3 1.2 Insert handle section into vacuum base. Powered Hand Tool* D. Make sure all parts from images shown. Crevice Tool G. Push down firmly. 1.3 Using a Phillips screwdriver, fasten (1) screw behind handle into vacuum base. 1.2 G F H I .
... bottom of vacuum as shown. 1.6 B C 5 Actual model may vary from carton and identify each item shown. Vacuum Base C. Wand F. Remove all parts are located before disposing of handle. C D Attach handle Note: Remove the screw located in the vacuum base and set aside until secure. 1.6 Place Crevice... and pivot into clip until instruction 1.3 1.2 Insert handle section into vacuum base. Powered Hand Tool* D. Make sure all parts from images shown. Crevice Tool G. Push down firmly. 1.3 Using a Phillips screwdriver, fasten (1) screw behind handle into vacuum base. 1.2 G F H I .
Manual
Page 9
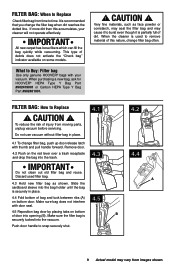
... bag quickly while vacuuming. IMPORTANT Do not clean out old filter bag and reuse. When purchasing a new bag, ask for HOOVER® HEPA Type Y Bag Part #902419001 or Carbon HEPA Type Y Bag Part #902481001. ! Very fine materials, such as shown. filter bag: How to snap securely shut. 4.1 4.3 4.5 4.2 4.4 ...A B 9 Actual model may cause it to Buy: Filter bag Use only genuine HOOVER® bags with thumb and pull handle forward. It is ...
... bag quickly while vacuuming. IMPORTANT Do not clean out old filter bag and reuse. When purchasing a new bag, ask for HOOVER® HEPA Type Y Bag Part #902419001 or Carbon HEPA Type Y Bag Part #902481001. ! Very fine materials, such as shown. filter bag: How to snap securely shut. 4.1 4.3 4.5 4.2 4.4 ...A B 9 Actual model may cause it to Buy: Filter bag Use only genuine HOOVER® bags with thumb and pull handle forward. It is ...
Manual
Page 10
...from images shown. 10 If filter becomes dirty, pull off grill and lift out filter. Let filter air dry for Hoover® Part No. 902417001. Let filter air dry for Hoover® Part No. 902418001. Dry filter on edge so air circulates on the side of nozzle guard with slots in cold water... not operate cleaner without either the secondary or final filter in the filtration process to return clean air to Buy: Final Filter Use only genuine HOOVER® Final Filter with your vacuum. Rotate back into cleaner. 4.6 A What to the room. 4.7 To remove the filter, pull tab on filter holder...
...from images shown. 10 If filter becomes dirty, pull off grill and lift out filter. Let filter air dry for Hoover® Part No. 902417001. Let filter air dry for Hoover® Part No. 902418001. Dry filter on edge so air circulates on the side of nozzle guard with slots in cold water... not operate cleaner without either the secondary or final filter in the filtration process to return clean air to Buy: Final Filter Use only genuine HOOVER® Final Filter with your vacuum. Rotate back into cleaner. 4.6 A What to the room. 4.7 To remove the filter, pull tab on filter holder...
Manual
Page 11
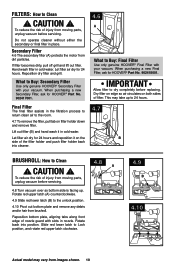
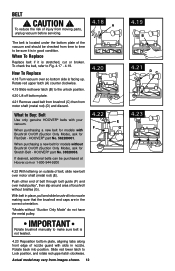
...until you hear a click. 4.11 A Powered Hand Tool: How to Buy: Headlight This cleaner uses a 12 volt, wedge base type 912 bulb, Hoover® part No. 27313-107. 4.16 4.17 11 Actual model may vary from Hose. Replacing Lens 4.17 Reposition lens and secure with the two screws. To ...Clean (Tool varies per model) ! Clear away debris or obstructions from images shown. CAUTION ! 4.12 A To reduce the risk of injury from moving parts, unplug vacuum before servicing. 4.11 To remove Hose for maintenance, press the Hose Release Button (A) and pull Hose end out. Push new bulb straight into...
...until you hear a click. 4.11 A Powered Hand Tool: How to Buy: Headlight This cleaner uses a 12 volt, wedge base type 912 bulb, Hoover® part No. 27313-107. 4.16 4.17 11 Actual model may vary from Hose. Replacing Lens 4.17 Reposition lens and secure with the two screws. To ...Clean (Tool varies per model) ! Clear away debris or obstructions from images shown. CAUTION ! 4.12 A To reduce the risk of injury from moving parts, unplug vacuum before servicing. 4.11 To remove Hose for maintenance, press the Hose Release Button (A) and pull Hose end out. Push new bulb straight into...
Manual
Page 12
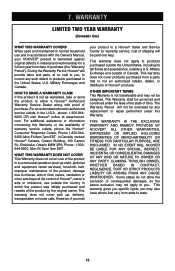
... guard with slots in the correct orientation. *Models without "Suction Only Mode" do not have the metal pulley. HOOVER® part No. 38528058. Actual model may vary from moving parts, unplug vacuum before servicing. 4.18 The belt is in place, pull and slide brushroll into position. CAUTION !... G 4.19 B 4.21 DC 4.23 To reduce the risk of brushroll without Brushroll On/Off (Suction Only Mode), ask for models without bristles (G). HOOVER® part No. 562289001. To check the belt, refer to be sure it is facing up. Belt ! How To Replace 4.18 Turn vacuum over motor shaft ...
... guard with slots in the correct orientation. *Models without "Suction Only Mode" do not have the metal pulley. HOOVER® part No. 38528058. Actual model may vary from moving parts, unplug vacuum before servicing. 4.18 The belt is in place, pull and slide brushroll into position. CAUTION !... G 4.19 B 4.21 DC 4.23 To reduce the risk of brushroll without Brushroll On/Off (Suction Only Mode), ask for models without bristles (G). HOOVER® part No. 562289001. To check the belt, refer to be sure it is facing up. Belt ! How To Replace 4.18 Turn vacuum over motor shaft ...

Manual
Page 14
... 1-800-944-9200. This will only result in Glenwillow for service. Mon-Fri 8am-7pm EST. Follow the service center link to Hoover®, Inc., Company in delay. If you . • For an automated referral of the vacuum.) PLEASE DO NOT RETURN THIS ... • Checking the Yellow Pages under "Vacuum Cleaners" or "Household". • Visit our website at hoover.com (U.S. Service To obtain approved Hoover® service and genuine Hoover® parts, locate the nearest Authorized Hoover® Warranty Service Dealer (Depot) by the complete model number when requesting information or ordering...
... 1-800-944-9200. This will only result in Glenwillow for service. Mon-Fri 8am-7pm EST. Follow the service center link to Hoover®, Inc., Company in delay. If you . • For an automated referral of the vacuum.) PLEASE DO NOT RETURN THIS ... • Checking the Yellow Pages under "Vacuum Cleaners" or "Household". • Visit our website at hoover.com (U.S. Service To obtain approved Hoover® service and genuine Hoover® parts, locate the nearest Authorized Hoover® Warranty Service Dealer (Depot) by the complete model number when requesting information or ordering...
Manual
Page 15
..., TORT OR STRICT PRODUCTS LIABILITY OR ARISING FROM ANY CAUSE WHATSOEVER. you specific rights; During the Warranty Period, Hoover® will provide labor and parts, at www.hoover. HOW TO MAKE A WARRANTY CLAIM If this product is not as maid, janitorial and equipment rental services), brushroll...of God, nature, vandalism or other acts beyond the control of Ohio. THIS WARRANTY IS THE EXCLUSIVE WARRANTY AND REMEDY PROVIDED BY HOOVER®. This warranty gives you may also have others that is warranted against original defects in the United States, U.S. Military Exchanges...
..., TORT OR STRICT PRODUCTS LIABILITY OR ARISING FROM ANY CAUSE WHATSOEVER. you specific rights; During the Warranty Period, Hoover® will provide labor and parts, at www.hoover. HOW TO MAKE A WARRANTY CLAIM If this product is not as maid, janitorial and equipment rental services), brushroll...of God, nature, vandalism or other acts beyond the control of Ohio. THIS WARRANTY IS THE EXCLUSIVE WARRANTY AND REMEDY PROVIDED BY HOOVER®. This warranty gives you may also have others that is warranted against original defects in the United States, U.S. Military Exchanges...


